Home>Garden Essentials>How To Use Grass Mat In Scale Model Train Layouts
Garden Essentials
How To Use Grass Mat In Scale Model Train Layouts
Modified: October 19, 2024
Learn how to enhance your scale model train layouts with the use of grass mats. Create a realistic garden setting for your trains with this step-by-step guide.
(Many of the links in this article redirect to a specific reviewed product. Your purchase of these products through affiliate links helps to generate commission for Storables.com, at no extra cost. Learn more)
Introduction
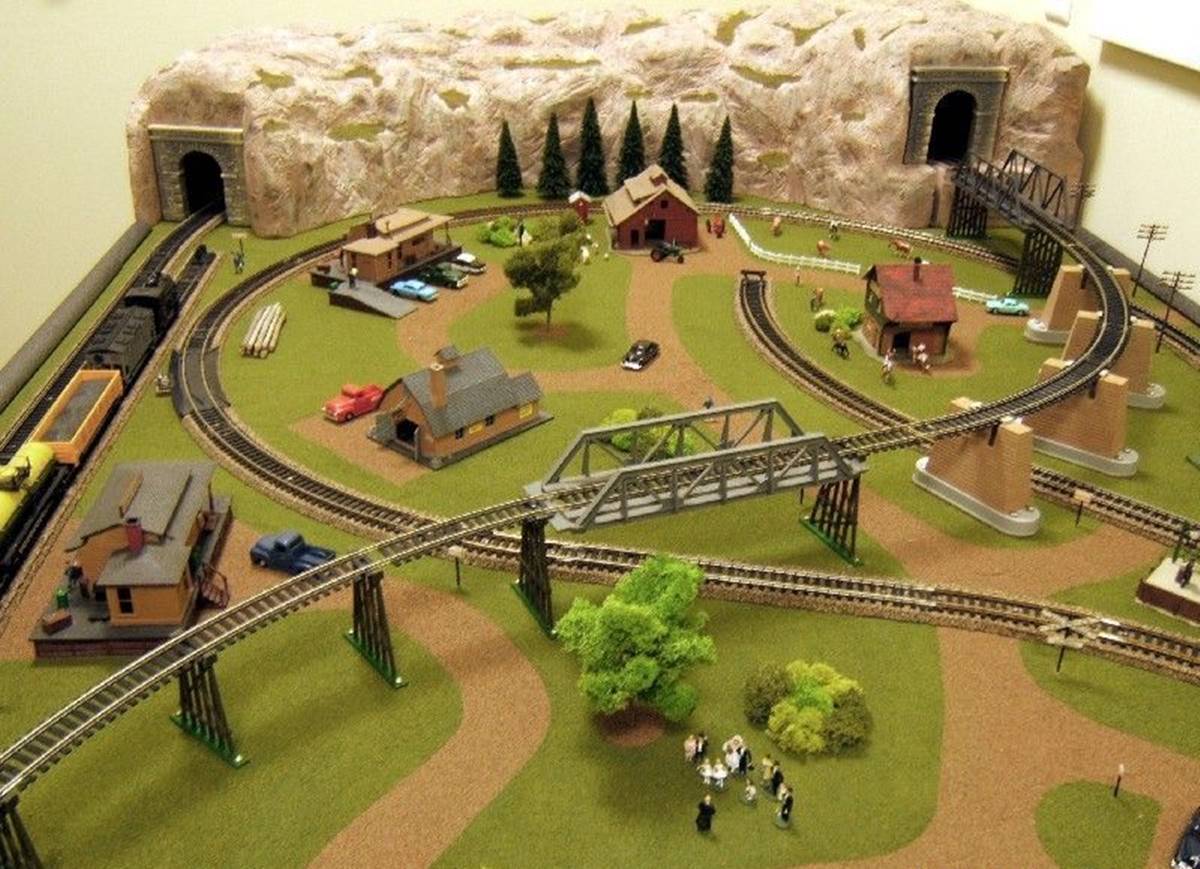
Welcome to the fascinating world of scale model train layouts! Creating these miniature landscapes is a beloved hobby that allows enthusiasts to bring their imaginations to life. Whether you’re a beginner or an experienced model railroader, one of the key elements in any layout is the scenery, and in particular, the grassy areas. In this article, we’ll explore how to use grass mats to enhance the realism of your scale model train layout.
A grass mat is a pre-made sheet of material designed to simulate the look and texture of real grass. It typically consists of a layer of textured turf adhered to a flexible backing. Grass mats are available in various colors, lengths, and densities, allowing you to create different types of landscapes, from lush meadows to dry desert terrains.
Using grass mats in your scale model train layout offers numerous benefits. Firstly, they save you time and effort compared to creating grassy areas from scratch. Instead of individually applying static grass or foam flocking, you can simply unroll a grass mat and have an instant realistic ground cover.
Additionally, grass mats provide a consistent and uniform appearance to your layout. Unlike manually applied grass, which can have uneven distribution or clumping issues, grass mats offer a smooth and seamless surface. This makes them ideal for beginners who may still be developing their skills in creating realistic scenery.
Another advantage of using grass mats is their versatility. They can be easily cut and shaped to fit any desired area in your layout. Whether you want to cover a small patch of land or an entire meadow, grass mats can be tailored to your specific needs.
Choosing the right grass mat for your scale model train layout is essential to achieve the desired effect. Consider factors such as the scale of your trains, the era or theme of your layout, and the overall aesthetic you want to create. Different manufacturers offer a variety of grass mat options, so it’s worth exploring the market to find the perfect fit for your project.
In the next sections of this article, we’ll delve into the steps involved in preparing the surface for the grass mat, applying the grass mat to your train layout, adding realism to it, and finally, the maintenance and care to ensure its longevity. So, let’s get started on transforming your scale model train layout into a breathtaking miniature world!
Key Takeaways:
- Grass mats are a convenient and time-saving way to create realistic landscapes in scale model train layouts. They offer consistency, versatility, and durability, making them ideal for model railroaders of all skill levels.
- Choosing the right grass mat is essential for achieving a realistic and visually appealing layout. Consider factors such as scale, theme, and landscape characteristics to enhance the authenticity of your miniature world.
Read more: How To Use Scale In Landscape Design
What is a Grass Mat?
A grass mat is a pre-made sheet of material that replicates the appearance and texture of real grass. It is specifically designed for use in scale model train layouts to create realistic landscapes. The grass mat consists of a layer of textured turf, which mimics the look and feel of grass, attached to a flexible backing.
Grass mats come in various colors and lengths, allowing you to choose the perfect match for the type of scenery you want to create. Whether you’re aiming for a vibrant green meadow, a dry and yellowed field, or even a snowy landscape, there’s a grass mat available to suit your needs.
These mats are typically made from synthetic materials such as nylon or polypropylene. The advantages of using synthetic materials are the durability and resistance to fading or color changes over time. This ensures that your grass mat will retain its realistic appearance for years to come.
Additionally, grass mats are easy to handle and work with. They are flexible and can be easily rolled, unrolled, cut, and shaped to fit any desired area in your layout. This versatility allows you to customize your scenery and create diverse landscapes with ease.
One of the key features of a grass mat is its ability to create a consistent and uniform ground cover. Unlike other methods of creating grassy areas, such as manually applying static grass or foam flocking, a grass mat provides a seamless surface. This uniformity is especially beneficial for beginners or those looking for a quick and efficient way to enhance their model train layout.
Grass mats are widely available from hobby stores, online retailers, and model train suppliers. When purchasing a grass mat, it’s important to consider the scale of your trains, the theme or era of your layout, and the overall aesthetic you’re trying to achieve. By selecting the right grass mat, you can enhance the realism and visual appeal of your scale model train layout.
Now that you understand what a grass mat is and its benefits, let’s move on to exploring the reasons why incorporating grass mats into your scale model train layout is a great idea.
Benefits of Using Grass Mats in Scale Model Train Layouts
Using grass mats in your scale model train layout offers several advantages that can greatly enhance the overall appearance and realism of your miniature world. Here are some key benefits:
- Time and Effort-Saving: One of the biggest advantages of using grass mats is that they save you time and effort. Instead of individually applying static grass or foam flocking, which can be a time-consuming and meticulous process, you can simply unroll a grass mat and instantly have a realistic ground cover. This is especially beneficial for model railroaders who have limited time or prefer a more efficient approach to scenery building.
- Consistency and Uniformity: Grass mats provide a consistent and uniform appearance to your layout’s scenery. Unlike manually applied grass, which can have uneven distribution or clumping issues, grass mats offer a smooth and seamless surface. This creates a more visually appealing and believable landscape for your scale model train layout.
- Versatility: Grass mats are highly versatile and can be easily cut and shaped to fit any area in your layout. Whether you want to cover a small patch of land or create vast meadows, grass mats can be tailored to your specific needs. Additionally, multiple grass mats can be combined to create different textures or mix colors, further enhancing the diversity and realism of your scenery.
- Realistic Texture: Grass mats are designed to replicate the look and texture of real grass. The textured turf layer of the mat provides a three-dimensional appearance, giving your layout a more lifelike representation of nature. Additionally, the realistic texture adds depth and visual interest to your scenery, making it more engaging and captivating for viewers.
- Durable and Long-Lasting: Grass mats are typically made from synthetic materials that are durable and resistant to fading or color changes. This ensures that your grassy areas will maintain their realistic appearance over time, even with frequent handling or exposure to sunlight. Additionally, the flexibility and robustness of the grass mat backing make it less prone to tearing or fraying, further increasing its longevity.
- Easy to Install and Modify: Applying a grass mat to your scale model train layout is a straightforward process. The mats can be easily adhered to the surface using a suitable adhesive or simply pinned down with small nails or staples. Furthermore, if you decide to make changes or modifications to your scenery, grass mats can be easily removed or replaced without causing significant damage to the underlying structure.
Incorporating grass mats into your scale model train layout not only saves you time and effort, but also provides a consistent, realistic, and visually appealing scenery. The versatility of grass mats allows you to create diverse landscapes, while their durability ensures long-lasting enjoyment. So, why not bring your miniature world to life with the use of grass mats in your next model train project?
Choosing the Right Grass Mat for Your Layout
When it comes to selecting the right grass mat for your scale model train layout, there are several factors to consider. Each layout has its own unique theme, era, and aesthetic, and choosing the appropriate grass mat can make a significant impact on the overall realism and visual appeal. Here are some key considerations to keep in mind:
- Scale: The scale of your trains is an essential factor in determining the size and density of the grass mat to use. For smaller scales such as N or Z, finer grass mats with shorter fibers are often preferred to achieve a realistic proportion. On the other hand, larger scales like O or G may require coarser grass mats with longer fibers to maintain visual balance.
- Theme or Era: Consider the theme or era your layout represents. If you’re modeling a modern scene, you may opt for vibrant green grass mats that depict well-maintained lawns or freshly cut fields. For a historical or rural setting, earthy tones with hints of dried grass or patches of wildflowers can add authenticity.
- Landscape Characteristics: Think about the specific characteristics of the landscape you want to portray. Is it a dry desert, a lush meadow, or a snowy mountainous region? Different grass mat colors and textures can be used to accurately represent these varying environments. Earthy tones and drier texture work well for arid landscapes, while rich greens and softer textures are ideal for fertile areas.
- Individual Preferences: Consider your personal preferences and the visual aesthetic you want to achieve. Some model railroaders prefer a more realistic approach, while others may lean towards a slightly exaggerated or stylized appearance. Explore different options and find a grass mat that aligns with your personal taste and vision for your layout.
- Quality and Brand: Research and choose reputable brands that offer high-quality grass mats. Reading product reviews from other model railway enthusiasts can provide valuable insights into the durability, color accuracy, and overall performance of different grass mat options.
Furthermore, it’s always a good idea to visit local hobby stores or attend model railroad exhibitions or fairs where you can examine and compare different grass mats before making a purchase. This allows you to physically touch and feel the texture, evaluate the colors, and ensure it complements the other elements in your layout.
Remember, the right grass mat can elevate the realism and immersion of your scale model train layout. By considering the scale, theme, landscape characteristics, individual preferences, and quality of the grass mat, you can choose the perfect option that enhances the visual appeal and authenticity of your miniature world.
Preparing the Surface for the Grass Mat
Before applying the grass mat to your scale model train layout, it’s essential to properly prepare the surface. This ensures optimal adhesion and a seamless integration of the grass mat into your scenery. Here are the steps for preparing the surface:
- Clean the Area: Start by ensuring the surface is clean and free of any debris, dust, or loose particles. Use a soft brush or vacuum cleaner to remove any dirt or unwanted materials. This step ensures a smooth and even application of the grass mat.
- Smooth and Level the Surface: If there are any rough or uneven areas on the surface, it’s important to address them before applying the grass mat. Fill in any gaps or holes with a suitable filler material and smooth it out to create a level surface. This will prevent any visible bumps or irregularities from showing through the grass mat.
- Apply a Base Layer: Depending on the desired appearance and texture of the grass mat, you may choose to apply a base layer before installing the mat. This can be a thin layer of foam or cork to add additional cushioning and depth to the scenery. Make sure the base layer is securely attached to the surface and any adhesive used has dried completely.
- Prime the Surface (Optional): If you’re working with a smooth surface, such as plywood or foam board, you may consider applying a coat of primer before installing the grass mat. This helps improve the adhesion of the grass mat and provides a better surface for the adhesive to bond to. Allow the primer to dry according to the manufacturer’s instructions.
- Test Fit the Grass Mat: Before fully committing to the installation, lay the grass mat over the prepared surface to ensure it fits properly and aligns with your desired layout. This allows you to make any necessary adjustments, such as trimming the grass mat to fit around curves or structures in your scenery.
- Secure the Grass Mat: Once you’re satisfied with the fit, it’s time to secure the grass mat to the prepared surface. Apply a suitable adhesive, such as white glue or spray adhesive, to the back of the grass mat and carefully press it onto the surface. Use a clean, dry cloth or roller to smooth out any air bubbles or wrinkles. Allow the adhesive to dry completely as per the manufacturer’s instructions.
By properly preparing the surface before applying the grass mat, you ensure a strong and lasting bond between the mat and the scenery. Taking the time to clean, level, and prime the surface, as well as test fitting the mat before securing it, will result in a seamless and professional-looking installation.
Now that the grass mat is securely in place, it’s time to move on to the next step – adding realism to your scale model train layout with some additional scenic elements.
When using grass mats in scale model train layouts, be sure to trim the edges carefully to fit the desired area. Use a spray adhesive to secure the mat in place, and add additional details like bushes or trees for a realistic look.
Read more: How To Train A Dog To Use Fake Grass
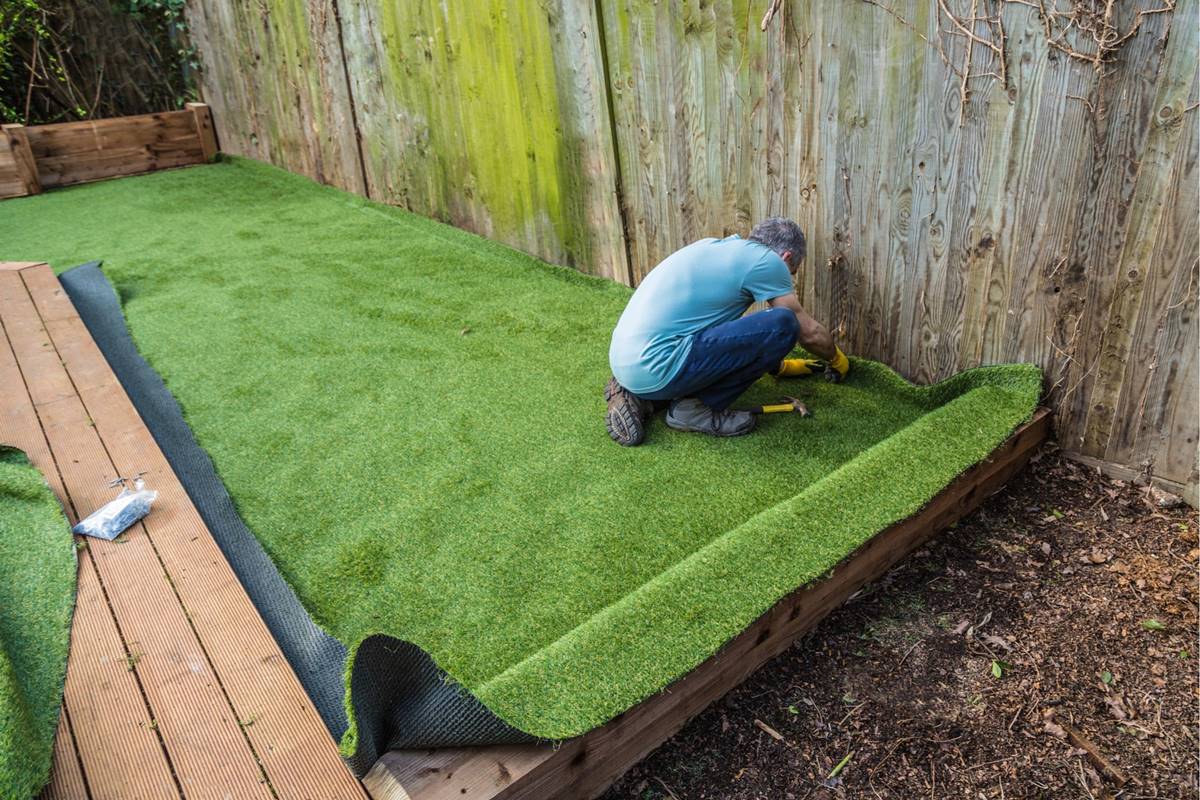
Applying the Grass Mat to Your Train Layout
Now that you have prepared the surface of your scale model train layout, it’s time to apply the grass mat and bring your scenery to life. Here are the steps to follow when applying the grass mat:
- Trim the Grass Mat: Start by trimming the grass mat to the desired size and shape. Use sharp scissors or a hobby knife to carefully cut the mat according to your layout’s specifications. This ensures a clean and precise fit.
- Apply Adhesive: To secure the grass mat, apply a suitable adhesive to the prepared surface. Consider using white glue, spray adhesive, or a specialized grass mat adhesive. Follow the manufacturer’s instructions for application and drying time.
- Start from the Back: Begin by applying the grass mat at the back of your layout. Press it firmly into the adhesive, making sure it adheres evenly across the surface. Smooth out any wrinkles or bubbles using a clean, dry cloth or roller.
- Work in Sections: Divide your layout into manageable sections and apply the grass mat one section at a time. This allows you to focus on each area and ensure a consistent and seamless installation.
- Overlap and Blend: As you move from one section to another, slightly overlap the edges of the grass mat to create a seamless transition. This helps avoid any visible gaps or lines between sections. Use a blending tool or the back of a spoon to gently press and blend the overlapping areas.
- Shape and Mold: Grass mats are flexible and can be easily shaped and molded to conform to the contours of your layout. Use your fingers or a modeling tool to press and shape the grass mat around hills, valleys, or structures, ensuring a natural and realistic appearance.
- Dry and Set: Allow the grass mat to dry and set completely according to the adhesive manufacturer’s instructions. This ensures a strong bond between the mat and the surface, preventing any shifting or loose areas.
- Touch-Up and Detail: Once the grass mat is fully dry, inspect the layout for any areas that may need touch-up or additional details. Fill in any visible gaps or exposed surfaces with static grass, foliage, or other scenic elements to enhance the realism and texture of the grassy areas.
By following these steps, you can successfully apply the grass mat to your scale model train layout, creating a visually stunning and lifelike scenery. Remember to take your time and work in sections to ensure a consistent and seamless installation.
With the grass mat securely in place, it’s time to add those finishing touches and bring even more realism to your miniature world. Let’s explore how to enhance the appearance of the grass mat and create stunning landscapes.
Adding Realism to the Grass Mat
Now that you have successfully applied the grass mat to your scale model train layout, it’s time to take it to the next level by adding additional elements that will enhance the realism and visual appeal of your scenery. Here are some tips and techniques to bring your grass mat to life:
- Texture Variation: To create a more realistic appearance, add texture variation to your grass mat. Use different lengths of static grass fibers or foam flocking in varying shades of green to mimic the natural diversity found in real grass. Apply shorter fibers in areas subject to regular mowing or grazing, and longer fibers in untamed sections.
- Foliage and Flowers: Introduce foliage and flowers to your grass mat to add color and visual interest. Use small tufts of static grass in different hues to represent wildflowers or patches of tall grass. You can also incorporate miniature trees, shrubs, or hedges to create depth and variety in your scenery.
- Weathering Effects: Apply weathering effects to your grass mat to replicate the natural wear and tear that occurs in outdoor environments. Use weathering powders or washes in earth tones to subtly age the grass mat and create the appearance of dirt or dust accumulation in certain areas.
- Blending with Surroundings: Ensure that the grass mat blends seamlessly with the surrounding scenery, such as rocks, terrain, or bodies of water. Blend the edges of the grass mat by applying static grass, foliage, or ground cover materials that match the adjacent landscape, creating a smooth transition between elements.
- Realistic Clumps and Patches: Real grass in nature does not grow uniformly, so it’s important to create realistic clumps and patches on your grass mat. Use small sections of static grass clumps, foam flocking, or even dried tea leaves to emulate tufts or patches of grass that naturally occur in uneven terrain.
- Weathering and Maintenance: Consider weathering and maintaining your grass mat to reflect the changing seasons or regular upkeep. Add fallen leaves, twigs, or debris to simulate autumn or create walking paths where the grass has been trampled or worn down by foot traffic. These small details add depth and realism to your layout.
Don’t be afraid to experiment and try different techniques to achieve the desired realism in your grass mat. Study real-life landscapes and observe how grass grows, changes with the seasons, and interacts with its surroundings. Taking inspiration from nature will help you create a more convincing miniature world.
Remember to maintain a balance between realism and the needs of your scale model train layout. Adjust the level of detail and elements based on the scale, theme, and overall aesthetic you want to achieve. Adding these realistic touches will truly bring your layout to life and captivate the viewers with its authenticity.
Now that your grass mat is looking vibrant and realistic, let’s explore how to maintain and care for it to ensure its longevity and continued visual appeal.
Maintenance and Care of Grass Mats
Proper maintenance and care of your grass mat will ensure its longevity and keep it looking vibrant and realistic. Here are some essential tips and guidelines to follow:
- Regular Cleaning: Periodically clean your grass mat to remove any dust or debris that may accumulate over time. Use a soft brush or a vacuum cleaner with a brush attachment to gently remove loose particles. Avoid using harsh chemicals or excessive force that could damage the grass fibers.
- Avoid Moisture: Grass mats are generally not designed to withstand prolonged exposure to moisture. If you need to clean the mat with water, do so sparingly. Use a damp cloth or sponge to gently wipe the surface and immediately pat it dry. Avoid soaking or saturating the grass mat, as this can cause the backing to warp or deteriorate.
- Secure Loose Fibers: Over time, some grass fibers may become loose or detach from the mat. To maintain a neat and tidy appearance, secure any loose fibers using a small amount of adhesive applied carefully with a fine-tipped brush or adhesive applicator. Ensure the adhesive is suitable for synthetic materials and dries clear.
- Protect from Sunlight: Prolonged exposure to direct sunlight can cause the colors of the grass mat to fade over time. To prevent this, consider using window blinds or curtains to control the amount of sunlight hitting your layout. Alternatively, place your layout away from direct sunlight or use UV-blocking coatings that offer protection against fading.
- Prevent Excessive Handling: Avoid excessive handling of the grass mat to minimize wear and tear. Constant rubbing or friction can cause the grass fibers to fray or flatten. If you need to make adjustments or modifications to your scenery, handle the grass mat with care, supporting it from the back to avoid putting strain on the fibers.
- Store Properly: If you need to store your grass mat, do so in a clean and dry environment. Roll it up loosely, with the grass side facing inward, to prevent any crushing or flattening of the fibers. Keep it away from extreme temperatures, excessive moisture, or direct sunlight to maintain its integrity.
- Touch-Up as Needed: Over time, certain areas of the grass mat may see more wear due to train operation or handling. Touch up these areas by applying additional grass fibers or foam flocking to maintain a consistent and realistic appearance. Blend the new elements with the existing grass mat to create a seamless transition.
By following these maintenance tips, you can ensure that your grass mat remains in top condition, allowing you to enjoy its realistic appearance for years to come.
With proper maintenance and care, your grass mat will serve as a stunning foundation for your scale model train layout, providing a vibrant and realistic backdrop to your miniature world. So, keep these guidelines in mind and enjoy the beauty and realism of your grassy landscape!
Now that we’ve covered the maintenance and care of the grass mat, let’s conclude our journey by summarizing the main points and the importance of incorporating grass mats into your scale model train layouts.
Conclusion
Incorporating grass mats into your scale model train layout is a fantastic way to enhance the realism and visual appeal of your miniature world. These pre-made sheets of material replicate the look and texture of real grass, providing a convenient and effective solution for creating realistic landscapes. By choosing the right grass mat, properly preparing the surface, and applying the mat with care, you can achieve stunning results that will captivate viewers and bring your scenery to life.
The benefits of using grass mats in your layout are numerous. They save you time and effort, provide consistency and uniformity, and offer versatility in terms of size, color, and texture. Grass mats also serve as a durable and long-lasting ground cover, maintaining their realistic appearance over time. The ability to easily shape and mold the mats allows you to create diverse landscapes, while the realistic texture adds depth and visual interest to your scenery.
Adding realism to your grass mat involves incorporating texture variation, foliage, and weathering effects. By paying attention to these details, you can create a more convincing representation of nature. Regular maintenance and care, such as cleaning, avoiding excessive moisture, and protecting from sunlight, will ensure the longevity and visual appeal of your grass mat.
Ultimately, the use of grass mats in your scale model train layout contributes to a more immersive and visually stunning experience. With proper preparation, application, and attention to detail, you can create breathtaking landscapes that will transport viewers into a miniature world of their own.
So, unleash your creativity, explore the options available, and enjoy the process of transforming your scale model train layout with grass mats. Whether you’re a beginner or a seasoned model railroader, incorporating these realistic ground covers will take your layout to new heights.
Now, it’s time to bring your imagination to life and showcase your breathtaking miniature world!
Frequently Asked Questions about How To Use Grass Mat In Scale Model Train Layouts
Was this page helpful?
At Storables.com, we guarantee accurate and reliable information. Our content, validated by Expert Board Contributors, is crafted following stringent Editorial Policies. We're committed to providing you with well-researched, expert-backed insights for all your informational needs.


0 thoughts on “How To Use Grass Mat In Scale Model Train Layouts”