Home>Garden Essentials>What Is Printer Infill
Garden Essentials
What Is Printer Infill
Modified: August 20, 2024
Discover the importance of printer infill and how it can enhance your garden. Explore the benefits of infill materials for a thriving garden.
(Many of the links in this article redirect to a specific reviewed product. Your purchase of these products through affiliate links helps to generate commission for Storables.com, at no extra cost. Learn more)
Introduction
Welcome to the world of 3D printing! Whether you’re a beginner just starting to explore this fascinating technology or an experienced enthusiast looking to dive deeper, understanding the concept of printer infill is essential. In the realm of 3D printing, infill refers to the inner structure or fill density of a printed object.
Printer infill plays a crucial role in determining the strength, weight, and overall quality of your 3D-printed creations. By adjusting the infill settings, you have the power to control the density and strength of your prints, as well as optimize material usage.
In this article, we’ll delve into the world of printer infill, exploring its definition, importance, different types, factors affecting infill, benefits, limitations, and best practices. So, let’s dive in and unlock the mysteries of printer infill!
Key Takeaways:
- Printer infill is the internal structure or fill density of a 3D-printed object, impacting strength, material usage, and print speed. It offers benefits like enhanced strength, material efficiency, and design flexibility.
- Understanding object requirements, experimenting with infill patterns, and optimizing infill density are key best practices for maximizing the benefits of printer infill in 3D printing projects.
Read more: What Is An Infill Speed
Definition of Printer Infill
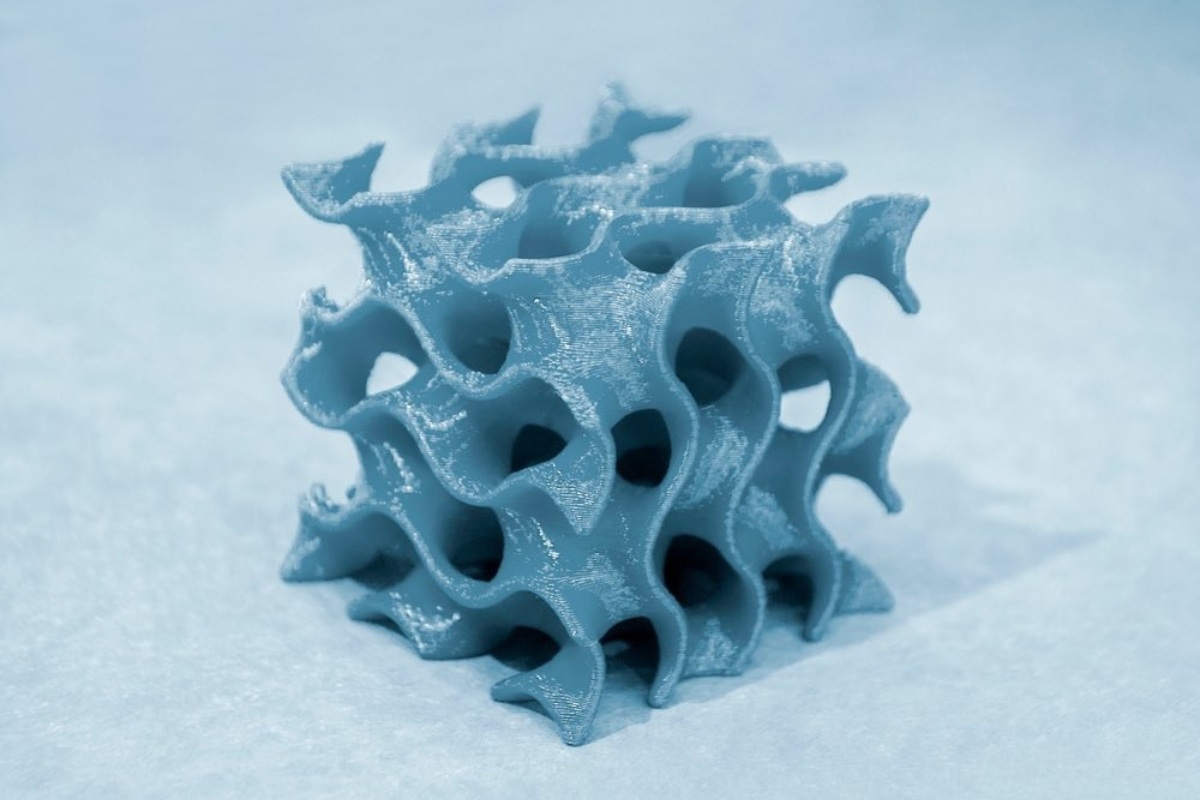
Printer infill, in the context of 3D printing, refers to the internal structure or fill density of a printed object. When you print a 3D object, it is not solid throughout; instead, it consists of a series of layers. The infill is the pattern or structure that fills the space between these layers, providing support and stability to the printed object.
Think of it as the internal scaffolding or skeleton that gives your printed object its shape and strength. Infill is typically represented as a percentage, indicating the amount of space filled within the object. For example, 100% infill means that the object is completely solid, while 0% infill means that the object is hollow.
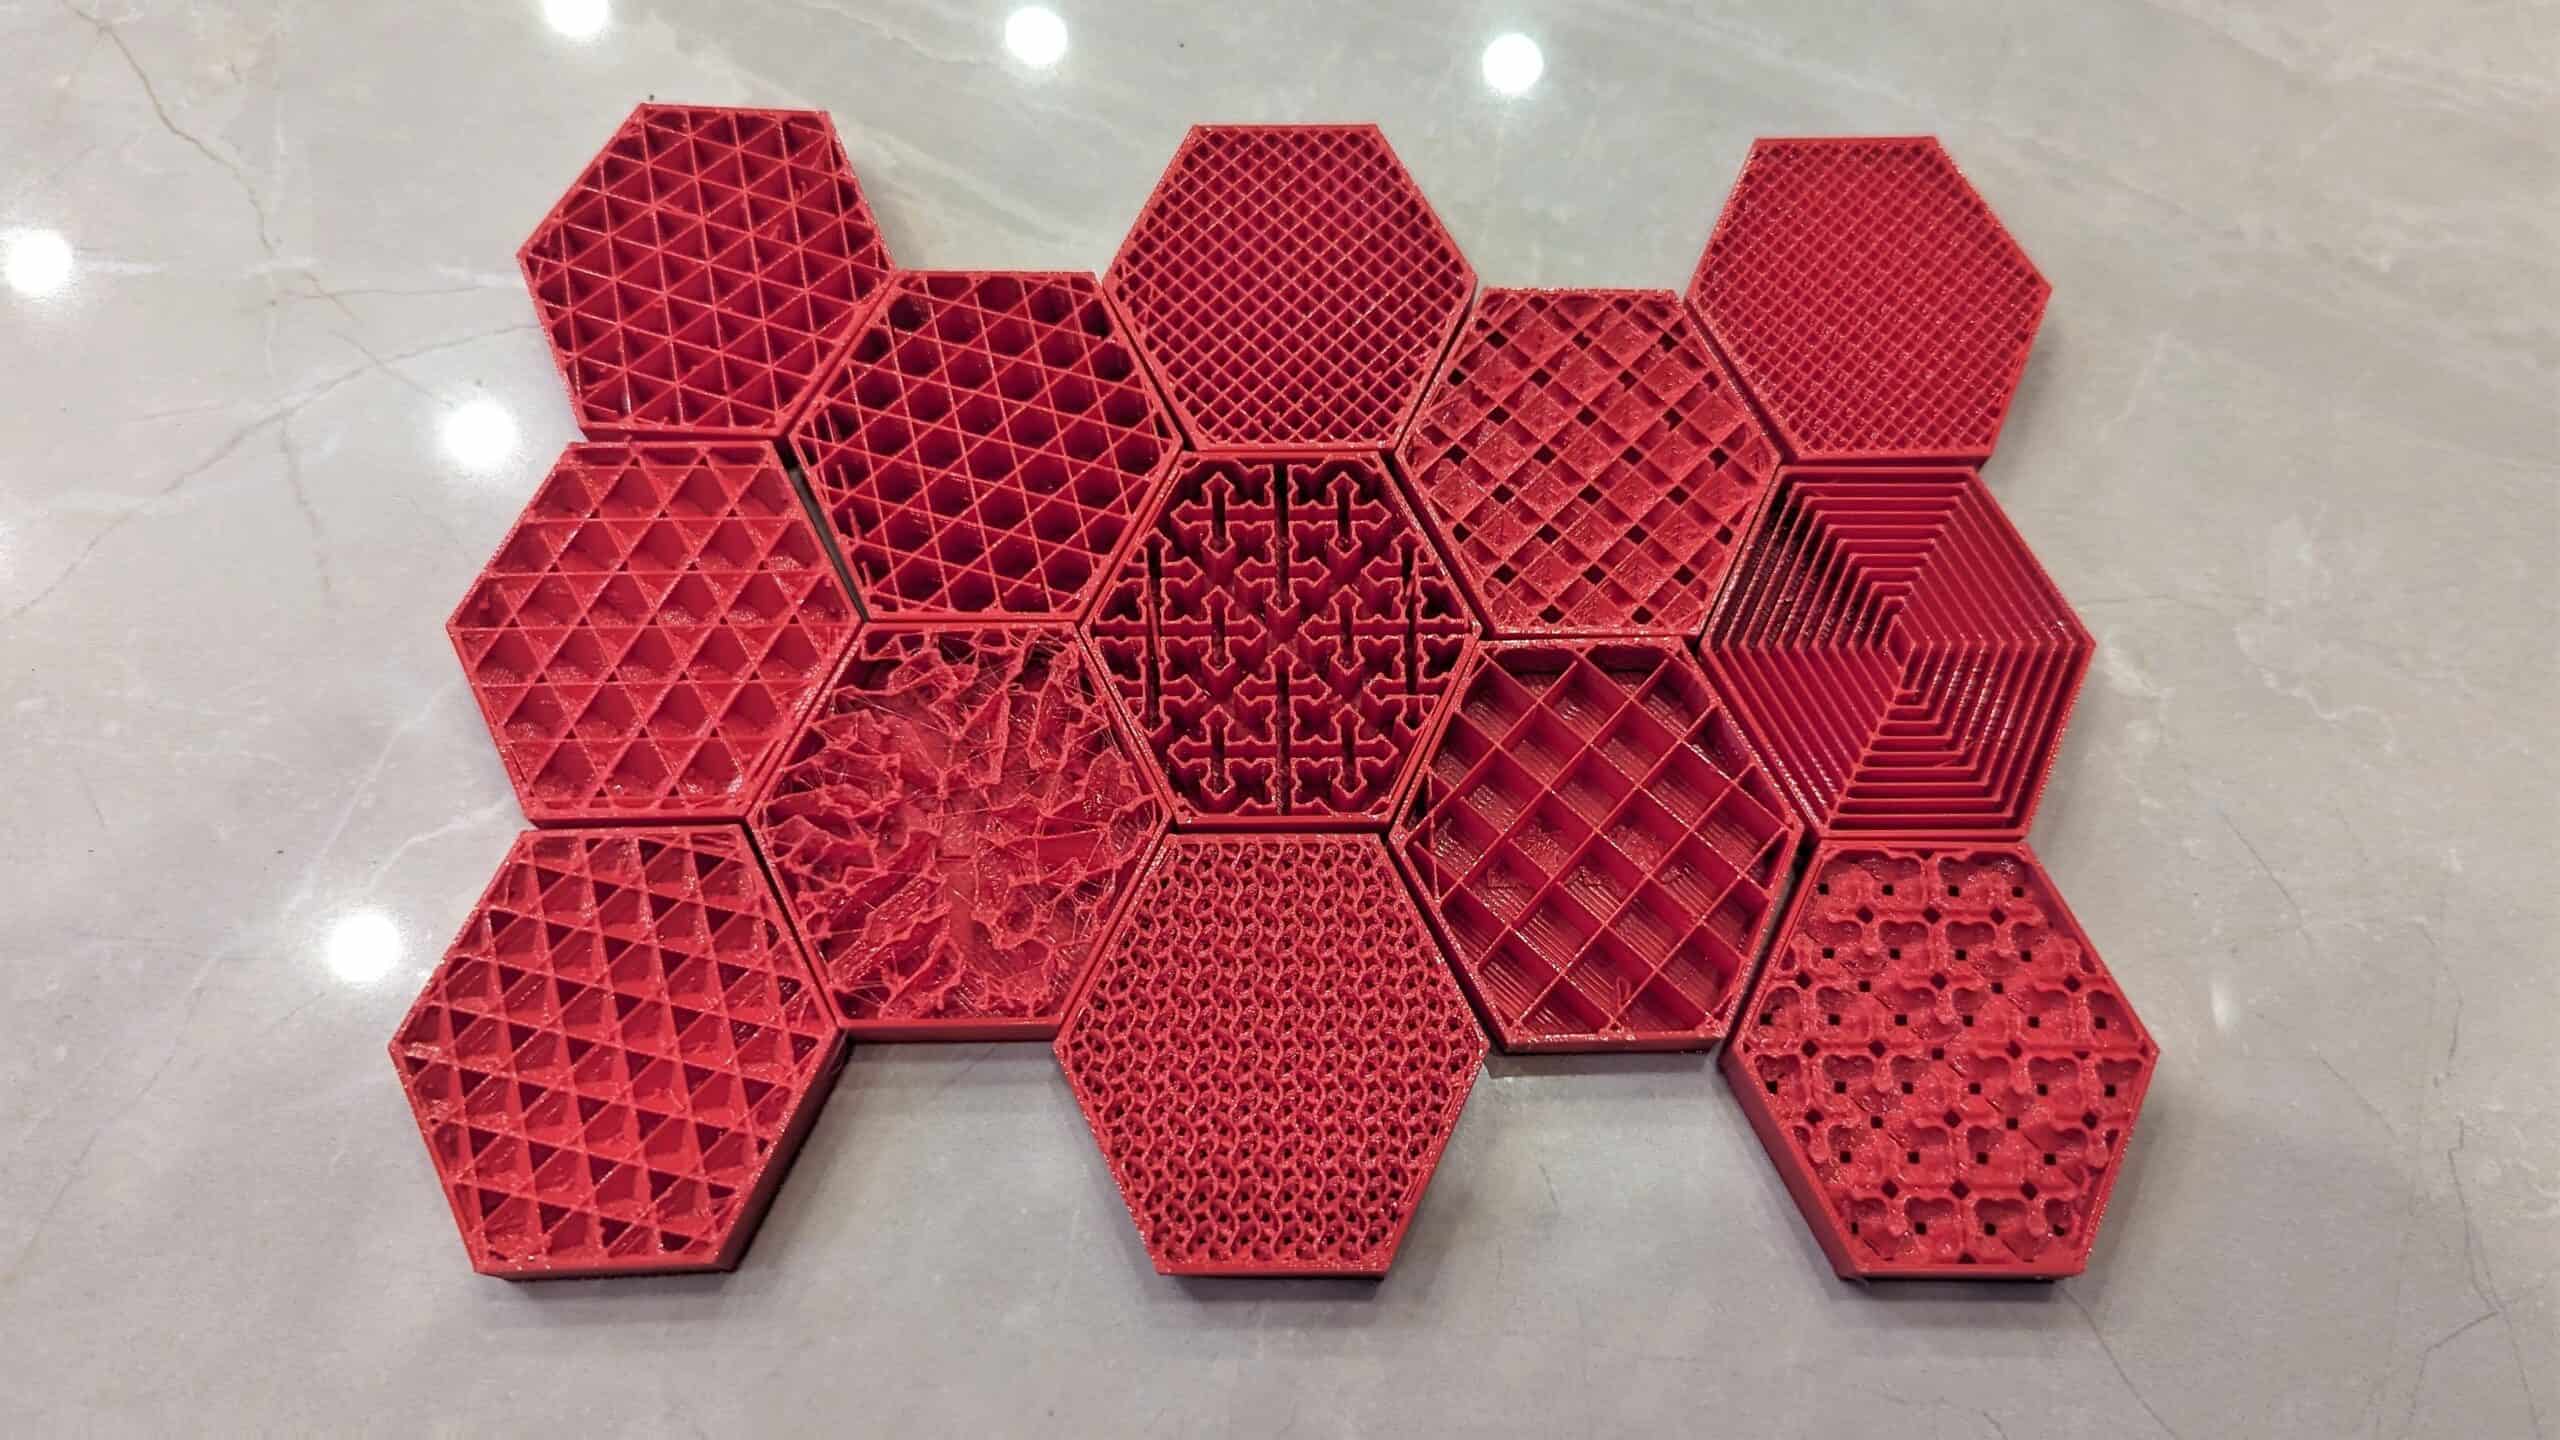
The infill pattern can vary, depending on the 3D printing software or slicer program you are using. Common infill patterns include grid, honeycomb, rectilinear, and triangular. These patterns are designed to provide optimal strength and stability to the printed object, while also conserving material and minimizing print time.
The infill density is another important aspect to consider. Higher infill densities result in a stronger and more rigid print, but they also consume more material and increase printing time. On the other hand, lower infill densities save material and time but may compromise the structural integrity of the print.
Now that we have covered the basics of printer infill, let’s explore why it is important in the world of 3D printing.
Importance of Printer Infill
Printer infill plays a vital role in the overall quality and functionality of your 3D prints. Here are a few reasons why understanding and optimizing printer infill is important:
Structural Integrity: The infill pattern and density directly impact the strength and stability of your 3D-printed objects. A well-calibrated infill ensures that your prints can withstand external forces, reducing the risk of deformation or breakage. By adjusting the infill settings, you can optimize the structural integrity of your prints for specific applications.
Material Efficiency: Printer infill allows you to maximize material usage. With the right infill settings, you can strike a balance between strength and material savings. By choosing a lower infill density, you can reduce material usage without compromising the overall integrity of the print. This can result in cost savings, especially when printing larger or multiple objects.
Print Speed: Printer infill also impacts the print speed. Higher infill densities require more time to print as they involve a greater number of printed layers. Conversely, lower infill densities can speed up print times. By adjusting the infill density according to your desired strength and time constraints, you can optimize the print speed without sacrificing quality.
Weight: In some cases, weight can be a crucial factor. For example, when designing functional objects or components for applications such as aerospace or robotics, reducing weight can enhance performance and efficiency. By using a lower infill density or specific infill patterns, you can create lightweight prints without compromising strength.
Cost Savings: Printer infill not only affects material usage but also impacts the overall cost of your 3D prints. By optimizing the infill settings, you can find the right balance between strength and material efficiency, ultimately saving costs in terms of material consumption and even printing time.
Now that we understand the importance of printer infill, let’s explore the different types of infill patterns and densities that you can utilize in your 3D printing projects.
Types of Printer Infill
When it comes to printer infill, there are several types of infill patterns and densities that you can choose from, depending on your specific printing needs. Let’s explore some of the most common types:
Grid Infill: The grid infill pattern consists of parallel lines intersecting at 90-degree angles, creating a grid-like structure inside the print. This pattern provides a good balance between strength and material usage. It is one of the most commonly used infill patterns due to its simplicity and effectiveness.
Honeycomb Infill: The honeycomb infill pattern features hexagonal cells that interlock, creating a strong and lightweight internal structure. This pattern offers excellent strength and stability while also maximizing material efficiency. It is particularly useful when weight reduction is a priority.
Rectilinear Infill: The rectilinear infill pattern is characterized by straight lines that run parallel in one direction and then perpendicular in the next layer, creating a rectangular grid-like pattern. This infill type provides good strength and is often used when a substantial amount of strength is required in a specific direction.
Triangular Infill: The triangular infill pattern consists of triangles arranged in a regular grid pattern. This infill type provides strength and rigidity while reducing material usage. It is especially useful for designs that require a balance between strength and lightweight construction.
Variable Density Infill: Some advanced slicing software allows for variable density infill, where different regions of the print can have varying infill densities. This allows you to optimize the strength and material usage based on specific areas of the object that require different structural requirements.
It’s important to note that the choice of infill pattern and density depends on several factors, including the desired strength, weight, print time, and material efficiency. Experimentation and testing may be necessary to determine the optimal infill settings for your specific project.
Now that we have explored the different types of infill patterns, let’s move on to the factors that can affect printer infill.
Factors Affecting Printer Infill
Printer infill settings can be influenced by several factors that impact the final result of your 3D prints. Understanding these factors will help you optimize the infill for your specific needs. Let’s take a look at some of the key factors that affect printer infill:
Object Application: The intended use of the printed object plays a significant role in determining the appropriate infill settings. For functional parts that require high strength and durability, a higher infill density may be necessary. However, for decorative or lightweight objects, a lower infill density can be sufficient.
Print Resolution: The resolution of your 3D printer affects the level of detail and precision that can be achieved in the infill structure. Higher resolutions allow for more intricate and fine infill patterns, resulting in stronger prints. Lower resolutions may limit the complexity of infill patterns and require higher infill densities for adequate strength.
Material Type: Different materials have varying properties, such as flexibility, brittleness, and density. These material characteristics can influence the optimal infill settings. For example, a flexible filament may require a lower infill density to maintain its elasticity, while a brittle filament may benefit from a higher infill density to enhance its strength.
Print Time: The time it takes to print a 3D object is affected by the infill density. Higher infill densities require more time to print due to the increased number of layers. If speed is a priority, using lower infill densities or infill optimization techniques can help reduce print time without compromising the overall strength and quality.
Cost Constraints: Material consumption directly impacts the cost of 3D printing. Higher infill densities require more material, which can increase the overall printing cost. Understanding the balance between infill density, strength requirements, and material usage can help you find a cost-effective solution for your projects.
Printer Capability: The capabilities of your 3D printer, including print bed size, extrusion temperature, and printer speed, can also influence the infill settings. Some printers may have limitations on specific infill patterns or densities, so it’s essential to consider these factors when determining the optimal infill settings for your printer.
Considering these factors and experimenting with different infill settings will allow you to tailor your prints to meet your specific requirements. It’s important to strike a balance between strength, print time, material usage, and cost to achieve the desired outcome for your 3D prints.
Now that we understand the factors affecting infill, let’s explore the benefits that printer infill brings to the world of 3D printing.
Printer infill refers to the internal structure of a 3D printed object. It is the pattern of material that fills the inside of the object to give it strength and support. Different infill patterns can affect the strength, weight, and flexibility of the printed object.
Read more: What Is An Infill
Benefits of Printer Infill
Printer infill offers several advantages that enhance the quality, functionality, and efficiency of 3D prints. Understanding these benefits will help you harness the full potential of infill settings in your 3D printing projects. Let’s explore some of the key benefits of printer infill:
Strength and Stability: One of the major benefits of printer infill is the enhanced strength and stability it provides to the printed object. By filling the interior with a structured infill pattern, you can reinforce the object, making it more resistant to external forces and reducing the risk of deformation or breakage.
Material Efficiency: Printer infill allows you to optimize the use of materials. By adjusting the infill density, you can determine the amount of material that is used to fill the interior of the object. Using higher infill densities in critical areas and lower densities in non-critical areas can result in significant material savings without compromising the overall integrity of the print.
Reduced Print Time: The infill density directly affects the print time. Lower infill densities require fewer layers to print, resulting in faster print times. This can be beneficial when time is a constraint, enabling you to produce prints more quickly without sacrificing structural integrity.
Design Flexibility: Printer infill offers design flexibility by allowing you to customize the internal structure of your prints. This opens up possibilities for creating lightweight designs, intricate patterns, or specific load-bearing structures. By experimenting with different infill patterns and densities, you can achieve unique designs that meet your specific requirements.
Cost Savings: Optimizing infill settings can lead to cost savings in terms of material usage. By reducing the amount of material required for infill, printing costs can be significantly reduced, especially for large or multiple objects. Additionally, faster print times resulting from lower infill densities can also contribute to cost savings by reducing energy consumption and machine time.
Customization for Application: Printer infill allows you to tailor the internal structure of your objects for specific applications. Depending on the intended use, you can adjust the infill density to achieve the desired level of strength, weight, and functionality. This customization capability enables you to create prints that are optimized for their intended purpose.
By utilizing printer infill effectively, you can maximize the strength and stability of your prints, conserve materials, reduce print times, and unlock design possibilities. However, it’s important to be aware of the limitations associated with printer infill. Let’s explore these limitations in the next section.
Limitations of Printer Infill
Although printer infill offers numerous benefits, there are a few limitations that need to be considered when using infill settings for 3D printing. Understanding these limitations will help you make informed decisions and achieve the best results. Let’s explore some of the key limitations of printer infill:
Print Weight: While infill can enhance the strength and stability of your prints, it can also add weight to the final object. Higher infill densities result in denser prints, which may not be suitable for applications where weight reduction is crucial. It’s important to strike a balance between strength and weight, considering the specific requirements of your project.
Printing Time: Higher infill densities require more time to print. As the density increases, the number of layers that need to be printed rises, leading to longer print times. This can be a limitation when time is a constraint, especially for large or complex objects. Finding the right balance between infill density and print time is essential for efficient printing.
Material Consumption: Higher infill densities consume more material. While this can enhance the strength and rigidity of the prints, it also adds to the material costs. When budget constraints are a factor, it’s important to optimize infill settings to achieve a balance between strength and material efficiency while keeping costs in check.
Print Complexity: Certain infill patterns may be more challenging to print than others, especially when using lower resolutions or less advanced 3D printers. Highly intricate or complex infill patterns can lead to issues like stringing, drooping, or even failed prints. It’s important to consider the capabilities of your printer and choose infill patterns that can be printed successfully with your setup.
Object Visibility: Infill patterns can sometimes be visible on the surface of the printed object, especially with lower infill densities or transparent materials. This may affect the aesthetics, especially for objects that require a smooth or seamless appearance. It’s important to consider the desired finish of the print and adjust the infill settings accordingly.
Specific Applications: In some cases, specific applications may require specialized infill structures that cannot be achieved with traditional infill patterns. Complex geometries, lattice structures, or variable density infills might be necessary but may not be supported by all slicing software or readily compatible with all printers. In such cases, additional techniques and tools may need to be explored.
While these limitations exist, they can be overcome through experimentation, optimization, and understanding the specific requirements of your 3D printing projects. By evaluating these limitations and finding the right balance, you can harness the benefits of printer infill while mitigating any potential drawbacks.
Now that we have explored the limitations of printer infill, let’s move on to best practices for utilizing infill effectively.
Best Practices for Printer Infill
To achieve optimal results with printer infill, it’s important to follow best practices that can help you maximize the strength, efficiency, and quality of your 3D prints. Here are some best practices to consider when working with printer infill:
Understand Object Requirements: Before selecting infill settings, consider the specific requirements of your printed object. Identify the desired strength, weight, and functionality to guide your infill choices. Different applications may require different infill patterns and densities, so understanding the purpose of your print is key.
Experiment with Infill Patterns: Explore different infill patterns available in your 3D printing software or slicer to find the one that best suits your needs. Test patterns like grid, honeycomb, rectilinear, and triangular to determine which provides the optimal balance of strength, material efficiency, and print quality for your project.
Optimize Infill Density: Find the right infill density that offers the desired strength while minimizing material usage and print time. Increasing infill density beyond a certain point may not significantly enhance strength but will consume more material and time. Conduct tests with different densities to determine the optimal balance for your specific application.
Consider Variable Density Infill: Utilize advanced slicing software that supports variable density infill. This capability allows for infill density variations within the same print, optimizing strength and material usage based on specific regions or requirements of the object. It offers a customized approach to infill, maximizing the performance of your prints.
Evaluate Print Speed and Quality: Find the balance between print speed and print quality when adjusting infill settings. Higher infill densities result in stronger prints but can increase print time. Consider the urgency of the project and the level of detail required to optimize print speed and quality while maintaining the necessary strength.
Consider Material Properties: Different materials have unique characteristics that can influence the performance of your prints. Consider the flexibility, density, and brittleness of the filament you are using when determining the optimal infill settings. Adjust the infill density accordingly to ensure compatibility with the material’s properties.
Inspect and Test Prints: Regularly inspect and test your 3D prints to evaluate the effectiveness of your chosen infill settings. Analyze the strength, integrity, and surface finish of the printed objects. If necessary, make adjustments to the infill patterns or densities to optimize the results for your specific application.
Document Successful Settings: Keep a record of the infill settings that have proven successful for various projects. This documentation can serve as a reference for future prints, ensuring consistency and efficiency in your 3D printing workflow. It can save you time and effort when working on similar projects or when revisiting previous designs.
By following these best practices, you can harness the full potential of printer infill and achieve high-quality, functional, and cost-effective 3D prints. Remember that experimentation and iteration are key to finding the optimal combination of infill patterns, densities, and print settings for your specific needs.
Now, let’s wrap up our discussion on printer infill.
Conclusion
Printer infill is a key aspect of 3D printing that affects the strength, weight, material usage, and overall quality of your printed objects. Understanding the concept of infill and optimizing its settings can greatly enhance the functionality and efficiency of your 3D prints.
In this article, we explored the definition of printer infill and its importance in 3D printing. We discussed the various types of infill patterns, such as grid, honeycomb, rectilinear, and triangular, that offer different levels of strength and material efficiency. We also examined the factors that affect infill, including object application, print resolution, material type, print time, cost constraints, and printer capability.
Furthermore, we highlighted the benefits of printer infill, such as improved strength, material efficiency, reduced print time, design flexibility, cost savings, and customization for specific applications. We also discussed the limitations of infill, including increased print weight, longer print times, material consumption, print complexity, object visibility, and specific application requirements.
To optimize the use of printer infill, we provided several best practices, including understanding object requirements, experimenting with infill patterns, optimizing infill density, considering variable density infill, evaluating print speed and quality, considering material properties, inspecting and testing prints, and documenting successful settings.
By implementing these best practices and understanding the complexities of printer infill, you can produce high-quality, strong, and efficient 3D prints that meet your specific requirements.
Remember, 3D printing is a dynamic field, and infill techniques and technologies are constantly evolving. Stay curious, keep experimenting, and stay up-to-date with the latest advancements to continually improve your 3D printing skills and stay ahead of the curve.
So, embrace the power of printer infill and unleash your creativity in the world of 3D printing!
Frequently Asked Questions about What Is Printer Infill
Was this page helpful?
At Storables.com, we guarantee accurate and reliable information. Our content, validated by Expert Board Contributors, is crafted following stringent Editorial Policies. We're committed to providing you with well-researched, expert-backed insights for all your informational needs.


0 thoughts on “What Is Printer Infill”