Home>Gardening & Outdoor>Outdoor Recreation & Activities>How To Change Swimming Pool Light
Outdoor Recreation & Activities
How To Change Swimming Pool Light
Published: February 18, 2024
Learn how to change your swimming pool light with our step-by-step guide. Ensure a safe and enjoyable outdoor recreation and activities experience.
(Many of the links in this article redirect to a specific reviewed product. Your purchase of these products through affiliate links helps to generate commission for Storables.com, at no extra cost. Learn more)
Introduction
Changing the swimming pool light is an essential maintenance task for pool owners. Whether you're upgrading to a more energy-efficient LED light or replacing a malfunctioning fixture, knowing how to change the swimming pool light can save you time and money. By following a few simple steps, you can ensure that your pool remains well-lit and inviting for evening swims and gatherings.
A well-lit pool not only enhances the aesthetic appeal of your outdoor space but also contributes to safety and security. Proper lighting allows swimmers to see clearly underwater, reducing the risk of accidents and ensuring a delightful swimming experience after sunset. Additionally, a functional swimming pool light creates a captivating ambiance, making your pool area an inviting focal point for social gatherings and relaxation.
In this comprehensive guide, we will walk you through the step-by-step process of changing a swimming pool light. From gathering the necessary tools and materials to safely turning off the power and installing the new light, each stage is crucial for a successful and hassle-free transition. By following these instructions, you can confidently undertake this maintenance task and enjoy a well-illuminated and enchanting swimming pool.
Let's dive into the process of changing your swimming pool light, ensuring that you have the right tools and knowledge to accomplish this task effectively and safely.
Key Takeaways:
- Ensure safety and efficiency by gathering the right tools and materials before changing your swimming pool light. This proactive approach streamlines the process and minimizes interruptions, making the task easier and more enjoyable.
- Prioritize safety by turning off the power and following meticulous steps to remove the old swimming pool light. Attention to detail and careful preparation pave the way for a successful transition to the new fixture, ensuring a well-lit and inviting pool environment.
Read more: How Often To Change Swimming Pool Water
Step 1: Gather the necessary tools and materials
Before embarking on the task of changing your swimming pool light, it's essential to gather all the required tools and materials. Having the right equipment at hand will streamline the process and ensure that you can complete the task efficiently. Here's a comprehensive list of the necessary items you'll need:
Tools:
- Screwdriver: A flathead or Phillips screwdriver will be necessary for removing the screws that secure the light fixture in place.
- Insulated Gloves: It's crucial to prioritize safety when working with electrical components. Insulated gloves will protect you from potential electrical hazards.
- Voltage Tester: This tool is essential for verifying that the power to the pool light has been safely turned off before beginning the replacement process.
- Gasket Lubricant: A lubricant specifically designed for gaskets will help ensure a secure and watertight seal when installing the new light fixture.
Materials:
- New Pool Light Fixture: Whether you're upgrading to a modern LED light or replacing a malfunctioning fixture with a similar model, ensure that you have the new light ready for installation.
- Replacement Gasket: It's advisable to have a new gasket on hand to ensure a proper seal and prevent water from seeping into the light fixture.
- Electrical Tape: This will come in handy for securing wire connections and providing an additional layer of protection.
- Safety Goggles: Protecting your eyes is crucial during any maintenance task. Safety goggles will shield your eyes from debris and potential splashes of water.
- Towel or Rag: Having a towel or rag nearby will allow you to wipe down the area around the light fixture, ensuring a clean working environment.
By ensuring that you have all the necessary tools and materials ready, you can proceed with confidence, knowing that you are fully equipped to change your swimming pool light. This proactive approach will help you avoid interruptions during the process and contribute to a smooth and successful transition to the new light fixture.
Step 2: Turn off the power to the swimming pool light
Before initiating any work on the swimming pool light, it is imperative to ensure that the power supply to the fixture is completely turned off. This crucial safety measure prevents the risk of electrical shock and allows for a secure environment to carry out the replacement process.
To begin, locate the circuit breaker or control panel that governs the power supply to the swimming pool light. This is typically situated near the pool area or in a designated utility space. Once you have identified the correct breaker or switch, firmly turn it to the "off" position. It is advisable to use a voltage tester to double-check that the power has been effectively disconnected. This simple yet vital step provides an added layer of assurance, confirming that the electrical circuit is indeed inactive.
In addition to turning off the power at the circuit breaker, it is recommended to cover the switch or breaker with a piece of tape and a conspicuous note indicating that maintenance work is in progress. This precautionary measure serves as a visual reminder to prevent accidental reactivation of the power supply during the replacement process.
Furthermore, it is essential to communicate with other individuals who may have access to the pool area, ensuring that they are aware of the ongoing maintenance and the importance of keeping the power off until the task is completed. Clear and open communication regarding the status of the power supply contributes to a safe working environment and minimizes the potential for accidents or disruptions.
By diligently following these steps to turn off the power to the swimming pool light, you prioritize safety and create a secure environment for the subsequent stages of the replacement process. This proactive approach sets the foundation for a smooth and successful transition to the new light fixture, ensuring that the maintenance task is carried out with the utmost care and attention to safety protocols.
Read more: How To Repair A Swimming Pool Light Leak
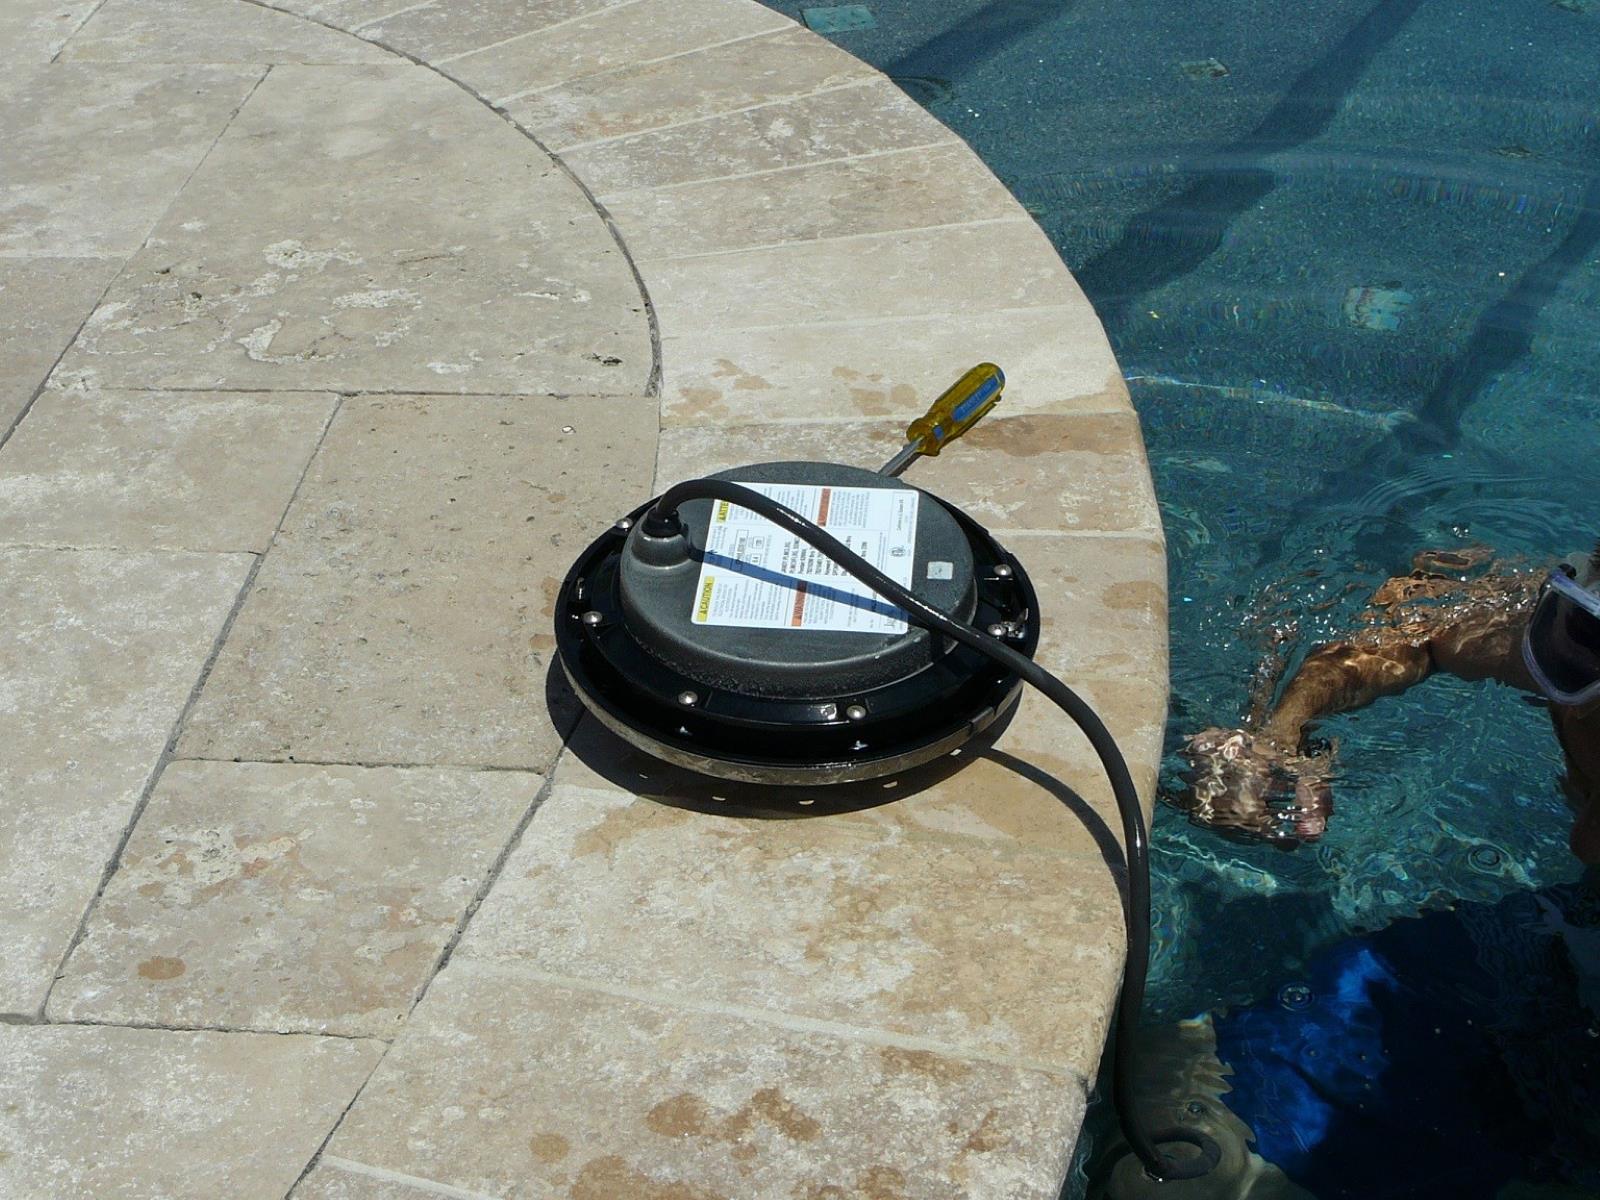
Step 3: Remove the old swimming pool light
With the power supply to the swimming pool light safely turned off, you can proceed to remove the old fixture in preparation for the installation of the new swimming pool light. This step requires careful attention to detail and adherence to safety protocols to ensure a seamless transition.
-
Drain the Pool: If your swimming pool light is located below the waterline, it is essential to lower the water level below the light fixture. This can be achieved by using a submersible pump or siphoning water out of the pool until the light fixture is accessible. Ensuring that the area around the light fixture is dry is crucial for safety and effective maintenance.
-
Remove the Screws: Using a suitable screwdriver, carefully remove the screws that secure the light fixture in place. These screws are typically located around the perimeter of the fixture. Exercise caution to prevent dropping the screws into the pool, as they can be challenging to retrieve from the water.
-
Disconnect the Wiring: Once the screws are removed, gently pull the old light fixture away from the niche or housing. Take care not to damage the wiring connected to the fixture. Identify the point where the wiring from the fixture connects to the electrical supply. Using insulated gloves and a voltage tester, ensure that there is no residual electrical charge in the wiring before proceeding to disconnect it. Untwist the wire connectors and carefully separate the wiring from the old fixture.
-
Inspect the Gasket: With the old light fixture removed, take a moment to inspect the condition of the gasket that seals the fixture to the pool wall. If the gasket appears worn, brittle, or damaged in any way, it is advisable to replace it with a new gasket to ensure a watertight seal when installing the new light fixture.
-
Clean the Surrounding Area: Before proceeding with the installation of the new swimming pool light, take the opportunity to clean the area around the niche or housing. Wipe away any debris, residue, or buildup to ensure a clean and smooth surface for the installation of the new fixture.
By meticulously following these steps to remove the old swimming pool light, you pave the way for a successful transition to the new fixture. Attention to detail, safety precautions, and thorough preparation set the stage for the subsequent installation process, ensuring that the replacement is carried out with precision and care.
Step 4: Install the new swimming pool light
With the old swimming pool light successfully removed and the necessary preparations completed, it is time to proceed with the installation of the new swimming pool light. This pivotal step requires attention to detail, adherence to safety measures, and a methodical approach to ensure a seamless transition to the new fixture.
-
Prepare the New Light Fixture: Before installing the new swimming pool light, carefully unpack the fixture and inspect it for any signs of damage or defects. Ensure that all components, including the gasket and screws, are readily accessible. If the fixture includes a gasket, apply a thin layer of gasket lubricant to the sealing surface to facilitate a secure and watertight seal.
-
Connect the Wiring: Begin by carefully threading the wiring from the new light fixture through the niche or housing. Exercise caution to prevent any damage to the wiring during this process. Once the wiring is in position, connect it to the electrical supply using wire connectors. Secure the connections with electrical tape, providing an additional layer of protection and stability.
-
Position the New Fixture: Gently maneuver the new swimming pool light into the niche or housing, ensuring that it aligns correctly and sits flush against the pool wall. Take care to position the fixture securely, allowing for a proper seal with the gasket and preventing any misalignment that could compromise the integrity of the installation.
-
Secure the Fixture: Using the provided screws, carefully secure the new swimming pool light in place. Ensure that the screws are tightened evenly to maintain a consistent seal around the perimeter of the fixture. Exercise caution to avoid over-tightening the screws, which could potentially damage the fixture or the pool wall.
-
Test the Fixture: With the new swimming pool light securely installed, it is advisable to conduct a brief test to verify its functionality. Turn the power supply back on at the circuit breaker and switch, and observe the new fixture to ensure that it illuminates as expected. This simple yet crucial step allows you to confirm that the installation was successful and that the new light is operating correctly.
By meticulously following these steps to install the new swimming pool light, you ensure a seamless and effective transition to the upgraded or replacement fixture. Attention to detail, precision in the installation process, and a commitment to safety contribute to a successful outcome, allowing you to enjoy a well-lit and inviting swimming pool for years to come.
Before changing a swimming pool light, make sure to turn off the power at the breaker to avoid electrical shock. Use a dry towel to grip and twist the light fixture counterclockwise to remove it. Be sure to replace the bulb with the correct wattage and type for your specific pool light fixture.
Step 5: Test the new swimming pool light
After the successful installation of the new swimming pool light, it is crucial to conduct a comprehensive test to ensure that the fixture is operating optimally. This essential step allows you to verify the functionality of the new light, confirm proper installation, and address any potential issues before concluding the maintenance process.
To begin the testing process, return to the circuit breaker or control panel that governs the power supply to the swimming pool light. Ensure that the power to the fixture is still turned off to prevent any electrical mishaps during the testing phase. Once confirmed, proceed to the next steps to conduct a thorough assessment of the new swimming pool light.
Upon verifying that the power supply is safely turned off, visually inspect the newly installed light fixture to ensure that all connections are secure, the fixture is positioned correctly, and the sealing gasket is properly in place. This visual assessment provides an initial indication of the installation's integrity and serves as a proactive measure to identify any potential issues before proceeding with the testing.
With the visual inspection complete, it is time to restore power to the swimming pool light. Return to the circuit breaker or control panel and firmly switch the breaker to the "on" position. As the power supply is reinstated, observe the new swimming pool light closely to determine if it illuminates as expected. A well-functioning fixture will emit a consistent and vibrant light, effectively illuminating the pool area and creating a captivating ambiance.
During the testing phase, pay attention to the quality and intensity of the light emitted by the new fixture. Ensure that the illumination is uniform and free from flickering or irregularities. Additionally, take note of any unusual sounds or odors, as these could indicate underlying issues that require attention.
As the new swimming pool light illuminates, take the opportunity to assess its performance from various vantage points around the pool area. Confirm that the light adequately illuminates the pool's interior, providing clear visibility for swimmers and enhancing the overall aesthetic appeal of the pool environment.
In addition to visual assessment, consider conducting a brief functionality test by activating any adjustable features or color settings, if applicable, to ensure that the fixture operates as intended. This comprehensive evaluation allows you to confirm that the new swimming pool light meets your expectations and functions optimally in its designated capacity.
By meticulously testing the new swimming pool light, you can confidently ascertain that the installation was successful and that the fixture is operating at peak performance. This thorough assessment provides peace of mind, ensuring that your pool remains well-lit and inviting, creating a captivating and safe environment for evening swims and social gatherings.
Step 6: Turn the power back on
With the successful installation and testing of the new swimming pool light, the final step in the replacement process is to safely restore power to the fixture. This crucial phase ensures that the newly installed light can fulfill its role in illuminating the pool area, enhancing safety, and creating an inviting ambiance for evening activities.
Before proceeding to turn the power back on, it is essential to conduct a final visual inspection of the new swimming pool light. Verify that all connections are secure, the fixture is positioned correctly, and the sealing gasket is properly in place. This meticulous assessment provides a last opportunity to confirm the integrity of the installation and address any potential issues before reinstating the power supply.
Once the visual inspection is complete, proceed to the circuit breaker or control panel that governs the power supply to the swimming pool light. With caution and attentiveness, switch the breaker to the "on" position, effectively restoring power to the newly installed fixture. As the power supply is reinstated, observe the new swimming pool light closely to ensure that it illuminates as expected.
As the fixture illuminates, take a moment to appreciate the vibrant and consistent light emitted by the new swimming pool light. Confirm that the illumination is uniform, free from flickering, and effectively illuminates the pool's interior, providing clear visibility for swimmers and creating an enchanting atmosphere for evening gatherings.
During this phase, it is advisable to assess the functionality of any adjustable features or color settings, if applicable, to ensure that the fixture operates as intended. This comprehensive evaluation allows you to confirm that the new swimming pool light meets your expectations and functions optimally in its designated capacity.
With the power successfully restored to the swimming pool light, take a final walk around the pool area to appreciate the impact of the new fixture. Observe how the well-lit pool enhances the overall aesthetic appeal of the outdoor space and creates a captivating focal point for relaxation and social activities.
By diligently following the process to turn the power back on, you complete the replacement of the swimming pool light with confidence and precision. The successful restoration of power ensures that your pool remains well-lit and inviting, contributing to a safe and enchanting environment for evening swims and gatherings.
Conclusion
In conclusion, the process of changing a swimming pool light is a vital aspect of pool maintenance that contributes to the safety, functionality, and aesthetic appeal of the pool environment. By following the comprehensive steps outlined in this guide, pool owners can confidently undertake the task of replacing a swimming pool light, ensuring a seamless transition to a new fixture.
The initial step of gathering the necessary tools and materials sets the stage for a well-prepared and efficient replacement process. By ensuring that all required equipment is readily available, pool owners can avoid interruptions and proceed with confidence.
Turning off the power to the swimming pool light is a critical safety measure that cannot be overlooked. By following the recommended protocols for deactivating the power supply and communicating the status of the maintenance work, pool owners prioritize safety and create a secure environment for the replacement process.
The meticulous steps involved in removing the old swimming pool light emphasize the importance of attention to detail and safety precautions. By carefully disconnecting the wiring, inspecting the gasket, and cleaning the surrounding area, pool owners pave the way for a successful installation of the new fixture.
The installation of the new swimming pool light requires precision, adherence to safety measures, and a methodical approach. By preparing the new fixture, connecting the wiring, positioning and securing the fixture, and conducting a thorough test, pool owners ensure a seamless transition to the upgraded or replacement light.
Thoroughly testing the new swimming pool light allows pool owners to confirm its functionality, address any potential issues, and ensure optimal performance. By conducting a comprehensive assessment of the fixture's illumination, functionality, and visual impact, pool owners can rest assured that the new light meets their expectations.
Finally, turning the power back on marks the successful completion of the replacement process, ensuring that the pool remains well-lit and inviting. By restoring power to the newly installed fixture and appreciating its impact on the pool environment, pool owners can enjoy the enhanced safety and captivating ambiance provided by the new swimming pool light.
In essence, the process of changing a swimming pool light encompasses meticulous preparation, attention to safety, precision in installation, and a commitment to optimal performance. By following these steps, pool owners can maintain a well-lit and enchanting pool environment, creating a captivating focal point for relaxation and social gatherings.
Frequently Asked Questions about How To Change Swimming Pool Light
Was this page helpful?
At Storables.com, we guarantee accurate and reliable information. Our content, validated by Expert Board Contributors, is crafted following stringent Editorial Policies. We're committed to providing you with well-researched, expert-backed insights for all your informational needs.


0 thoughts on “How To Change Swimming Pool Light”