Home>Gardening & Outdoor>Outdoor Structures>How To Install Composite Decking
Outdoor Structures
How To Install Composite Decking
Modified: September 2, 2024
Learn how to install composite decking for your outdoor structures with our step-by-step guide. Create a durable and low-maintenance outdoor space.
(Many of the links in this article redirect to a specific reviewed product. Your purchase of these products through affiliate links helps to generate commission for Storables.com, at no extra cost. Learn more)
Introduction
So, you've decided to upgrade your outdoor living space with a beautiful and durable composite decking. Congratulations on this exciting decision! Whether you're envisioning a cozy spot for relaxation, a space for entertaining guests, or a safe play area for your children, composite decking offers a perfect blend of aesthetics and functionality.
Composite decking has gained immense popularity due to its low maintenance, longevity, and eco-friendly composition. Unlike traditional wood decking, composite boards are crafted from a blend of recycled materials, such as wood fibers and plastic, resulting in a product that resists fading, staining, and rot. Additionally, composite decking is available in a wide array of colors and textures, allowing you to customize your outdoor oasis to suit your personal style.
In this comprehensive guide, we'll walk you through the step-by-step process of installing composite decking. Whether you're a seasoned DIY enthusiast or a first-time homeowner eager to tackle a new project, this guide will equip you with the knowledge and confidence to transform your outdoor space into a stunning retreat. We'll cover everything from the tools and materials you'll need to the final finishing touches, ensuring that you're well-prepared to embark on this rewarding endeavor.
By the end of this journey, you'll be able to bask in the satisfaction of having created a beautiful, low-maintenance outdoor sanctuary that will serve as a gathering place for cherished memories for years to come. Let's dive in and bring your vision to life!
Key Takeaways:
- Transform your outdoor space with composite decking, offering low maintenance, durability, and customizable designs. Follow the step-by-step guide to create a stunning retreat for relaxation and entertainment.
- Ensure a sturdy foundation by meticulously preparing the installation area and constructing a solid frame for your composite decking. With attention to detail, bring your vision to life and enjoy your outdoor sanctuary.
Read more: How To Install Composite Decking On Stairs
Tools and Materials Needed
Before diving into the installation process, it’s essential to gather the necessary tools and materials to ensure a smooth and efficient workflow. Here’s a comprehensive list to help you prepare for the project:
Tools:
- Measuring tape
- Level
- Hammer
- Drill/driver
- Saw (circular saw or miter saw)
- Jigsaw
- Speed square
- Adjustable wrench
- Chalk line
- Work gloves
- Safety glasses
- Dust mask
- Broom
- Shovel
- Wheelbarrow (for mixing concrete, if needed)
Materials:
- Composite decking boards
- Pressure-treated lumber (for the frame, if applicable)
- Concrete footings or post anchors
- Joist hangers
- Galvanized screws or hidden fasteners
- Gravel or crushed stone (for ground preparation)
- Landscape fabric
- Composite shims (for leveling)
- Plastic or composite spacers
- End caps (for a polished finish)
- Composite deck cleaner
It’s important to ensure that all the tools are in good working condition, and the materials are of high quality to guarantee a durable and visually appealing result. Additionally, be mindful of safety precautions when handling power tools and construction materials. Now that you’ve assembled everything you need, it’s time to move on to preparing the installation area.
Preparing the Area
Proper preparation of the installation area is crucial for the long-term performance and aesthetics of your composite decking. Follow these essential steps to ensure a solid foundation for your outdoor oasis:
Read more: How To Install Composite Decking Border
1. Clear the Site:
Begin by clearing the designated area of any debris, vegetation, and obstacles. This may involve removing grass, rocks, or old patio materials to create a clean and level surface for the decking installation.
2. Mark the Layout:
Use stakes and string to outline the perimeter of the deck, providing a visual guide for the dimensions and shape of the structure. This step is particularly important for larger or uniquely shaped decks.
3. Prepare the Ground:
If the ground is uneven, consider using a shovel to level the area. It’s advisable to remove any topsoil and create a slight slope away from the house to facilitate proper drainage. Additionally, adding a layer of gravel or crushed stone can aid in water drainage and prevent the growth of weeds beneath the deck.
4. Install Landscape Fabric:
To further inhibit weed growth and promote drainage, lay down landscape fabric over the prepared ground. This will serve as a barrier, preventing unwanted vegetation from encroaching on the space beneath the deck.
5. Plan for Support:
Depending on the height of your deck and local building codes, you may need to install concrete footings or post anchors to provide stable support for the deck’s frame. Be sure to consult local regulations and consider factors such as soil type and frost depth when determining the appropriate support system.
By meticulously preparing the installation area, you’ll establish a sturdy and level foundation for your composite decking, setting the stage for a seamless and visually appealing installation process. With the area meticulously prepped, you’re ready to move on to the next phase: installing the frame.
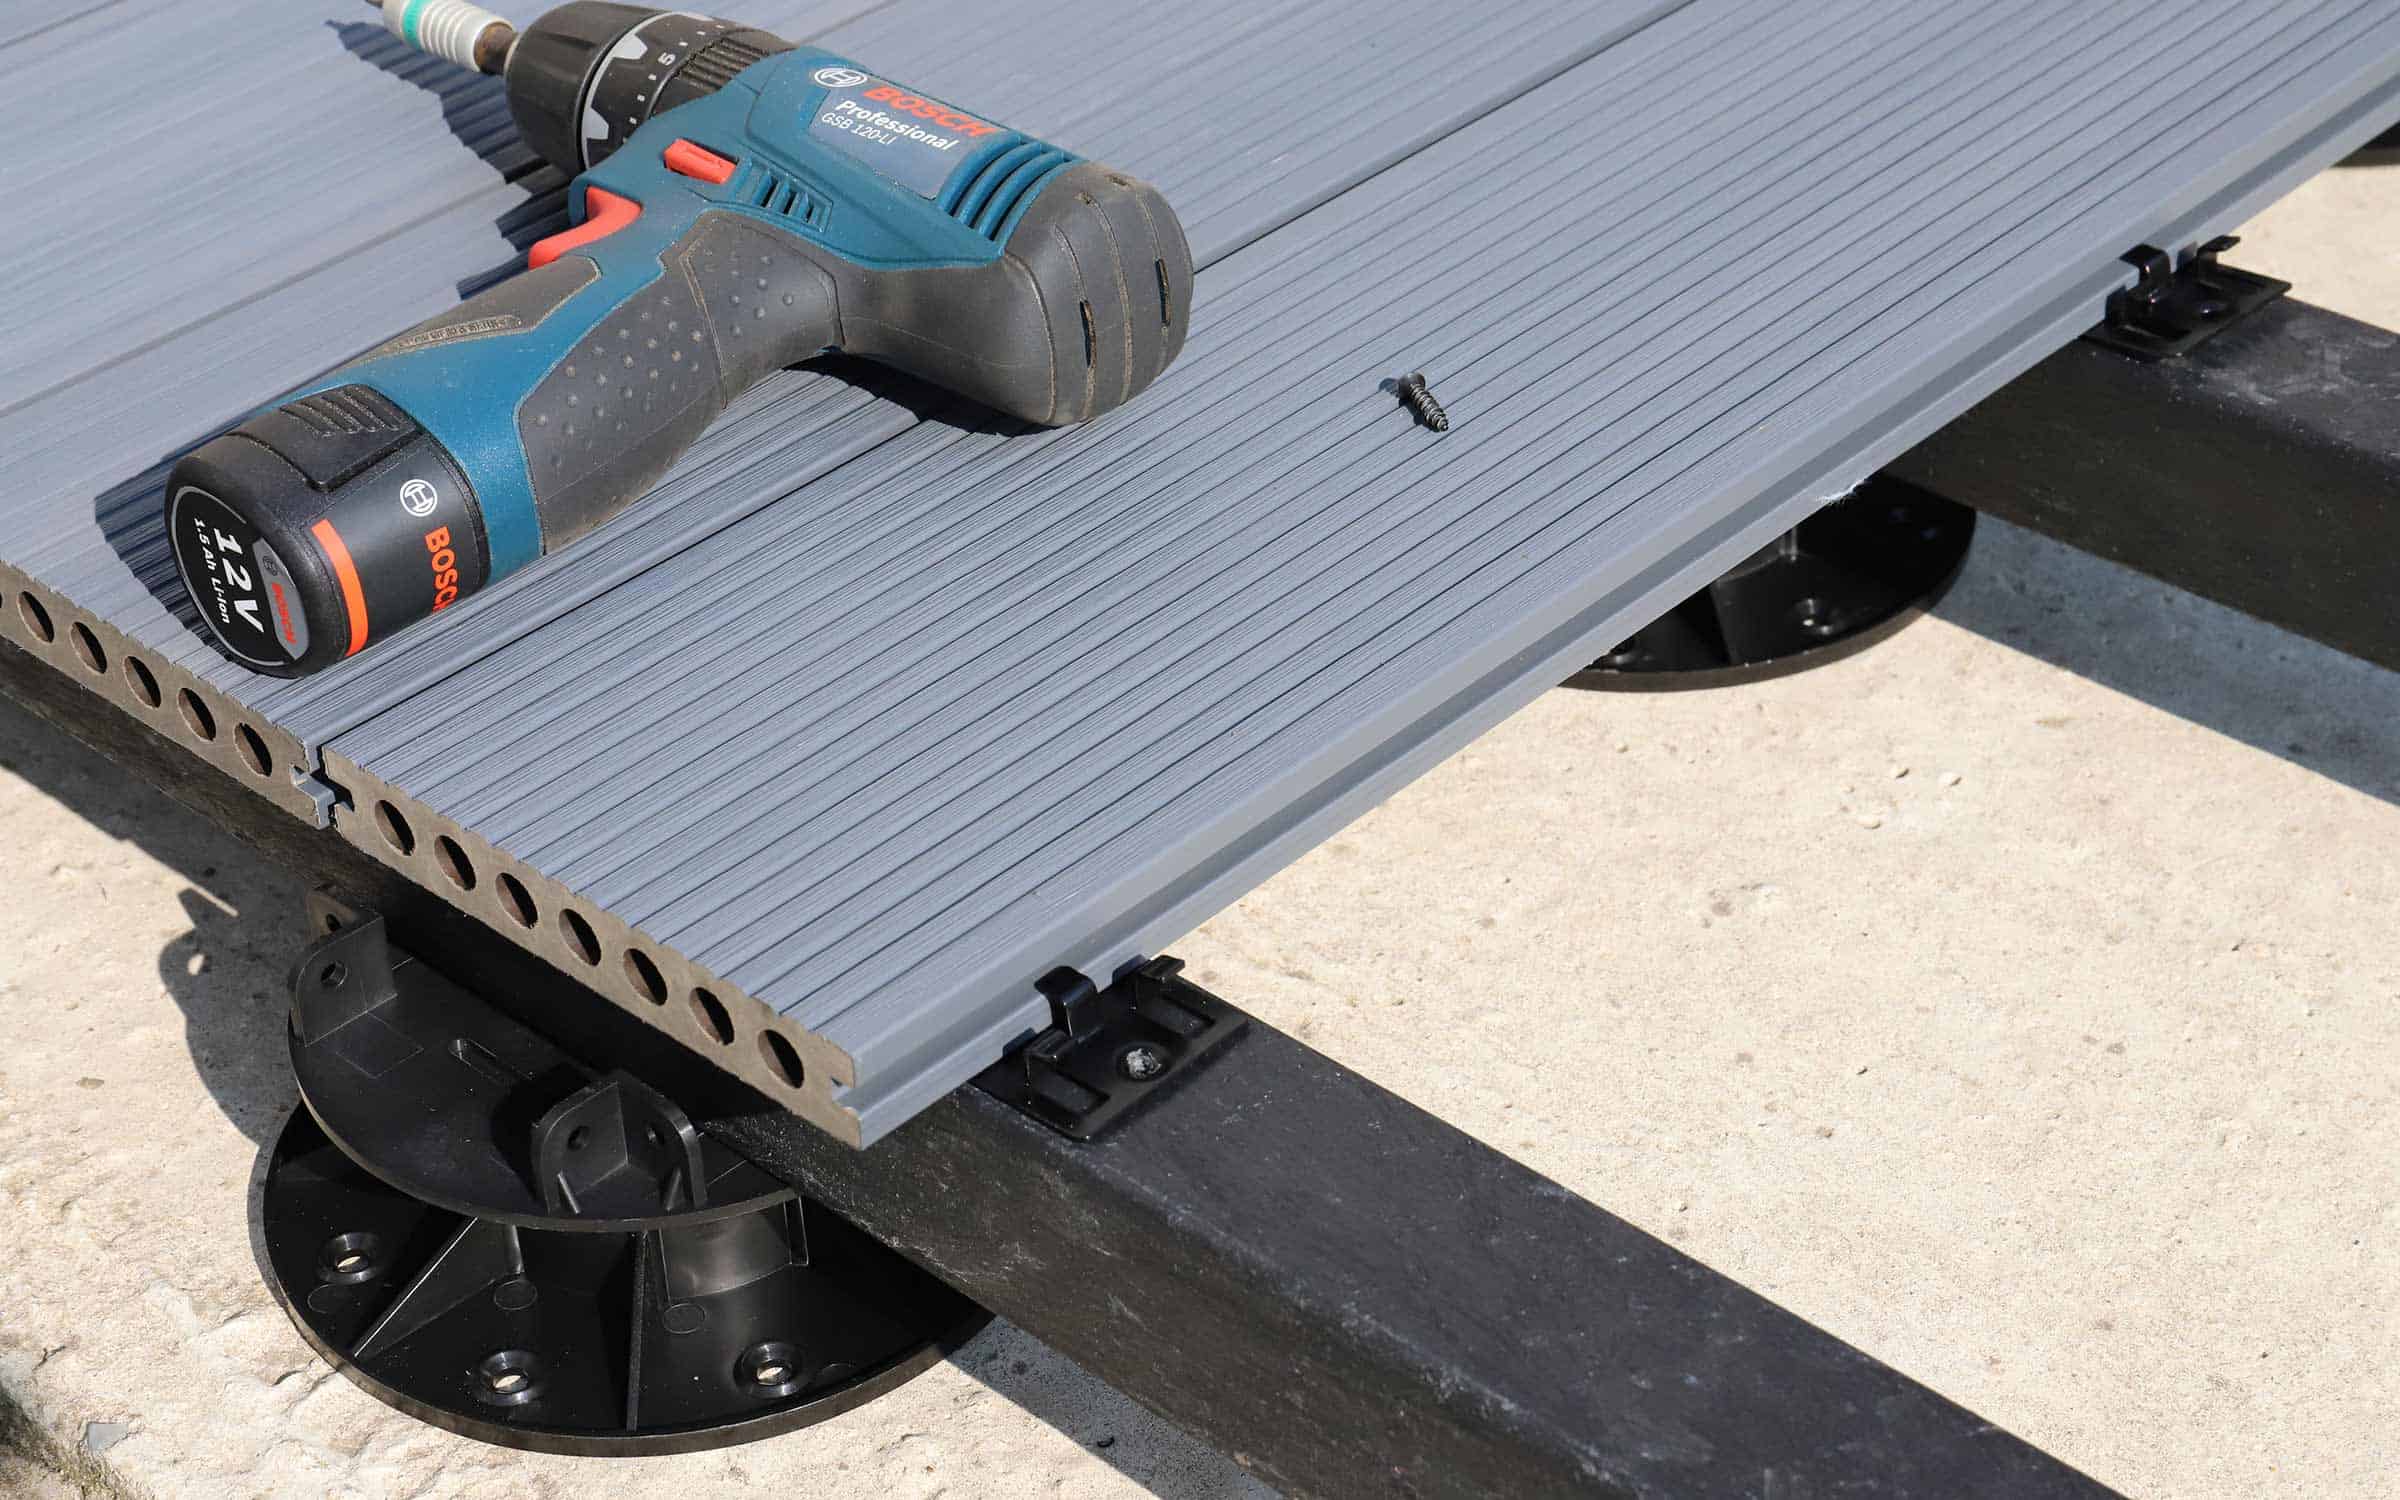
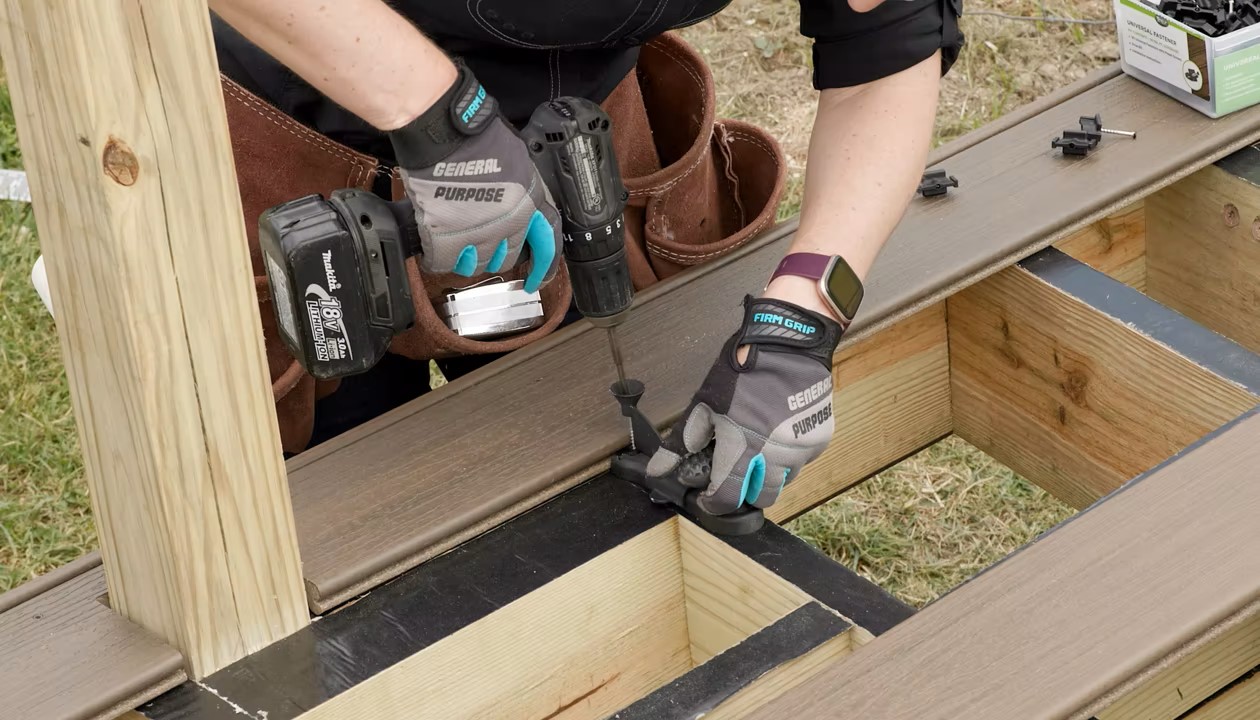
Installing the Frame
Building a solid and level frame is essential for the structural integrity and longevity of your composite decking. Follow these steps to construct a sturdy and stable frame for your outdoor oasis:
1. Determine the Layout:
Begin by marking the locations for the support posts or footings according to your deck’s design and local building codes. Ensure that the layout aligns with the dimensions and shape outlined during the preparation phase.
2. Install Support Posts:
If using concrete footings, dig holes at the designated locations and set the posts in place. Ensure that the posts are plumb and securely anchored. For added stability, consider using post anchors to connect the posts to the footings.
3. Construct the Joist Framework:
Using pressure-treated lumber, construct the joist framework to support the decking boards. Install joist hangers at the ledger board and secure the joists at the appropriate spacing, typically 16 inches on center. Be sure to use a level to ensure that the framework is uniformly horizontal.
4. Add Beam Support:
Depending on the size and design of your deck, you may need to incorporate beam supports to bolster the frame’s stability. Connect the beams to the support posts using appropriate hardware, ensuring that they are level and properly aligned with the joists.
5. Verify Structural Integrity:
Before proceeding, double-check the entire frame for structural integrity. Ensure that all connections are secure, the frame is level, and the dimensions are accurate. Making any necessary adjustments at this stage will prevent issues during the decking installation.
6. Consider Elevations and Angles:
If your deck features multiple levels or unique angles, take the time to plan and construct the frame accordingly. This may involve incorporating additional support beams and adjusting the elevation of specific sections to accommodate the design.
By meticulously constructing a sturdy frame, you’ll establish a reliable foundation for your composite decking, ensuring that it withstands the test of time and provides a safe and enjoyable outdoor environment. With the frame securely in place, you’re now ready to move on to the exciting phase of placing the decking boards.
Read more: How To Build A Deck With Composite Decking
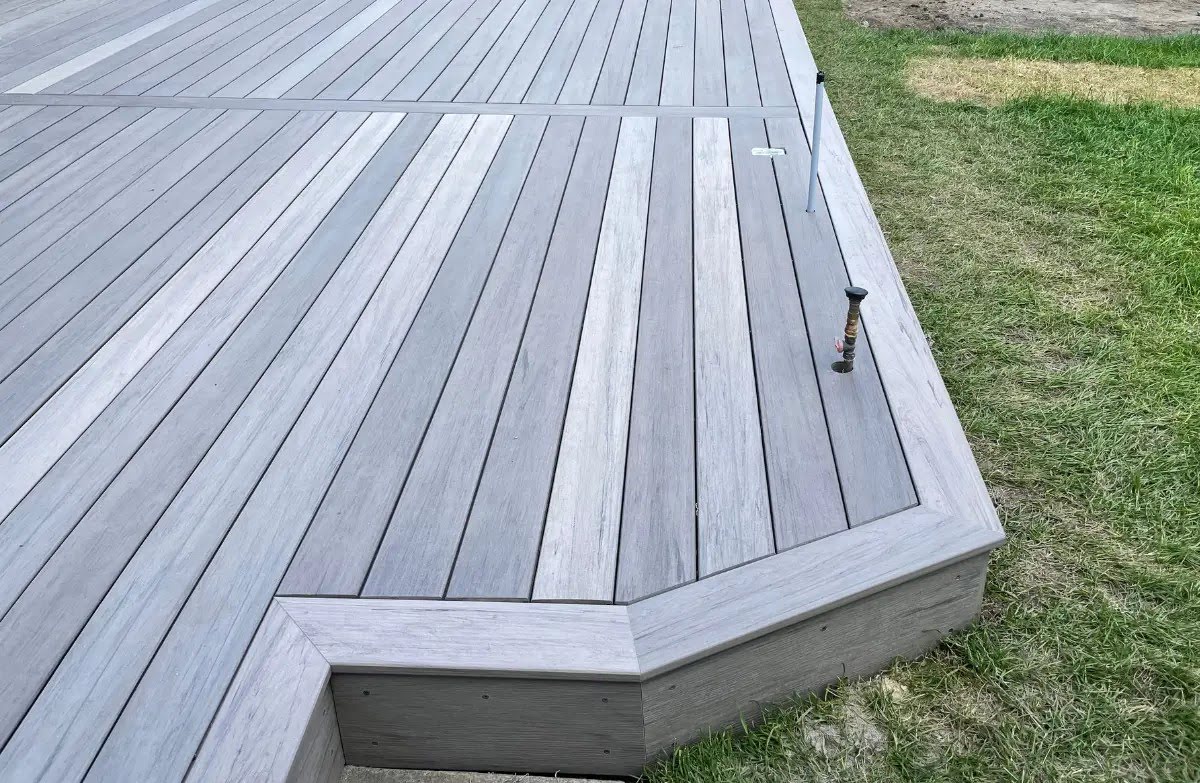
Placing the Decking Boards
Now comes the exciting part of bringing your vision to life by installing the composite decking boards. This phase allows you to witness your outdoor space transform into a stunning and functional area for relaxation and entertainment. Follow these steps to ensure a seamless and visually appealing installation of the decking boards:
1. Plan the Layout:
Before fastening the boards, take the time to plan the layout and orientation of the decking. Consider factors such as board orientation, pattern variation, and any design elements, such as picture framing or unique board configurations, that will enhance the aesthetic appeal of the deck.
2. Start at the Perimeter:
Begin by installing the perimeter boards, ensuring that they are parallel to the outer edges of the frame and evenly overhang the edges, if desired. Use appropriate fasteners to secure the boards in place, maintaining a consistent gap between the boards for drainage and expansion.
3. Fasten the Boards:
With the perimeter boards in place, proceed to fasten the inner decking boards to the joists using either galvanized screws or hidden fasteners, depending on your preferred installation method. Be mindful of maintaining consistent spacing between the boards and ensuring that they are aligned for a uniform appearance.
Read more: What Is Composite Decking
4. Cut and Trim as Needed:
Utilize a saw, such as a circular saw or jigsaw, to trim the decking boards to fit around obstacles, create clean edges, and accommodate the deck’s unique shape. Precision is key to achieving a professional and polished result.
5. Address Board Ends:
Depending on the design and layout of your deck, you may need to address the exposed ends of the decking boards. This can be achieved by installing end caps, trimming the ends at a 45-degree angle, or incorporating a picture frame border for a refined and finished look.
6. Consider Board Patterns:
If your design incorporates multiple board lengths or patterns, take the time to meticulously plan and execute the layout, ensuring that the boards seamlessly interlock and create a visually captivating surface.
7. Maintain Consistency:
Throughout the installation process, prioritize consistency in board spacing, fastener placement, and overall alignment to achieve a professional and visually appealing result.
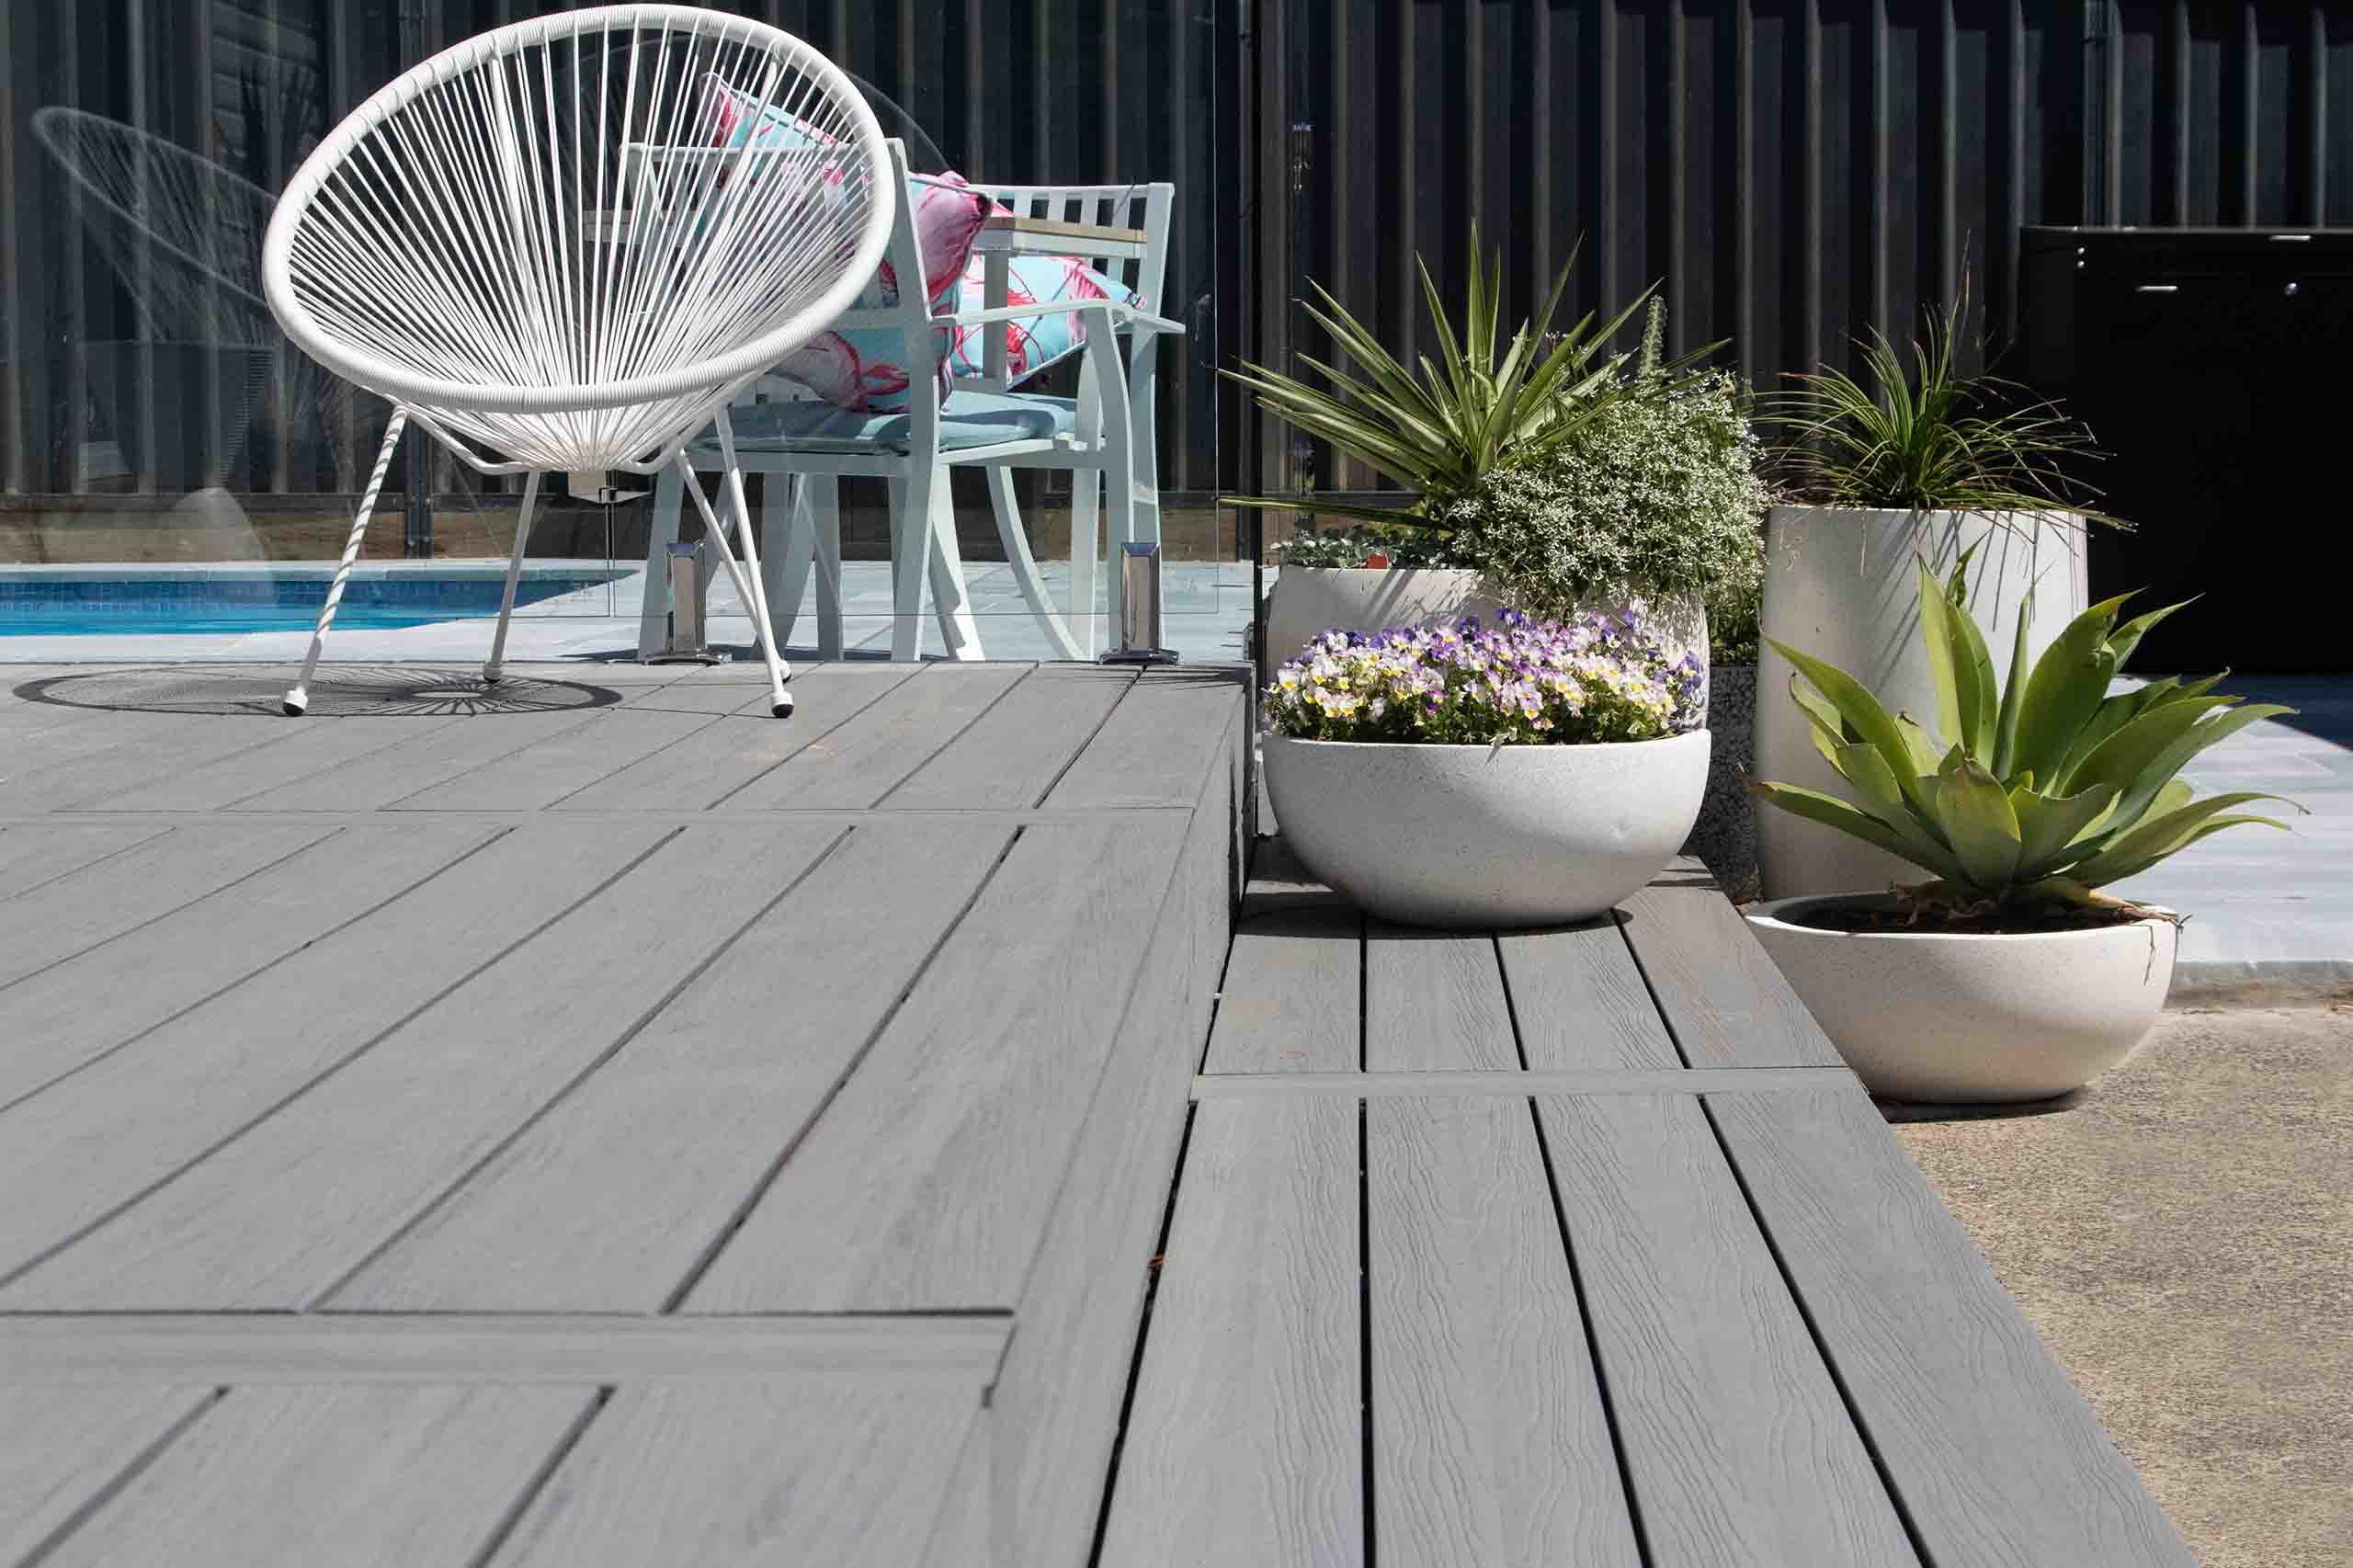
By methodically placing the decking boards, you’ll witness your outdoor space undergo a remarkable transformation, evolving into a captivating and functional extension of your home. With the boards securely in place, it’s time to add the finishing touches that will elevate the overall appeal and performance of your composite decking.
Read more: How To Cut Composite Decking
Finishing Touches
As you near the completion of your composite decking installation, it’s time to add the finishing touches that will elevate the overall appeal and functionality of your outdoor oasis. These final steps will contribute to the longevity, safety, and visual allure of your deck, ensuring that it becomes a welcoming and enjoyable space for relaxation and entertainment. Let’s explore the essential finishing touches:
1. Install Fascia Boards:
To create a polished and seamless look, consider installing fascia boards along the perimeter of the deck. These boards will conceal the structural elements and exposed edges, providing a cohesive and refined appearance.
2. Secure Railings and Balusters:
If your design incorporates railings and balusters, ensure that they are securely installed to enhance safety and add a decorative element to the deck. Verify that the railings are level and meet local building codes for height and spacing.
3. Apply Deck Cleaner:
Prior to unveiling the full splendor of your composite decking, consider applying a gentle deck cleaner to remove any construction residue, dirt, or marks. This step will rejuvenate the appearance of the decking boards and prepare them for long-term enjoyment.
Read more: How To Screw Composite Decking
4. Add Lighting Elements:
Enhance the ambiance and functionality of your deck by incorporating lighting elements, such as post cap lights, step lights, or integrated LED strips. These additions will extend the utility of the space and create a captivating atmosphere for evening gatherings.
5. Incorporate Outdoor Furnishings:
Complete the transformation of your deck by adding outdoor furnishings, such as comfortable seating, a dining set, or decorative accents. Thoughtfully arranged furnishings will imbue the space with comfort and style, inviting you and your guests to savor the outdoor experience.
6. Consider Personal Touches:
Infuse your personality into the space by incorporating potted plants, vibrant cushions, or decorative elements that reflect your unique style. These personal touches will impart warmth and character to your outdoor retreat.
7. Perform a Final Inspection:
Before inaugurating your newly installed composite decking, conduct a thorough inspection to ensure that all components are securely fastened, the surface is clean and free of debris, and the overall appearance meets your expectations.
With the finishing touches in place, your composite decking has been transformed into a captivating and functional outdoor sanctuary. It’s now time to step back, take in the beauty of your creation, and look forward to the countless moments of joy and relaxation that await in your splendid new outdoor space.
Read more: How To Bend Composite Decking
Conclusion
Congratulations on successfully completing the installation of your composite decking! You’ve embarked on a transformative journey that has culminated in the creation of a captivating and functional outdoor sanctuary. As you stand on your newly constructed deck, envision the countless moments of relaxation, laughter, and connection that await in this inviting space. Your dedication and craftsmanship have yielded a remarkable addition to your home, one that will be cherished for years to come.
By choosing composite decking, you’ve embraced a low-maintenance, durable, and eco-friendly solution that harmoniously blends aesthetics and performance. The versatility of composite materials has allowed you to customize your outdoor space with a wide array of colors, textures, and design possibilities, resulting in a deck that reflects your unique style and vision.
Throughout the installation process, you’ve demonstrated meticulous attention to detail, ensuring that each component of the deck, from the sturdy frame to the precisely placed decking boards, contributes to a cohesive and visually appealing result. Your dedication to quality and craftsmanship is evident in every aspect of the deck’s construction.
As you prepare to inaugurate your new outdoor oasis, take a moment to appreciate the transformative power of this project. Your deck stands as a testament to your creativity, determination, and commitment to enhancing your living space. It is a canvas upon which memories will be forged, celebrations will unfold, and moments of tranquility will be savored.
Whether you envision lively gatherings with friends and family, tranquil mornings with a cup of coffee, or simply a peaceful retreat to unwind after a long day, your composite decking is poised to fulfill these aspirations. With the finishing touches in place, the stage is set for a myriad of experiences that will enrich your life and create lasting impressions.
As you embark on this new chapter of outdoor living, may your composite decking serve as a source of joy, comfort, and inspiration. Embrace the opportunities it presents, and relish the moments of serenity and connection that unfold within its inviting embrace. Your outdoor sanctuary awaits, ready to enrich your life and provide a backdrop for cherished memories for years to come.
With your composite decking installation complete, the stage is set for a new chapter of outdoor living, brimming with possibilities and the promise of countless delightful moments. Embrace this transformative addition to your home, and revel in the beauty, functionality, and endless potential it brings to your outdoor lifestyle.
Frequently Asked Questions about How To Install Composite Decking
Was this page helpful?
At Storables.com, we guarantee accurate and reliable information. Our content, validated by Expert Board Contributors, is crafted following stringent Editorial Policies. We're committed to providing you with well-researched, expert-backed insights for all your informational needs.


0 thoughts on “How To Install Composite Decking”