Home>Home Maintenance>How To Repair Hole In Air Conditioning Flex Duct

Home Maintenance
How To Repair Hole In Air Conditioning Flex Duct
Modified: March 6, 2024
Learn how to repair a hole in your air conditioning flex duct with these simple home maintenance tips. Ensure efficient cooling and save money on energy bills.
(Many of the links in this article redirect to a specific reviewed product. Your purchase of these products through affiliate links helps to generate commission for Storables.com, at no extra cost. Learn more)
Introduction
Welcome to this comprehensive guide on how to repair a hole in air conditioning flex duct. As a homeowner, it’s essential to be aware of common maintenance issues that can arise with your HVAC system. One such issue is a hole in the flex duct, which can occur due to wear and tear, pest infestations, or accidental damage.
A hole in the air conditioning flex duct can lead to air leakage, causing a significant decrease in the efficiency of your HVAC system. It can also result in unbalanced cooling or heating, uncomfortable indoor temperatures, and higher energy bills. Fortunately, repairing a hole in the flex duct is a relatively straightforward process that can be done with a few tools and materials.
In this step-by-step guide, we will walk you through the process of identifying and repairing a hole in your air conditioning flex duct. By following these instructions, you can restore the performance of your HVAC system and ensure comfortable indoor temperatures throughout your home.
Before we begin, please keep in mind that if the hole in your air conditioning flex duct is extensive or beyond your comfort level to repair, it is recommended to consult a professional HVAC technician. They have the expertise and specialized tools to handle more complex duct repairs.
Now, let’s dive into the step-by-step process of repairing a hole in your air conditioning flex duct!
Key Takeaways:
- Repairing a hole in your air conditioning flex duct is a straightforward process that requires gathering the right tools, locating the hole, cleaning the area, and applying a durable patch to ensure a long-lasting and effective repair.
- Testing the repaired duct for leaks is crucial to ensure the success of the repair. By following the step-by-step process and conducting a thorough leak test, you can maintain the efficiency of your HVAC system and enjoy comfortable indoor temperatures.
Read more: How Does Ducted Air Conditioning Work
Step 1: Gather the necessary tools and materials
Before you begin repairing the hole in your air conditioning flex duct, it’s essential to gather all the necessary tools and materials. By having everything at hand, you can work efficiently and minimize any interruptions. Here is a list of what you will need:
- Duct tape
- Aluminum foil tape
- Scissors or utility knife
- Adhesive suitable for use with flex duct
- Measuring tape
- Clean cloth or paper towels
- Protective gloves (optional)
Duct tape is handy for temporary fixes and holding the flex duct in place while you prepare the patch. However, it’s important to note that duct tape is not a long-term solution and may degrade over time. Therefore, we will be using aluminum foil tape for the actual repair, as it is more durable and suitable for use with flex ducts.
Ensure that you have a pair of sturdy scissors or a utility knife for cutting the patch from the aluminum foil tape. The adhesive you choose should be specifically formulated for use with flex ducts to ensure a secure and long-lasting repair.
It’s a good idea to have a measuring tape handy to accurately determine the dimensions of the patch required. A clean cloth or paper towels will come in handy for cleaning the area around the hole before applying the patch.
Lastly, consider wearing protective gloves to protect your hands from any sharp edges or adhesives.
Once you have gathered all the necessary tools and materials, you are ready to proceed to the next step, which is locating the hole in the air conditioning flex duct.
Step 2: Locate the hole in the air conditioning flex duct
Now that you have gathered your tools and materials, it’s time to locate the hole in your air conditioning flex duct. Identifying the exact location of the hole will help you accurately assess its size and determine the best course of action for the repair.
Here’s how you can locate the hole in the air conditioning flex duct:
- Turn on your HVAC system: Start by turning on your air conditioning or heating system. This will allow air to flow through the ducts, making it easier to identify any air leakage.
- Inspect visible sections of the duct: Begin by visually examining the flex duct for any noticeable signs of damage. Look for punctures, tears, or loose sections of the duct that may indicate a hole.
- Feel for air leaks: Run your hand along the length of the flex duct, feeling for any areas where air is escaping. Pay close attention to joints, bends, and connections, as these are common areas for leaks to occur.
- Use a smoke test: If you’re having trouble locating the hole visually or by touch, you can conduct a smoke test. Light a small piece of incense or a smoke stick, and carefully move it along the surface of the duct. Watch for any disturbances in the smoke, which may indicate air leaking through a hole.
Once you have successfully located the hole in your air conditioning flex duct, mark its position using a piece of tape or a marker. This will make it easier to clean and repair the specific area later on.
Remember, it’s important to be thorough and take your time during this step. Locating the hole accurately will ensure that your repair efforts are targeted, leading to a successful and long-lasting fix.
With the hole in the flex duct identified, we can move on to the next step: cleaning the area around the hole.
Step 3: Clean the area around the hole
Now that you have located the hole in your air conditioning flex duct, it’s crucial to clean the area around the hole before proceeding with the repair. Cleaning ensures that the patch adheres properly and provides a secure seal.
Follow these steps to clean the area around the hole:
- Turn off your HVAC system: Before cleaning, shut off your air conditioning or heating system to prevent any air movement through the ducts.
- Wipe the area with a clean cloth or paper towels: Use a clean cloth or paper towels to remove any dust, dirt, or debris that may have accumulated around the hole. Gently wipe the area, taking care not to damage the duct material.
- Use a mild detergent solution (optional): If the area around the hole is particularly dirty or greasy, you may use a mild detergent solution. Mix a small amount of mild dish soap with warm water and dampen a clean cloth or sponge. Wipe the area, then rinse with a damp cloth to remove any soap residue. Allow the area to dry completely before proceeding.
By cleaning the area around the hole, you ensure that the patching material adheres properly and provides a strong bond. Any dirt or debris left on the surface can hinder the effectiveness of the repair.
Once you have cleaned the area around the hole and it has dried completely, you are ready to move on to the next step: applying duct tape as a temporary fix. This will help secure the duct and prevent any further air leakage until you are ready to proceed with the permanent repair.
Step 4: Apply duct tape as a temporary fix
After cleaning the area around the hole in your air conditioning flex duct, it’s time to apply duct tape as a temporary fix. Duct tape provides a quick and easy solution to secure the damaged area and prevent any further air leakage until you are ready to proceed with the permanent repair.
Here’s how you can apply duct tape as a temporary fix:
- Cut a piece of duct tape: Measure and cut a piece of duct tape that is slightly larger than the size of the hole. This will ensure adequate coverage and adhesion.
- Apply the tape over the hole: Place the cut piece of duct tape directly over the hole in the flex duct, ensuring that it completely covers the damaged area. Press down firmly to ensure proper adhesion.
- Smooth out any wrinkles or air bubbles: Gently smooth out the tape with your hand, ensuring that there are no wrinkles or air bubbles trapped underneath. This will help create a tight seal and prevent any air from escaping.
By applying duct tape as a temporary fix, you can prevent any further air leakage and maintain the functionality of your HVAC system until you are ready to proceed with the permanent repair.
It’s important to note that duct tape is not a long-term solution and may degrade over time, especially when exposed to the heat and moisture present in HVAC systems. Therefore, it’s essential to proceed with the permanent repair as soon as possible to ensure a reliable and lasting fix.
With the temporary fix in place, we can now move on to the next step: measuring and cutting a patch piece from aluminum foil tape.
Read more: How Much Does Ducted Air Conditioning Cost
Step 5: Measure and cut a patch piece from aluminum foil tape
Now that you have temporarily fixed the hole in your air conditioning flex duct with duct tape, it’s time to proceed with the permanent repair. In this step, you will measure and cut a patch piece from aluminum foil tape to cover the damaged area.
Follow these steps to measure and cut a patch piece from aluminum foil tape:
- Measure the size of the hole: Use a measuring tape to determine the dimensions of the hole in your flex duct. Measure both the length and width of the hole, and make a note of the measurements.
- Transfer the measurements to the aluminum foil tape: Using a pencil or marker, transfer the measurements onto the backing paper of the aluminum foil tape. Ensure that the patch piece is slightly larger than the size of the hole to provide adequate coverage.
- Cut the patch piece: Using a pair of sturdy scissors or a utility knife, carefully cut the patch piece from the aluminum foil tape along the marked lines. Take your time to ensure a clean and precise cut.
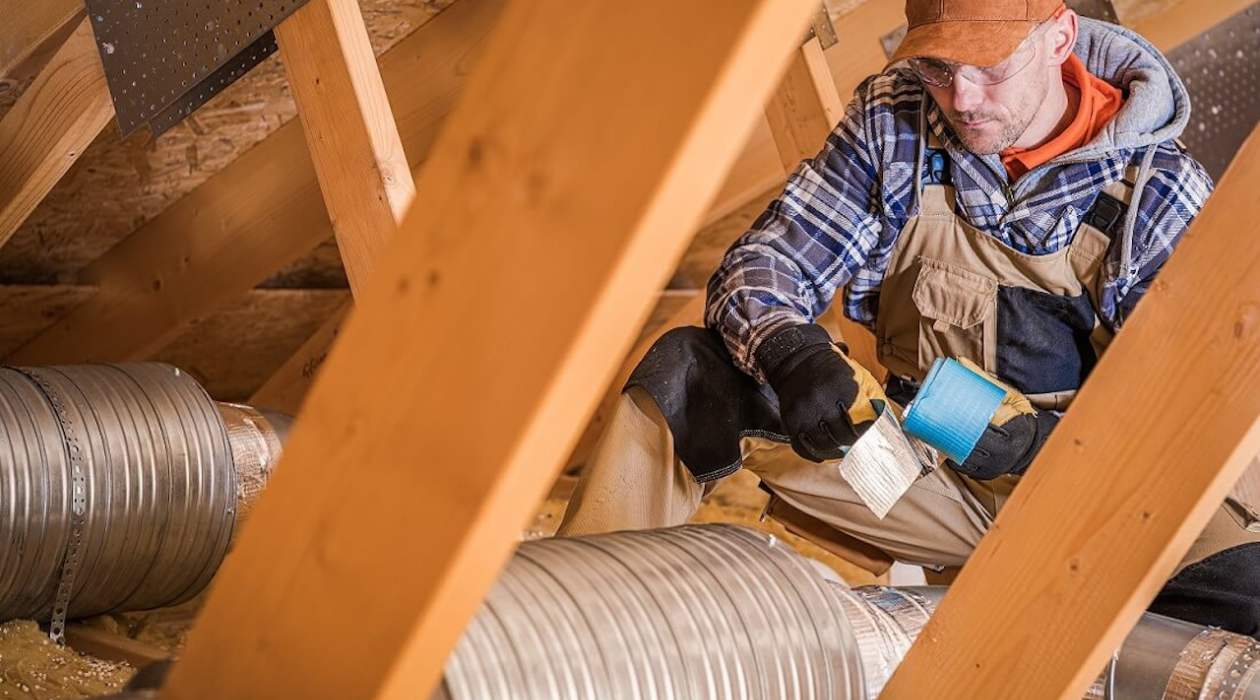
It’s important to note that aluminum foil tape is an excellent choice for repairing flex ducts, as it is durable, heat-resistant, and provides an effective seal. Ensure that you are using high-quality aluminum foil tape specifically designed for HVAC applications.
Once you have meticulously measured and cut the patch piece, you are ready to proceed to the next step: applying adhesive to the patch and securing it over the hole.
Use aluminum foil tape to cover the hole in the flex duct. Make sure to clean and dry the area before applying the tape for a secure seal.
Step 6: Apply adhesive to the patch and secure it over the hole
Now that you have measured and cut a patch piece from aluminum foil tape, it’s time to apply adhesive and secure it over the hole in your air conditioning flex duct. This step will provide a permanent solution to repair the damaged area and prevent any further air leakage.
Follow these steps to apply adhesive to the patch and secure it over the hole:
- Apply adhesive to the back of the patch: Using a brush or a small spatula, apply a thin, even layer of adhesive to the back of the patch piece. Ensure that the entire back surface is covered with adhesive.
- Position the patch over the hole: Gently place the adhesive-coated side of the patch over the hole in the flex duct. Make sure to center the patch to provide even coverage over the damaged area.
- Press down firmly: Press down firmly on the patch, ensuring that it adheres well to the duct surface. Apply consistent pressure for a few seconds to ensure a strong bond.
It’s important to use an adhesive that is specifically formulated for use with flex ducts. This type of adhesive provides excellent bonding strength and is resistant to the temperature and moisture conditions within HVAC systems. Follow the manufacturer’s instructions regarding the application and curing time of the adhesive.
By applying the adhesive-coated patch over the hole, you create a sealed barrier that prevents air leakage and restores the integrity of your air conditioning flex duct. The adhesive will securely bond the patch to the duct surface, providing a long-lasting repair.
With the patch in place, we will move on to the next step: sealing the edges of the patch with more aluminum foil tape.
Step 7: Seal the edges of the patch with more aluminum foil tape
After applying the adhesive-coated patch over the hole in your air conditioning flex duct, it’s time to ensure a secure and airtight seal by sealing the edges of the patch with more aluminum foil tape. This step will further enhance the effectiveness of the repair and prevent any potential air leakage.
Follow these steps to seal the edges of the patch:
- Cut a strip of aluminum foil tape: Measure and cut a strip of aluminum foil tape that is long enough to cover the edges of the patch and extend onto the surrounding duct surface.
- Position the tape along the edge of the patch: Place one end of the aluminum foil tape strip on the edge of the patch, ensuring that it slightly overlaps the patch to create a continuous seal. Press down firmly to secure it in place.
- Continue wrapping the tape around the edges: Wrap the aluminum foil tape smoothly and tightly around the circumference of the patch, ensuring that it covers all the edges completely. Apply firm pressure to ensure proper adhesion.
- Extend the tape onto the duct surface: As you wrap the tape around the edges of the patch, allow it to extend onto the surrounding duct surface. This will create a seamless transition and provide an extra layer of protection against air leakage.
- Smooth out any wrinkles or air bubbles: Gently smooth out the tape with your hand, ensuring that there are no wrinkles or air bubbles trapped underneath. This will help create a tight and secure seal.
By sealing the edges of the patch with aluminum foil tape, you reinforce the repair and create a strong barrier against any potential air leakage. The tape’s heat resistance, durability, and adhesive properties make it an ideal choice for this application.
With the edges of the patch securely sealed, we can now move on to the next step: allowing the adhesive to cure.
Step 8: Allow the adhesive to cure
After sealing the edges of the patch with aluminum foil tape, it’s crucial to allow the adhesive to cure properly. Curing time allows the adhesive to fully bond and create a strong and durable repair. It’s important to follow the manufacturer’s instructions regarding the specific curing time required for the adhesive you’re using.
Here’s what you need to do to allow the adhesive to cure effectively:
- Read the adhesive instructions: Refer to the adhesive manufacturer’s instructions to determine the recommended curing time. This information can usually be found on the adhesive container or packaging.
- Avoid disturbing the repair: Once the patch and aluminum foil tape are in place, avoid touching or disturbing the repair during the curing process. This will ensure that the adhesive has enough time to bond securely.
- Allow ample curing time: Depending on the adhesive, the curing time can range from a few hours to a full day. Ensure that you provide sufficient time for the adhesive to cure completely before using your HVAC system again.
It’s important to note that the curing time may be affected by factors such as temperature, humidity, and the specific adhesive used. These factors can influence the drying and bonding process, so it’s crucial to be patient and allow adequate time for curing.
By allowing the adhesive to cure properly, you ensure that the repair is strong and long-lasting. This will help maintain the integrity of your air conditioning flex duct and prevent any future air leakage.
Once the adhesive has fully cured, it’s time to proceed to the final step: testing the repaired duct for leaks.
Read more: How To Repair A Hole In HVAC Duct
Step 9: Test the repaired duct for leaks
After completing the repair process for the hole in your air conditioning flex duct, it’s essential to test the repaired duct for any potential leaks. This will ensure that the repair was successful and that your HVAC system is operating efficiently without any air leakage.
Follow these steps to test the repaired duct for leaks:
- Turn on your HVAC system: Start by turning on your air conditioning or heating system to allow air to flow through the ducts.
- Inspect the repaired area: Visually examine the area where the hole was repaired, paying close attention to the patch, aluminum foil tape, and the surrounding duct surface. Look for any signs of air leakage such as hissing sounds, visible air movement, or any noticeable temperature variations.
- Feel for air leaks: Run your hand along the repaired area, feeling for any noticeable air leakage. Pay attention to the edges of the patch and the seams of the aluminum foil tape. Any air movement can indicate a potential leak.
- Use a smoke test: If you’re having trouble detecting air leaks visually or by touch, you can perform a smoke test. Light a small piece of incense or a smoke stick and hold it close to the repaired area. Observe the smoke for any disturbances, which may indicate air escaping through a leak.
If you observe any signs of air leakage or suspect that the repaired area is not effectively sealed, you may need to revisit the steps and make necessary adjustments. This can include applying additional aluminum foil tape, reinforcing the adhesive bond, or consulting a professional HVAC technician for assistance.
By testing the repaired duct for leaks, you can ensure that the repair is successful and that your HVAC system is operating at its optimal efficiency. A well-sealed and properly functioning duct system will contribute to more consistent indoor temperatures and improved energy efficiency in your home.
Congratulations! You have now completed the process of repairing a hole in your air conditioning flex duct. By following these steps and taking the necessary precautions, you have successfully restored the functionality of your HVAC system and eliminated any potential air leakage.
Remember, regular maintenance and inspections are key to preventing future duct issues. If you notice any further damage or deterioration in your ductwork, it’s always wise to address the problem promptly to maintain the efficiency and performance of your HVAC system.
Thank you for choosing this guide as your resource for repairing a hole in your air conditioning flex duct. We hope it has been helpful, and may your home remain comfortably cooled or heated for years to come!
Conclusion
Repairing a hole in your air conditioning flex duct is a crucial maintenance task that ensures the efficient operation of your HVAC system and maintains comfortable temperatures in your home. By following the step-by-step process outlined in this guide, you can successfully repair the hole and prevent any air leakage, ultimately saving energy and reducing your utility bills.
Throughout this guide, we have covered everything you need to know, from gathering the necessary tools and materials to testing the repaired duct for leaks. We emphasized the importance of proper cleaning, measuring, cutting, and securing the patch using adhesive and aluminum foil tape. Additionally, we highlighted the significance of allowing the adhesive to cure and conducting a thorough leak test to ensure the effectiveness of the repair.
Remember, if the hole in your flex duct is extensive or beyond your comfort level to repair, it is best to consult a professional HVAC technician. They have the expertise and specialized tools to handle more complex duct repairs.
To keep your HVAC system running smoothly in the long term, it’s essential to perform regular maintenance, including inspecting your ductwork for any signs of damage or deterioration. By promptly addressing any issues, you can prevent small problems from escalating into more significant and costly repairs.
We hope this guide has empowered you with the knowledge and confidence to successfully repair a hole in your air conditioning flex duct. By taking the time to conduct the repair properly, you can ensure the longevity and efficiency of your HVAC system, providing a more comfortable living environment for you and your family.
Thank you for choosing to use this guide, and happy repairing!
Frequently Asked Questions about How To Repair Hole In Air Conditioning Flex Duct
Was this page helpful?
At Storables.com, we guarantee accurate and reliable information. Our content, validated by Expert Board Contributors, is crafted following stringent Editorial Policies. We're committed to providing you with well-researched, expert-backed insights for all your informational needs.

