Home>Ideas and Tips>DIY Guide To Installing A Kitchen Under-Cabinet Stemware Rack
Ideas and Tips
DIY Guide To Installing A Kitchen Under-Cabinet Stemware Rack
Published: September 20, 2024
Learn how to install a kitchen under-cabinet stemware rack with our step-by-step DIY guide. Maximize space and add elegance to your kitchen effortlessly.
(Many of the links in this article redirect to a specific reviewed product. Your purchase of these products through affiliate links helps to generate commission for Storables.com, at no extra cost. Learn more)
Introduction
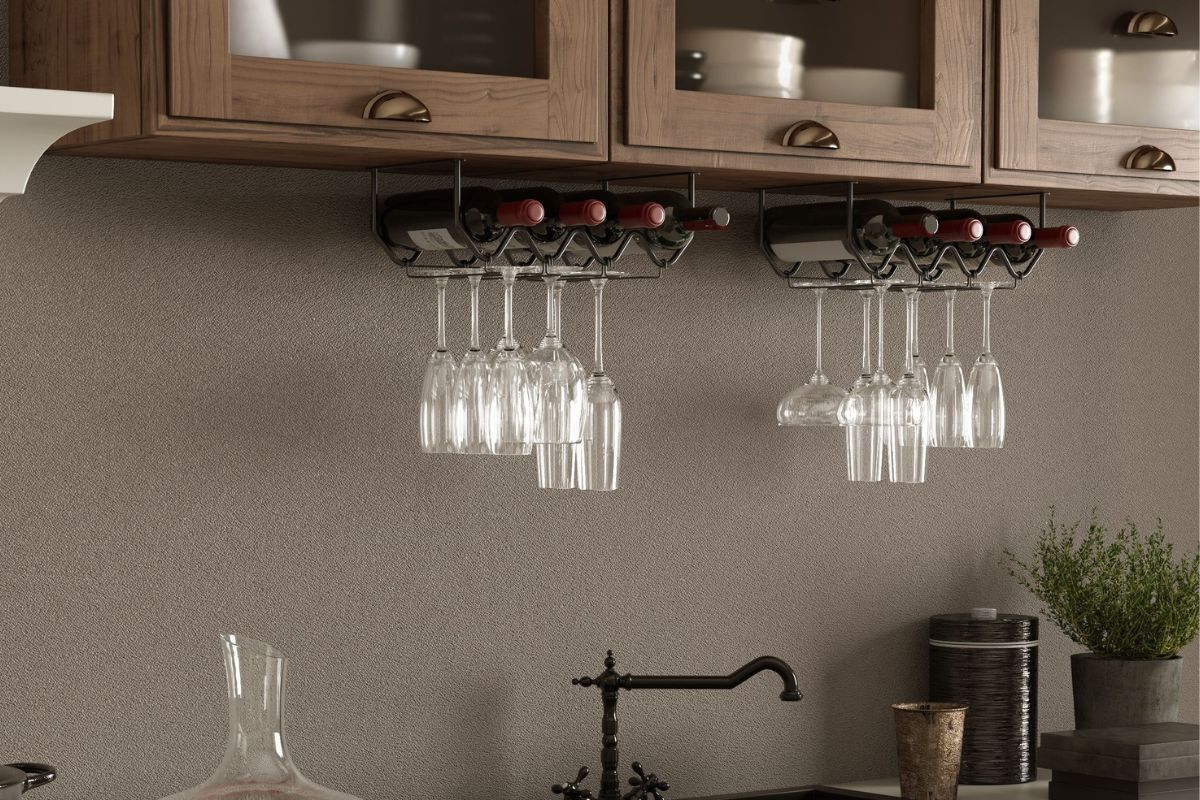
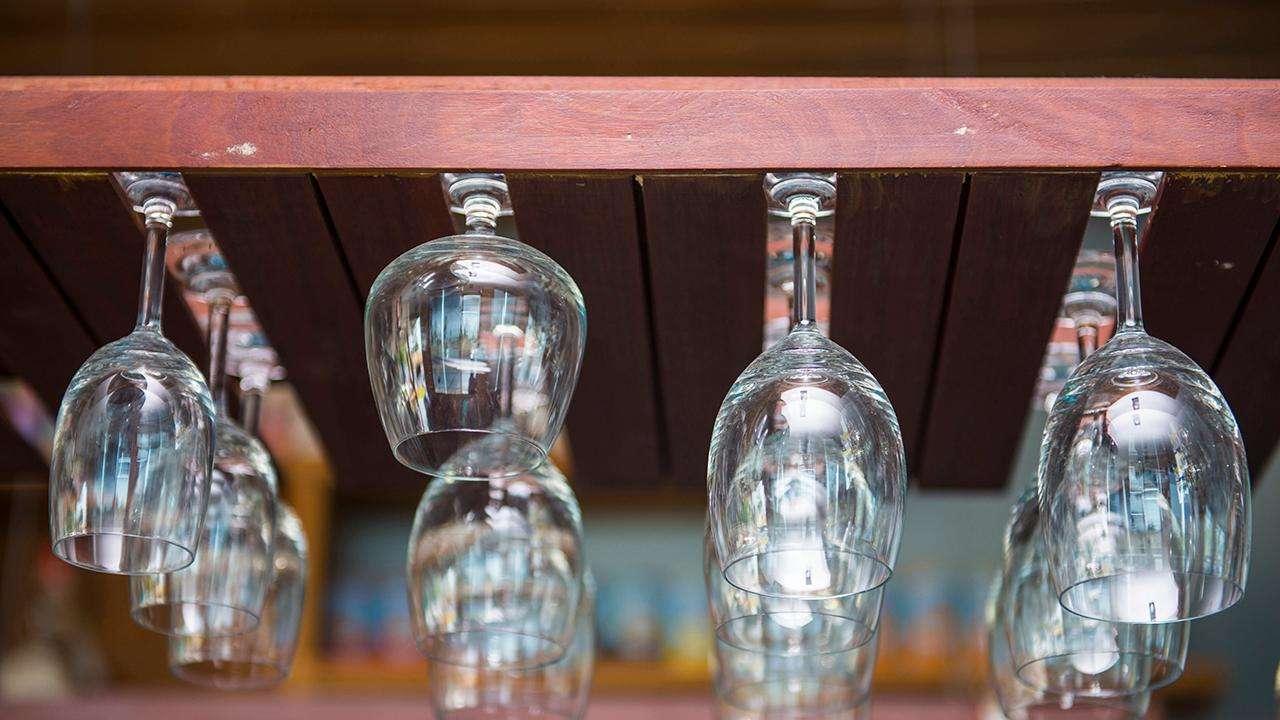
Adding an under-cabinet stemware rack to your kitchen is an excellent way to enhance both the functionality and aesthetic appeal of your space. Whether you're a wine enthusiast or simply someone who appreciates the elegance of fine glassware, this DIY project can help you maximize your cabinet storage while keeping your favorite glasses within easy reach. In this article, we will guide you through a step-by-step process for installing an under-cabinet stemware rack, covering all the necessary tools, materials, and techniques.
Why Choose an Under-Cabinet Stemware Rack?
Before diving into the installation process, let's explore why an under-cabinet stemware rack is such a great addition to any kitchen:
-
Space Efficiency: Under-cabinet spaces are often underutilized, but they offer a perfect spot for storing delicate items like wine glasses. By installing a rack here, you can keep your glassware organized and out of the way while still being easily accessible.
-
Aesthetic Appeal: A well-designed under-cabinet stemware rack can add a touch of elegance to your kitchen. It not only provides storage but also serves as a decorative element that complements your existing cabinetry.
-
Convenience: Having your wine glasses stored in an easy-to-reach location makes entertaining a breeze. Whether you're hosting dinner parties or simply enjoying a quiet evening at home, having your favorite glasses at hand can elevate the experience.
Step 1: Gather Your Tools & Materials
Before starting any DIY project, it's crucial to have all the necessary tools and materials at your disposal. Here’s what you’ll need for this installation:
- Under-Cabinet Stemware Rack: Choose a rack that fits your cabinet dimensions and can hold the number of glasses you need. You can opt for a pre-made rack or create your own using materials like T-molding or plywood.
- Measuring Tape: Essential for measuring the cabinet space and ensuring the rack fits perfectly.
- Level: To ensure the rack is straight and level.
- Pencil: For marking drill points and stud locations.
- Stud Finder: To locate the studs in your cabinet for added stability.
- Drill: For creating pilot holes in the cabinet.
- Screws: Choose screws that are long enough to secure the rack but won’t protrude too far into the cabinet.
- Drill Bits: Pilot bits or small drill bits to avoid splitting the wood.
- T-Molding or Plywood (Optional): If you're making your own rack, these materials will be necessary.
Step 2: Measure & Locate the Studs
Measuring twice is always better than measuring once when it comes to DIY projects. Here’s how you can measure and locate the studs:
-
Measure the Cabinet Space: Use your measuring tape to determine the exact dimensions of your cabinet space. Ensure that the rack you choose fits within these dimensions with enough clearance for the glasses.
-
Locate the Studs: Use a stud finder to identify where the studs are located within your cabinet. Mark these points with a pencil as they will provide additional support for your rack.
-
Double-Check Measurements: Verify that both the rack and the bottles will fit comfortably within the cabinet without interfering with other appliances or drawers.
Step 3: Align & Install the Wine Rack
Now that you have your measurements and stud locations marked, it's time to align and install your under-cabinet stemware rack:
-
Positioning the Rack: Place the rack in its desired position within the cabinet, ensuring it’s centered and level using your level tool.
-
Mark Drill Points: Use your pencil to mark where you'll need to drill pilot holes through the mounting holes of the rack.
-
Drill Pilot Holes: Carefully use your drill with pilot bits to create holes at these marked points. This step helps avoid splitting the wood and makes it easier to drive screws directly into studs.
-
Secure with Screws: Align the rack with freshly drilled pilot holes and secure it by driving screws through these holes directly into studs for increased stability.
Step 4: Mounting Considerations
When mounting your under-cabinet stemware rack, there are several considerations to keep in mind:
-
Screw Length: Ensure that screws are long enough to secure the rack but won’t protrude too far into the cabinet, potentially causing damage or creating an uneven surface.
-
Leveling: As you tighten each screw, use your level tool to ensure that the rack maintains a straight position aligned correctly with your cabinet.
-
Clearance: Make sure there is adequate clearance between each glass on the rack so they don’t touch or rub against each other excessively.
Step 5: Additional Tips & Considerations
Here are some additional tips and considerations that can enhance your DIY experience:
-
Choosing Materials: If opting for a DIY approach using T-molding or plywood, consider materials that are durable yet easy to work with.
-
Spacing & Alignment: For T-molding racks, position them so that wine glasses slide between strips approximately 2” apart for optimal spacing.
-
Stability & Support: Ensure that your rack is securely fastened to studs for added stability; this prevents it from shifting over time due to weight or movement.
-
Aesthetics & Design: Choose a design that complements your existing cabinetry; consider factors like color, material, and style when selecting an under-cabinet stemware rack.
-
Maintenance & Cleaning: Regularly clean your under-cabinet stemware rack to prevent dust buildup; this also helps maintain its appearance over time.
Case Study: Pre-Made vs DIY Racks
Let's compare two approaches: using a pre-made under-cabinet stemware rack versus creating one yourself using materials like T-molding or plywood:
Pre-Made Racks
-
Ease of Installation: Pre-made racks come with clear instructions and usually require minimal tools; they often include all necessary hardware like screws and mounting brackets.
-
Convenience: These racks are designed specifically for under-cabinet installation, ensuring they fit perfectly without needing custom measurements.
-
Quality & Durability: Reputable brands offer high-quality materials that are durable enough to support multiple glasses without compromising on aesthetics.
-
Cost: Generally more affordable than custom-made solutions but may vary depending on brand quality and features offered.
DIY Racks
-
Customization: Creating your own rack allows for complete customization based on your specific needs; you can choose materials that match your kitchen decor perfectly.
-
Cost-Effective: Using readily available materials like T-molding or plywood can be cost-effective compared to purchasing a pre-made rack.
-
Learning Experience: This approach provides an opportunity to develop DIY skills which can be applied to future projects.
-
Potential Challenges: Requires more effort in terms of planning, measuring, cutting, drilling, etc., which might be daunting for beginners.
Conclusion
Installing an under-cabinet stemware rack is a rewarding DIY project that enhances both functionality and aesthetics in your kitchen. By following these steps—gathering tools & materials, measuring & locating studs, aligning & installing the rack—you can create a beautiful storage solution that keeps your favorite glasses organized and easily accessible. Whether opting for a pre-made rack or going the DIY route with T-molding or plywood, this guide provides comprehensive insights into what it takes to successfully complete this project.
Frequently Asked Questions
What type of under-cabinet wine rack works best in a small kitchen?
For small kitchens, it's essential to choose a rack that maximizes space without compromising on functionality. Look for compact designs that fit snugly under cabinets while holding an adequate number of glasses. Pre-made racks specifically designed for small kitchens often come with adjustable shelves or slim profiles to accommodate limited space.
How do I prevent my wine glasses from falling off the rack?
To prevent wine glasses from falling off the rack, ensure proper alignment during installation. Use spacers if necessary to maintain even spacing between glasses. Additionally, consider adding DIY stoppers at the front ends of the rack to prevent accidental knocking when closing cabinet doors.
Can I use LED strips under my cabinet for lighting?
Yes, you can use LED strips under your cabinet for lighting. This is an excellent DIY project that adds ambient lighting while enhancing visibility within your kitchen. Use LED strips with diffusing housing to reduce reflections and ensure they blend seamlessly with your cabinet design.
By following these guidelines and tips, you'll be able to create an elegant under-cabinet stemware rack that not only adds functionality but also enhances the overall aesthetic appeal of your kitchen. Whether you're a seasoned DIY enthusiast or just starting out, this project offers a great opportunity to develop new skills while enjoying the satisfaction of a job well done.
Was this page helpful?
At Storables.com, we guarantee accurate and reliable information. Our content, validated by Expert Board Contributors, is crafted following stringent Editorial Policies. We're committed to providing you with well-researched, expert-backed insights for all your informational needs.


0 thoughts on “DIY Guide To Installing A Kitchen Under-Cabinet Stemware Rack”