Articles
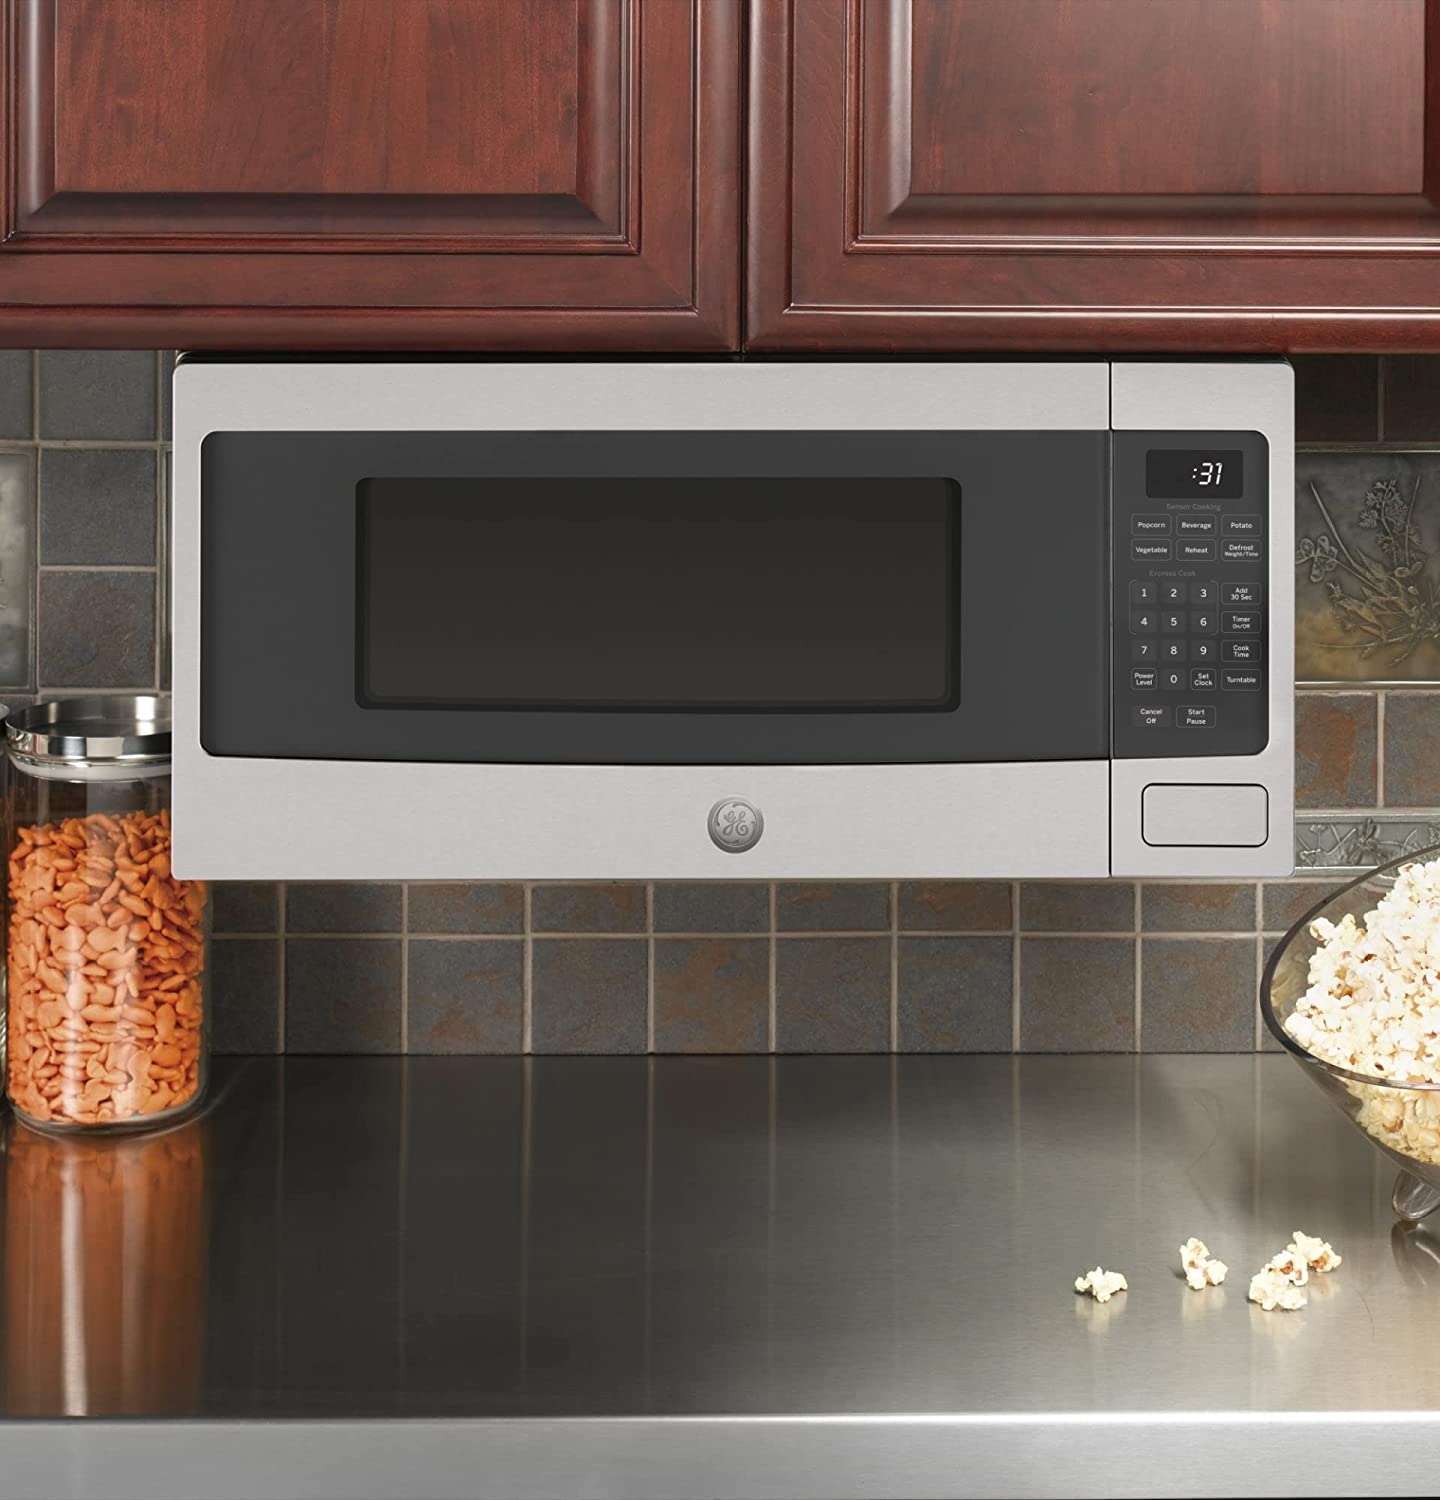
How To Install Under Cabinet Microwave
Modified: October 20, 2024
Looking to install an under cabinet microwave in your kitchen furniture? Learn how to seamlessly integrate this space-saving solution and elevate your kitchen's functionality.
(Many of the links in this article redirect to a specific reviewed product. Your purchase of these products through affiliate links helps to generate commission for Storables.com, at no extra cost. Learn more)
Introduction
Installing an under cabinet microwave is a convenient and space-saving option for any kitchen. Whether you’re renovating your kitchen or simply looking to upgrade your appliances, this step-by-step guide will walk you through the process of installing an under cabinet microwave.
An under cabinet microwave not only saves valuable countertop space but also provides easy access and enhances the overall aesthetic of your kitchen. It offers the convenience of a microwave without taking up valuable real estate on your kitchen counter.
Before you begin the installation process, it’s essential to gather all the necessary tools and materials. You’ll need a measuring tape, screwdriver, drill, stud finder, mounting bracket, electrical wiring, and, of course, the under cabinet microwave itself.
Remember, safety should always be your top priority. Ensure you follow all necessary safety precautions, including turning off the power before working with electrical wiring. If you’re not confident in your DIY skills, it’s always best to consult a professional for assistance.
With that said, let’s dive into the step-by-step process of installing an under cabinet microwave and create a functional and stylish kitchen space.
Key Takeaways:
- Save valuable countertop space and enhance your kitchen’s aesthetic by installing an under cabinet microwave. Follow the step-by-step guide for a convenient and space-saving kitchen upgrade.
- Prioritize safety, precise measurements, and secure installation to enjoy the convenience of a properly installed under cabinet microwave. Create a functional and stylish kitchen space with this comprehensive guide.
Read more: How To Hang Microwave Under Cabinet
Step 1: Measure the Space
Before you begin installing your under cabinet microwave, it’s crucial to measure the available space accurately. This step will ensure that the microwave fits perfectly and is securely installed.
Start by measuring the width, height, and depth of the space where you plan to install the microwave. Make sure to take accurate measurements, accounting for any cabinets, trim, or obstructions that may affect the dimensions.
When measuring the width, measure the distance between the two adjacent cabinets or the walls. This measurement will determine the maximum width of the microwave that can be installed.
Next, measure the height from the bottom of the cabinet to the countertop. This measurement will help determine the appropriate height for the mounting bracket.
Lastly, measure the depth from the back wall to the front edge of the cabinet. This measurement will ensure that the microwave doesn’t protrude too far out from the cabinets.
Once you have these measurements, compare them to the dimensions of the under cabinet microwave you plan to install. Ensure that there is enough clearance for the microwave to fit comfortably without any obstructions.
It’s important to note that different microwave models may have varying dimensions. Double-check the manufacturer’s specifications to ensure a proper fit.
If you find that the available space doesn’t align with the dimensions of your desired microwave, you may need to consider adjusting the cabinets or exploring other installation options.
By taking accurate measurements, you’ll be able to choose the right under cabinet microwave and ensure a seamless and secure installation process.
Step 2: Prepare the Cabinet
Once you have measured the space and chosen the appropriate under cabinet microwave, the next step is to prepare the cabinet for installation. This involves ensuring that the cabinet is sturdy enough to support the weight of the microwave and making any necessary modifications.
Start by removing any items or clutter from the cabinet where the microwave will be installed. This will provide you with a clear workspace and make the installation process smoother.
Next, inspect the cabinet for any signs of damage or weakness. It’s crucial to have a stable and secure cabinet structure to support the weight of the microwave. Check for any loose screws, sagging shelves, or compromised surfaces.
If you notice any issues, address them before proceeding with the installation. Tighten loose screws, reinforce sagging shelves, and repair any structural damage. It’s important to ensure that the cabinet is in good condition to provide a safe and reliable mounting surface.
In some cases, you may need to make modifications to the cabinet to accommodate the installation. This could involve removing a shelf, adjusting the height of the cabinet, or creating an opening for the power cord.
Follow the manufacturer’s instructions for any necessary modifications, and use the appropriate tools to make clean and precise cuts or adjustments.
Once the cabinet is sturdy and any necessary modifications have been made, thoroughly clean the interior to remove any dust or debris. A clean and well-prepared cabinet will ensure a seamless installation and optimal performance of the under cabinet microwave.
Preparing the cabinet is a crucial step in the installation process. By ensuring that the cabinet is in good condition and making any necessary modifications, you’ll create a solid foundation for securely mounting the under cabinet microwave.
Step 3: Install the Mounting Plate
With the cabinet prepared, it’s time to install the mounting plate for the under cabinet microwave. The mounting plate serves as the support structure for the microwave, ensuring that it is securely attached to the cabinet.
Start by locating the designated mounting holes on the back of the microwave. These holes will align with the mounting plate and facilitate a secure installation.
Hold the mounting plate against the bottom of the cabinet and align it with the desired position for the microwave. Use a pencil or marker to mark the screw hole locations on the cabinet.
Next, using a drill and the appropriate size bit, create pilot holes at the marked locations. Pilot holes will help guide the screws and prevent the wood from splitting during installation.
Securely attach the mounting plate to the cabinet using screws. Ensure that the plate is level and tightly secured, as it will bear the weight of the microwave.
After the mounting plate is in place, carefully lift the under cabinet microwave and position it on the mounting plate. Ensure that the mounting holes on the microwave align with the holes on the mounting plate.
With the help of an assistant or by using a support platform, hold the microwave in place while you insert and tighten the mounting screws through the holes on the microwave and into the mounting plate.
Double-check that the microwave is level and securely attached to the mounting plate. Make any necessary adjustments before proceeding to the next step.
Installing the mounting plate is a critical step in ensuring a safe and stable installation of the under cabinet microwave. By securely attaching the mounting plate, you’ll create a strong foundation for the microwave to be mounted onto.
Step 4: Mount the Microwave
With the mounting plate securely installed, it’s time to mount the under cabinet microwave. This step involves carefully lifting the microwave and attaching it to the mounting plate for a stable and secure fit.
Before proceeding, ensure that the power supply to the kitchen is turned off for safety purposes. You should also have assistance from another person to help you lift and position the microwave.
Starting with the microwave in a slightly tilted position, align the bottom of the microwave with the bottom lip of the mounting plate. Gradually lift the microwave, ensuring that the mounting holes on the microwave align with the screws protruding from the mounting plate.
With the help of your assistant, carefully guide the microwave into position, making sure that it securely rests on the mounting plate.
Once the microwave is in place, verify that it is level using a spirit level. Make any necessary adjustments by slightly tilting the microwave or loosening/tightening the mounting screws until it is properly aligned.
Take your time to ensure that the microwave is flush against the cabinet and sits securely on the mounting plate. A correctly mounted microwave will provide stability and prevent any shifting or movement during use.
Once you’re satisfied with the positioning, tighten the mounting screws using a screwdriver to securely attach the microwave to the mounting plate.
Step back and visually inspect the mounted microwave to ensure that it is level and properly aligned with the cabinet. This final check will give you peace of mind and ensure a seamless integration of the under cabinet microwave into your kitchen space.
By following these steps and taking the necessary precautions, you can successfully mount your under cabinet microwave and enjoy the convenience it brings to your kitchen.
When installing an under cabinet microwave, make sure to measure the space accurately and ensure proper ventilation. Use a mounting template for accurate placement and secure the microwave to the cabinet with the appropriate hardware.
Read more: How To Install Under Cabinet Range Hood
Step 5: Secure the Microwave
Now that the under cabinet microwave is mounted in place, it’s time to ensure that it is securely fastened to prevent any accidental movement or loosening. Take the following steps to secure the microwave and provide additional stability.
Start by inspecting the mounting screws to verify that they are tightened securely. Use a screwdriver to tighten them if necessary, but be careful not to overtighten and risk damaging the mounting plate or microwave.
Next, check the sides and bottom of the microwave for any additional screw holes or attachment points. Some microwaves may have brackets or tabs that need to be secured to the cabinet using screws or clips.
If your microwave has any additional attachment points, locate them and securely fasten them to the cabinet according to the manufacturer’s instructions. This will provide added support and prevent any movement or wobbliness.
Once all the necessary screws and attachment points are secured, give the microwave a gentle shake and ensure that it remains stable. If there is any movement, double-check that all screws and attachments are tightened properly.
To further enhance the stability of the microwave, consider using adhesive strips or brackets specifically designed for securing appliances. These additional measures can provide extra peace of mind and minimize any potential movement.
Lastly, test the stability of the microwave by opening and closing the door. Make sure that the microwave door operates smoothly and doesn’t cause any shifting or shaking. If you notice any issues, reevaluate the installation and make any necessary adjustments to ensure proper alignment.
Securing the under cabinet microwave is crucial not only for safety reasons but also for optimal performance and longevity. A securely fastened microwave will provide years of reliable service without any unwanted movement or instability.
By following these steps and taking the necessary precautions, you can ensure a secure and stable installation of your under cabinet microwave.
Step 6: Connect the Electrical Wiring
Connecting the electrical wiring of your under cabinet microwave is a critical step to ensure its functionality and safe operation. Follow these steps to properly connect the electrical wiring:
1. Start by turning off the power to the kitchen at the main circuit breaker. This precautionary measure will prevent any risk of electrical shock during the installation process. Use a voltage tester to verify that the power is indeed off.
2. Locate the electrical junction box in the cabinet above or near the microwave installation area. This is where the microwave’s power cord will connect to the electrical supply.
3. Carefully remove the cover of the electrical junction box by unscrewing the screws holding it in place. Set aside the cover for later usage.
4. Insert the power cord of the under cabinet microwave through the hole in the back of the cabinet. Ensure that there is enough slack to comfortably make the necessary connections.
5. Strip approximately 1/2 inch of the outer plastic covering from the power cord, exposing the individual wires inside.
6. Inside the electrical junction box, you will typically find three wires: black (hot), white (neutral), and green or bare (ground).
7. Connect the black wire from the power cord to the black hot wire in the junction box. Twist the exposed ends of the wires together and secure them with a wire connector cap. Ensure a tight connection.
8. Connect the white wire from the power cord to the white neutral wire in the junction box. Again, twist the exposed ends of the wires together and secure them with a wire connector cap.
9. If present, connect the green or bare wire from the power cord to the grounding wire in the junction box. Twist the exposed ends and secure them together with a wire connector cap.
10. Once all the connections are made, carefully tuck the connected wires into the junction box, ensuring they do not interfere with any moving parts or get pinched by the microwave or cabinet.
11. Replace the cover on the electrical junction box and securely fasten it with the screws to protect the wiring.
12. Turn the power back on at the main circuit breaker and test the under cabinet microwave to ensure it powers on and functions as intended.
By following these steps and handling the electrical connections with caution, you can safely and correctly connect the electrical wiring of your under cabinet microwave.
Step 7: Test the Microwave
After completing the installation and electrical wiring, it’s essential to thoroughly test the under cabinet microwave to ensure it is working properly. Follow these steps to conduct a comprehensive test:
1. Double-check that the power to the kitchen is turned on at the main circuit breaker.
2. Open the microwave door and verify that the interior is clean and free from any packaging materials or debris.
3. Place a microwave-safe container filled with water in the microwave. The amount of water will depend on the manufacturer’s recommendations for testing purposes.
4. Close the microwave door securely to initiate the testing process.
5. Set the microwave’s timer according to the desired cooking time. Start with a short cooking time, such as 1 minute, to observe the microwave’s performance.
6. Press the start button to begin the microwave operation. Pay close attention to the microwave’s behavior during the testing process.
7. Observe whether the microwave heats the water evenly and whether the turntable (if applicable) rotates smoothly without any obstructions.
8. Listen for any unusual or loud noises coming from the microwave during operation. While some noise is normal, excessively loud or grinding sounds may indicate a potential issue.
9. Monitor the control panel for any error codes or error messages that might appear during the test cycle. Refer to the manufacturer’s manual for troubleshooting guidance if necessary.
10. After the designated cooking time has passed, carefully remove the container from the microwave using oven mitts or heat-resistant gloves, as it may be hot.
11. Check the temperature of the water to ensure that it has been heated according to the microwave’s specifications. If the water is not adequately heated, there may be an issue with the microwave’s functionality that needs to be addressed.
12. Repeat the testing process with different cooking times and power settings to further assess the microwave’s performance and functionality.
By conducting a thorough test of the under cabinet microwave, you can ensure that it operates as expected and meets your culinary needs. If any issues arise during the testing process, consult the manufacturer’s manual or contact their customer support for assistance and troubleshooting.
Conclusion
Congratulations! You have successfully completed the installation of your under cabinet microwave. By following the step-by-step guide detailed in this article, you have created a functional and space-saving addition to your kitchen.
Installing an under cabinet microwave offers numerous benefits, including saving valuable countertop space and providing easy access to reheating and cooking capabilities. With the microwave securely mounted and properly connected, you can enjoy the convenience it brings to your daily kitchen activities.
Throughout the installation process, safety should always be prioritized. Remember to turn off the power before working with electrical wiring, and if necessary, seek professional assistance if you’re unsure about any steps or encounter any challenges.
By precisely measuring the space, preparing the cabinet, installing the mounting plate, mounting the microwave, securing it tightly, connecting the electrical wiring, and testing its functionality, you have successfully completed a successful installation.
Remember to consult the manufacturer’s manual for specific instructions and guidelines related to your under cabinet microwave model. Every microwave may have slight variations in installation requirements, so it’s essential to refer to the provided documentation.
With your newly installed under cabinet microwave, you can enjoy the convenience and functionality it brings to your kitchen. Whether you’re heating up leftovers, cooking meals, or defrosting food, your under cabinet microwave is sure to make your kitchen tasks easier and more efficient.
As you continue to use your under cabinet microwave, be mindful of its maintenance. Clean it regularly, follow the manufacturer’s instructions, and promptly address any issues that may arise.
Thank you for following this installation guide. We hope it has been helpful in guiding you through the process of installing your under cabinet microwave. Enjoy your newly enhanced kitchen space!
Now that you've mastered installing under cabinet microwaves, why not tackle another microwave setup? Our guide on placing microwaves above your range can simplify cooking tasks and free up counter space. Or perhaps you're feeling more ambitious and want to broaden your handy skills around the house. Check out our comprehensive steps on DIY home improvements for practical upgrades that can transform any space. Both articles provide invaluable tips and tricks that are easy to follow.
Frequently Asked Questions about How To Install Under Cabinet Microwave
Was this page helpful?
At Storables.com, we guarantee accurate and reliable information. Our content, validated by Expert Board Contributors, is crafted following stringent Editorial Policies. We're committed to providing you with well-researched, expert-backed insights for all your informational needs.


0 thoughts on “How To Install Under Cabinet Microwave”