Home>Ideas and Tips>Indoor Pilea Peperomioides Propagation and Chinese Money Plant Tips

Ideas and Tips
Indoor Pilea Peperomioides Propagation and Chinese Money Plant Tips
Published: September 4, 2024
Learn how to propagate Pilea Peperomioides, also known as the Chinese Money Plant, with these easy indoor tips for division, leaf cuttings, and stem cuttings.
(Many of the links in this article redirect to a specific reviewed product. Your purchase of these products through affiliate links helps to generate commission for Storables.com, at no extra cost. Learn more)
The Pilea Peperomioides, commonly known as the Chinese Money Plant or Friendship Plant, has become a beloved addition to many indoor gardens. Its unique, coin-shaped leaves and ability to thrive in low-light conditions make it an ideal choice for both beginners and experienced plant enthusiasts. One of the most appealing aspects of this plant is its ease of propagation, which allows you to multiply your Pilea and share it with friends and family. In this article, we will delve into the detailed process of propagating Pilea Peperomioides indoors, providing you with all the necessary tips and techniques to successfully multiply your Chinese Money Plant.
Understanding Pilea Peperomioides
Before diving into the propagation process, it's essential to understand the characteristics and needs of your Pilea Peperomioides. This herbaceous perennial belongs to the nettle family (Urticaceae) and is native to southern China. Known for its round, shiny leaves that sit atop long petioles extending from the main stem, the plant typically grows up to 50 cm tall. It prefers well-drained, humus-rich potting soil with a pH value between 5.5 and 6.5.
Propagation Methods
Pilea Peperomioides is renowned for its ability to produce offsets or baby plants at the base of the main plant. These offsets are connected to the mother plant by underground rhizomes and can be easily separated and rooted to create new plants. There are three primary methods for propagating Pilea Peperomioides: division, leaf cuttings, and stem cuttings.
Method 1: Division
Division is the simplest and most straightforward method of propagating Pilea Peperomioides. This method involves separating the offsets from the mother plant and rooting them in water or soil.
-
Locate Offsets: Look for small offsets or baby plants at the base of your Pilea Peperomioides. These offsets should have their own set of leaves and be connected to the mother plant by an underground rhizome.
-
Separate Offsets: Use your fingers to gently dig around the offset, uncovering the connective rhizome. Then, use a knife or needle-nosed pruner to sever the rhizome as close to the mother plant as possible. Leaving as much of the rhizome attached to the stem plantlet will give it more surface area to form new roots.
-
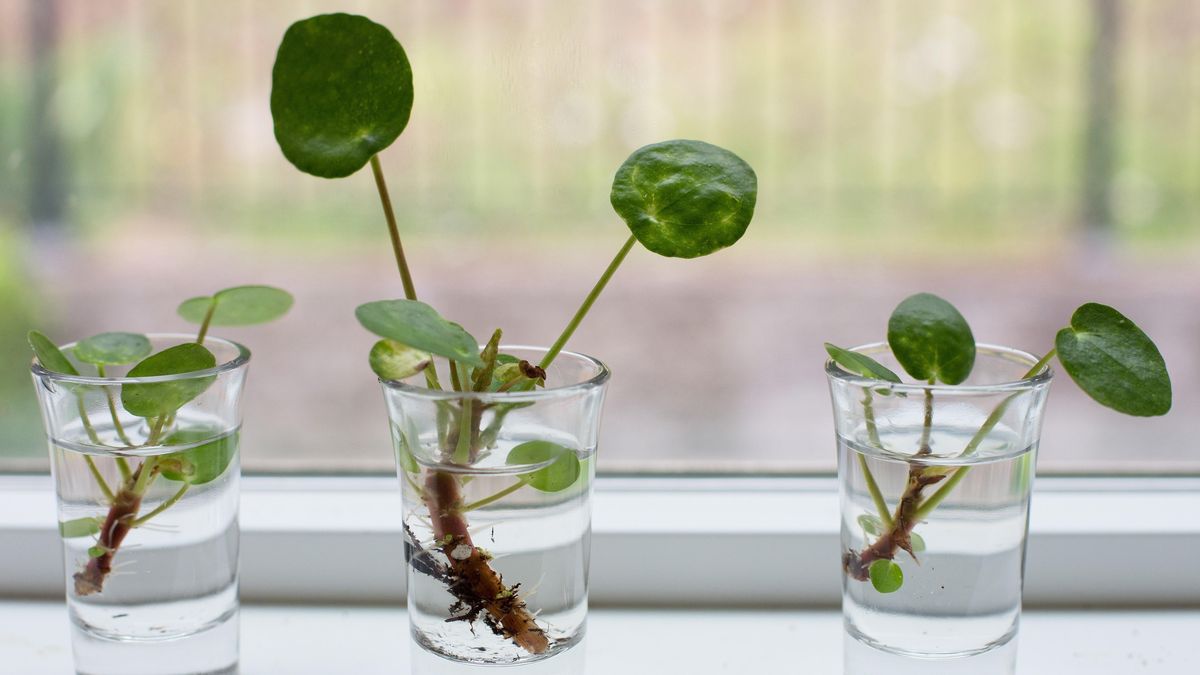
Potting: Pot the separated offset into a small pot filled with sterile potting soil. Alternatively, you can stick the division into a small vase of water, allowing the roots to develop further before potting it into soil. The water level in the vase should reach only to the top of the rhizome, ensuring that the leaves do not get submerged.
-
Care: Keep the newly potted offsets watered and place them in an east- or west-facing window. They will grow quickly and thrive with proper care.
Method 2: Leaf Cuttings
Propagating Pilea Peperomioides using leaf cuttings is another popular method that involves cutting a leaf from the mother plant and allowing it to root in water.
-
Select a Leaf: Choose a healthy leaf from your Pilea Peperomioides. The leaf should be long and have a visible petiole (stem) attached to it.
-
Cut the Leaf: Carefully cut the leaf from the plant, making sure to leave a small portion of the petiole intact. This will help the leaf develop roots more efficiently.
-
Rooting in Water: Place the cut end of the leaf into a glass of water. Keep the water fresh by changing it every few days. Roots should begin to sprout within a week or two.
-
Potting: Once roots have formed, gently handle the leaf cutting to avoid breaking the roots. Pot the new plant into a small pot filled with fresh potting soil, keeping the soil moist but not waterlogged.
-
Care: Place the newly potted plant in an area with bright, indirect light. Water sparingly until the plant is established, then follow regular watering guidelines for Pilea Peperomioides.
Method 3: Stem Cuttings
Propagating Pilea Peperomioides using stem cuttings involves cutting a section of the stem from the mother plant and allowing it to root in water or soil.
-
Locate a Stem Section: Identify a section of the stem from your Pilea Peperomioides that has at least one node (the joint where a leaf meets the stem). This section should include a few leaves and some stem tissue.
-
Cut the Stem: Using a sharp knife or pruning tool, cut the stem section from the mother plant. Make sure each cut is clean and just above a node to increase the chances of successful rooting.
-
Rooting in Water: Place the cut end of the stem into a glass of water. Roots should begin to sprout within a week or two. Change the water every few days to keep it fresh.
-
Potting: Once roots have formed, carefully handle the stem cutting to avoid breaking the roots. Pot the new plant into a small pot filled with fresh potting soil, keeping the soil moist but not waterlogged.
-
Care: Place the newly potted plant in an area with bright, indirect light. Water sparingly until the plant is established, then follow regular watering guidelines for Pilea Peperomioides.
Tips for Successful Propagation
While propagating Pilea Peperomioides is generally easy, there are several tips that can enhance your success rate:
-
Timing: The best time for propagation is in the early spring when the plant is actively growing. However, you can also propagate at other times if you have proper lighting conditions.
-
Lighting: Ensure that your propagated plants receive bright, indirect light. Direct sunlight can cause the leaves to become pale or develop brown spots.
-
Watering: Water your propagated plants sparingly until they are established. Overwatering can lead to root rot and other issues, while underwatering may cause stress to the plant.
-
Fertilization: Once your propagated plants have taken root, fertilize them with a weak or diluted house plant food. This will help them grow into healthier and stronger mature plants.
-
Humidity: Maintain a humid environment for your propagated plants by placing them in a bathroom or using a humidifier. This will help them thrive and reduce stress.
-
Temperature: Keep your propagated plants in an area with temperatures between 15°C and 20°C (59°F to 68°F). Avoid placing them near heating vents or drafty windows.
Common Issues and Solutions
While propagating Pilea Peperomioides is generally straightforward, there are some common issues you might encounter:
-
Yellow or Brown Leaves: Yellow or brown leaves at the base of the plant are normal as they die and drop off naturally. However, if yellow leaves appear all over the plant, it could be due to over- or under-watering. Check your watering regime and adjust accordingly.
-
Flopping Leaves: Flopping or lacklustre leaves can be due to under-watering or over-watering. Check the soil to see which applies to your plant and adjust your watering schedule accordingly.
-
Bending Leaves: Bending or curling leaves can be a sign of insufficient light. Rotate the plant regularly to maintain its mounded appearance and ensure it receives even light distribution.
-
Pale Leaves: Pale leaves can be a sign of too much bright sunlight. Move the plant to a spot with filtered light or use a sheer curtain to diffuse the sunlight.
-
Brown Spots: Brown spots on the leaves are often due to sunburn. Move the plant away from direct sunlight and ensure it receives bright, indirect light.
-
Scale Insects: Scale insects can appear as small brown lumps on the leaves. Gently wipe them away with cotton wool soaked in an insecticide based on fatty acids or plant oils. Act promptly as soon as you see them, as the problem can become widespread and affect the plant's health.
-
Powdery Mildew: Powdery mildew can appear as white patches on the leaves. Remove the affected leaves and improve air circulation around the plant by moving it to a well-ventilated area.
Conclusion
Propagating Pilea Peperomioides is a rewarding experience that allows you to multiply your Chinese Money Plant and share it with friends and family. By following the methods outlined above—division, leaf cuttings, and stem cuttings—and adhering to the tips for successful propagation, you can ensure that your new plants thrive. Remember to monitor for common issues and take prompt action if you notice any problems. With proper care and attention, your Pilea Peperomioides will continue to flourish, providing you with a beautiful and unique addition to your indoor garden.
By following these steps and tips, you will be well on your way to becoming a proficient propagator of Pilea Peperomioides. Whether you choose to propagate using division, leaf cuttings, or stem cuttings, the end result will be the same—a new, healthy Pilea Peperomioides ready to bring joy and beauty to your indoor space. Happy propagating!
Was this page helpful?
At Storables.com, we guarantee accurate and reliable information. Our content, validated by Expert Board Contributors, is crafted following stringent Editorial Policies. We're committed to providing you with well-researched, expert-backed insights for all your informational needs.


0 thoughts on “Indoor Pilea Peperomioides Propagation and Chinese Money Plant Tips”