Home>Ideas and Tips>Upgrading Your Home’s Basement With DIY Piezoelectric Floor Tiles

Ideas and Tips
Upgrading Your Home’s Basement With DIY Piezoelectric Floor Tiles
Published: August 31, 2024
Upgrade your basement with DIY piezoelectric floor tiles to harness energy from foot traffic, enhance aesthetics, and promote sustainability.
(Many of the links in this article redirect to a specific reviewed product. Your purchase of these products through affiliate links helps to generate commission for Storables.com, at no extra cost. Learn more)
Upgrading your home's basement with DIY piezoelectric floor tiles is a fantastic way to blend modern technology with sustainable living. But what exactly are piezoelectric floor tiles, and why should you consider them for your basement? Let's dive right in.
What Are Piezoelectric Floor Tiles?
Piezoelectric floor tiles are a type of flooring material that incorporates piezoelectric materials. These materials have the unique ability to convert mechanical stress, like pressure from footsteps, into electrical energy. This phenomenon is known as the piezoelectric effect, first discovered by the Curie brothers in 1880.
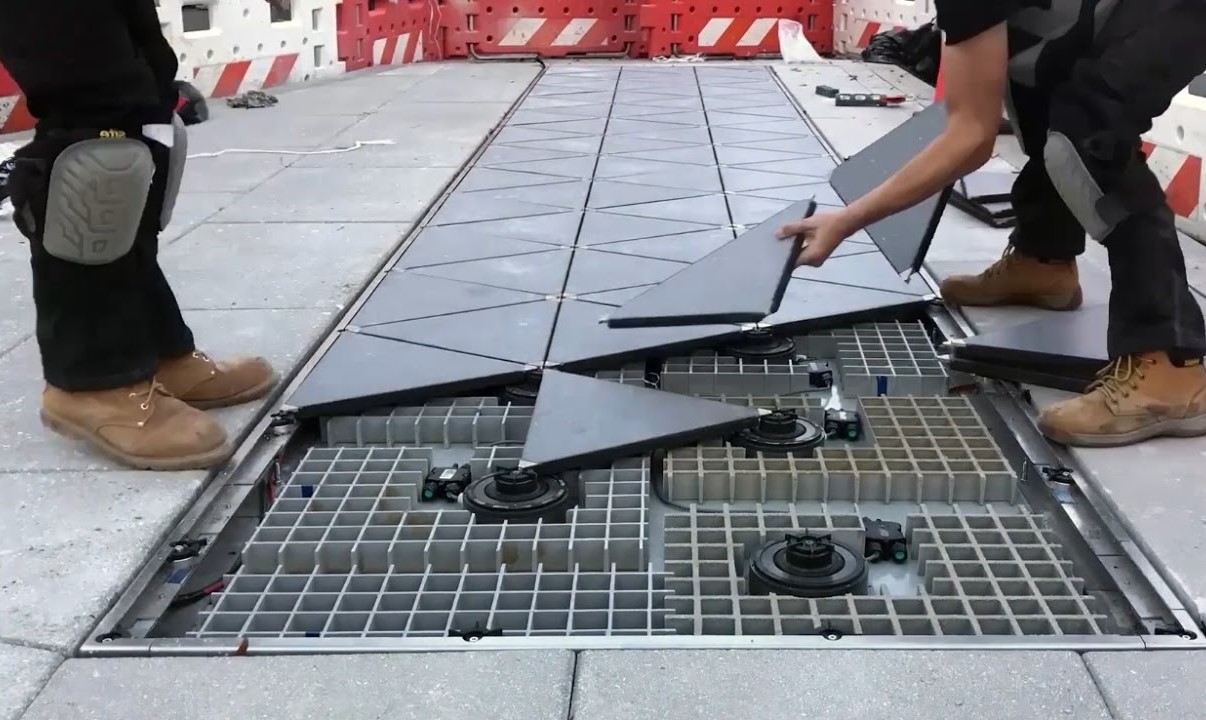
Piezoelectric tiles are designed to be embedded within the flooring, either by using tiles or by coating the surface with piezoelectric materials. When a footstep or other mechanical force is applied to the tile, it generates a voltage potential across its surface. This voltage can then be harnessed and used to power small devices or even contribute to the overall energy needs of your home.
Benefits of Piezoelectric Floor Tiles
-
Energy Harvesting:
- One of the most significant benefits of piezoelectric tiles is their ability to harvest energy from foot traffic. This means that every step you take in your basement can contribute to generating electricity, albeit in small amounts. While the efficiency may be low, it is a sustainable and innovative way to reduce your reliance on traditional energy sources.
-
Self-Powered Sensors:
- Piezoelectric tiles can also function as self-powered sensors. They can track movement patterns and foot traffic in public spaces or homes, providing valuable data for various applications such as urban planning or home automation.
-
Aesthetic Appeal:
- These tiles can be designed to blend seamlessly with your existing flooring, offering a modern and sleek look that enhances the overall aesthetic of your basement.
-
Durability:
- Piezoelectric tiles are typically made from durable materials like ceramic or granite, ensuring they can withstand heavy foot traffic and last for years without significant wear and tear.
-
Environmental Sustainability:
- By harnessing energy from foot traffic, piezoelectric tiles contribute to reducing our reliance on non-renewable energy sources, making them an environmentally friendly option for homeowners.
Materials Needed for DIY Installation
To embark on a DIY project to install piezoelectric floor tiles in your basement, you will need the following materials:
-
Piezoelectric Tiles or Sheets:
- You can purchase pre-made piezoelectric tiles or sheets that are specifically designed for flooring applications. These materials are usually available in various sizes and configurations.
-
Adhesive:
- A strong adhesive is necessary to secure the piezoelectric tiles to the existing flooring. Epoxy or polyurethane-based adhesives work well for this purpose.
-
Substrate (Optional):
- If you are using sheets instead of tiles, you may need a substrate material like plywood or cemented rubberized mats to provide a stable base for the piezoelectric material.
-
Rectifier and Power Conditioning Unit:
- To convert the generated voltage into usable electrical current, you will need a rectifier and possibly a power conditioning unit. These components can be purchased separately or integrated into the tile itself.
-
Wireless Transmitter (Optional):
- If you want to transmit data or energy wirelessly, you will need a wireless transmitter that can be integrated into the tile.
-
Housing and Sealing Materials:
- A housing that encases the piezoelectric layer and other components is crucial for protecting them from moisture and dust. Flexible seals can be used to ensure the housing remains watertight.
-
Conductive Traces or Cables:
- Conductive traces or cables may be required to communicate digital signals and/or high-currents between adjacent tiles.
-
Tools:
- Basic tools such as a trowel for applying adhesive, a level to ensure proper alignment, and a hammer for tapping the tiles into place are essential.
Step-by-Step Guide to Installing Piezoelectric Floor Tiles
-
Prepare Your Basement Floor:
- Before starting your project, ensure your basement floor is clean and dry. Remove any old flooring materials and level the surface if necessary.
-
Measure and Cut the Substrate (If Necessary):
- If you are using sheets instead of tiles, measure out the area where you want to install them and cut the substrate accordingly.
-
Apply Adhesive:
- Use a trowel to apply a layer of adhesive to the prepared floor surface. Make sure it covers the entire area where you plan to install the piezoelectric material.
-
Install the Piezoelectric Material:
- Place the piezoelectric tiles or sheets onto the adhesive layer, ensuring they are evenly spaced and aligned properly. Use a level to ensure they are straight.
-
Secure the Tiles:
- Use a hammer to tap each tile gently into place, ensuring they are securely fastened to the substrate or existing flooring.
-
Integrate Rectifier and Power Conditioning Unit:
- Connect the rectifier and power conditioning unit according to the manufacturer's instructions. This step may require some electrical knowledge but is crucial for converting generated voltage into usable electrical current.
-
Add Wireless Transmitter (If Applicable):
- If you have opted for wireless transmission, integrate the wireless transmitter into your setup following the manufacturer's guidelines.
-
Seal the Housing:
- Apply flexible seals around any openings in the housing to prevent moisture and dust from entering and affecting the performance of your piezoelectric tiles.
-
Connect Conductive Traces or Cables:
- If necessary, connect conductive traces or cables between adjacent tiles to facilitate communication between them.
-
Test Your Setup:
- Once everything is installed and connected, test your setup by applying pressure (e.g., stepping on it) and measuring the generated voltage using a voltmeter or galvanometer.
Case Studies and Real-World Applications
Piezoelectric floor tiles have been successfully implemented in various settings around the world. One notable example is a power-generating floor installed in a Japanese train station back in 2008. This installation harnessed energy from over 400,000 daily pedestrians, powering some of the LED lighting in the station.
Another case study involves a metro station where piezoelectric flooring tiles were used to generate electricity from foot traffic. This project demonstrated the feasibility of using piezoelectric tiles in high-occupancy public buildings.
Challenges and Future Prospects
While piezoelectric floor tiles offer numerous benefits, there are several challenges associated with their implementation:
-
Efficiency:
- The efficiency of piezoelectric tiles in converting mechanical stress into electrical energy is relatively low compared to other energy harvesting methods.
-
Scalability:
- Large-scale installations may require significant investment in materials and infrastructure, which can be cost-prohibitive for many homeowners.
-
Integration:
- Integrating piezoelectric tiles seamlessly into existing flooring systems can be complex and may require specialized knowledge.
Despite these challenges, research continues to improve the design and efficiency of piezoelectric tiles. Recent studies have focused on optimizing mechanical designs, electrical circuits, and materials used in these tiles.
Conclusion
Upgrading your home's basement with DIY piezoelectric floor tiles is an exciting project that combines modern technology with sustainable energy harvesting. While there are challenges associated with their implementation, the benefits of aesthetic appeal, environmental sustainability, and potential energy generation make them an attractive option for homeowners looking to innovate their living spaces.
By following the step-by-step guide outlined above and leveraging available resources and case studies, you can successfully install piezoelectric floor tiles in your basement and contribute to a more sustainable future.
References: Piezoelectric Floor Tiles and Harvesting Energy from Pedestrians. Blog post by Piezo.com. Harnessing Energy with Piezoelectric Flooring: Materials and Setup Guide. Physics Forums. Energy Generation in Public Buildings Using Piezoelectric Flooring Tiles; A Case Study of a Metro Station. ScienceDirect. US20130154441A1 – Flooring System and Floor Tile. Google Patents. A Review of Piezoelectric Energy Harvesting Tiles. ScienceDirect.
This comprehensive guide provides you with all the information needed to embark on a DIY project involving piezoelectric floor tiles. Whether you're looking to enhance your home's aesthetic appeal or contribute to sustainable energy practices, these tiles offer a unique opportunity for innovation and environmental stewardship.
Was this page helpful?
At Storables.com, we guarantee accurate and reliable information. Our content, validated by Expert Board Contributors, is crafted following stringent Editorial Policies. We're committed to providing you with well-researched, expert-backed insights for all your informational needs.














0 thoughts on “Upgrading Your Home’s Basement With DIY Piezoelectric Floor Tiles”