Home>Articles>How To Fix Peeling Ceiling Paint In The Bathroom
Articles
How To Fix Peeling Ceiling Paint In The Bathroom
Modified: October 19, 2024
Looking for articles on how to fix peeling ceiling paint in your bathroom? Find practical solutions and expert tips to restore your bathroom's appearance.
(Many of the links in this article redirect to a specific reviewed product. Your purchase of these products through affiliate links helps to generate commission for Storables.com, at no extra cost. Learn more)
Introduction
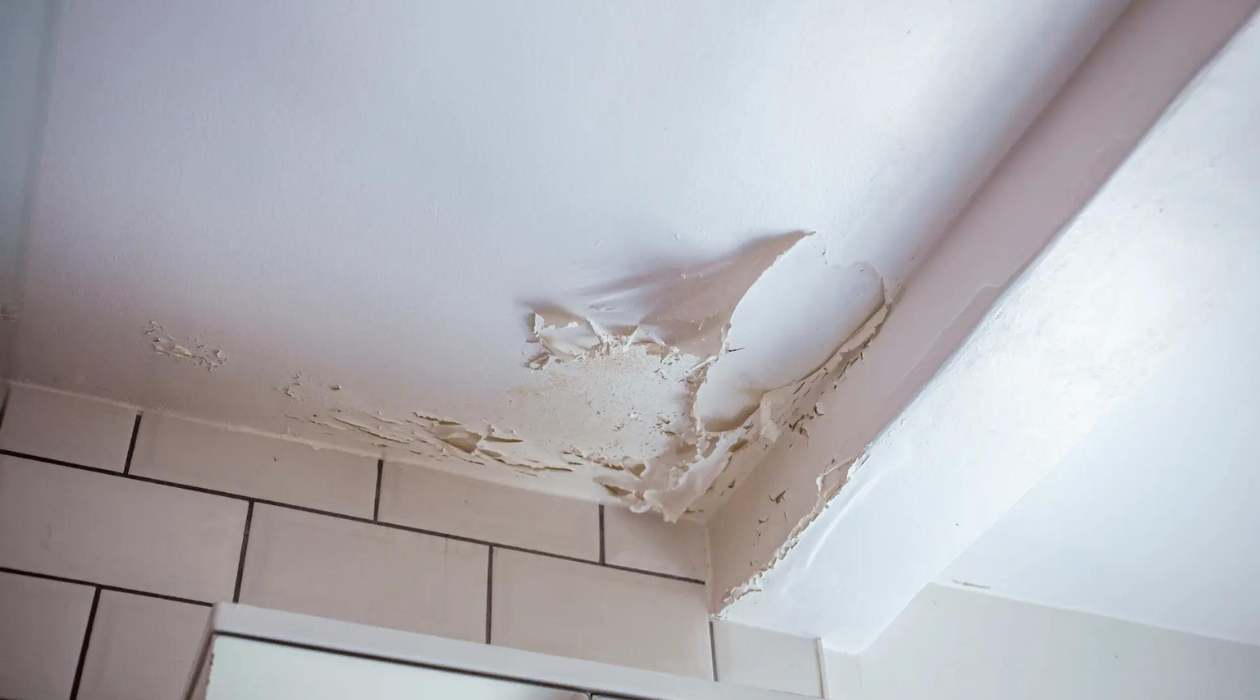
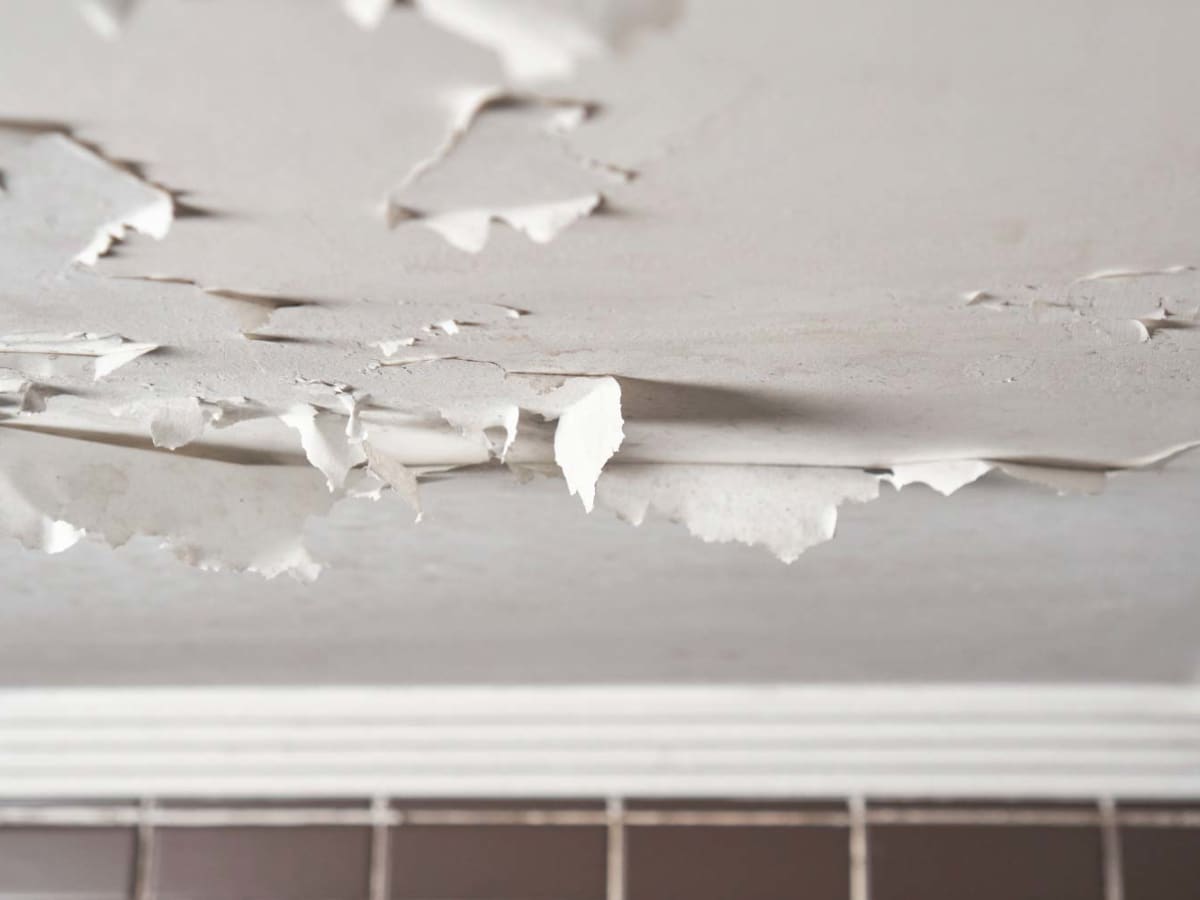
Having a well-maintained and visually pleasing bathroom is a top priority for many homeowners. However, one common problem that can ruin the aesthetic appeal of a bathroom is peeling ceiling paint. Not only does it make the bathroom look neglected, but it can also be a sign of underlying issues such as moisture or inadequate surface preparation.
The peeling of ceiling paint in the bathroom can be frustrating, but the good news is that it can be fixed with a bit of time and effort. In this article, we will guide you through the step-by-step process of fixing peeling ceiling paint in your bathroom, ensuring a smooth and long-lasting finish.
Before we dive into the solution, it’s important to understand the common causes of peeling ceiling paint in the bathroom. By addressing these underlying issues, you can prevent future paint problems.
Key Takeaways:
- Addressing the underlying causes of peeling ceiling paint, such as moisture, poor ventilation, and inadequate surface preparation, is crucial to effectively resolving the issue and preventing future paint problems in the bathroom.
- Proper preparation, including clearing the area, protecting fixtures, and wearing protective gear, is essential before tackling the steps of removing peeling paint, sanding the surface, and applying primer and paint to achieve a durable and visually appealing result.
Read more: How To Fix Cracked Ceiling Paint
Causes of peeling ceiling paint in the bathroom
Understanding the causes of peeling ceiling paint in the bathroom is key to determining the appropriate solution. Here are some common factors that contribute to this frustrating issue:
- Moisture and humidity: Bathrooms are prone to high levels of moisture and humidity due to the regular use of showers, baths, and sinks. Excessive moisture can seep into the paint, causing it to lose adhesion and eventually peel off.
- Poor ventilation: Inadequate ventilation in the bathroom can exacerbate the moisture problem. Without proper air circulation, the trapped moisture has no way to escape, leading to the deterioration of the paint.
- Water leaks: Plumbing leaks, whether from pipes, faucets, or the shower, can cause water to seep into the ceiling and compromise the integrity of the paint. This can result in peeling, blistering, or bubbling.
- Inadequate surface preparation: Proper surface preparation is crucial before applying paint. If the bathroom ceiling was not cleaned, primed, or smoothed properly, the paint may not adhere adequately, leading to peeling over time.
- Low-quality paint: Using low-quality or incompatible paint products can also contribute to peeling. It’s important to select a paint that is specifically designed for high-moisture areas like bathrooms and is resistant to mold and mildew.
- Aged or damaged paint: Over time, paint can deteriorate due to factors like exposure to sunlight, aging, or accidental damage. This weakened condition makes it more prone to peeling and flaking.
By identifying the root cause of the peeling, you can take appropriate measures to rectify the issue and prevent future paint problems. Now that we know the common causes, let’s move on to the tools and materials needed for fixing peeling ceiling paint in the bathroom.
Tools and materials needed
Before you begin the process of fixing the peeling ceiling paint in your bathroom, it’s important to gather the necessary tools and materials. Here’s what you’ll need:
- Paint scraper: A sturdy paint scraper will help you effectively remove the peeling paint from the ceiling.
- Sandpaper: Choose a fine-grade sandpaper to smooth out the ceiling surface after removing the peeling paint. This will create a clean and even base for the new paint.
- Bucket: A bucket will come in handy for cleaning the ceiling and collecting the scraped-off paint.
- Mild detergent: Use a mild detergent or a specifically formulated cleaner to wash the ceiling and remove any dirt or residue.
- Primer: Select a high-quality primer that is suitable for your bathroom ceiling. The primer will help promote adhesion and prevent future peeling.
- Paint: Choose a paint that is specifically designed for high-moisture areas and is mold and mildew resistant. Consider using a paint with a sheen that is easy to clean and maintain.
- Paint roller and brushes: Use a paint roller with a long handle for efficient and even paint application on the ceiling. Additionally, have brushes on hand for cutting in and reaching corners.
- Dust mask and goggles: Protect yourself by wearing a dust mask and goggles during the scraping and sanding process to avoid inhaling dust or debris.
- Drop cloths or plastic sheets: Cover the bathroom fixtures, floor, and any other areas you want to protect from paint splatters or drips.
- Ladder or step stool: Depending on the height of your bathroom ceiling, you may need a ladder or step stool to reach and work comfortably.
Gathering these tools and materials beforehand will ensure a smoother and more efficient process while fixing the peeling ceiling paint. Now that you’re equipped with everything you need, let’s move on to the step-by-step guide for repairing the peeling paint in your bathroom ceiling.
Step-by-step guide to fix peeling ceiling paint in the bathroom
Now that you have all the necessary tools and materials at hand, let’s dive into the step-by-step process of fixing peeling ceiling paint in your bathroom:
- Prepare the bathroom: Start by removing any bathroom fixtures or furniture that might hinder your work. Cover the floor with drop cloths or plastic sheets to protect it from paint drips or spills.
- Remove the peeling paint: Use a paint scraper to gently and carefully remove the peeling paint from the ceiling. Be diligent in this process, ensuring that all loose or flaking paint has been completely removed. Take care not to damage the underlying surface.
- Sand the ceiling surface: After removing the peeling paint, use fine-grade sandpaper to smooth out the ceiling surface. This will create a clean and even base for the new paint to adhere to. Make sure to sand any rough edges or areas where the paint has been removed.
- Clean the ceiling: Using a bucket of water mixed with a mild detergent or a specifically formulated cleaner, wash the ceiling to remove any dirt, dust, or residue. Allow the ceiling to dry completely before proceeding.
- Apply primer: Apply a coat of primer to the clean and dry ceiling using a paint roller or brush. The primer will help promote adhesion and prevent future peeling. Make sure to cover the entire ceiling surface evenly and let the primer dry completely as per the manufacturer’s instructions.
- Repaint the ceiling: Once the primer is dry, it’s time to apply the paint. Use a paint roller with a long handle for efficient and even coverage. Start from one corner and work your way across the ceiling, making sure to cover the entire area with a smooth and even coat of paint. Depending on the desired finish, you may need to apply multiple coats, allowing each coat to dry before applying the next one.
- Properly ventilate the bathroom: After you’ve finished painting, make sure to properly ventilate the bathroom to prevent excessive moisture buildup. Use exhaust fans or open windows to allow fresh air to circulate, which will help the paint dry and prevent future peeling.
Following these steps will help you successfully resolve the issue of peeling ceiling paint in your bathroom. Remember to take your time, be thorough with each step, and allow adequate drying time before moving on to the next. With a little effort and attention to detail, you can achieve a beautifully painted and peeling-free bathroom ceiling.
Now that you know how to fix peeling ceiling paint in the bathroom, you can enjoy a fresh and aesthetically pleasing bathroom once again. Don’t let peeling paint dampen your bathroom’s appearance and functionality. Take charge of the problem and give your bathroom the attention it deserves.
Prepare the bathroom
Before you start the process of fixing the peeling ceiling paint in your bathroom, it is important to prepare the space properly. This will help ensure a safe and efficient repair process. Here are the steps to prepare your bathroom:
- Clear the area: Remove any bathroom fixtures, such as shower curtains, towel racks, or any other items that might hinder your work. Clearing the space will give you better access to the ceiling and prevent accidental damage to your belongings.
- Protect the floor: Cover the bathroom floor with drop cloths or plastic sheets to protect it from paint drips, spills, or debris. This will make the cleanup process much easier and prevent any damage to your flooring.
- Shield bathroom fixtures: If there are any fixtures, such as the toilet, sink, or bathtub, that cannot be removed, cover them with plastic sheets or bags. This will ensure that they stay protected from any accidental paint splatters or drops.
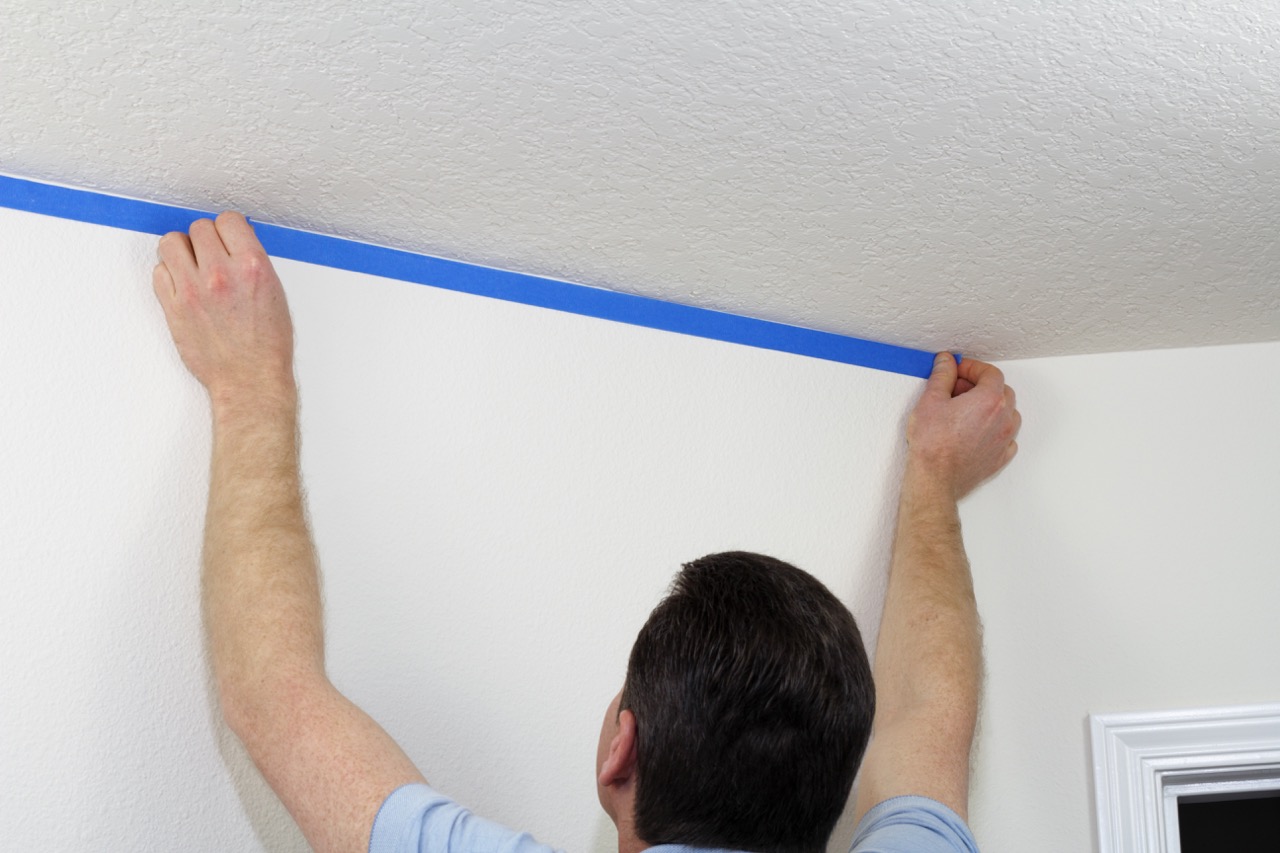
- Secure electrical outlets and switches: Use painter’s tape to cover electrical outlets and switches to prevent any paint from getting inside. This will ensure the safety of the electrical components and prevent any damage or accidents.
- Wear protective gear: Prior to starting the repair process, make sure to wear appropriate protective gear. This includes safety goggles to shield your eyes from debris, a dust mask to protect your respiratory system from dust or fumes, and disposable gloves to keep your hands clean and protected.
By following these steps to prepare your bathroom, you are setting yourself up for a smooth and hassle-free repair process. Taking the time to prepare the space properly will not only protect your belongings but also make the entire process more manageable and efficient.
Now that you have prepared your bathroom, it’s time to move on to the next step – removing the peeling paint from the ceiling.
Read more: How To Fix Peeling Laminate Floor
Remove the peeling paint
Now that you have prepared the bathroom, it’s time to tackle the next step in fixing the peeling ceiling paint – removing the peeling paint itself. Here’s a step-by-step guide to help you remove the peeling paint efficiently:
- Gather your tools: Before you begin, gather a sturdy paint scraper, a bucket, and a drop cloth or plastic bags to collect the scraped-off paint and prevent it from making a mess.
- Protect yourself: Remember to wear your protective gear, including safety goggles, a dust mask, and disposable gloves. This will keep you safe from any potential dust or debris.
- Start at the peeling edges: Carefully insert the paint scraper at the edges of the peeling paint. Begin at a corner and work your way along the edges. Apply gentle pressure to lift and scrape away the loose or flaking paint. Be cautious not to apply too much pressure to avoid damaging the underlying ceiling surface.
- Work in sections: Divide the ceiling into manageable sections and focus on one section at a time. This will help prevent overwhelming yourself and ensure thorough removal of the peeling paint.
- Continue scraping: Move the paint scraper in a back-and-forth motion, scraping off the peeling paint. Use a light touch to avoid causing further damage to the ceiling surface.
- Collect the scraped-off paint: As you scrape, collect the scraped-off paint in the bucket or on the drop cloth. This will keep the work area clean and make the cleanup process easier.
- Inspect for any remaining loose paint: Once you have removed the majority of the peeling paint, inspect the ceiling surface for any remaining loose or flaking paint. If you spot any, gently scrape it off to ensure a smooth and even result.
- Clean up: Dispose of the scraped-off paint properly and clean up any debris or dust that may have accumulated during the process. Use a broom or vacuum cleaner to remove any loose paint particles from the floor and surrounding area.
Removing the peeling paint is a crucial step in the repair process as it provides a clean canvas for the next steps. By following these steps carefully, you can effectively remove the peeling paint and prepare the ceiling for the next stage of the repair process.
With the residual paint removed, it’s time to move on to the next step – sanding the ceiling surface to create a smooth and even base for the new paint.
Use a putty knife to scrape off any loose or peeling paint. Sand the area lightly to smooth it out. Apply a coat of primer and then repaint the ceiling with a moisture-resistant paint.
Sand the ceiling surface
After removing the peeling paint, the next step in fixing the peeling ceiling paint is to sand the surface. Sanding helps create a smooth and even base for the new paint to adhere to. Here’s a step-by-step guide to help you sand the ceiling surface:
- Gather your tools: Before you begin, gather a fine-grade sandpaper and a sanding block or sanding pole. A sanding pole is recommended for ceilings to reach higher areas more easily.
- Protect yourself: Remember to wear your protective gear, including safety goggles and a dust mask, to shield yourself from any dust or debris that may be generated during the sanding process.
- Sand the ceiling: Start by sanding the ceiling surface using the sandpaper attached to the sanding block or pole. Start from one corner and work your way methodically across the ceiling in a back-and-forth motion. Apply light and even pressure to ensure a smooth and consistent sanding result.
- Pay attention to rough areas: Focus on areas where the paint has peeled off completely or areas that feel rough to the touch. Sand these spots more thoroughly to achieve a level and smooth surface.
- Clean up: Once you have finished sanding, use a broom or vacuum cleaner to remove any dust or debris that may have accumulated. It’s essential to have a clean surface before moving on to the next step.
Sanding the ceiling surface plays a crucial role in ensuring that the new paint adheres properly and results in a professional finish. By following these steps, you can create a smooth and even base for the next stages of the repair process.
Now that the ceiling has been sanded, it’s time to move on to the next step – cleaning the ceiling to remove any dust or residue.
Clean the ceiling
Once the ceiling has been sanded to create a smooth and even surface, the next step in fixing the peeling ceiling paint is to clean the ceiling thoroughly. Cleaning the ceiling ensures that any dust, debris, or residue from the previous steps is removed, providing a clean canvas for the primer and new paint. Here’s a step-by-step guide to help you clean the ceiling effectively:
- Gather your materials: Before you begin, gather a bucket, warm water, a mild detergent, a sponge or soft cloth, and a clean towel.
- Prepare the cleaning solution: Fill the bucket with warm water and add a small amount of mild detergent. Mix the solution well to create a soapy mixture.
- Dip the sponge or cloth into the cleaning solution: Dip the sponge or cloth into the soapy water, ensuring it is not soaking wet. Squeeze out any excess water.
- Start cleaning the ceiling: Begin by gently wiping the ceiling surface with the damp sponge or cloth. Work in small sections, applying light pressure and using circular or back-and-forth motions. Pay extra attention to areas that may have accumulated dust or residue, such as corners or edges.
- Rinse the sponge or cloth: Rinse the sponge or cloth frequently in clean water to remove any dirt or residue. This will prevent cross-contamination and ensure a thorough cleaning.
- Dry the ceiling: After cleaning a section, use a clean towel to gently dry the area. This will help prevent any streaks or water marks from forming on the ceiling.
- Repeat the process: Continue cleaning the ceiling in small sections until the entire surface has been cleaned. Make sure to replace the soapy water in the bucket if it becomes dirty or cloudy.
- Allow the ceiling to dry: After the cleaning process, allow the ceiling to air dry completely. It’s important to ensure that the surface is dry before moving on to the next step.
By following these steps to clean the ceiling, you are setting the stage for proper adhesion of the primer and the new paint. Removing any dust, debris, or residue will ensure a smooth and flawless finish for your bathroom ceiling.
Now that the ceiling is clean, it’s time to move on to the next step – applying the primer to prepare the surface for painting.
Apply primer
After cleaning the ceiling, the next crucial step in fixing the peeling ceiling paint is to apply a primer. Primer not only helps the new paint adhere properly to the surface but also provides added protection against future peeling. Here’s a step-by-step guide to help you apply the primer effectively:
- Gather your materials: Before you begin, make sure you have your primer, a paint roller or brush, a paint tray, and a drop cloth or plastic sheets to protect the surrounding areas.
- Protect yourself and the area: Wear your protective gear, including safety goggles and disposable gloves, to keep yourself safe during the application process. Use drop cloths or plastic sheets to cover the floor and any fixtures or furniture that may be at risk of getting primer on them.
- Stir the primer: Open the can of primer and give it a good stir with a paint stirrer or a stirring stick. This will ensure that the primer is well-mixed and ready for application.
- Pour the primer: Pour a sufficient amount of primer into the paint tray to cover the area you’ll be working on. Avoid pouring too much primer to prevent wastage and spills.
- Apply the primer: Dip the paint roller or brush into the primer in the tray, making sure to coat it evenly. Start at one corner of the ceiling and work your way across in smooth, overlapping strokes. Work in small sections to ensure even coverage.
- Smooth out the primer: As you apply the primer, use the roller or brush to smooth out any uneven areas or drips. Aim for a consistent and uniform layer of primer on the entire ceiling surface.
- Allow the primer to dry: Check the drying time specified on the primer’s label and allow it to dry completely. Make sure the room is well-ventilated to facilitate drying.
- Inspect for missed spots: After the primer has dried, inspect the ceiling for any missed spots or areas that may require an additional coat of primer. Touch up those areas as needed.
By following these steps to apply the primer, you are ensuring a strong foundation for the final coat of paint. The primer will promote better adhesion of the paint, prevent future peeling, and provide an even base for a flawless finish.
With the primer applied, it’s time to move on to the next step – repainting the ceiling with a fresh coat of paint.
Read more: How To Paint A Ceiling Fan
Repaint the ceiling
After applying the primer and allowing it to dry completely, it’s time to repaint the ceiling. This step will give your bathroom a fresh and renewed look, while also providing added protection against future peeling. Follow this step-by-step guide to repaint the ceiling effectively:
- Gather your materials: Before you begin, make sure you have your chosen paint color, a paint roller or brush, a paint tray, and a drop cloth or plastic sheets to protect the surrounding areas.
- Protect yourself and the area: Wear your protective gear, including safety goggles and disposable gloves, to keep yourself safe during the painting process. Use drop cloths or plastic sheets to cover the floor and any fixtures or furniture that may be at risk of getting paint on them.
- Stir the paint: Open the can of paint and give it a good stir with a paint stirrer or a stirring stick. This will ensure that the paint is well-mixed and ready for application.
- Pour the paint: Pour a sufficient amount of paint into the paint tray to cover the area you’ll be working on. Avoid pouring too much paint to prevent wastage and spills.
- Start painting: Dip the paint roller or brush into the paint in the tray, making sure to coat it evenly. Begin at one corner of the ceiling and work your way across in smooth, overlapping strokes. Use consistent pressure to ensure an even application of paint.
- Work in small sections: Paint the ceiling in small sections to maintain a wet edge. This will help prevent visible brush marks or roller lines and ensure a seamless finish.
- Take care of corners and edges: Use a brush or a smaller roller to reach corners and edges, ensuring that they are painted evenly and thoroughly.
- Apply multiple coats if needed: Depending on the paint color and coverage, you may need to apply multiple coats of paint. Follow the drying time specified on the paint’s label between each coat.
- Allow the paint to dry: After applying the final coat of paint, allow it to dry completely. Ensure proper ventilation in the bathroom to facilitate the drying process.
- Inspect for touch-ups: Once the paint has dried, inspect the ceiling for any missed spots or areas that may require touch-ups. Use a brush or a small roller to address any imperfections.
By following these steps to repaint the ceiling, you are adding the final touch to the repair process. The fresh coat of paint will not only enhance the appearance of your bathroom but also provide a protective barrier against future peeling.
With the ceiling repainted and looking fresh, it’s important to properly ventilate the bathroom to maintain a healthy environment and prevent moisture buildup. Let’s explore the next step in the process.
Properly ventilate the bathroom
After completing the painting process, it’s crucial to properly ventilate your bathroom to prevent excessive moisture buildup. Adequate ventilation is essential for the longevity of the newly painted ceiling and to minimize the risk of future paint issues. Follow these guidelines to ensure proper ventilation in your bathroom:
- Use exhaust fans: If your bathroom is equipped with an exhaust fan, turn it on during and after showering or bathing. The fan helps to remove excess moisture from the air, reducing the chances of paint peeling and mold growth. Leave the fan running for at least 15-20 minutes after using the bathroom.
- Open windows: If weather conditions permit, open windows in your bathroom to allow fresh air to circulate. This helps in drying out the space and reducing moisture levels.
- Install a dehumidifier: Consider installing a dehumidifier in your bathroom, especially if you live in a particularly humid climate or have persistent moisture issues. A dehumidifier helps to extract excess moisture from the air, preventing condensation on the walls and ceiling.
- Repair any leaks: Check for and promptly repair any leaks in your bathroom. Leaking pipes, faucets, or showers can introduce excess moisture into the room, increasing the risk of paint peeling and damage.
- Wipe down surfaces: After showering or bathing, make a habit of wiping down bath fixtures and the walls with a towel to remove excess moisture. This simple step helps to reduce the amount of water lingering in the bathroom.
- Ensure proper airflow: Arrange bathroom furnishings and accessories in a way that promotes airflow. Avoid blocking ventilation vents or obstructing airflow with excessive storage items. Good airflow helps in dissipating moisture and preventing moisture buildup in the bathroom.
- Maintain good bathroom hygiene: Regularly clean your bathroom to minimize the growth of mold and mildew. Keep surfaces dry and promptly address any signs of excess moisture or water damage.
Properly ventilating your bathroom is important not only for the well-being of your newly painted ceiling but also for the overall health and comfort of the space. Following these ventilation practices will help to reduce humidity levels, prevent peeling, and maintain a clean and fresh environment in your bathroom.
With the peeling ceiling paint issue resolved and the bathroom properly ventilated, you can now enjoy a beautiful and well-maintained bathroom that will stand the test of time. Remember to periodically assess the condition of your bathroom ceiling and address any signs of peeling or deterioration promptly to prevent further damage.
By following this comprehensive step-by-step guide, you have successfully learned how to fix peeling ceiling paint in your bathroom. Congratulations on a job well done!
Conclusion
Fixing peeling ceiling paint in your bathroom can be a daunting task, but with the right approach and a little effort, you can achieve a beautifully painted and peeling-free ceiling. Throughout this comprehensive guide, we have covered the causes of peeling ceiling paint, the tools and materials needed, and provided a step-by-step process to help you resolve this common issue.
Understanding the underlying factors contributing to peeling paint, such as moisture, poor ventilation, water leaks, inadequate surface preparation, low-quality paint, and aged or damaged paint, is crucial. By addressing these issues and following the steps outlined in this guide, you can effectively repair your bathroom ceiling and prevent future peeling.
Preparing the bathroom, removing the peeling paint, sanding the ceiling surface, cleaning the ceiling, applying primer, repainting the ceiling, and properly ventilating the bathroom are the key steps involved in the process. Each step plays a significant role in achieving a durable and visually appealing result. Remember to gather the necessary tools and materials, protect yourself and the surrounding area, and take your time to complete each step carefully.
Once you have successfully repaired the peeling ceiling paint in your bathroom, it is important to maintain good bathroom hygiene and promptly address any signs of water leaks or damage. Regular cleaning, proper ventilation, and keeping the bathroom dry will help preserve the integrity of the paint and prevent future issues.
By following this comprehensive guide, you have acquired the knowledge and skills necessary to fix peeling ceiling paint in your bathroom. You have taken the necessary steps to enhance the aesthetic appeal and functionality of your bathroom while ensuring a long-lasting and durable result.
Now it’s time to step back, admire your work, and enjoy a beautifully painted and peeling-free bathroom ceiling. Sit back, relax, and take pride in the accomplishment of transforming your bathroom into a space that is not only visually pleasing but also well-maintained and protected from future paint problems.
Frequently Asked Questions about How To Fix Peeling Ceiling Paint In The Bathroom
Was this page helpful?
At Storables.com, we guarantee accurate and reliable information. Our content, validated by Expert Board Contributors, is crafted following stringent Editorial Policies. We're committed to providing you with well-researched, expert-backed insights for all your informational needs.


0 thoughts on “How To Fix Peeling Ceiling Paint In The Bathroom”