Home>Technology>Home Entertainment Systems>How To Tell If You Have Projector Headlights

Home Entertainment Systems
How To Tell If You Have Projector Headlights
Modified: August 27, 2024
Learn how to identify projector headlights for your home entertainment system. Find out the key features and benefits to enhance your viewing experience. Discover if you have projector headlights today!
(Many of the links in this article redirect to a specific reviewed product. Your purchase of these products through affiliate links helps to generate commission for Storables.com, at no extra cost. Learn more)
Introduction
Are you ready to shed some light on the fascinating world of projector headlights? Whether you're a car enthusiast, a safety-conscious driver, or simply someone who appreciates cutting-edge automotive technology, understanding projector headlights is a bright idea.
In this article, we'll embark on an illuminating journey to explore the ins and outs of projector headlights. From understanding their design and functionality to identifying them on different vehicles, we'll shed light on everything you need to know about these advanced lighting systems.
So, buckle up and get ready to enlighten yourself about the world of projector headlights. Whether you're considering upgrading your vehicle's lighting or you're simply curious about the technology behind modern automotive illumination, this guide is here to brighten your knowledge and help you navigate the road ahead with clarity and confidence.
Key Takeaways:
- Upgrade to projector headlights for improved visibility, reduced glare, and energy efficiency. Their advanced technology enhances safety and adds a sleek, modern look to your vehicle.
- Identify projector headlights by their distinct lens, sharp cutoff line, and advanced lighting capabilities. Embrace the innovation and safety they bring to nighttime driving.
Read more: How To Retrofit Projector Headlights
Understanding Projector Headlights
Projector headlights represent a significant advancement in automotive lighting technology. Unlike traditional reflector headlights, which have a simple, bowl-shaped reflective surface, projector headlights feature a more complex design that incorporates a precisely engineered lens and a focused light source. This innovative design allows projector headlights to produce a more controlled and uniform beam pattern, resulting in improved visibility and reduced glare for oncoming drivers.
At the heart of a projector headlight is the projector unit, which consists of a bulb, a reflector, and a lens. The bulb, often a high-intensity discharge (HID) or light-emitting diode (LED) type, serves as the light source. The reflector gathers and directs the light towards the lens, which then focuses and distributes the light in a specific pattern onto the road ahead.
One of the key advantages of projector headlights is their ability to produce a sharper and more defined cutoff line, which separates the illuminated and non-illuminated areas. This precise cutoff helps prevent the scattering of light and reduces glare, making projector headlights particularly effective for nighttime driving and inclement weather conditions.
Furthermore, projector headlights are renowned for their versatility and adaptability. The focused beam pattern can be optimized for different driving scenarios, such as city driving, highway cruising, or off-road adventures, by adjusting the shape and positioning of the internal components. This flexibility allows for enhanced visibility and safety across various driving conditions.
By understanding the intricate design and functionality of projector headlights, drivers can appreciate the technological sophistication behind these lighting systems and make informed decisions when considering them for their vehicles.
Identifying Projector Headlights
Recognizing projector headlights amidst the diverse array of automotive lighting configurations is essential for enthusiasts and drivers seeking to understand and appreciate this advanced lighting technology. While identifying projector headlights may seem daunting at first, there are several key visual cues and characteristics that distinguish them from traditional reflector headlights.
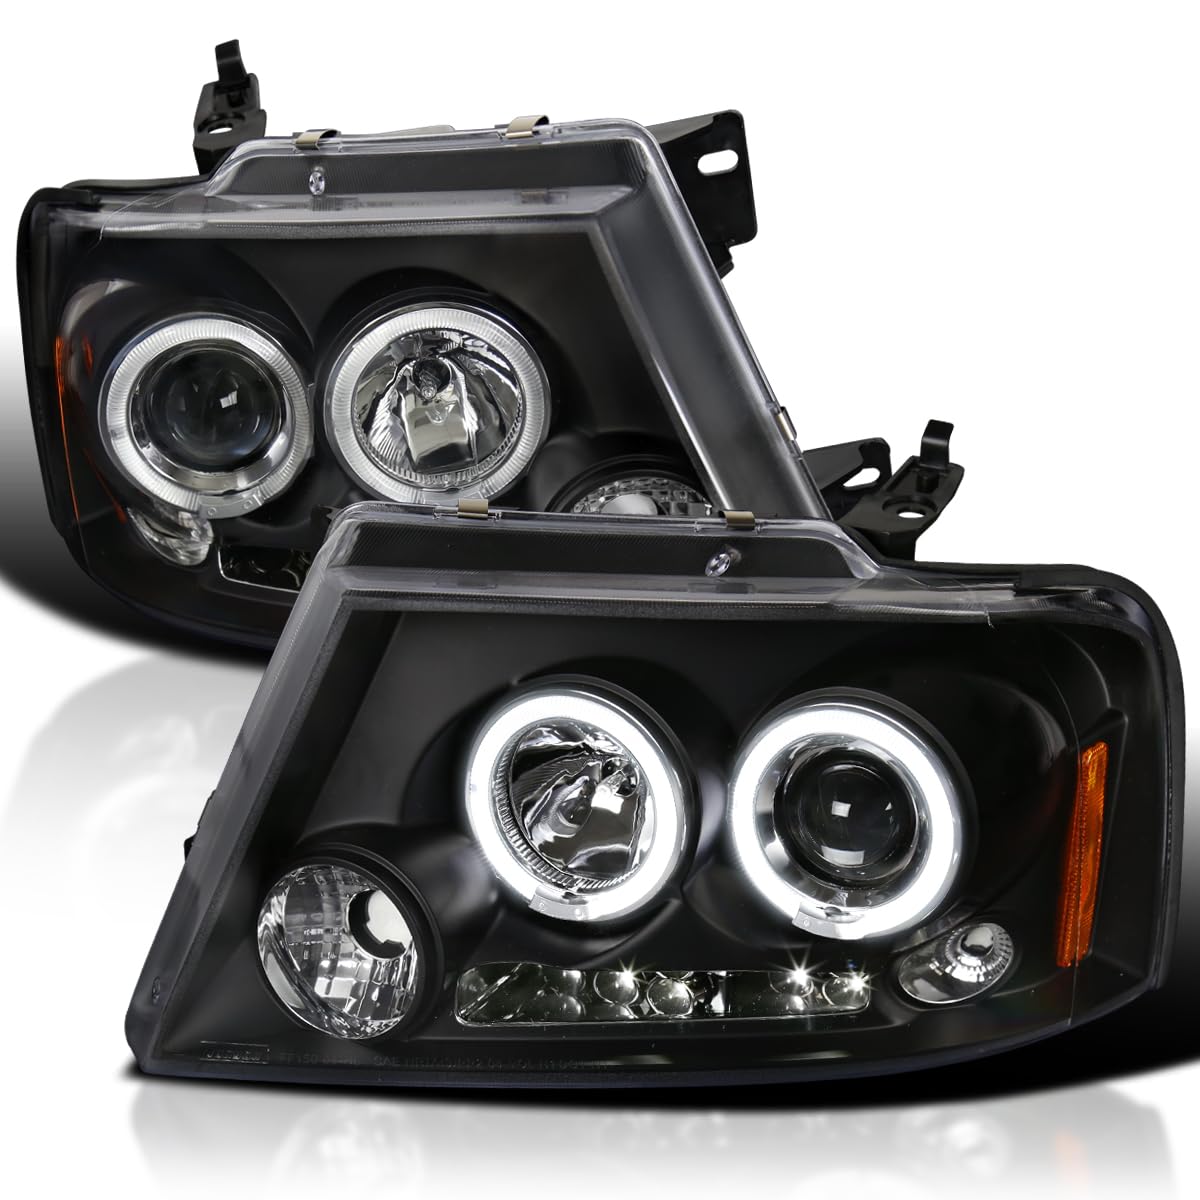
One of the most prominent features of projector headlights is the presence of a distinct lens that protrudes slightly from the headlight housing. This lens, often circular or rectangular in shape, serves as the focal point for the light emitted by the headlight assembly. Unlike the smooth, bowl-shaped appearance of reflector headlights, the lens of a projector headlight typically exhibits a more structured and intricate design, hinting at the sophisticated optics within.
Additionally, when observing the beam pattern produced by projector headlights, one can often discern a sharp and well-defined cutoff line between the illuminated and non-illuminated areas. This crisp cutoff is a hallmark of projector headlights and is a result of the precise light distribution achieved by the internal components, including the reflector and lens assembly.
Another indicator of projector headlights is the presence of a distinct light source, such as HID or LED bulbs, positioned at the center of the housing. Unlike traditional headlights, which may feature a reflective surface surrounding the light source, projector headlights often showcase a clear separation between the light source and the surrounding components, emphasizing the focused nature of the illumination.
Furthermore, some vehicles may feature projector headlights equipped with adaptive or dynamic lighting capabilities, allowing the beam pattern to adjust based on steering input, vehicle speed, or environmental conditions. These advanced projector headlights may exhibit additional components, such as motors or sensors, further distinguishing them from conventional headlight designs.
By familiarizing themselves with these visual cues and distinctive features, automotive enthusiasts and drivers can confidently identify projector headlights and gain a deeper understanding of the innovative lighting technology integrated into modern vehicles.
Check the front of your car for a clear lens that covers the headlight. Projector headlights have a distinct lens design that looks like a small, round magnifying glass. If you see this lens, you likely have projector headlights.
Differences Between Projector and Non-Projector Headlights
Understanding the disparities between projector and non-projector headlights is pivotal for discerning the distinct advantages and characteristics of each lighting system. While both serve the fundamental purpose of illuminating the road ahead, their design, functionality, and performance diverge significantly, influencing aspects such as beam pattern, light distribution, and overall visibility.
One of the primary disparities lies in the construction of the headlight assembly. Non-projector headlights, also known as reflector headlights, utilize a simple and traditional design consisting of a reflective surface encompassing the light source. This design allows the light to disperse more broadly, resulting in a less defined beam pattern and potentially increased glare for oncoming drivers.
In contrast, projector headlights feature a more intricate internal structure, incorporating a dedicated lens and a focused light source. This design enables projector headlights to produce a more controlled and precise beam pattern with a distinct cutoff line, minimizing glare and enhancing visibility for the driver without compromising the visual comfort of others on the road.
Another notable difference pertains to the light source utilized in each type of headlight. Non-projector headlights commonly employ halogen bulbs, which, while cost-effective, may not deliver the same level of brightness and efficiency as the high-intensity discharge (HID) or light-emitting diode (LED) bulbs often found in projector headlights. The advanced technology of HID and LED bulbs contributes to the superior illumination and energy efficiency of projector headlights.
Furthermore, the beam pattern and light distribution exhibited by projector headlights surpass those of non-projector headlights. Projector headlights produce a more focused and uniform beam, offering enhanced visibility and clarity, especially during nighttime driving and adverse weather conditions. This precision in light projection contributes to improved safety and reduced strain on the driver's eyes.
Additionally, projector headlights are renowned for their adaptability and versatility, with some models featuring dynamic lighting functionalities that adjust the beam pattern based on driving conditions and environmental factors. This level of sophistication is not typically found in non-projector headlights, highlighting the technological advancements inherent in projector headlight systems.
By recognizing these disparities, drivers can make informed decisions when selecting vehicles equipped with projector or non-projector headlights, understanding the impact of these lighting systems on safety, visibility, and overall driving experience.
Benefits of Projector Headlights
Projector headlights offer a multitude of benefits that cater to the safety, performance, and aesthetic preferences of drivers, making them a sought-after feature in modern vehicles. From enhanced visibility to advanced lighting capabilities, the advantages of projector headlights extend beyond traditional automotive illumination, elevating the driving experience and prioritizing safety on the road.
- Improved Visibility: One of the foremost benefits of projector headlights is their ability to provide superior visibility, especially during low-light conditions. The focused and uniform beam pattern produced by projector headlights ensures that the road ahead is well-illuminated, reducing the likelihood of obscured obstacles and enhancing overall driving confidence.
- Reduced Glare: Projector headlights are designed to minimize glare for oncoming drivers, thanks to their precise cutoff line and controlled light distribution. This not only enhances the safety of fellow motorists but also contributes to a more comfortable and less distracting driving environment for all road users.
- Energy Efficiency: Many projector headlights utilize high-intensity discharge (HID) or light-emitting diode (LED) bulbs, which are renowned for their energy efficiency and longevity. This results in reduced power consumption and a longer lifespan compared to traditional halogen bulbs, offering both environmental and cost-saving advantages.
- Adaptive Lighting Capabilities: Some projector headlights feature adaptive or dynamic lighting functionalities that adjust the beam pattern based on steering input, vehicle speed, and environmental conditions. This advanced feature enhances visibility around curves and corners, optimizing the illumination to suit varying driving scenarios.
- Customization Options: Projector headlights often provide opportunities for customization, allowing drivers to personalize the appearance of their vehicles while benefiting from improved lighting performance. From different lens designs to color temperature options, projector headlights offer versatility and aesthetic appeal.
Furthermore, projector headlights contribute to the overall aesthetics and modernity of a vehicle, adding a touch of sophistication and technological prowess to its exterior design. The sleek and contemporary appearance of projector headlights enhances the visual appeal of the vehicle, making it stand out on the road and reflecting the driver’s appreciation for advanced automotive technology.
By embracing the benefits of projector headlights, drivers can prioritize safety, efficiency, and style, elevating their driving experience and demonstrating a commitment to leveraging cutting-edge lighting technology for enhanced visibility and road presence.
Read more: What Bulbs Are Best For Projector Headlights
Conclusion
As we conclude our exploration of projector headlights, it’s evident that these advanced lighting systems represent a significant leap forward in automotive illumination technology. From their intricate design and precise light projection to their myriad benefits for drivers, projector headlights illuminate the road with clarity, safety, and style.
Understanding the fundamental differences between projector and non-projector headlights empowers drivers to make informed decisions when selecting vehicles equipped with these distinct lighting systems. The enhanced visibility, reduced glare, energy efficiency, and adaptive lighting capabilities of projector headlights underscore their role in promoting safety and elevating the driving experience.
Moreover, the visual appeal and modernity of projector headlights contribute to the overall aesthetics of a vehicle, reflecting the driver’s appreciation for innovative automotive technology and their commitment to embracing advanced lighting solutions.
Whether you’re a car enthusiast seeking to delve into the intricacies of automotive lighting or a safety-conscious driver looking to enhance your visibility on the road, projector headlights illuminate the path ahead with unparalleled clarity and sophistication.
So, as you embark on your automotive journeys, remember that projector headlights are more than just a shining feature – they’re a beacon of innovation and safety, guiding you through the night and illuminating the road with unwavering precision.
Let the brilliance of projector headlights light your way, ensuring that every drive is a clear, safe, and visually captivating experience.
Frequently Asked Questions about How To Tell If You Have Projector Headlights
Was this page helpful?
At Storables.com, we guarantee accurate and reliable information. Our content, validated by Expert Board Contributors, is crafted following stringent Editorial Policies. We're committed to providing you with well-researched, expert-backed insights for all your informational needs.


0 thoughts on “How To Tell If You Have Projector Headlights”