Home>Technology>Home Entertainment Systems>Where To Place A Projector
Home Entertainment Systems
Where To Place A Projector
Modified: November 1, 2024
Discover the best placement for your home entertainment system projector to optimize your viewing experience. Learn about ideal projector locations and installation tips. Explore how to create the perfect setup for your projector with our expert guidance.
(Many of the links in this article redirect to a specific reviewed product. Your purchase of these products through affiliate links helps to generate commission for Storables.com, at no extra cost. Learn more)
Introduction
When it comes to creating a captivating home entertainment experience, a projector can be a game-changer. Whether you’re setting up a dedicated home theater or looking to elevate your living room into a cinematic paradise, the placement of your projector plays a crucial role in achieving optimal visual performance. Finding the perfect spot for your projector involves considering various factors, including room layout, screen size, and viewing angles. In this guide, we’ll explore the key considerations for placing a projector in your home, covering ceiling mounting, wall mounting, tabletop placement, and floor stand placement options. By the end of this article, you’ll have a clear understanding of how to position your projector for an immersive and enjoyable viewing experience.
Key Takeaways:
- Choose the Right Spot
Consider room size, screen size, and viewing angles when placing your projector. Ceiling, wall, tabletop, or floor stand options offer unique benefits to enhance your viewing experience. - Prioritize Safety and Quality
Ensure proper installation and cable management for a seamless and enjoyable viewing experience. Whether it’s a dedicated home theater or a living room setup, the right projector placement is key.
Read more: Where To Place A Shed
Factors to Consider When Placing a Projector
Before diving into the specific placement options, it’s essential to consider several factors that can significantly impact the performance of your projector. These factors include:
- Room Size and Layout: The dimensions and layout of the room where the projector will be used play a crucial role in determining the ideal placement. Consider the distance between the projector and the screen, as well as the available space for seating.
- Screen Size and Aspect Ratio: The desired screen size and aspect ratio will influence the throw distance and mounting height of the projector. Different projector models have specific throw ratios, which determine the distance required to achieve a certain screen size.
- Viewing Angles and Sightlines: Assess the viewing angles from various seating positions to ensure that the projected image is visible from every part of the room. This consideration is particularly important for rooms with multiple seating areas.
- Ambient Light Conditions: The ambient light in the room can affect the projector’s image quality. Rooms with high natural light may require additional measures such as light-blocking curtains or ambient light-rejecting screens to optimize the viewing experience.
- Ceiling Height and Structural Limitations: For ceiling or wall mounting, it’s crucial to assess the ceiling height and any structural obstacles that may impact the installation process.
By carefully evaluating these factors, you can make informed decisions about the placement of your projector, ensuring that it complements the overall home entertainment setup and delivers an immersive viewing experience.
Ceiling Mounting
Ceiling mounting is a popular choice for positioning projectors, especially in dedicated home theater environments. This placement option offers several advantages, including maximizing floor space, minimizing cable visibility, and providing a clean, unobstructed projection path. When considering ceiling mounting for your projector, here are the key steps to follow:
- Assess the Ceiling Structure: Before proceeding with ceiling mounting, evaluate the ceiling structure to ensure it can support the weight of the projector and the mounting hardware. If necessary, consult a professional to determine the feasibility of ceiling installation.
- Choose the Mounting Location: Select a centralized location on the ceiling that aligns with the desired screen position. Ensure that the chosen spot allows for proper ventilation and easy access for maintenance, such as bulb replacement.
- Install the Mounting Bracket: Use a sturdy mounting bracket designed for projectors to securely attach the projector to the ceiling. Follow the manufacturer’s instructions and consider professional installation if you’re not familiar with mounting hardware.
- Adjust Projection Angles: Once the projector is mounted, adjust the projection angles to align the image with the screen. Most projectors offer keystone correction and lens shift features to fine-tune the projected image.
- Manage Cables and Power: Conceal the cables and power cords to maintain a clean and organized appearance. Consider using cable management solutions to route the cables discreetly along the ceiling or within wall channels.
When executed properly, ceiling mounting can provide a streamlined and professional look while optimizing the viewing experience. It’s important to prioritize safety and proper installation techniques to ensure the longevity and performance of the ceiling-mounted projector.
Wall Mounting
Wall mounting offers an alternative placement option for projectors, particularly in rooms where ceiling mounting may not be feasible or preferred. This approach can provide a sleek and unobtrusive setup while allowing for easy access to the projector for maintenance and adjustments. Here’s a step-by-step guide to wall mounting a projector:
- Locate an Optimal Wall Position: Identify a suitable wall space that aligns with the desired screen location and offers adequate clearance for the projector’s throw distance. Consider factors such as wall material, stud locations, and potential obstructions when choosing the mounting spot.
- Use a Sturdy Wall Mount: Select a robust wall mount designed specifically for projectors, ensuring that it provides secure attachment and adjustable positioning. Follow the manufacturer’s guidelines for weight capacity and installation procedures.
- Mount the Projector Bracket: Attach the projector bracket to the wall using appropriate hardware and mounting techniques. Verify that the bracket is level and securely anchored to the wall to support the projector’s weight.
- Position and Align the Projector: Once the bracket is in place, carefully position and align the projector to achieve the desired projection angle and screen coverage. Use a level to ensure the projector is mounted parallel to the screen for optimal image quality.
- Manage Cables and Connections: Organize and conceal the cables running from the projector to the A/V equipment and power source. Utilize wall cable covers or raceways to create a tidy cable management solution that complements the overall setup.
Wall mounting provides a versatile and visually appealing option for projector placement, offering flexibility in rooms with specific layout and design considerations. When executed with precision and attention to detail, a wall-mounted projector can seamlessly integrate into the home entertainment environment, enhancing the overall viewing experience.
When placing a projector, make sure it is positioned at the right distance from the screen to ensure a clear and focused image. Use the projector’s manual or online resources to find the recommended throw distance for your specific model.
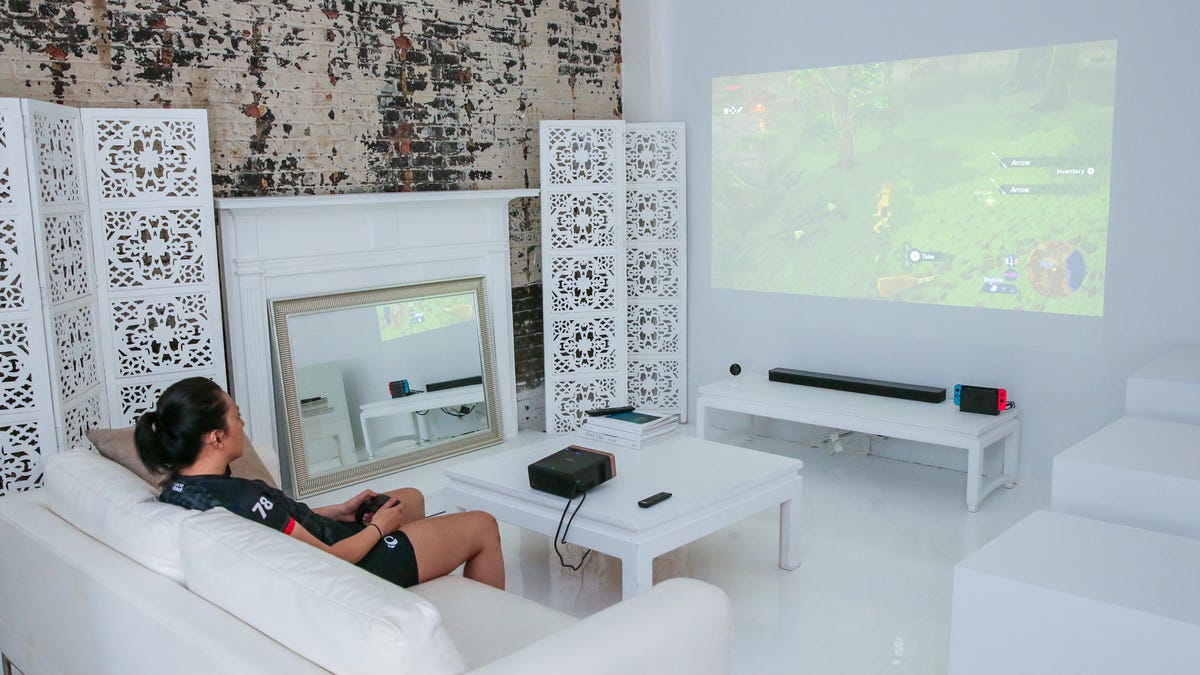
Tabletop Placement
Tabletop placement offers a convenient and flexible approach to positioning a projector, particularly in environments where ceiling or wall mounting may not be feasible or desirable. This method allows for easy adjustment and relocation of the projector while providing a stable and accessible setup. Here’s a guide to effectively utilizing tabletop placement for your projector:
- Select a Stable Surface: Choose a sturdy and level tabletop or furniture surface to support the projector. Ensure that the selected location offers ample space for the projector and allows for proper ventilation to prevent overheating.
- Use a Projector Stand or Mount: Consider utilizing a dedicated projector stand or mount designed for tabletop placement. These accessories provide adjustable height and tilt options, allowing you to optimize the projector’s position and projection angle.
- Position for Optimal Projection: Place the projector at an appropriate distance from the screen, taking into account the throw distance and desired image size. Adjust the projector’s zoom, focus, and keystone correction settings to achieve a clear and well-aligned image.
- Manage Cables and Power: Organize the cables and power cords to minimize clutter and maintain a tidy appearance. Utilize cable management solutions to route the cables discreetly from the projector to the A/V equipment and power source.
- Consider Portable Options: For added flexibility, explore portable projectors that are specifically designed for tabletop placement. These compact and lightweight models offer convenient mobility and can be easily repositioned for different viewing scenarios.
Tabletop placement provides a versatile and user-friendly solution for integrating a projector into various home entertainment setups. Whether you’re creating a temporary viewing area or seeking a more accessible installation approach, tabletop placement offers the flexibility to adapt to different viewing preferences and room configurations.
Read more: Where To Place Bookshelves
Floor Stand Placement
When exploring placement options for projectors, floor stand placement offers a practical and adaptable solution for positioning the projector within a room. This approach provides the flexibility to adjust the projector’s height and placement while accommodating different seating arrangements and room layouts. Here’s a comprehensive guide to effectively utilizing floor stand placement for your projector:
- Choose a Stable Floor Stand: Select a sturdy and adjustable floor stand designed specifically for projectors. Look for a stand that offers customizable height and tilt options, allowing you to achieve the optimal projection angle and screen coverage.
- Position for Viewing Comfort: Place the floor stand in a location that provides comfortable viewing angles for the audience. Consider the throw distance and screen size to determine the ideal placement that ensures clear and immersive visuals from various seating positions.
- Securely Mount the Projector: Attach the projector to the floor stand using the appropriate mounting hardware and techniques. Ensure that the projector is securely fastened to the stand to prevent any instability or movement during operation.
- Adjust Height and Projection Angle: Utilize the floor stand’s height and tilt adjustments to fine-tune the projector’s position and projection angle. Aim for a level and well-aligned projection that complements the room’s layout and seating configuration.
- Integrate Cable Management: Organize and conceal the cables running from the projector to the A/V equipment and power source. Utilize the floor stand’s cable management features or supplementary cable covers to maintain a neat and uncluttered setup.
Floor stand placement offers a versatile and adaptable approach to integrating a projector into a home entertainment environment. Whether you’re setting up a temporary viewing area or seeking a flexible installation option, floor stand placement provides the freedom to adjust the projector’s position to suit different viewing scenarios and room configurations.
Conclusion
Choosing the ideal placement for your projector is a pivotal step in creating a captivating and immersive home entertainment experience. Whether you opt for ceiling mounting, wall mounting, tabletop placement, or floor stand placement, each option offers unique advantages and considerations to enhance your viewing environment. By carefully assessing factors such as room size, screen size, ambient light conditions, and structural limitations, you can make informed decisions about the most suitable placement for your projector.
Ceiling mounting provides a professional and streamlined setup, maximizing floor space and offering unobstructed projection paths. Wall mounting offers a visually appealing and flexible solution, particularly in rooms where ceiling installation may not be viable. Tabletop placement delivers convenience and adaptability, allowing for easy adjustment and relocation of the projector within different viewing scenarios. Floor stand placement provides the freedom to customize the projector’s height and position to accommodate diverse seating arrangements and room layouts.
Regardless of the placement option you choose, it’s essential to prioritize safety, proper installation techniques, and cable management to ensure a seamless and enjoyable viewing experience. Whether you’re setting up a dedicated home theater or transforming your living space into a cinematic retreat, the placement of your projector plays a pivotal role in optimizing visual performance and creating a captivating atmosphere for entertainment and relaxation.
By understanding the nuances of each placement option and considering the specific requirements of your home environment, you can embark on a rewarding journey to elevate your home entertainment experience with a strategically positioned projector.
Frequently Asked Questions about Where To Place A Projector
Was this page helpful?
At Storables.com, we guarantee accurate and reliable information. Our content, validated by Expert Board Contributors, is crafted following stringent Editorial Policies. We're committed to providing you with well-researched, expert-backed insights for all your informational needs.


0 thoughts on “Where To Place A Projector”