Home>Technology>Security & Surveillance>How To Install Power Door Lock Actuator
Security & Surveillance
How To Install Power Door Lock Actuator
Modified: August 27, 2024
Learn how to install a power door lock actuator for enhanced security and surveillance. Step-by-step guide to upgrade your door locks for added protection.
(Many of the links in this article redirect to a specific reviewed product. Your purchase of these products through affiliate links helps to generate commission for Storables.com, at no extra cost. Learn more)
**
Introduction
**
Installing a power door lock actuator is a practical and rewarding project that can enhance the security and convenience of your vehicle. A power door lock actuator is a crucial component of a vehicle's central locking system, responsible for activating the locks to secure and protect the vehicle. Over time, wear and tear can lead to malfunctions, causing inconvenience and potential security risks. By learning how to install a power door lock actuator, you can save on costly professional services and gain a deeper understanding of your vehicle's inner workings.
In this comprehensive guide, we will walk you through the step-by-step process of installing a power door lock actuator. From the tools and materials you'll need to the testing phase, we'll cover every essential detail to ensure a successful installation. Whether you're a seasoned DIY enthusiast or a novice looking to expand your automotive skills, this guide is designed to empower you with the knowledge and confidence to tackle this project.
By the end of this tutorial, you'll not only have a fully functional power door lock actuator but also a sense of accomplishment and pride in your newfound automotive expertise. So, roll up your sleeves, gather your tools, and let's dive into the rewarding world of power door lock actuator installation.
**
Key Takeaways:
- Installing a power door lock actuator enhances vehicle security and convenience. With the right tools and preparation, DIY installation can save money and deepen automotive knowledge.
- Careful testing and attention to detail ensure a successful power door lock actuator installation. Embrace the satisfaction of a job well done and the empowerment of automotive expertise.
Read more: How To Fix Door Lock Actuator
Tools and Materials Needed
**
Before embarking on the installation of a power door lock actuator, it’s essential to ensure that you have the necessary tools and materials at your disposal. Here’s a comprehensive list of what you’ll need:
Tools:
- Screwdriver Set: A set of flathead and Phillips screwdrivers will be essential for removing screws and panels.
- Trim Panel Removal Tool: This tool will help you safely remove the door panel without causing damage.
- Socket and Ratchet Set: You'll need these to remove and install bolts and nuts.
- Torx Drivers: Some vehicles may have Torx screws, so having a set of Torx drivers will be beneficial.
- Pliers: A pair of pliers will come in handy for various tasks during the installation process.
- Multimeter: This tool will be useful for testing electrical connections and diagnosing any issues.
- Trim Clip Removal Tool: This tool will aid in removing trim clips without damaging them.
- Wire Crimping Tool: You'll need this tool to secure electrical connections effectively.
- Work Light or Flashlight: Adequate lighting is crucial for working in the confined spaces within the door panel.
- Safety Equipment: This includes gloves and safety glasses to protect yourself during the installation process.
Materials:
- Replacement Power Door Lock Actuator: Ensure that the new actuator is compatible with your vehicle's make and model.
- Electrical Contact Cleaner: This will help clean electrical connections and prevent corrosion.
- Electrical Tape: Use high-quality electrical tape to secure and insulate electrical connections.
- Zip Ties: These will be useful for organizing and securing wiring within the door panel.
- Protective Padding or Blanket: Place this on the ground to protect the door panel and interior components when they are removed.
- Rust Penetrant/Lubricant: This may be needed to loosen any stubborn bolts or components during the installation process.
- Owner's Manual: Keep the vehicle's owner's manual handy for reference and guidance specific to your vehicle's make and model.
By ensuring that you have these tools and materials ready, you’ll be well-prepared to proceed with the installation of the power door lock actuator. With everything in place, you can approach the project with confidence and efficiency, knowing that you have what you need to complete the task successfully.
Preparation
Before diving into the installation process, it’s crucial to set the stage for a smooth and efficient workflow. Proper preparation can make a significant difference in the outcome of the project. Here are the essential steps to take as you prepare to install a power door lock actuator:
1. Workspace Setup: Begin by selecting a well-lit and spacious area to carry out the installation. Ensure that the vehicle is parked on a level surface, and there is ample room to maneuver around the door without obstruction. Additionally, gather all the necessary tools and materials, organizing them within easy reach of your workspace.
2. Vehicle Inspection: Take a few moments to inspect the door that requires the power door lock actuator installation. Look for any signs of damage or corrosion on the door panel, handles, and surrounding areas. Addressing any pre-existing issues at this stage will contribute to a seamless installation process.
3. Battery Disconnection: As a safety precaution, disconnect the vehicle’s battery to prevent any electrical mishaps during the installation. This step is crucial when working with electrical components to avoid short circuits and potential hazards.
4. Reference Material: Familiarize yourself with the vehicle’s owner’s manual and any specific documentation related to the central locking system. Understanding the manufacturer’s recommendations and specifications will provide valuable insights as you proceed with the installation.
5. Protective Gear: Prioritize safety by donning appropriate protective gear, including gloves and safety glasses. These items will shield you from potential hazards and ensure a secure and comfortable working environment.
6. Mental Preparation: Approach the project with a focused and patient mindset. Installing a power door lock actuator requires attention to detail and precision. Mentally preparing yourself for the task ahead will contribute to a successful and satisfying outcome.
By following these preparatory steps, you’ll establish a solid foundation for the installation of the power door lock actuator. Taking the time to set up your workspace, assess the vehicle, and equip yourself with the necessary knowledge and safety measures will pave the way for a seamless and rewarding installation process.
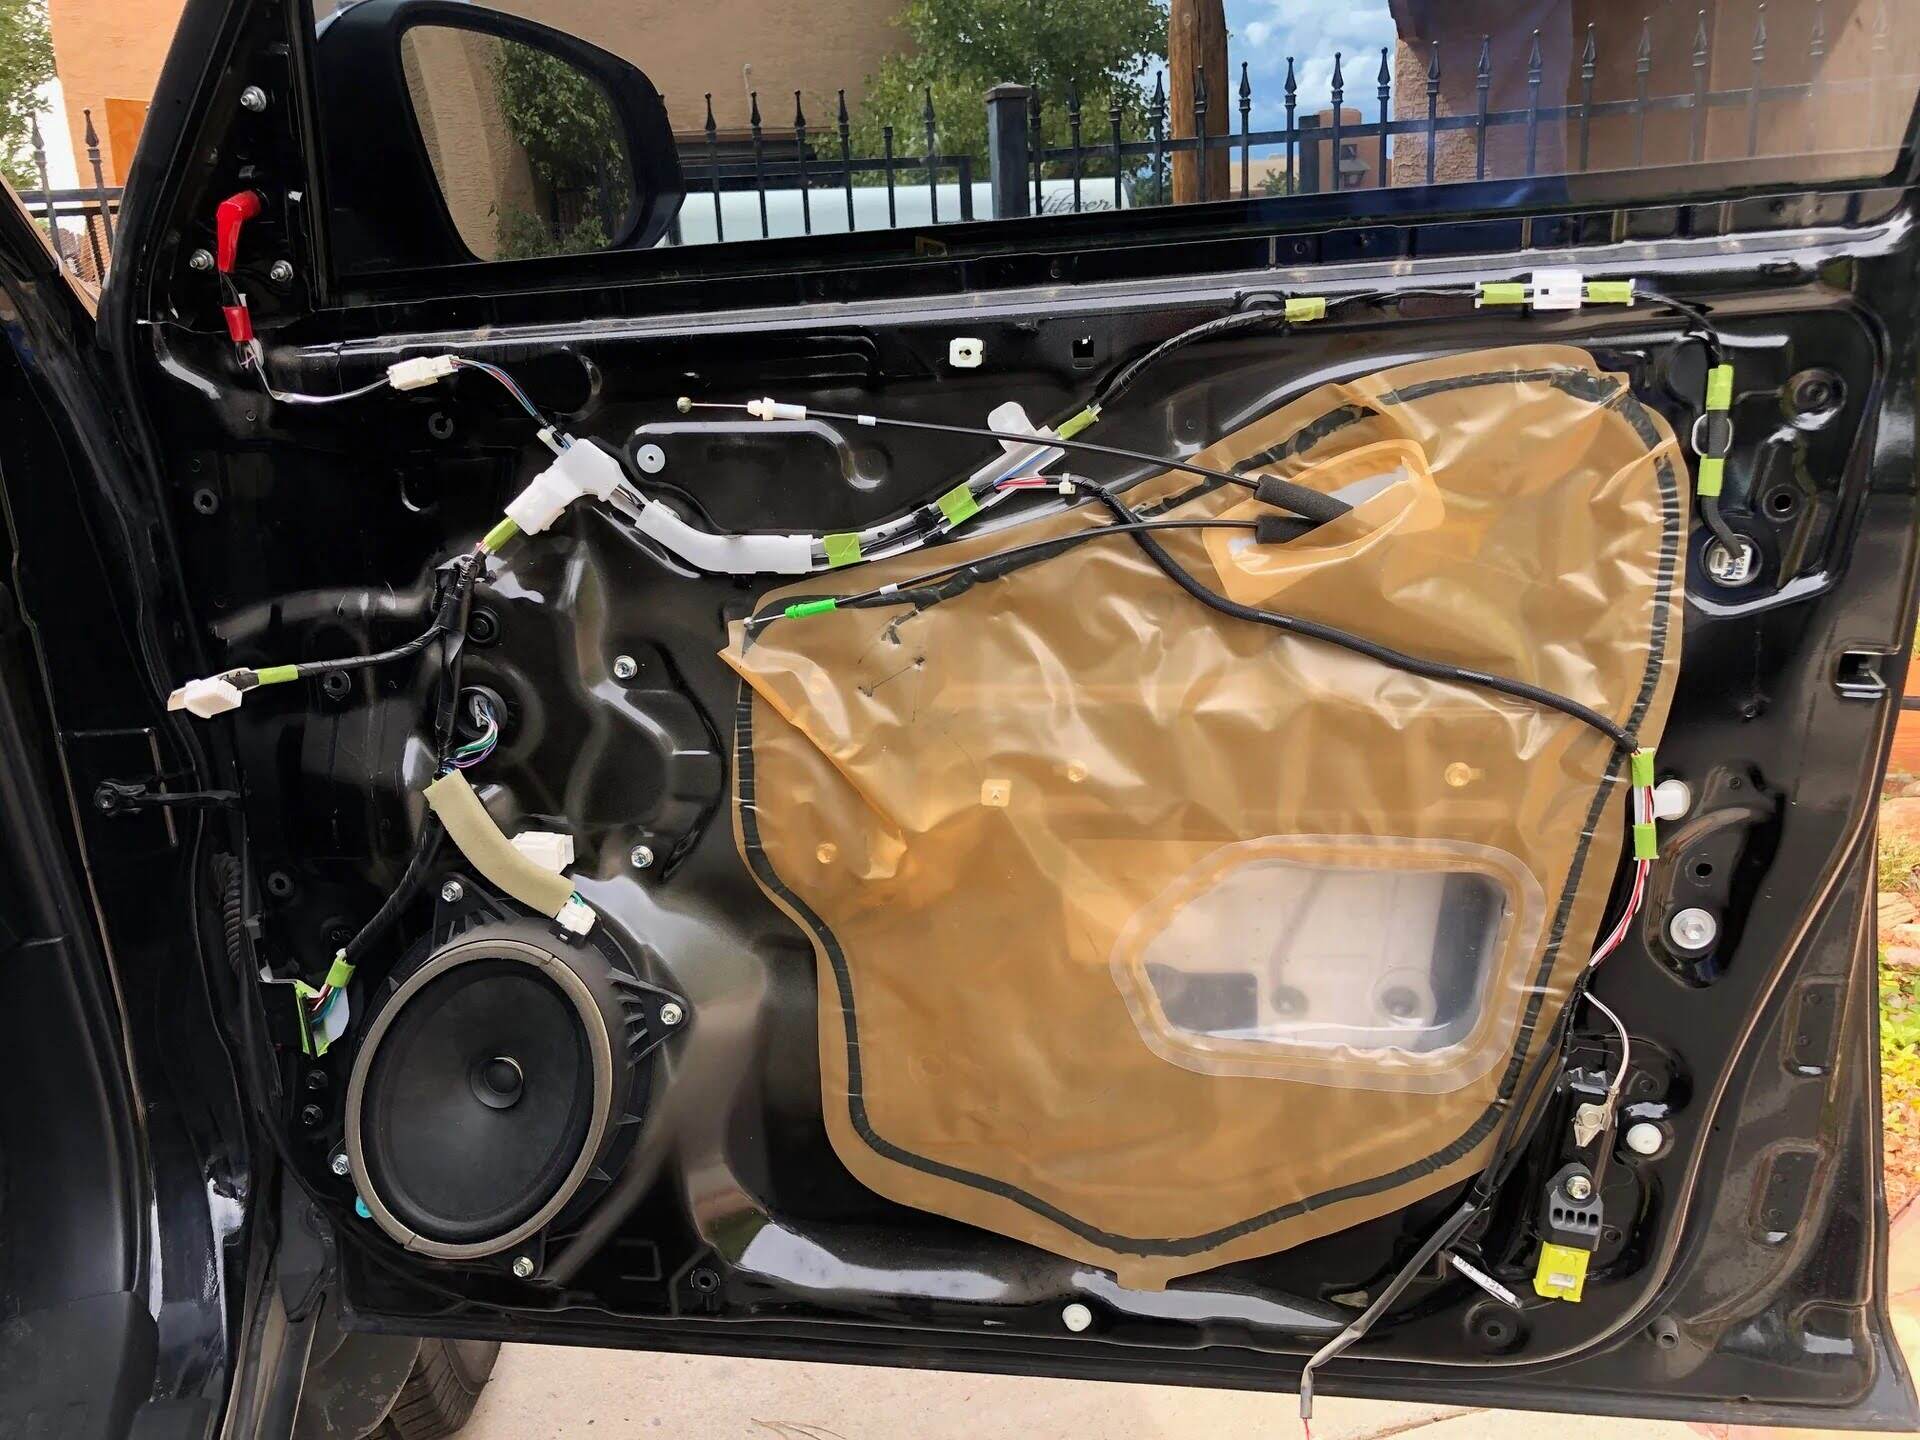
Removing the Door Panel
Removing the door panel is a crucial preliminary step in gaining access to the inner components of the vehicle’s door, including the power door lock actuator. This process requires precision and care to avoid damage to the panel and its attachments. Here’s a step-by-step guide to removing the door panel:
1. Locate and Remove Screws: Using a screwdriver, locate and remove any visible screws securing the door panel to the door frame. These screws are typically found along the edges of the panel and may be concealed by plastic covers or trim pieces.
2. Remove Trim Pieces: Carefully detach any trim pieces or covers that conceal additional screws or fasteners. These pieces may be secured with clips or adhesive and should be handled with caution to prevent breakage.
3. Access Hidden Fasteners: Some door panels may feature hidden fasteners behind handles, switches, or armrests. Use a trim panel removal tool to carefully pry these components away from the door panel and access the fasteners behind them.
4. Disconnect Electrical Connections: If the door panel is equipped with electrical components such as window switches or door locks, carefully disconnect the wiring harnesses attached to them. Use caution and ensure that the vehicle’s battery is disconnected to prevent electrical mishaps.
5. Release Panel Retention Clips: Once all screws and fasteners are removed, gently release the panel retention clips by carefully prying the panel away from the door frame. Take care not to force the panel, as this can cause damage to the clips or the panel itself.
6. Lift and Remove the Panel: With all fasteners and clips released, carefully lift the door panel upward to disengage it from the door frame. Be mindful of any remaining wiring or components attached to the panel as it is lifted away.
7. Set the Panel Aside: Place the removed door panel in a safe and secure location, ensuring that it is protected from damage and debris. This will prevent any potential harm to the panel and its components during the remainder of the installation process.
By following these steps, you can effectively remove the door panel, granting access to the internal mechanisms of the door, including the power door lock actuator. Proceeding with precision and care will contribute to a successful and damage-free removal process.
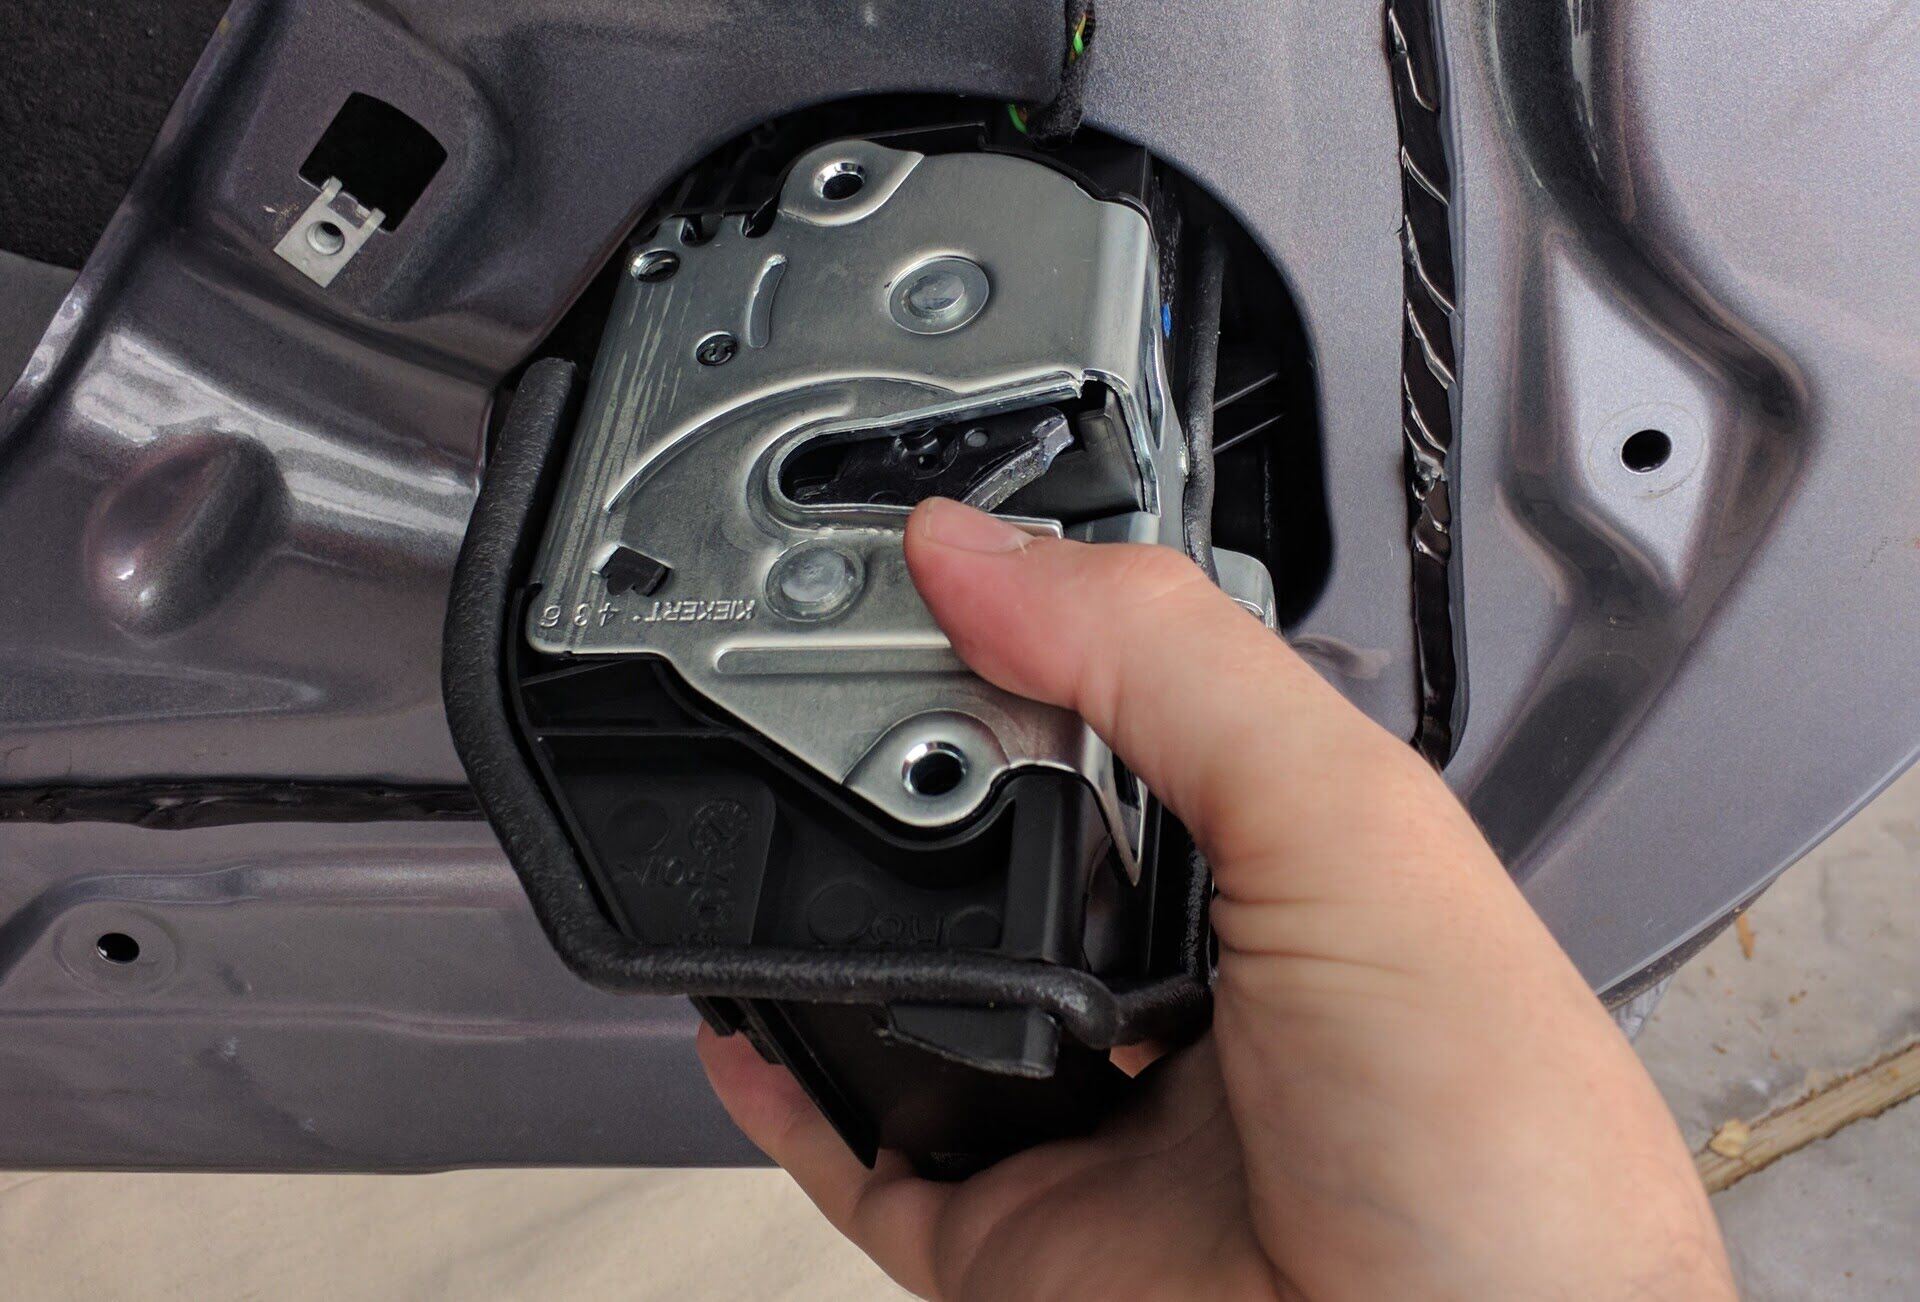
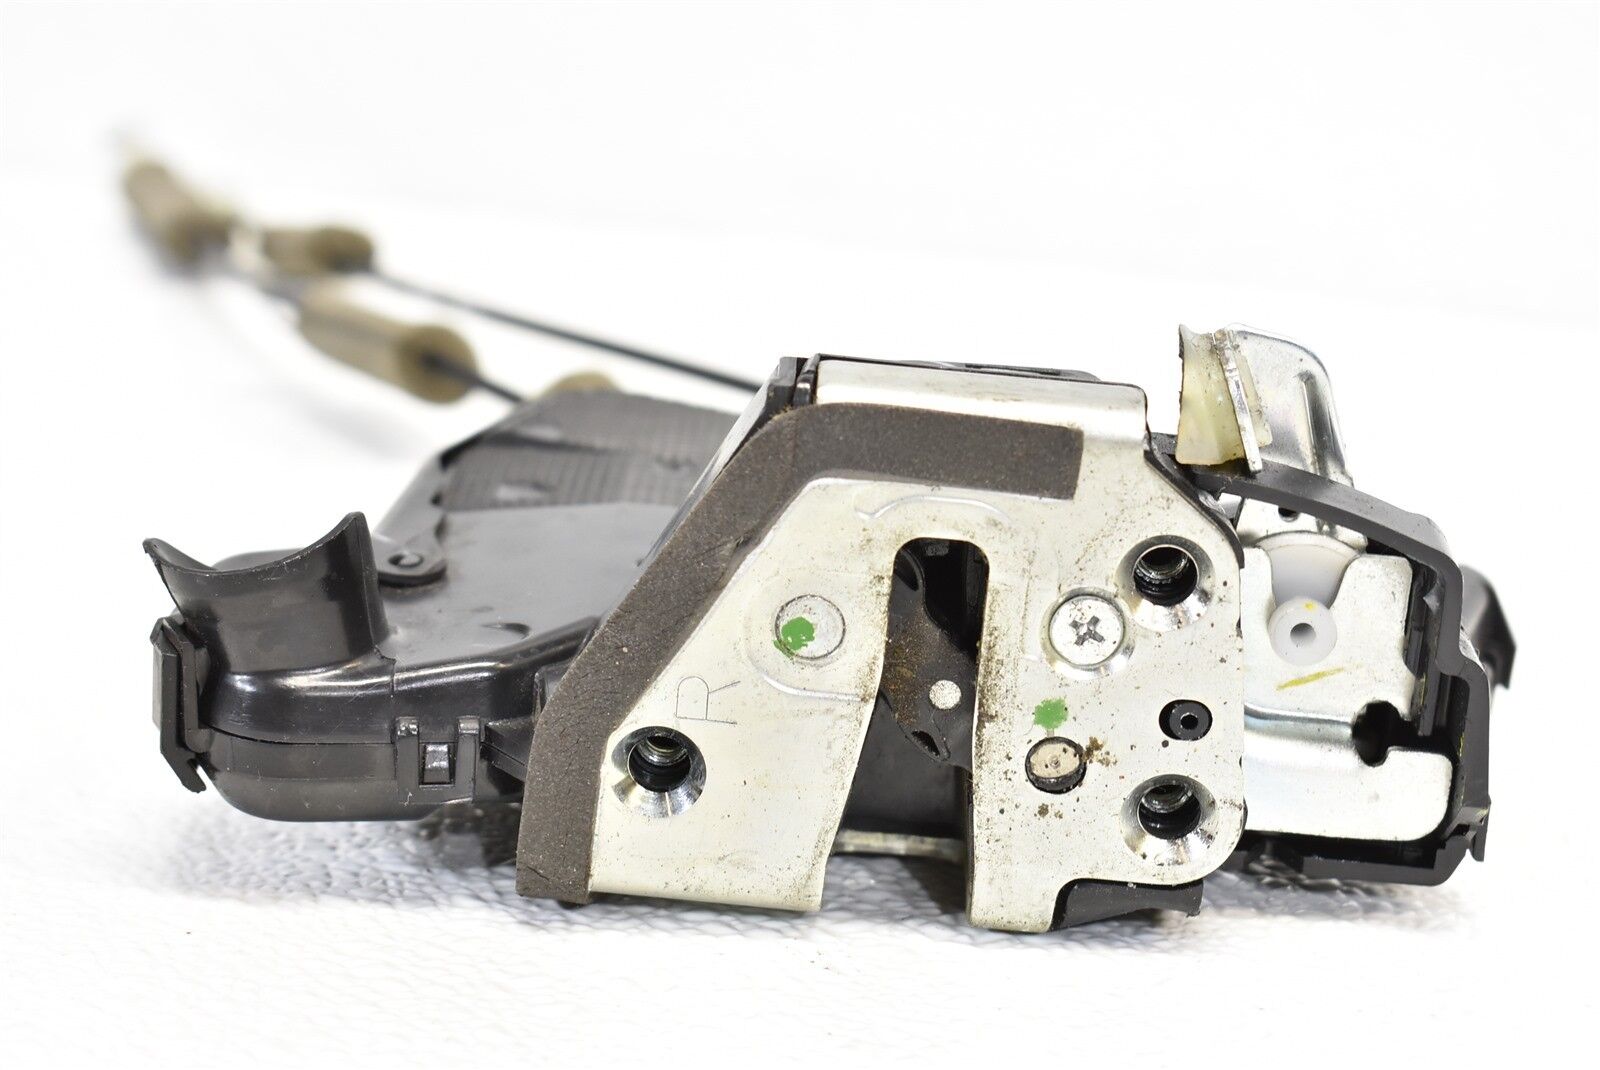
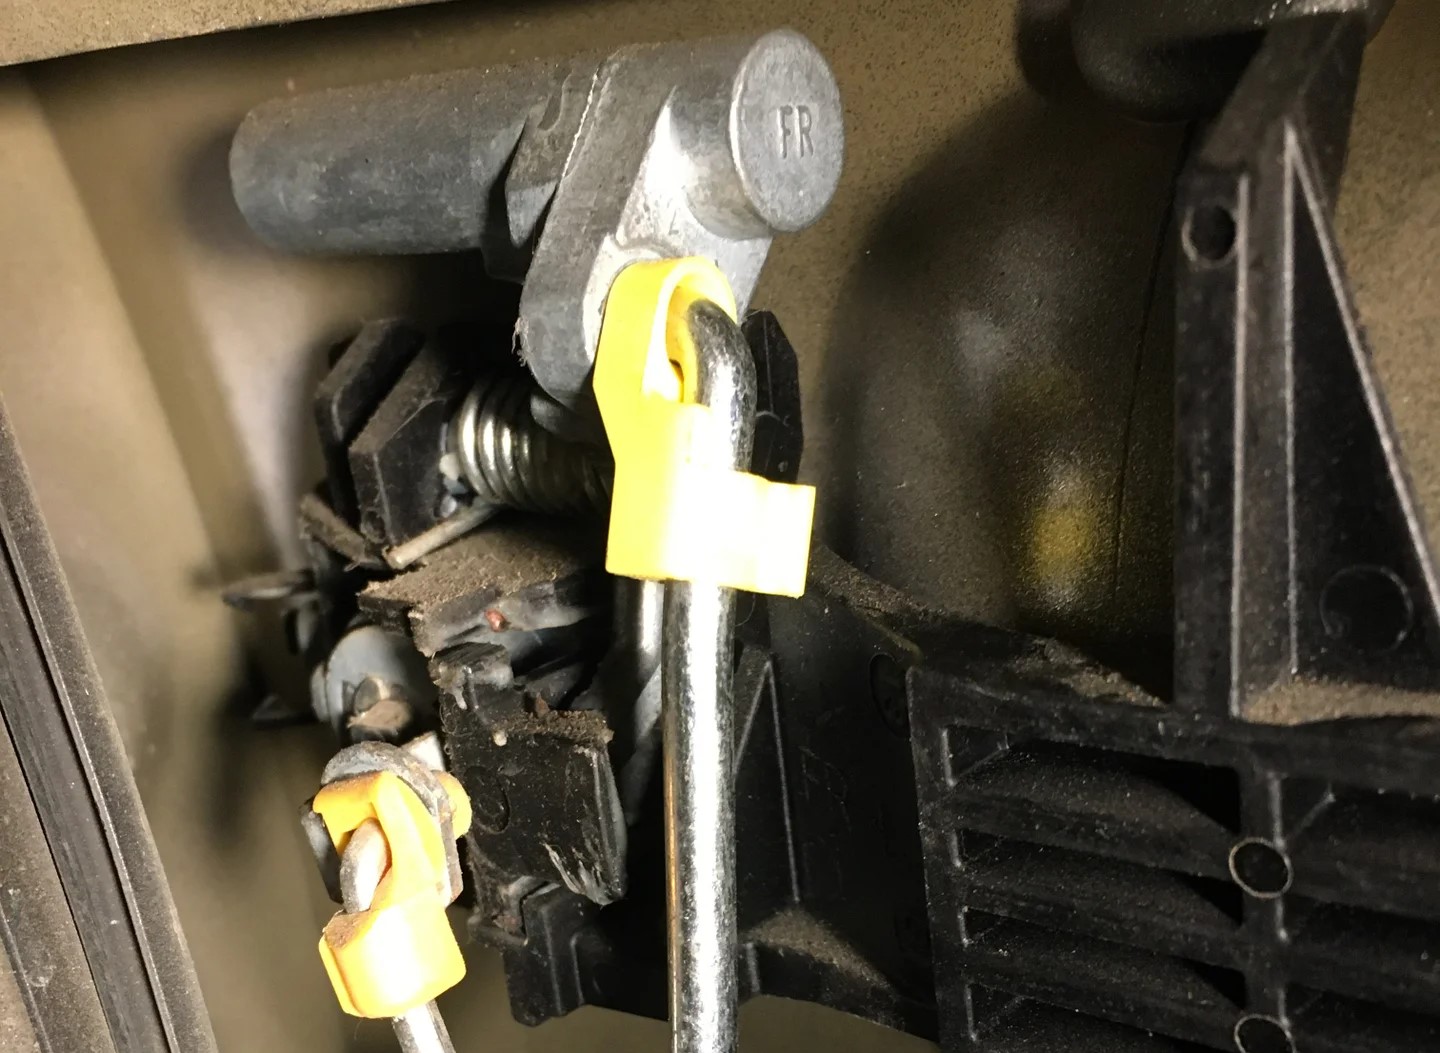
Accessing the Door Lock Actuator
Once the door panel has been successfully removed, the next crucial step is to access the door lock actuator within the door cavity. This component is integral to the central locking system and is responsible for engaging the door locks. Here’s a detailed guide on accessing the door lock actuator:
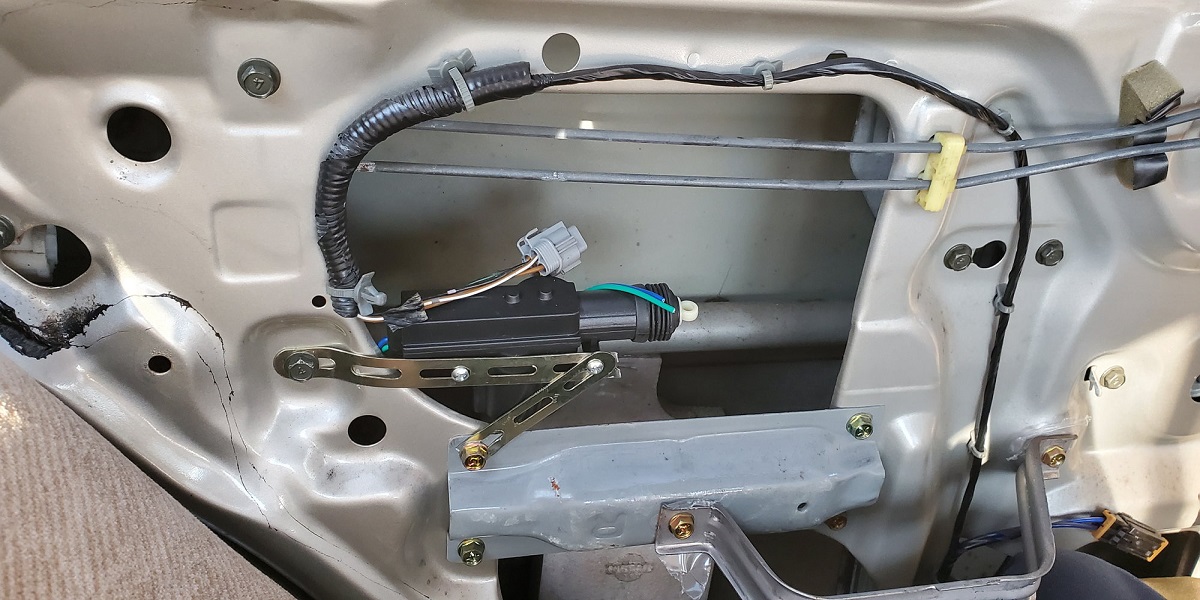
1. Identify the Door Lock Actuator: Locate the door lock actuator within the door cavity. It is typically positioned near the door latch mechanism and may be secured to the door frame with screws or fasteners.
2. Inspect the Actuator Mounting: Assess how the door lock actuator is mounted within the door. Note the location of any securing bolts, brackets, or clips that hold the actuator in place. This will guide you in the subsequent steps of the installation process.
3. Disconnect Actuator Linkages: If the door lock actuator is connected to the door latch or locking mechanism via linkages or rods, carefully disconnect these connections. Take note of the orientation and positioning of the linkages to facilitate reassembly later on.
4. Remove Mounting Hardware: Using the appropriate tools, such as a socket and ratchet set or screwdriver, remove any mounting hardware securing the door lock actuator to the door frame. Keep track of the removed hardware to ensure that it can be reinstalled correctly.
5. Extract the Actuator: With the mounting hardware removed and any linkages disconnected, carefully extract the door lock actuator from the door cavity. Exercise caution to avoid damaging the actuator or surrounding components during the extraction process.
6. Inspect for Additional Components: While accessing the door lock actuator, take the opportunity to inspect the surrounding components within the door cavity. Check for any signs of wear, damage, or corrosion that may warrant attention or replacement.
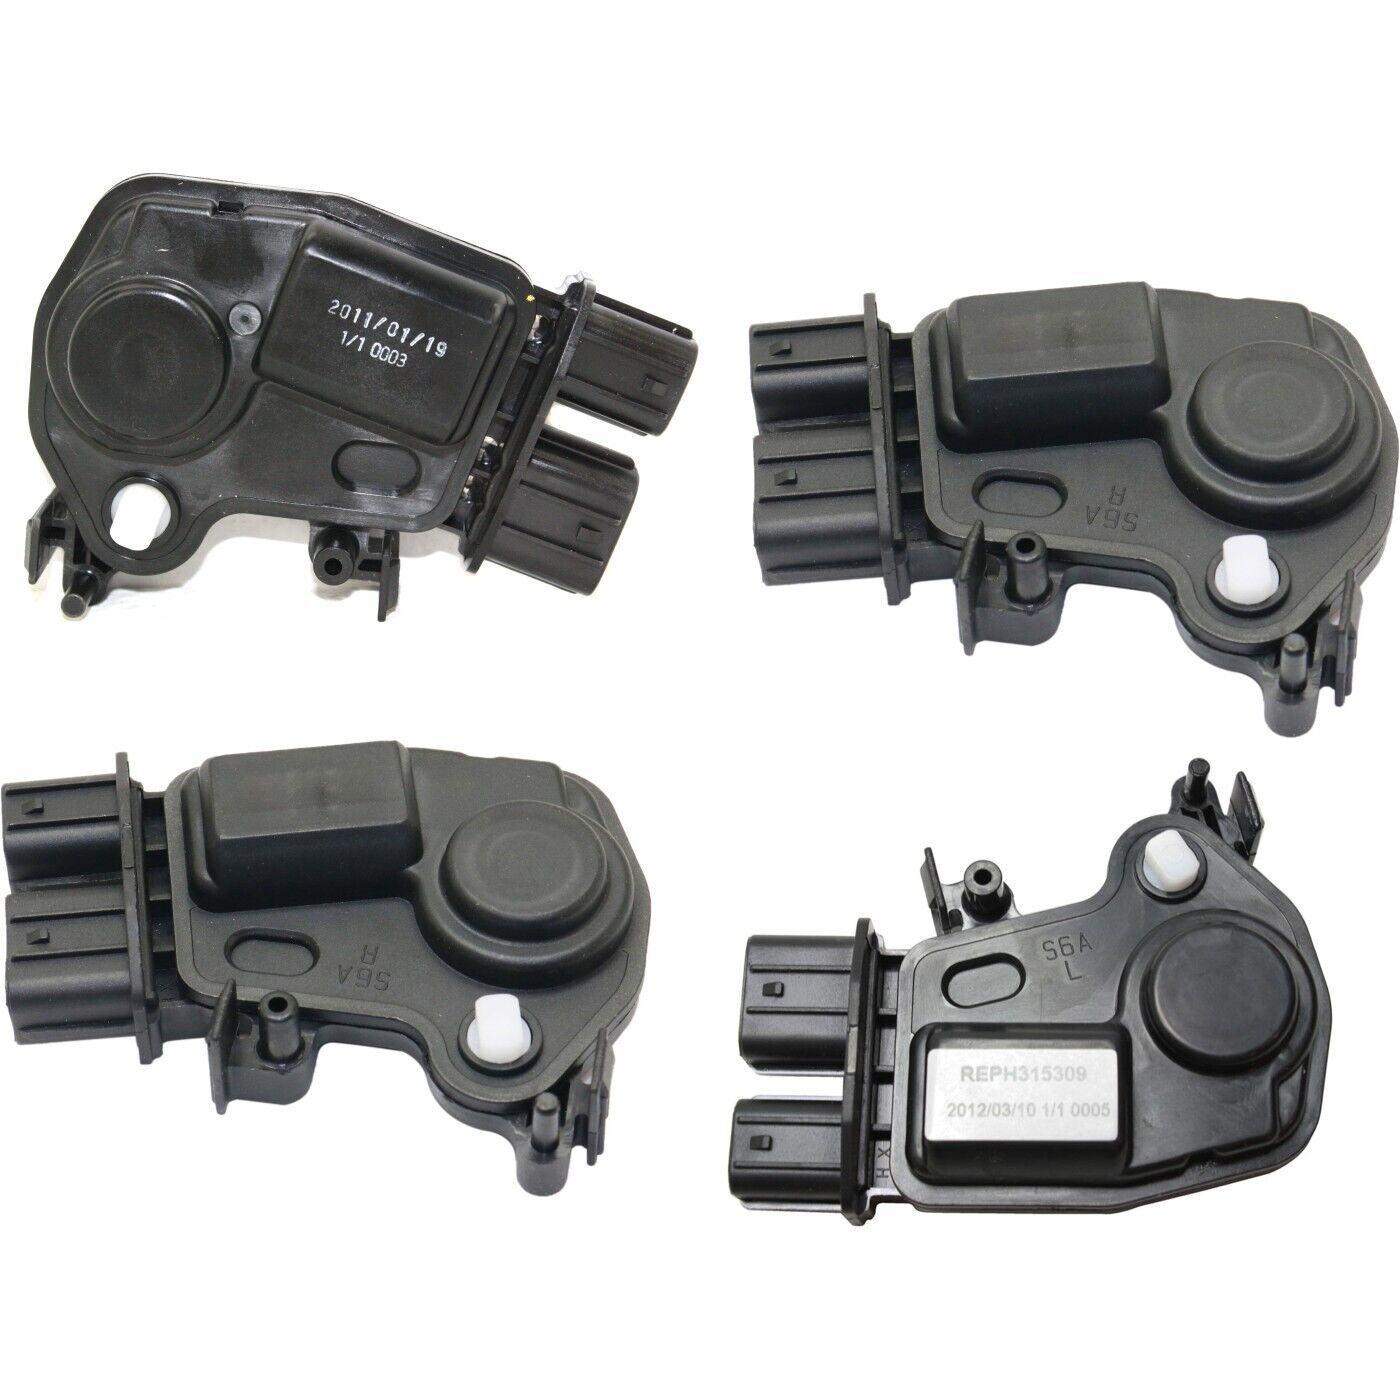
7. Prepare the Replacement Actuator: If you are installing a new door lock actuator, compare it to the removed actuator to ensure that it is the correct replacement part. Verify that the new actuator matches the specifications and mounting points of the original component.
By following these steps, you can effectively access the door lock actuator within the door cavity, paving the way for the installation of a new actuator or any necessary maintenance or repairs. Approach this process with care and attention to detail to ensure a successful transition to the installation phase.
When installing a power door lock actuator, make sure to disconnect the car’s battery to avoid any electrical accidents. Always follow the manufacturer’s instructions for proper installation.
Read more: How To Test Door Lock Actuator
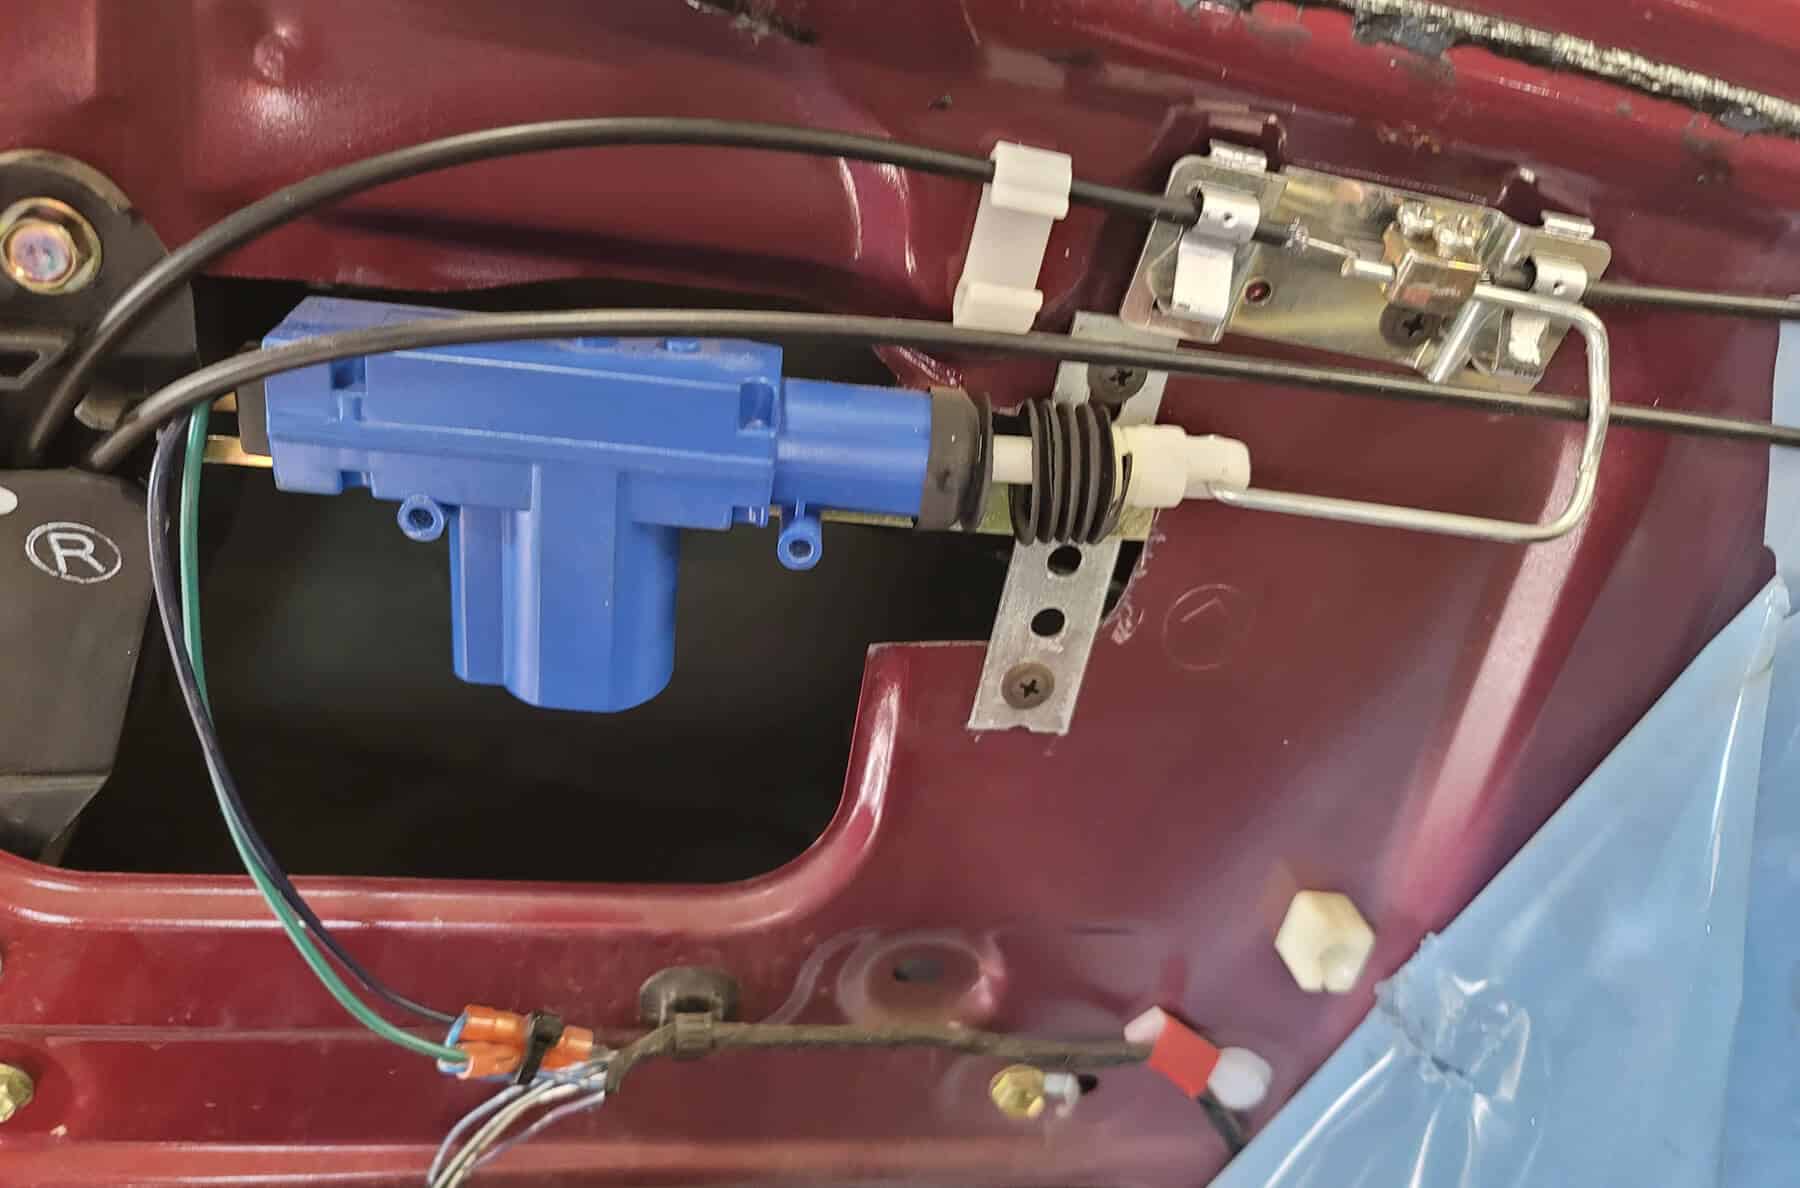
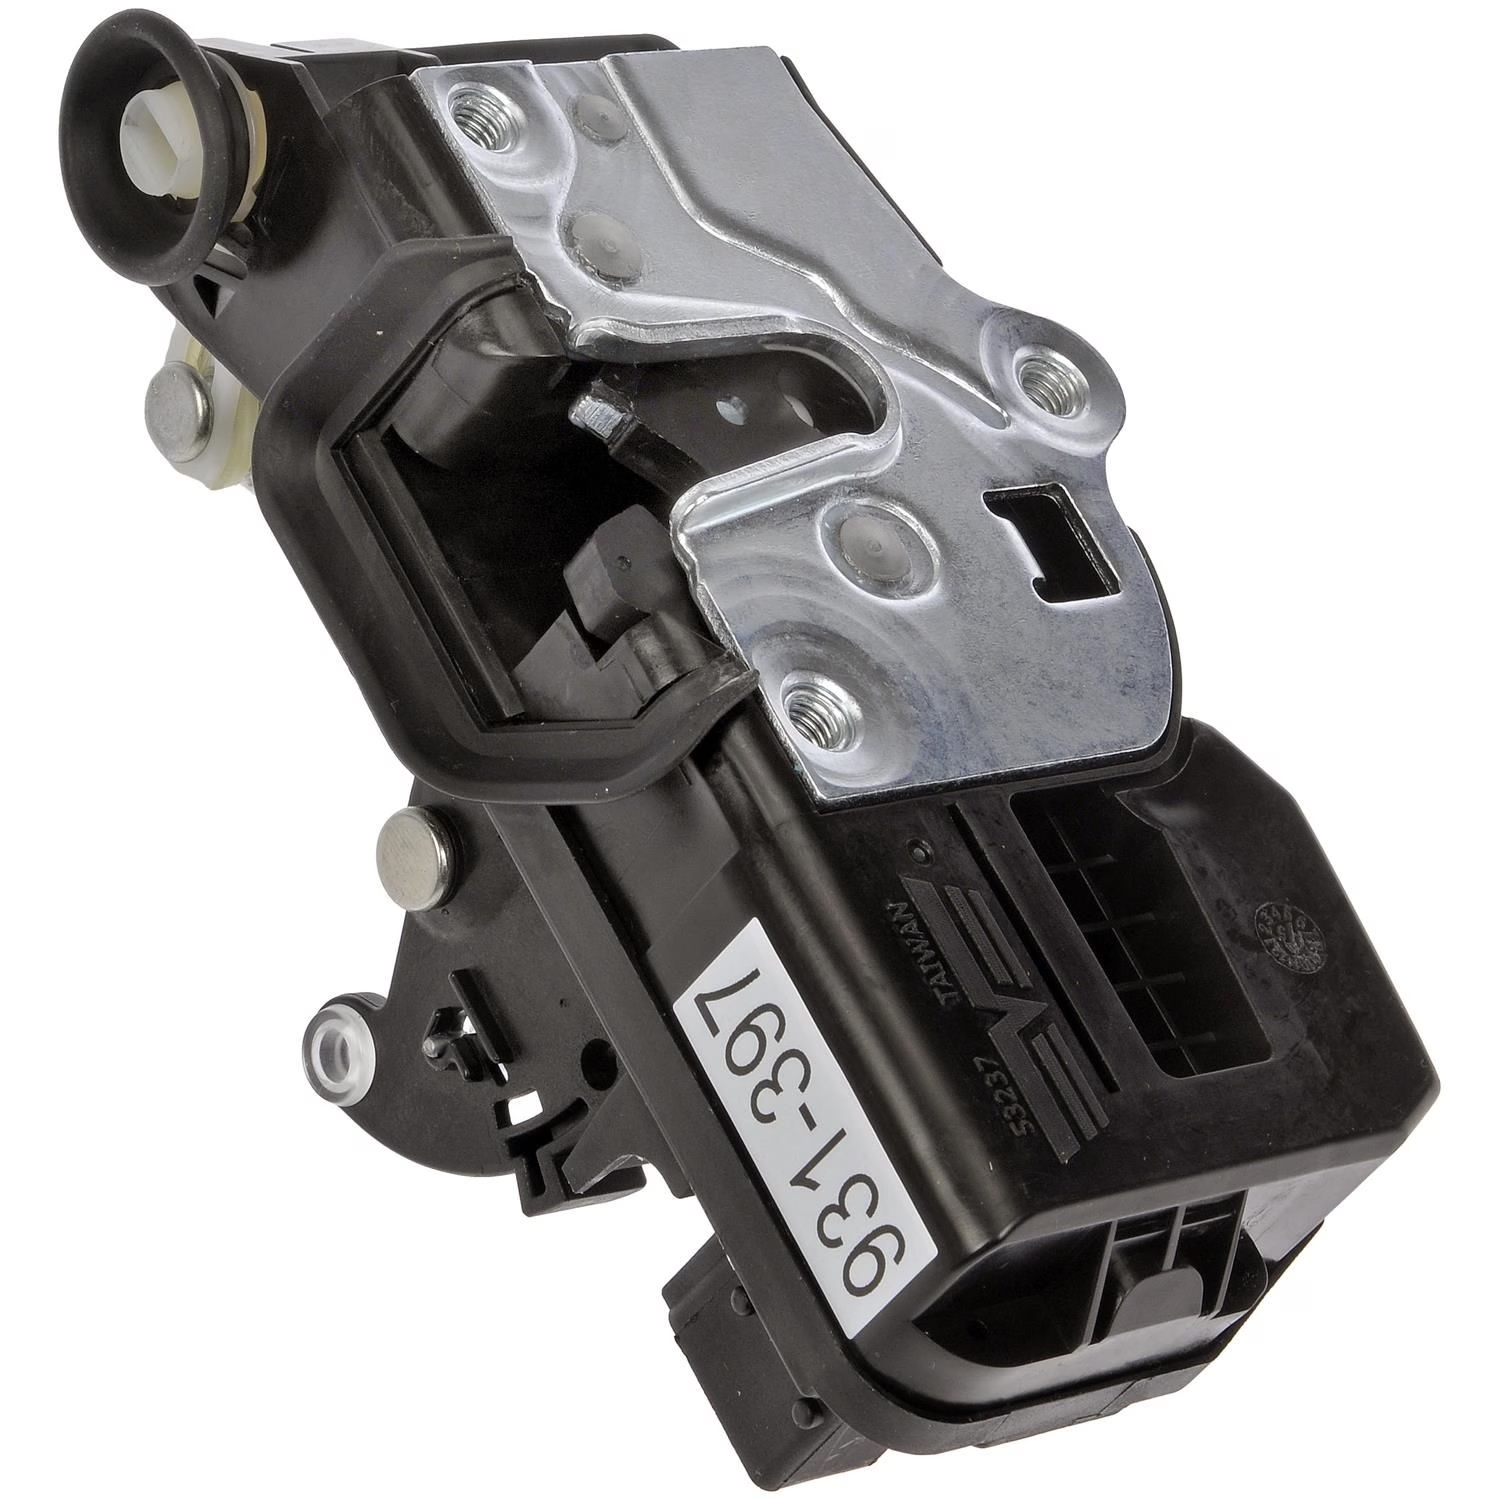
Installing the New Door Lock Actuator
With the old door lock actuator successfully removed, it’s time to proceed with the installation of the new actuator. This critical step directly impacts the functionality and security of the vehicle’s central locking system. Here’s a comprehensive guide to installing the new door lock actuator:
1. Position the New Actuator: Carefully position the new door lock actuator within the door cavity, aligning it with the mounting points and ensuring that it sits securely in place. Take note of any orientation or alignment requirements specified by the manufacturer.
2. Secure Mounting Hardware: Using the appropriate fasteners and tools, secure the new door lock actuator to the door frame. Tighten the mounting hardware to the manufacturer’s recommended torque specifications to ensure a secure and stable installation.
3. Reconnect Actuator Linkages: If the new actuator is equipped with linkages or rods for connection to the door latch or locking mechanism, carefully reconnect these components. Ensure that the linkages are properly aligned and secured to facilitate smooth and reliable operation.
4. Verify Electrical Connections: If the door lock actuator requires electrical connections, such as wiring harnesses or connectors, verify that these connections are properly seated and secured. Inspect the electrical connections for signs of damage or corrosion, addressing any issues as needed.
5. Test Actuator Functionality: Prior to reassembling the door panel, conduct a preliminary test of the new door lock actuator. Activate the central locking system and test the actuator’s response to ensure that it engages and disengages the door locks as intended. This step validates the proper installation and functionality of the new actuator.
6. Address Any Alignment Issues: If the door lock actuator or its linkages exhibit misalignment or resistance during testing, carefully assess and adjust their positioning to ensure smooth and consistent operation. Proper alignment is essential for the reliable performance of the central locking system.
7. Confirm Actuator Compatibility: Verify that the new door lock actuator is compatible with the vehicle’s make and model, as well as the specific requirements of the central locking system. Compatibility ensures seamless integration and optimal performance.
By following these steps, you can effectively install a new door lock actuator, restoring the central locking system’s functionality and security. Approach the installation process with precision and attention to detail to ensure a reliable and long-lasting outcome.
Reassembling the Door Panel
With the new door lock actuator successfully installed and tested, the next critical phase is reassembling the door panel. This process involves restoring the panel to its original position, ensuring that all components are securely reattached. Here’s a detailed guide to reassembling the door panel:
1. Position the Door Panel: Align the door panel with the door frame, taking care to guide any wiring or components through their respective openings in the panel. Ensure that the panel sits flush against the door and aligns with any retention clips or mounting points.
2. Reconnect Electrical Components: If the door panel features electrical components such as window switches or door lock controls, reconnect the wiring harnesses to their respective components. Verify that the connections are secure and properly seated to enable the functionality of the panel’s features.
3. Engage Panel Retention Clips: Gently press the door panel against the door frame to engage the retention clips. Apply even pressure along the edges of the panel to ensure that the clips securely fasten the panel in place. Take care not to force the panel, as this can damage the clips or the panel itself.
4. Secure Mounting Hardware: Using the appropriate screws and fasteners, reattach any trim pieces, covers, or components that were removed during the panel removal process. Ensure that each fastener is tightened to the manufacturer’s recommended torque specifications to secure the panel effectively.
5. Test Panel Functionality: Prior to completing the reassembly process, test the functionality of the door panel components, including window switches, door locks, and any other controls. Verify that each component operates as intended, indicating a successful reassembly of the panel.
6. Inspect for Proper Alignment: Check the alignment and fit of the door panel to ensure that it sits evenly and securely against the door frame. Address any misalignments or gaps by adjusting the panel’s positioning and fasteners as needed.
7. Verify Panel Stability: With the door panel reassembled, conduct a final inspection to confirm that the panel is stable and free from any rattles or loose components. Gently tap and press on various areas of the panel to ensure that it is securely attached to the door frame.
By following these steps, you can effectively reassemble the door panel, restoring the interior aesthetics and functionality of the vehicle’s door. Approach the reassembly process with care and attention to detail to ensure a secure and professional outcome.
Testing the Power Door Lock Actuator
Following the installation and reassembly of the door panel, it’s essential to conduct thorough testing of the power door lock actuator to ensure its proper functionality. This critical step validates the successful installation and integration of the new actuator into the vehicle’s central locking system. Here’s a comprehensive guide to testing the power door lock actuator:
1. Central Locking System Test: Activate the vehicle’s central locking system using the key fob or interior door lock controls. Observe the response of the door lock actuator as it engages and disengages the door locks. Verify that all doors lock and unlock smoothly and simultaneously, indicating the proper synchronization of the central locking system.
2. Individual Door Lock Tests: Test each door lock individually by using the key fob or interior door lock controls to lock and unlock each door. Pay close attention to the response of the door lock actuator in each door, ensuring that it operates smoothly and promptly without any delays or unusual sounds.
3. Manual Lock and Unlock Verification: Manually lock and unlock each door by using the exterior door handles and interior lock buttons. Confirm that the door lock actuator responds accurately to these manual actions, providing secure locking and effortless unlocking of the doors.
4. Door Panel Component Functionality: Test the functionality of the door panel components, including window switches, door lock controls, and any other integrated features. Verify that each component operates as intended without any issues, ensuring a seamless integration with the newly installed door lock actuator.
5. Operational Consistency Check: Repeat the central locking system test and individual door lock tests to verify the consistent and reliable operation of the power door lock actuator. Pay attention to any variations in the actuator’s performance across multiple test cycles, addressing any inconsistencies promptly.
6. Visual and Auditory Inspection: While testing the power door lock actuator, visually inspect the door locks and listen for any unusual sounds or behaviors during the locking and unlocking processes. Any abnormal observations should be investigated further to identify and resolve potential issues.
7. Road Test: Take the vehicle for a brief road test to assess the functionality of the central locking system in real-world conditions. Lock and unlock the doors while stationary and in motion to evaluate the actuator’s performance and responsiveness during typical driving scenarios.
By following these testing procedures, you can thoroughly evaluate the functionality and integration of the power door lock actuator within the vehicle’s central locking system. Conducting comprehensive tests ensures that the actuator operates reliably and contributes to the overall security and convenience of the vehicle.
Conclusion
Congratulations on successfully completing the installation of a power door lock actuator in your vehicle! By following this comprehensive guide, you’ve gained valuable insight into the intricate process of enhancing the central locking system’s functionality and security. As you reflect on the journey from preparation to testing, it’s important to acknowledge the newfound expertise and confidence you’ve acquired in tackling automotive projects.
Throughout this endeavor, you’ve demonstrated patience, precision, and a commitment to excellence, resulting in a seamlessly integrated power door lock actuator. Your dedication to understanding the intricacies of your vehicle’s inner mechanisms has not only yielded tangible results but has also deepened your connection to the vehicle itself.
As you embark on future automotive endeavors, whether they involve maintenance, repairs, or enhancements, remember the invaluable skills and knowledge you’ve gained from this experience. Your ability to navigate the complexities of automotive installations with confidence and proficiency will continue to serve you well in your automotive journey.
Furthermore, by taking a proactive approach to maintaining and improving your vehicle, you’ve embraced a sense of empowerment and self-reliance. The satisfaction of a job well done and the peace of mind that comes with a secure and functional central locking system are testaments to your dedication and resourcefulness.
As you enjoy the enhanced security and convenience provided by the newly installed power door lock actuator, take pride in the role you’ve played in elevating your vehicle’s capabilities. Your commitment to excellence and your willingness to expand your automotive skill set exemplify the spirit of innovation and self-improvement.
With the successful installation of the power door lock actuator, you’ve not only enhanced the functionality of your vehicle but also enriched your own automotive expertise. As you continue to explore the realm of automotive maintenance and enhancements, may your journey be filled with discovery, accomplishment, and the satisfaction of overcoming challenges.
Embrace the knowledge you’ve gained, and let it fuel your passion for automotive excellence. Your dedication to honing your skills and expanding your capabilities sets the stage for a future filled with rewarding automotive accomplishments.
Remember, the journey of automotive mastery is an ongoing adventure, and each project is an opportunity to further elevate your skills and deepen your connection to the vehicles you cherish. With your newfound expertise, the road ahead is paved with endless possibilities and the promise of continued success in all your automotive endeavors.
Frequently Asked Questions about How To Install Power Door Lock Actuator
Was this page helpful?
At Storables.com, we guarantee accurate and reliable information. Our content, validated by Expert Board Contributors, is crafted following stringent Editorial Policies. We're committed to providing you with well-researched, expert-backed insights for all your informational needs.


0 thoughts on “How To Install Power Door Lock Actuator”