Articles
How To Get A Cassette Adapter To Work
Modified: January 18, 2024
Learn the best articles on how to get a cassette adapter to work. Discover tips, troubleshooting guides, and step-by-step instructions for a seamless listening experience.
(Many of the links in this article redirect to a specific reviewed product. Your purchase of these products through affiliate links helps to generate commission for Storables.com, at no extra cost. Learn more)
Introduction
Welcome to the world of cassette adapters, where vintage technology meets modern convenience. In an era of streaming services and Bluetooth connectivity, cassette adapters offer a unique way to play music from your portable devices through your car’s cassette player or home stereo system. Whether you’re a cassette enthusiast, a nostalgic individual, or simply looking for a budget-friendly audio solution, understanding how to get a cassette adapter to work can open up a whole new world of possibilities.
But what exactly is a cassette adapter? How does it work? And what are the common issues you may encounter when using one? In this article, we will explore the ins and outs of cassette adapters, discuss the steps to get them to work effectively, and provide troubleshooting tips to overcome any challenges you may face along the way.
So, let’s dive in and unravel the secrets of the cassette adapter!
Key Takeaways:
- Embrace the nostalgia and convenience of cassette adapters by understanding how they work and troubleshooting common issues for optimal audio playback.
- Maximize your audio experience with cassette adapters through proper alignment, cleaning, and testing, and consider specialized car cassette adapters for enhanced performance.
Read more: How Does A Cassette Toilet Work
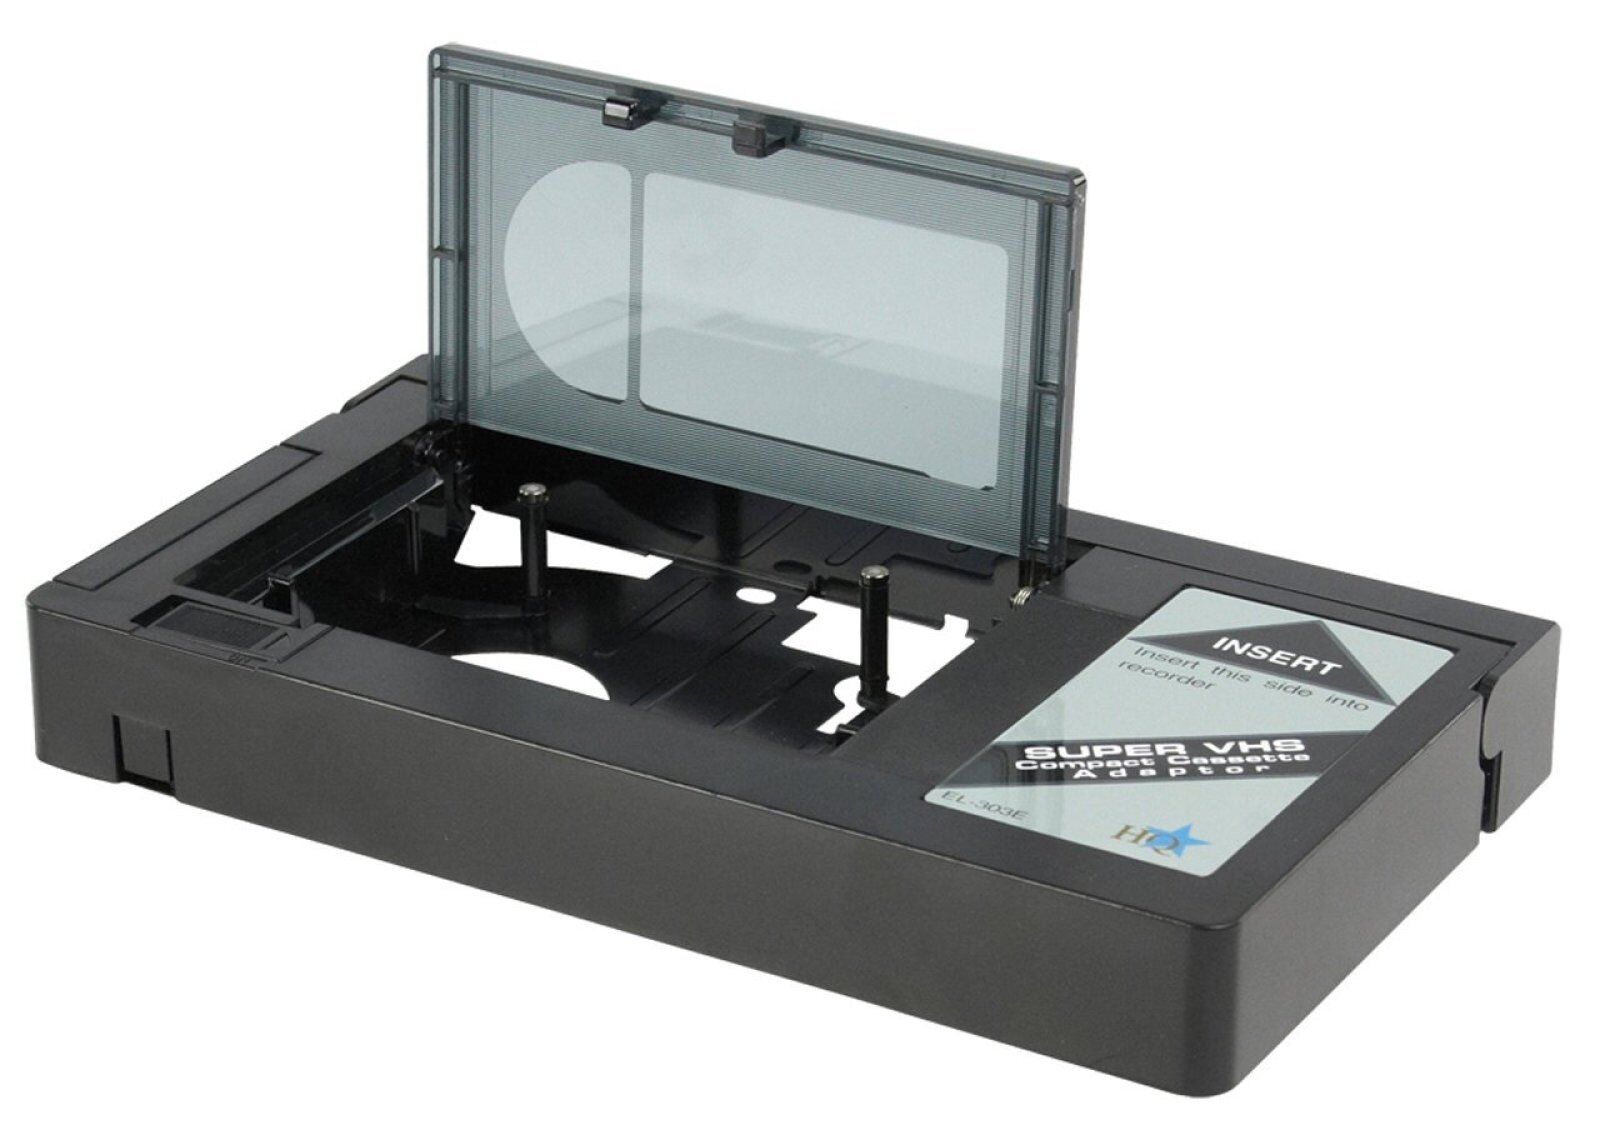
What is a cassette adapter?
A cassette adapter is a device that allows you to play audio from your portable devices, such as smartphones, MP3 players, or CD players, through a cassette player. It acts as a bridge between the analog world of cassette players and the digital audio files stored on your modern devices.
When inserted into a cassette player, the cassette adapter mimics the shape and size of a standard cassette tape. It has a cable attached to it, with a headphone jack on one end and a mechanism on the other end that looks like a mini cassette tape. This allows you to connect your portable device to the cassette adapter via the headphone jack.
The cassette adapter works by converting the electrical signals from your device into magnetic signals that the cassette player can interpret. When the cassette player reads these magnetic signals, it plays back the audio through its speakers, just like it would with a regular cassette tape.
One of the benefits of cassette adapters is their versatility. They can be used not only in car cassette players but also in home stereo systems or any other cassette player with a compatible cassette deck. This makes them a convenient and portable solution for enjoying your favorite tunes or audio content in various settings.
Now that you have a better understanding of what a cassette adapter is and how it functions, let’s explore the intricacies of how to get a cassette adapter to work effectively.
Understanding how cassette adapters work
Before we delve into the steps to get a cassette adapter to work, it’s helpful to have a deeper understanding of how these devices function. By understanding the underlying mechanics, you’ll be better equipped to troubleshoot any issues you may encounter and ensure optimal performance.
As mentioned earlier, cassette adapters work by converting electrical signals from your portable device into magnetic signals that mimic those of a standard cassette tape. This conversion is achieved through a combination of components within the adapter.
The cable attached to the cassette adapter serves as the conduit for the electrical signals. It transfers the audio signals from the headphone jack of your device to the adapter. This cable is usually thin, flexible, and made of materials that minimize signal loss and interference.
Inside the cassette adapter, there is a small mechanism that houses the magnetic components. These components are responsible for converting the electrical signals into magnetic ones. They consist of a magnetic head and a small motor.
The magnetic head is positioned to make contact with the cassette player’s playback heads. It reads the magnetic signals generated by the adapter and sends them to the playback heads, which interpret the signals and play back the audio through the speakers.
Meanwhile, the motor in the cassette adapter spins a small reel, which drives the tape mechanism and creates the illusion that a cassette tape is playing. This motion is necessary for the cassette player to engage and start playing the audio signals.
Overall, cassette adapters are ingeniously designed to bridge the gap between old and new audio technologies. They allow you to enjoy the convenience of modern digital devices while still making use of the cassette players that are ubiquitous in many cars and homes.
Now that you have a solid grasp of how cassette adapters work, let’s move on to the common issues that may arise when using them and the steps to address them effectively.
Common issues with cassette adapters
While cassette adapters are generally reliable and easy to use, there are a few common issues that users may encounter. Being aware of these issues can help you troubleshoot and resolve them quickly, ensuring a seamless audio experience.
1. Audio quality: One of the most common issues is poor audio quality, including static, distortion, or low volume. This can be caused by several factors, such as dust or debris on the cassette player’s tape heads, a misaligned adapter, or low-quality cassette tapes. Addressing these factors by cleaning the tape heads, ensuring proper alignment, and using high-quality cassette tapes can significantly improve audio quality.
2. Playback issues: Sometimes, the cassette player may have trouble engaging or playing the audio from the cassette adapter. This can be due to a worn-down tape mechanism in the cassette player or a faulty cassette adapter. In such cases, troubleshooting steps include cleaning the cassette player, checking for any mechanical issues, and trying a different cassette adapter.
3. Compatibility issues: Not all cassette players are compatible with cassette adapters. Some older or specialized cassette players may not recognize the adapter or may not have an appropriate playback mechanism. If you encounter compatibility issues, it’s recommended to consult the user manual of your cassette player or consider using an alternative audio connection method.
4. Tangled cables: The cable connected to the cassette adapter can sometimes become tangled or twisted, leading to poor audio quality or difficulties in inserting the adapter into the cassette player. Taking care to avoid tangling the cable and ensuring it is adequately secured can help prevent this issue.
5. Interference: In rare cases, you may experience interference or audio disruptions due to external factors like nearby electronic devices or electromagnetic interference. To minimize this issue, try moving away from sources of interference or using shielded cables for better signal integrity.
While these issues can be frustrating, they can typically be resolved by following a few troubleshooting steps. In the next section, we will outline the essential steps to get a cassette adapter to work effectively, resolving these common issues and ensuring an optimal audio experience.
Steps to get a cassette adapter to work
Getting a cassette adapter to work effectively involves a few key steps to ensure proper setup and address any potential issues. By following these steps, you’ll be able to enjoy clear audio playback and a seamless audio experience.
- Clean the cassette player and adapter: Dust and debris can accumulate on the tape heads of the cassette player and the magnetic components of the cassette adapter, leading to poor audio quality. Use a clean, lint-free cloth and isopropyl alcohol to gently clean these surfaces, ensuring a smooth playback process.
- Ensure proper alignment: Proper alignment between the cassette adapter and the cassette player is crucial for optimal performance. Make sure the adapter is fully inserted into the cassette deck, ensuring a snug and secure fit. If the adapter is not aligned properly, you may experience audio issues or playback difficulties.
- Check the audio source: Ensure that the audio source you’re connecting to the cassette adapter, such as your smartphone or MP3 player, is functioning correctly. Test the audio output through headphones to ensure there are no issues with the source device itself.
- Adjust volume levels: Depending on the output volume of your audio source, you may need to adjust the volume levels to achieve the desired audio level. Start with a low volume level on your device and gradually increase it to a comfortable listening level.
- Test different cassette tapes: If you’re experiencing audio quality issues or playback problems, try using different cassette tapes in the adapter. Sometimes, certain tapes may not work well with the adapter due to variations in tape quality. Testing different tapes can help identify if the issue lies with the tape or the adapter itself.
- Consider using a car cassette adapter: If you’re using a cassette adapter in your car and experiencing difficulties, consider using a dedicated car cassette adapter. These adapters are specifically designed for automotive use and often provide better audio quality and compatibility with car cassette players.
- Troubleshooting tips: If you encounter persistent issues, try some troubleshooting tips. This may include updating the firmware or software of your audio source, trying a different cable, or consulting the user manual of your cassette player for specific troubleshooting steps.
By following these steps, you’ll be well on your way to getting a cassette adapter to work effectively, addressing common issues, and enjoying your favorite tunes with clear and crisp sound.
Clean the cassette player and adapter
One of the first steps to get a cassette adapter to work effectively is to ensure the cassette player and adapter are clean. Over time, dust, dirt, and debris can accumulate on the tape heads of the cassette player and the magnetic components of the cassette adapter, leading to poor audio quality and playback issues. Cleaning these surfaces can significantly improve the performance and audio output.
Here’s how you can clean the cassette player and adapter:
- Start by turning off the cassette player and removing any cassette tapes that might be inside.
- Take a clean, lint-free cloth and dampen it slightly with isopropyl alcohol. Avoid using water or harsh cleaning agents, as they can damage the cassette player or adapter.
- Gently rub the cloth over the tape heads of the cassette player. The tape heads are the small metal components that come into contact with the cassette tape. Be careful not to press too hard or apply excessive force, as this can damage the heads.
- Next, clean the magnetic components of the cassette adapter using the same cloth. Pay attention to the area where the adapter contacts the tape heads of the cassette player.
- Allow both the cassette player and adapter to dry completely before inserting the cassette adapter into the player.
By cleaning the cassette player and adapter, you remove any dirt or debris that may interfere with the audio playback and ensure proper contact between the heads and magnetic components. This leads to improved audio quality and a smoother user experience.
Remember to clean the cassette player and adapter regularly, especially if you notice a decline in audio quality or encounter playback issues. This preventive maintenance ensures that your cassette adapter continues to work effectively over time.
Ensure proper alignment
Proper alignment between the cassette adapter and the cassette player is crucial for optimal performance and seamless audio playback. If the adapter isn’t aligned correctly, you may experience audio issues, playback difficulties, or even damage to the cassette player or adapter itself. Therefore, it is essential to ensure proper alignment before using a cassette adapter.
Here are the steps to ensure proper alignment:
- Start by turning off the cassette player.
- Insert the cassette adapter into the cassette deck of the player. Make sure it is aligned correctly and fully inserted.
- Ensure that the adapter fits snugly and securely in the cassette player. It should not be loose or wobbly.
- If your cassette player has an auto-reverse feature, make sure the adapter is inserted correctly for both sides of the tape.
- Gently push the adapter inward to make sure it is in the proper position.
- Once you’re confident that the adapter is aligned properly, gently close the cassette player’s tape compartment.
By ensuring proper alignment, you create a good connection between the cassette adapter and the cassette player’s tape heads, allowing for effective transmission of audio signals. This helps to minimize audio quality issues and ensures smooth playback.
If you’re experiencing any difficulties inserting the cassette adapter or if it doesn’t seem to fit correctly, double-check that you have the correct type of adapter for your cassette player. Some players may require specific adapters, so it’s crucial to consult the user manual or do some research to ensure compatibility.
Proper alignment is a key factor in getting a cassette adapter to work effectively. Taking the time to align the adapter correctly can greatly enhance your audio experience and prevent any potential damage to your cassette player or adapter.
Make sure the cassette adapter is fully inserted into the tape deck and the audio cable is securely connected to your device. Clean the adapter’s head with a cotton swab if there’s any audio distortion.
Check the audio source
When using a cassette adapter, it’s important to ensure that the audio source, such as your smartphone, MP3 player, or CD player, is functioning correctly. Any issues with the audio source can impact the overall audio quality and playback experience. Therefore, before connecting your audio source to the cassette adapter, it’s a good idea to check and troubleshoot any potential problems.
Here are a few steps to check the audio source:
- Start by testing the audio output of your device using headphones. Plug in your headphones and play a song or audio clip. Check if the audio is clear and at an appropriate volume level. If you notice any distortion, low volume, or other issues, try adjusting the volume settings on your device.
- If your audio source has a built-in equalizer or audio settings, make sure they are properly configured. Adjusting the equalizer settings can enhance the audio output and tailor it to your preferences.
- Ensure that the audio source is not on silent or in do not disturb mode. Some devices have silent or do not disturb modes that can mute or limit the audio output. Check the settings of your device to ensure that sound is enabled.
- If you have recently updated the firmware or software of your audio source, make sure it is up to date. Sometimes, software updates can impact audio settings or introduce new features that may affect compatibility with the cassette adapter. Updating your device’s software can potentially resolve any issues.
By checking the audio source and troubleshooting any problems, you can eliminate potential issues that may affect the performance of the cassette adapter. This ensures that the audio signals transmitted to the adapter are of good quality and can be played back without any interference or distortion.
If you have tried the above steps and are still experiencing issues with audio quality or playback, it may be worth trying a different audio source. Testing the cassette adapter with a different device can help determine whether the issue is with the adapter or the initial audio source.
Remember, a properly functioning audio source is key to getting a cassette adapter to work effectively and enjoy high-quality audio playback.
Adjust volume levels
Adjusting the volume levels is an important step in getting a cassette adapter to work effectively and ensuring a pleasant audio experience. Sometimes, the output volume of your audio source may be too low or too high, resulting in subpar audio quality or discomfort during playback. By adjusting the volume levels appropriately, you can find the right balance and enjoy clear and enjoyable audio through the cassette adapter.
Here are some steps to help you adjust the volume levels effectively:
- Start by playing audio from your device through the cassette adapter.
- Begin with the volume level set to a low position on your audio source. This will prevent any sudden or excessive volume that could potentially damage your speakers or the cassette adapter.
- Slowly increase the volume on your audio source until you reach a comfortable listening level. If the audio seems too soft, gradually raise the volume until it matches your desired level. Be mindful of any distortion or clipping that may occur if the volume is too high.
- If your audio source has volume controls or settings specific to the cassette adapter, adjust them accordingly. Some devices may have separate volume controls for various audio outputs, allowing you to fine-tune the volume specifically for the cassette adapter.
- Once you have adjusted the volume levels, do a quick check to ensure that the audio output is clear and at an appropriate volume. Listen for any distortion or any inconsistencies in the sound quality. Make further adjustments as needed.
Keep in mind that volume levels may vary depending on the audio source and the content you’re playing. For example, a podcast or audiobook may require lower volume compared to a music album. Adjust the volume levels to your preference and comfort, and be mindful of any audio limitations or recommendations specific to your cassette player or adapter.
By adjusting the volume levels carefully, you can enjoy optimum audio quality and prevent any discomfort or audio-related issues while using the cassette adapter.
Read more: How Does Bluetooth Adapter Work
Test different cassette tapes
When using a cassette adapter, the quality and condition of the cassette tape can have a significant impact on the audio playback. Sometimes, you may experience issues such as poor sound quality, muffled audio, or distorted playback. Testing different cassette tapes can help you identify whether the issue lies with the adapter or the cassette tape itself.
Here are some steps to test different cassette tapes:
- Begin by selecting a variety of cassette tapes to test with your cassette adapter. Choose tapes from different brands, genres, and recording quality to get a comprehensive understanding of the adapter’s compatibility.
- Insert the first cassette tape into the cassette adapter and play it through your audio source.
- Listen carefully to the audio playback. Take note of any issues such as distortion, hissing, dropouts, or other anomalies.
- If you encounter any issues with the first cassette tape, try a different one. Repeat the playback process with the new tape and compare the audio quality.
- Continue testing different cassette tapes until you find one that provides consistently good audio playback.
By testing different cassette tapes, you can determine whether the quality issues you’re experiencing are specific to a particular tape or if they’re related to the cassette adapter itself. Sometimes, older or worn-out cassette tapes may not produce optimal audio quality, so experimenting with various tapes can help identify the problem and provide a solution.
If you find that a particular cassette tape consistently provides poor audio quality or issues, it may be best to avoid using that tape. Instead, focus on tapes that deliver better sound and playback performance. Additionally, consider cleaning the tape heads of your cassette player and the magnetic components of the cassette adapter regularly to ensure optimal audio reproduction.
Remember to handle cassette tapes with care, avoiding any twisting or winding that could damage the tape. Proper storage of cassette tapes in cool and dry conditions can also help preserve their audio quality.
By testing different cassette tapes, you can maximize the performance of your cassette adapter and enjoy high-quality audio playback.
Consider using a car cassette adapter
If you’re using a cassette adapter in your car, it’s worth considering the option of using a dedicated car cassette adapter. These adapters are specifically designed for automotive use and can provide several advantages over generic cassette adapters when it comes to audio quality, compatibility, and convenience.
Here are some reasons to consider using a car cassette adapter:
- Improved audio quality: Car cassette adapters are designed to optimize audio quality for car stereo systems. They often have better shielding against interference, resulting in clearer and more robust sound reproduction.
- Enhanced compatibility: Car cassette adapters are built with car stereo systems in mind, ensuring better compatibility with a wider range of car cassette players. They are less likely to encounter compatibility issues compared to generic cassette adapters.
- Convenient design: Car cassette adapters typically have a flexible cable that allows you to position the adapter conveniently and connect it to your audio source without obstructing other controls or storage compartments in your car. They are designed to fit snugly and securely in the car’s cassette deck.
- Additional features: Some car cassette adapters come with extra features such as built-in Bluetooth connectivity or a USB port, allowing you to connect your devices wirelessly or charge them while listening to audio through the adapter. These added functionalities can enhance your overall audio experience.
- Optimized performance: Car cassette adapters undergo thorough testing for automotive use, ensuring reliable performance even during long drives and varying road conditions. They are built with durability in mind, ensuring longevity and consistent performance.
If you frequently use a cassette adapter in your car and prioritize audio quality and convenience, investing in a car cassette adapter can be a worthwhile decision. While generic cassette adapters can still work well in many cases, a dedicated car cassette adapter offers specialized features and optimized performance specifically for automotive audio systems.
Before purchasing a car cassette adapter, consider the compatibility with your car’s cassette player and any additional features you may require. Read reviews and do some research to find a reputable brand or model that suits your needs and offers the best audio experience for your specific car.
By using a car cassette adapter, you can enhance your in-car audio experience and ensure seamless audio playback while on the road.
Troubleshooting tips
Even with proper alignment, cleaning, and testing different cassette tapes, you may still encounter some issues with your cassette adapter. Luckily, there are a few troubleshooting tips you can try to address these issues and get your cassette adapter to work effectively.
- Check the cable: Ensure that the cable connected to the cassette adapter is in good condition and properly connected. If the cable is damaged or loose, it can cause audio interruptions or poor sound quality. Consider replacing the cable if necessary.
- Inspect the cassette player: Examine the cassette player for any signs of damage or wear that may affect the adapter’s performance. If you notice any issues, consult the user manual or seek professional assistance to address the problem.
- Verify the tape deck mechanism: Ensure that the tape deck mechanism in the cassette player is functioning correctly. If the mechanism is worn out or faulty, it can impact the proper engagement of the cassette adapter and cause playback issues. In such cases, professional repair or replacement may be necessary.
- Try a different audio source: If you are experiencing consistent issues with a specific audio source, try connecting a different device to the cassette adapter. This helps determine if the problem lies with the adapter or the original audio source.
- Check for interference: Nearby electronic devices or electromagnetic interference can sometimes disrupt the audio quality. Try moving away from potential sources of interference or use shielded cables for better signal integrity.
- Consider firmware updates: If you’re using a digital audio source, check if there are any firmware updates available for your device. Updating the firmware can sometimes resolve compatibility issues or improve audio performance.
- Consult the user manual: If you’re still experiencing difficulties, refer to the user manual of your cassette player or cassette adapter. The manual may have specific troubleshooting steps or valuable information to help you resolve the issue.
If you have exhausted all troubleshooting options and are still unable to resolve the issue, consider seeking professional assistance or contacting the manufacturer for support. They may be able to provide further guidance or suggest specific solutions based on your specific situation.
Remember, troubleshooting can often be a process of trial and error. Patience and persistence are key to identifying and resolving any issues you may encounter with your cassette adapter.
By following these troubleshooting tips, you can overcome common challenges and ensure optimal performance from your cassette adapter.
Conclusion
Using a cassette adapter to play audio from your portable devices through a cassette player can unlock a world of possibilities for enjoying your favorite tunes or audio content. While cassette adapters provide a convenient and cost-effective solution, it’s important to know how to get them to work effectively to ensure a seamless audio experience.
In this article, we’ve explored the ins and outs of cassette adapters, from understanding how they work to addressing common issues and troubleshooting tips. By following the steps outlined in this article, including cleaning the cassette player and adapter, ensuring proper alignment, checking the audio source, adjusting volume levels, testing different cassette tapes, and considering a car cassette adapter, you can maximize the performance of your cassette adapter and enjoy optimal audio quality.
Remember, troubleshooting may be necessary from time to time, but with patience and persistence, you can overcome any challenges that may arise. If all else fails, don’t hesitate to seek professional assistance or contact the manufacturer for further support.
So, go ahead and dust off that old cassette player, insert your cassette adapter, and embark on a nostalgic musical journey or indulge in your favorite audio content. With the knowledge and tips shared in this article, you’ll be able to get your cassette adapter to work effectively and enjoy the best possible audio experience.
Happy listening!
Frequently Asked Questions about How To Get A Cassette Adapter To Work
Was this page helpful?
At Storables.com, we guarantee accurate and reliable information. Our content, validated by Expert Board Contributors, is crafted following stringent Editorial Policies. We're committed to providing you with well-researched, expert-backed insights for all your informational needs.


0 thoughts on “How To Get A Cassette Adapter To Work”