
Articles
How To Hang Decorative Ladder On Wall
Modified: October 19, 2024
Discover the best tips and tricks for hanging decorative ladders on your wall with our helpful articles. Create a stunning and unique display in your home effortlessly.
(Many of the links in this article redirect to a specific reviewed product. Your purchase of these products through affiliate links helps to generate commission for Storables.com, at no extra cost. Learn more)
Introduction
Decorative ladders are a great way to add style and functionality to any space. Whether you’re looking to display blankets, towels, plants, or decorative items, hanging a decorative ladder on your wall can instantly elevate the aesthetic appeal of your home. Plus, it’s a versatile and practical solution for organizing and displaying items in small spaces.
In this article, we will guide you through the step-by-step process of how to hang a decorative ladder on a wall. By following these instructions and using the right tools, you’ll be able to securely mount your ladder and create a stunning focal point in your home.
Before you begin, take a moment to consider the overall aesthetic of your space. Think about the room’s style, color scheme, and the placement of other furniture and decor. This will help you determine the best location for your decorative ladder.
So, let’s dive in and learn how to hang a decorative ladder on a wall!
Key Takeaways:
- Elevate your home’s aesthetic appeal and functionality by securely hanging a decorative ladder on the wall. Follow the step-by-step guide to create a stunning focal point that showcases your personal style and adds extra storage space.
- Carefully choose the perfect spot, gather necessary tools, measure and mark positions, and secure the ladder for stability. Add a personal touch with decorations like blankets, plants, or lights to enhance your space’s beauty and functionality.
Read more: How To Hang Ladder On Wall
Step 1: Choose the Perfect Spot
The first step in hanging a decorative ladder on a wall is to carefully choose the perfect spot. Consider the purpose of the ladder and the overall layout of the room. You want to select a location that is both visually appealing and functional.
If you’re hanging the ladder in the living room, you might want to position it near a cozy seating area where you can easily access blankets or throws. In the bathroom, you might want to hang it on a wall near the bathtub or shower area, providing a place to hang towels or robes. In the bedroom, you might choose a spot near the bed to display scarves or jewelry.
Additionally, take into account the height and size of the ladder. You’ll want to ensure that it doesn’t obstruct any doors, windows, or other furniture. Measure the width and length of the ladder and mark the chosen spot with a pencil.
Consider the wall material as well. Some walls may require additional support or special anchors to securely hold the weight of the ladder. It’s important to choose a wall that can withstand the weight and strain placed on it.
Once you have chosen the perfect spot, you are ready to gather your tools and materials for the next step.
Step 2: Gather the Necessary Tools and Materials
Before you start hanging your decorative ladder, it’s important to gather all the necessary tools and materials. Having everything you need ready will make the process smoother and more efficient.
Here’s a list of tools and materials you’ll need:
- Decorative ladder
- Tape measure
- Pencil
- Screwdriver or drill
- Screws or wall anchors
- Hanging brackets or hooks
- Level
- Optional: Stud finder
Make sure you choose screws or wall anchors that are appropriate for the weight and size of your ladder. If you’re unsure, it’s always better to choose stronger anchors or consult a professional for guidance.
The hanging brackets or hooks should be sturdy and able to securely hold the weight of your ladder. Consider the design and style of the brackets to ensure they complement the ladder and the overall aesthetic of the room.
Keep in mind that if you’re hanging the ladder on a drywall, it’s important to locate the studs for added stability. A stud finder can be helpful in detecting the studs behind the wall. If you’re unable to find studs, wall anchors can provide additional support.
Once you have gathered all the tools and materials, you’re ready to move on to the next step: measuring and marking the positions.
Step 3: Measure and Mark the Positions
To ensure proper placement of the decorative ladder on the wall, it’s crucial to accurately measure and mark the positions. This will help you achieve a balanced and visually appealing look.
Start by measuring the width of your ladder. Use a tape measure to determine the distance between the outer edges of the ladder. This measurement will help you determine the spacing between the wall brackets or hooks.
Next, measure the height of the ladder. Determine where you want the bottom of the ladder to sit on the wall and mark this position with a pencil. This will serve as your baseline for aligning the brackets or hooks.
Now, divide the width of the ladder by the number of brackets or hooks you’ll be using. This will give you the spacing between each bracket or hook. Mark the positions on the wall, making sure they are evenly spaced and align with your desired ladder placement.
Use a level to ensure that the markings are straight and aligned properly. This will help you achieve a balanced and symmetrical look once the ladder is hung.
Take a step back and visually assess the marked positions. Make any necessary adjustments to ensure that the ladder will be at the desired height and position on the wall.
Once you are satisfied with the measurements and markings, you’re ready to move on to the next step: installing the wall anchors (if necessary).
Step 4: Install the Wall Anchors (if necessary)
If you’re planning to hang your decorative ladder on a wall that is made of drywall or a similar material, it’s important to install wall anchors to provide additional support. Wall anchors help distribute the weight of the ladder more evenly and prevent it from pulling away from the wall.
Start by determining the location of the studs using a stud finder. Studs are the vertical wooden or metal beams behind the wall that provide a strong anchor point. If the marked positions for your ladder brackets or hooks align with the studs, you can skip this step.
However, if the marked positions do not align with the studs, you’ll need to install wall anchors. Wall anchors come in various types, such as toggle bolts, screw-in anchors, or plastic expanding anchors.
Follow the manufacturer’s instructions for the specific type of wall anchors you’re using. Generally, the process involves drilling a hole into the wall at the marked positions, inserting the wall anchor, and then tightening it in place using a screwdriver or drill.
Make sure the wall anchors are securely attached to the wall and are able to support the weight of the ladder. Give them a gentle tug to ensure they’re firmly in place.
If you’re unsure about the installation process or the suitability of the wall anchors for your specific situation, consult a professional or seek advice from a hardware store expert.
Once the wall anchors are installed (if necessary), you’re ready to move on to the next step: mounting the hanging brackets.
Use wall anchors or screws to securely hang the decorative ladder on the wall. Make sure to measure and mark the placement before drilling to ensure it is level and secure.
Step 5: Mount the Hanging Brackets
With the wall anchors in place (if needed), it’s time to mount the hanging brackets for your decorative ladder. The brackets will provide support and stability, ensuring that your ladder stays securely attached to the wall.
Start by holding one of the brackets against the wall, aligning it with the marked position. Use a pencil to mark the screw holes on the wall through the holes in the bracket.
Set the bracket aside and repeat the process for the remaining brackets. Make sure to evenly space the brackets along the width of the ladder, following the measurements from step 3.
Once all the screw holes are marked, use a drill or screwdriver to insert the screws into the marked holes. Make sure the brackets are securely fastened to the wall, but be careful not to overtighten and damage the wall or the bracket.
Test the stability of the brackets by giving them a gentle tug. They should feel solid and not move or shift on the wall.
If you’re using hooks instead of brackets, follow the manufacturer’s instructions to securely mount them on the wall. Hooks are a popular choice for hanging lightweight decorative ladders.
Take a step back and visually assess the mounted brackets or hooks. Ensure that they are aligned properly and level. Make any necessary adjustments to ensure that the ladder will hang straight and securely on the wall.
With the brackets or hooks securely mounted, you’re ready to move on to the next step: hanging the decorative ladder on the wall.
Step 6: Hang the Decorative Ladder on the Wall
Now that you have the hanging brackets or hooks securely mounted on the wall, it’s time to hang your decorative ladder. This step will require some assistance, especially if your ladder is large or heavy.
Start by positioning the ladder near the wall, making sure that the brackets or hooks line up with the ladder’s rungs or rails. Carefully lift one end of the ladder and place it onto the corresponding bracket or hook.
With the help of a friend, hold the ladder in place while you repeat the process for the other end. Make sure that the ladder is level and evenly aligned with the brackets or hooks.
Gently push the ladder against the wall to ensure it’s securely seated on the brackets or hooks. Take a step back and visually assess the positioning and alignment of the ladder. Make any necessary adjustments to ensure it looks visually appealing and straight on the wall.
If the ladder is not level, you can adjust it by slightly lifting one end and making small adjustments until it’s perfectly level.
Once the ladder is securely and neatly hung on the wall, take a moment to admire your handiwork. Congratulations! You’re almost finished. The next step is to secure and adjust the position of the ladder.
Step 7: Secure and Adjust the Position
After hanging your decorative ladder on the wall, it’s important to secure it and make any necessary adjustments to ensure it’s properly positioned. This will help prevent the ladder from moving or slipping out of place.
Start by checking the stability of the ladder. Gently shake the ladder to see if it feels secure on the wall. If there’s any wobbling or movement, you may need to tighten the brackets or hooks or make sure the ladder is properly seated on them.
If you’re using brackets, you can tighten the screws slightly to ensure a snug fit. Be careful not to overtighten and damage the ladder or the brackets.
If you’re using hooks, double-check that they are securely latched onto the ladder rungs or rails. Make any necessary adjustments or tighten the hooks if needed.
Once the ladder feels stable, step back and assess its position. Ensure that it’s straight and level on the wall. If you notice any slanting or misalignment, you can slightly lift the ladder and make small adjustments until it’s perfectly aligned.
It’s also a good idea to stand back and view the ladder from different angles to ensure it looks visually pleasing and fits well within the room’s overall aesthetic.
Take this time to admire your work and make any final adjustments before moving on to the last step: adding final touches and decorations.
Step 8: Add Final Touches and Decorations
Now that your decorative ladder is securely and beautifully hung on the wall, it’s time to add the final touches and decorations to complete the look. This step allows you to personalize and enhance the aesthetic appeal of your ladder.
Consider the purpose of your ladder and the room’s overall style when selecting decorations. Here are a few ideas to inspire you:
- Hang blankets or throws from the ladder rungs. This not only adds a cozy touch but also provides easy access to blankets when you need them.
- Add potted plants or hanging planters to bring a touch of greenery and freshness to your ladder. This can be especially attractive when hanging the ladder in the living room or bedroom.
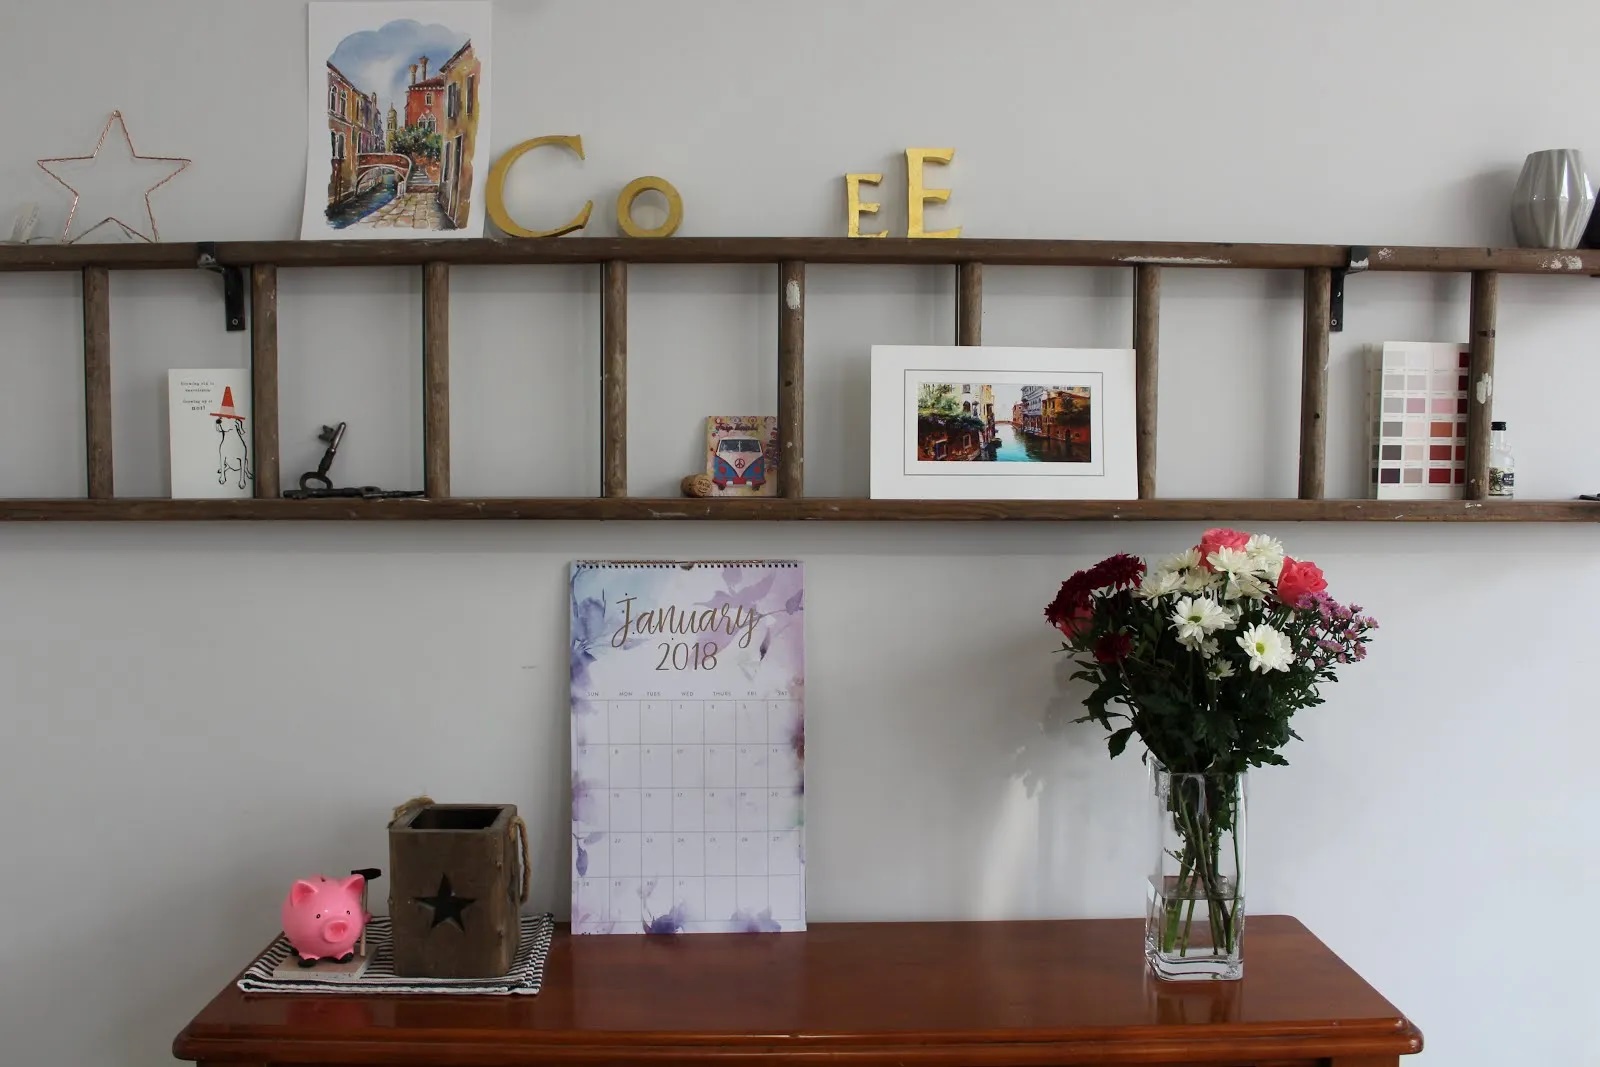
- Showcase decorative items such as framed photos, small artworks, or trinkets on the ladder rungs or shelves. Be sure to arrange them in a visually pleasing way.
- Hang string lights or fairy lights around the ladder to create ambiance and a warm glow. This can be particularly charming when using the ladder as a decorative piece in a festive setting.
Experiment with different arrangements and decorations until you achieve the desired look. Remember, the beauty of a decorative ladder is its versatility. Don’t be afraid to get creative and change up the decorations to suit different seasons or occasions.
Lastly, step back and admire your completed decorative ladder. Take a moment to appreciate the added beauty and functionality it brings to your space.
By following these eight steps, you have successfully hung a decorative ladder on your wall. Whether it’s in the living room, bedroom, bathroom, or any other area of your home, your decorative ladder is sure to make a stylish statement.
Remember to regularly check the ladder for stability and make any necessary adjustments as needed. With proper care, your decorative ladder will continue to enhance your space for years to come.
Enjoy the beauty and functionality of your newly hung decorative ladder!
Read more: How To Hang Ladder From Ceiling
Conclusion
Hanging a decorative ladder on your wall is a fantastic way to add style, organization, and functionality to any space in your home. By following the step-by-step guide outlined in this article, you have learned how to securely mount and position a decorative ladder, allowing you to create a stunning focal point that showcases your personal style.
Remember to carefully choose the perfect spot for your ladder, considering both aesthetics and functionality. Gather the necessary tools and materials, ensuring that you have everything you need before getting started. Measure and mark the positions to ensure precision and balance.
If required, install wall anchors to provide additional support for the ladder. Mount the hanging brackets or hooks securely to the wall, ensuring they are level and aligned properly. Then, hang the ladder with the help of a friend, making any necessary adjustments to achieve a straight and secure installation.
Once the ladder is hung, take the time to secure it and make any final adjustments to ensure stability. Finally, add your own personal touch by decorating the ladder with items such as blankets, plants, pictures, or lights.
Now that you have successfully hung and decorated your decorative ladder, step back and admire the beauty and functionality it brings to your space. Enjoy the convenience of the extra storage and the visual impact it has on the room.
Remember to regularly check the ladder for stability and make any necessary adjustments as needed. With proper care, your decorative ladder will continue to enhance your home’s aesthetic appeal for years to come.
So go ahead, embrace your creativity, and have fun transforming your space with a beautiful decorative ladder!
Frequently Asked Questions about How To Hang Decorative Ladder On Wall
Was this page helpful?
At Storables.com, we guarantee accurate and reliable information. Our content, validated by Expert Board Contributors, is crafted following stringent Editorial Policies. We're committed to providing you with well-researched, expert-backed insights for all your informational needs.





0 thoughts on “How To Hang Decorative Ladder On Wall”