Articles
How To Remove Oil Tank From Basement
Modified: December 7, 2023
Learn the step-by-step process to safely remove an oil tank from your basement with our informative articles. Safeguard your home and the environment today!
(Many of the links in this article redirect to a specific reviewed product. Your purchase of these products through affiliate links helps to generate commission for Storables.com, at no extra cost. Learn more)
Introduction
Welcome to our guide on how to remove an oil tank from your basement. If you have an old oil tank that is no longer in use or if you are renovating your basement and need to get rid of the tank, this step-by-step guide will walk you through the process. Removing an oil tank can be a challenging task, but with the right information and preparation, you can accomplish it safely and effectively.
Before you begin the removal process, it’s important to assess the situation and determine if you are equipped to handle the job. Removing an oil tank requires careful planning, adherence to safety guidelines, and obtaining necessary permits. It is also important to consider the environmental impact and proper disposal of the oil tank.
In this guide, we will provide you with detailed instructions on how to remove the oil tank from your basement. We will cover everything from assessing the situation and obtaining permits to the actual removal process and proper disposal of the tank. Following these steps will ensure a smooth and successful removal of the oil tank while minimizing any potential hazards.
Please note that removing an oil tank is a complex task that may require professional assistance. If you are unsure about any step of the process or if you have any concerns about safety, it is highly recommended to consult with an experienced contractor or environmental specialist.
Now, let’s dive into the step-by-step process of removing an oil tank from your basement.
Key Takeaways:
- Proper planning, safety precautions, and compliance with environmental regulations are essential for successfully removing an oil tank from your basement. Thorough assessment, obtaining permits, and proper disposal are crucial steps in the process.
- After removing the oil tank, inspecting and repairing the basement is vital to restore the space to a safe and functional condition. Prioritize safety, seek professional assistance if needed, and contribute to a healthier living environment.
Read more: How To Remove Radon From Basement
Step 1: Assessing the Situation
The first step in removing an oil tank from your basement is to assess the situation. This involves evaluating the size and condition of the tank, as well as considering any potential risks or obstacles in the removal process.
Start by inspecting the tank for any signs of damage, such as corrosion or leaks. If you notice any issues with the tank, it is important to address them before proceeding with the removal. This may involve repairing the tank or taking additional safety measures.
Next, evaluate the accessibility of the tank. Determine if there is enough space around the tank to safely maneuver and remove it from the basement. Take into account any narrow doorways or tight corners that may pose challenges during the removal process.
Consider the weight of the tank and ensure you have the necessary equipment to safely lift and transport it. If the tank is too heavy for you to handle on your own, it is recommended to enlist the help of professionals or find a suitable lifting mechanism.
Additionally, you should assess the location of the oil tank in relation to other components in your basement. Take note of any electrical wires, pipes, or structural elements that may be impacted by the removal process. It is essential to plan the removal in a way that minimizes potential damage to your basement and ensures the safety of yourself and others.
Lastly, consider the environmental impact of the oil tank removal. Oil tanks can sometimes contain residual oil or contaminants, so it is important to have a plan for proper disposal. Research local regulations and guidelines regarding the disposal of oil tanks to ensure compliance with environmental standards.
By thoroughly assessing the situation, you will be able to identify any potential challenges or safety concerns that may arise during the oil tank removal process. This evaluation will help you plan accordingly and take the necessary precautions to ensure a smooth and successful removal.
Step 2: Obtaining the Required Permits
Before you can start the process of removing an oil tank from your basement, it is crucial to obtain the necessary permits from your local authorities. This step ensures that you are in compliance with regulations and helps to protect the environment and the safety of everyone involved.
The specific permits required may vary depending on your location, so it is important to research the regulations in your area. Contact your local building department or environmental agency to inquire about the permits and any associated fees or documentation that may be needed.
Typically, you will need to provide details about the oil tank’s size, location, and the removal process. You may also be required to submit information on the disposal plan for the tank and any hazardous materials it may contain.
When applying for the permits, be prepared to provide relevant information such as your contact details, property information, and any certifications or qualifications you may have. It is crucial to provide accurate and complete information to avoid any delays or complications in the permitting process.
Once you have submitted your permit application, it may take some time for it to be reviewed and approved. It is advisable to apply for the permits well in advance of your planned removal date to account for any potential processing delays.
During the inspection process, it is important to follow any guidelines or requirements set forth by the issuing authority. This may include having a professional inspector verify the condition of the tank or adhering to specific safety protocols during the removal process.
Obtaining the required permits not only ensures that you are legally compliant, but it also demonstrates your commitment to responsible and safe practices. By following the regulatory requirements, you contribute to the overall protection of the environment and the well-being of your community.
Once you have the necessary permits in place, you can proceed with confidence to the next step of the oil tank removal process.
Step 3: Emptying the Oil Tank
Before you can safely remove an oil tank from your basement, it is essential to empty it of any remaining oil. This step requires careful planning and adherence to safety protocols to avoid spills and minimize environmental impact.
Here are the steps to follow when emptying the oil tank:
- Turn off the power: Before you begin emptying the tank, make sure to turn off any power sources connected to it, such as the furnace or heating system. This prevents the risk of ignition or other accidents.
- Prepare for oil transfer: Set up a suitable container or drum to collect the oil. Ensure that the container is clean, leak-proof, and appropriately sized to hold the contents of the tank. Place absorbent material or a spill containment tray beneath the oil tank to catch any spills or drips.
- Locate the oil supply valve: The oil supply valve is typically located near the bottom of the tank. Close this valve to stop the flow of oil into the tank.
- Attach a temporary transfer hose: Connect a temporary transfer hose to the oil supply valve. The other end of the hose should be inserted into the collection container. Make sure the hose is securely attached to prevent leaks or spills.
- Open the air vent valve: Open the air vent valve on the oil tank to allow air to enter as the oil is drained. This helps to maintain a consistent flow and prevent vacuum-related issues.
- Begin transferring the oil: Slowly open the oil supply valve, allowing the oil to flow from the tank into the collection container. Monitor the transfer process closely to ensure that there are no leaks or spills. Use a flashlight to check for any residual oil remaining in the tank.
- Dispose of the collected oil: Once you have successfully emptied the oil tank, dispose of the collected oil in accordance with local regulations. Contact your local waste management facility or recycling center for guidance on proper disposal methods.
It is important to exercise caution and follow safety guidelines throughout the oil transfer process. Use appropriate protective gear such as gloves and safety goggles to protect yourself from potential hazards.
Remember, oil is a hazardous substance, and improper handling and disposal can have serious environmental consequences. Adopting environmentally friendly practices, such as recycling or repurposing the oil, is encouraged whenever possible.
By effectively emptying the oil tank, you are one step closer to completing the removal process and ensuring a safe and clean environment in your basement.
Step 4: Disconnecting the Oil Tank
Once the oil tank has been emptied, the next step in removing it from your basement is to disconnect it from any remaining connections. This process involves shutting off the fuel supply, draining any remaining residue, and disconnecting the necessary pipes and hoses.
Follow these steps to properly disconnect the oil tank:
- Turn off the fuel supply: Locate the fuel supply valve and securely turn it off. This valve is typically located near the tank or on the fuel line leading to the tank. Shutting off the fuel supply prevents any potential leaks or spills during the disconnection process.
- Drain any remaining residue: Use a suitable container or absorbent material to collect and dispose of any remaining oil or residue in the tank. Ensure proper safety measures such as using gloves and protective gear while handling the residue.
- Disconnect the pipes and hoses: Carefully disconnect the pipes and hoses attached to the oil tank. This may include fuel supply lines, vent pipes, and return lines. Use appropriate tools and techniques to loosen any fittings or connections, ensuring that you do not damage the tank or surrounding components.
- Cap or seal the open pipes and hoses: After disconnecting the pipes and hoses, immediately cap or seal the open ends to prevent any fuel or fumes from escaping. This helps maintain safety and prevents any potential environmental hazards.
- Remove any remaining components: Look for any additional components attached to the oil tank, such as gauges, valves, or filters. Disconnect and remove these components as necessary.
- Inspect for any leaks: Once the disconnection is complete, conduct a thorough inspection of the oil tank and surrounding area for any signs of leaks or spills. Address any issues promptly to minimize potential hazards.
It’s important to take the necessary precautions during the disconnection process to ensure your safety and prevent any damage to the tank or your basement. If you are unsure about the proper techniques or lack the necessary tools, it is advisable to consult a professional or licensed contractor.
By completing the disconnection process, you are one step closer to successfully removing the oil tank from your basement and moving on to the next phase of the removal process.
Before removing an oil tank from the basement, it’s important to first drain the tank completely to prevent any spills or leaks. This can be done by hiring a professional to pump out the remaining oil.
Read more: How To Remove Algae From A Fish Tank Glass
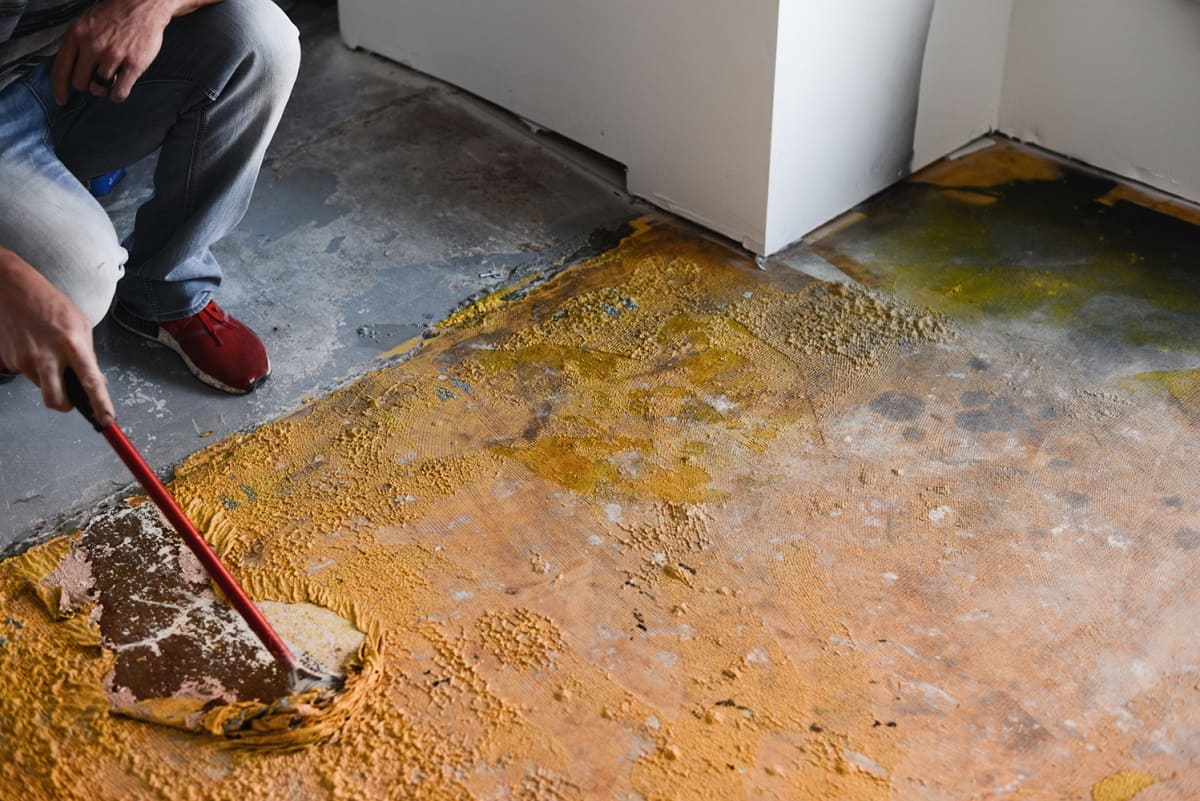
Step 5: Cleaning Up and Preparing the Area
After disconnecting the oil tank, it is important to clean up the area and prepare it for the actual removal process. This step involves removing any debris, cleaning any spills or leaks, and ensuring a safe and clear working space.
Follow these steps to effectively clean up and prepare the area:
- Remove any remaining debris: Clear out any loose debris, such as dirt, dust, or small objects, from the area surrounding the oil tank. Use a broom, vacuum, or any appropriate tool to ensure a clean working environment.
- Clean up spills or leaks: If there were any spills or leaks during the disconnection process or throughout the life of the oil tank, it is crucial to clean them up properly. Use absorbent materials to soak up any oil or fuel residues, and dispose of them according to local regulations.
- Inspect for any damages: Take the time to carefully inspect the surrounding walls, floors, and other structures for any damages caused by the oil tank or the disconnection process. If any damages are found, make note of them and consider repairing or reinforcing the affected areas.
- Ensure proper ventilation: Check the ventilation in the area and make sure it is functioning correctly. Good ventilation is essential to protect against any remaining fumes or odors that may be present after disconnecting the oil tank.
- Secure the area: To ensure the safety of yourself and others, barricade or cordon off the area where the oil tank was located. Use caution tape or signs to clearly mark the area as a hazard zone and prevent anyone from accidentally entering or disturbing the space.
- Dispose of cleaning materials: Properly dispose of any cleaning materials, such as absorbent pads or rags, that were used to clean up spills or leaks. Follow local regulations and guidelines for the appropriate disposal method.
By cleaning up and preparing the area, you create a safe and organized environment for the next steps of the oil tank removal. It also allows for a smoother transition and ensures the efficient progress of the removal process.
Remember, safety should always be a top priority during this step and throughout the entire removal process. Take necessary precautions, wear proper protective gear, and seek professional assistance if needed.
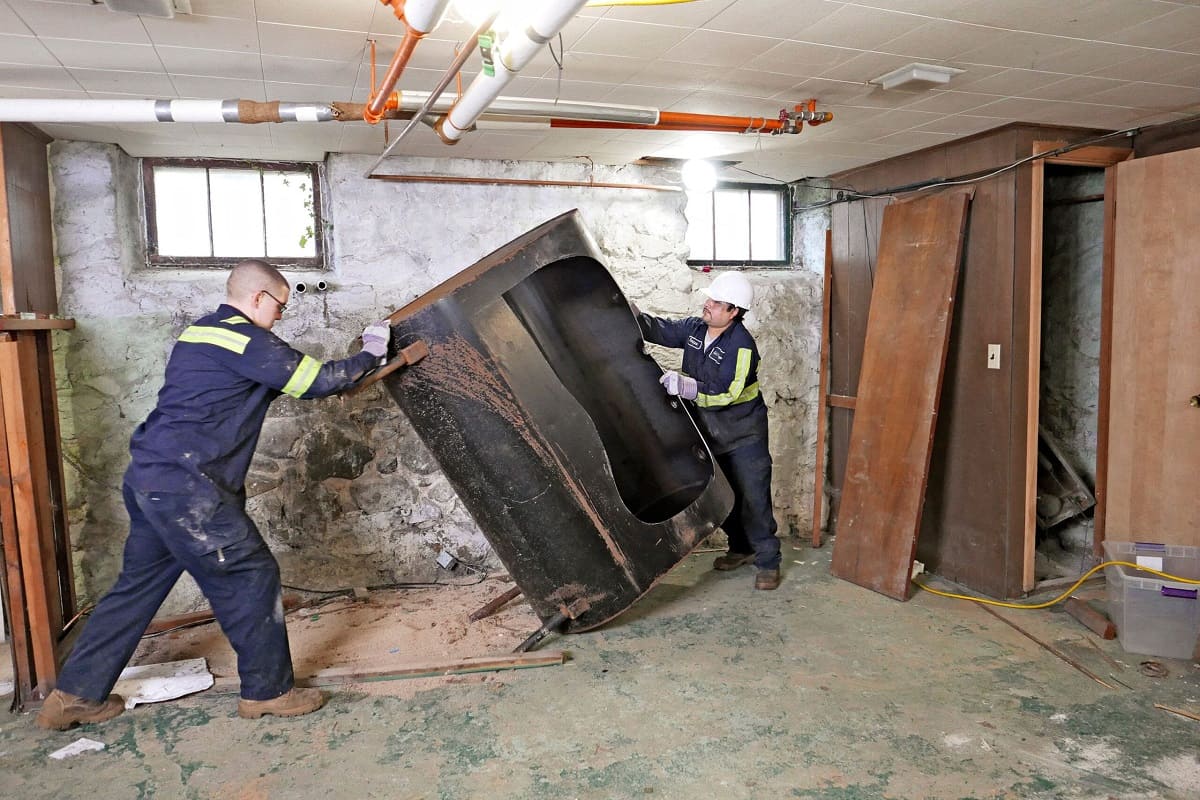
Step 6: Removing the Oil Tank from the Basement
Removing the oil tank from your basement is a critical step in the overall process. It is important to approach this step with caution and follow proper procedures to ensure the safety of yourself and others involved.
Here are the steps to remove the oil tank from the basement:
- Enlist professional help if needed: Removing an oil tank from the basement can be a challenging task, especially if it is large or located in a difficult-to-reach area. If you are not confident in your ability to handle the removal on your own, it is advisable to hire a professional contractor who has experience in oil tank removal.
- Use proper lifting equipment: Before attempting to remove the oil tank, make sure you have the necessary equipment to lift and transport it safely. This may include a hydraulic jack, specialized lifting straps or slings, and a dolly or cart for transportation.
- Securely stabilize the tank: Ensure that the oil tank is stable and properly supported during the removal process. Secure it using straps or chains to prevent any sudden movements or accidents.
- Consider machinery and structural constraints: Take into account any structural components, doorways, or narrow passageways that may pose challenges during the tank removal. If necessary, disassemble the tank or modify its shape to facilitate easier removal.
- Carry out the removal process slowly and carefully: As you lift the oil tank, proceed slowly and steadily to maintain control and minimize the risk of damage or injury. Work with a team of individuals to ensure a coordinated effort during the removal.
- Transport the tank to the designated area: Once the tank is lifted and detached from its original location, carefully transport it to the designated area for temporary storage or disposal. Ensure that the area is suitable and compliant with local regulations for oil tank storage or disposal.
Throughout the process, it is important to prioritize safety and take necessary precautions. Use appropriate personal protective equipment (PPE), such as gloves, goggles, and suitable footwear, to protect yourself from any potential hazards.
If you encounter any unexpected issues or difficulties during the removal process, it is recommended to consult with professionals or experts in oil tank removal to ensure the safe completion of the task.
By effectively removing the oil tank from your basement, you are one step closer to completing the overall removal process and creating a safer and more functional space.
Step 7: Properly Disposing of the Oil Tank
Proper disposal of the oil tank is essential to protect the environment and comply with local regulations. Oil tanks can contain residual oil and other hazardous materials that can have a negative impact if not disposed of correctly. Follow these steps to ensure the proper disposal of the oil tank:
- Consult with local authorities: Research and contact your local environmental or waste management agency to understand the regulations and guidelines regarding the disposal of oil tanks in your area. They can provide you with information on approved methods and facilities for proper disposal.
- Consider recycling or repurposing options: Explore options for recycling or repurposing the oil tank. Some recycling centers or scrap metal yards may accept oil tanks for recycling. Repurposing the tank for other uses, such as storage containers, may also be an option.
- Arrange for professional disposal: If recycling or repurposing is not viable, contact professional waste removal companies that specialize in hazardous materials. They have the expertise and equipment to safely transport and dispose of the oil tank according to regulations.
- Prepare the oil tank for disposal: Prior to disposal, make sure the tank is emptied of any remaining oil and cleaned to the best of your ability. Remove any fittings, valves, or other accessories that may pose a risk during handling and disposal.
- Follow proper transport protocols: If you are transporting the oil tank to a disposal facility yourself, ensure that you follow all regulations and guidelines for transportation of hazardous materials. Use appropriate containers, secure the tank properly, and comply with any labeling requirements.
- Document and keep records: Keep copies of any documentation or paperwork related to the disposal of the oil tank. This can include receipts, disposal certificates, or other records that demonstrate compliance with regulations.
It is essential to comply with local laws and regulations to avoid fines or penalties associated with improper disposal of the oil tank. The responsible disposal of the tank contributes to safeguarding the environment and minimizing any potential harm.
Remember, if you are unsure about the specific requirements or need further guidance, consult with professionals in waste management or environmental agencies. They can provide you with the most up-to-date information and assistance in the proper disposal of your oil tank.
By properly disposing of the oil tank, you can ensure that its impact on the environment is minimal, and you can complete the removal process with peace of mind.
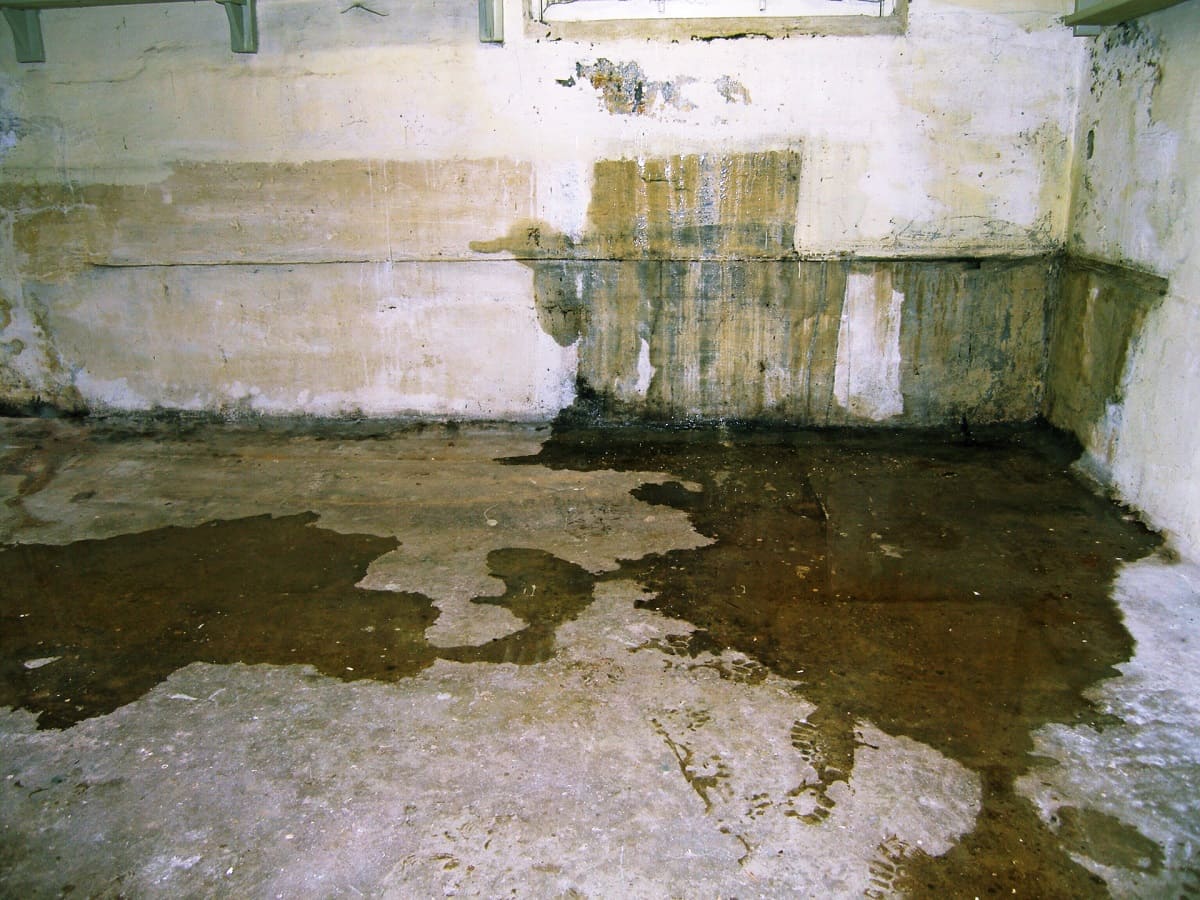
Step 8: Inspecting and Repairing the Basement
After the oil tank has been removed from your basement, it is important to inspect the area for any damages or issues that may have arisen during the removal process. This step involves assessing the condition of the basement and making any necessary repairs to restore it to its original state.
Here are the steps to inspect and repair the basement:
- Assess for any structural damages: Inspect the walls, floors, and foundation of the basement for any signs of damage caused by the oil tank or the removal process. Look for cracks, dampness, or weakened sections that may require repair.
- Address any oil spills or stains: If there were any oil spills or stains during the removal process, take steps to clean and remove them. Follow appropriate cleaning methods and use suitable products to avoid further damage to the basement surfaces.
- Check for potential leaks or odors: After the oil tank removal, inspect the plumbing and HVAC systems in the basement for any signs of leaks or lingering odors. Address any issues promptly to prevent further damage or discomfort.
- Repair or replace damaged components: If any pipes, wires, or other components were disassembled or damaged during the removal process, make the necessary repairs or replacements. This ensures the proper functioning and safety of the basement’s infrastructure.
- Reinforce or seal any openings: Inspect for any openings, gaps, or access points in the basement that may have been created during the oil tank removal. Seal or reinforce these areas to prevent moisture, pests, or other potential issues.
- Consider waterproofing measures: Depending on the condition of your basement and the presence of moisture or dampness, consider implementing waterproofing measures. This may include applying sealants, installing sump pumps, or improving drainage to prevent future water damage.
- Consult with professionals if needed: If you are unsure about the necessary repairs or if there are significant damages in the basement, it is advisable to consult with professionals such as contractors, plumbers, or structural engineers. They can provide expert advice and assistance in assessing and repairing the basement.
By thoroughly inspecting and repairing the basement, you can restore it to a safe and functional space after the oil tank removal. This step ensures the long-term integrity of the basement and reduces the risk of any potential issues in the future.
Remember to maintain proper ventilation and ensure that the space is clean and free from any residual oil or hazardous materials. Completing the inspection and repair process allows you to use your renovated basement with confidence and peace of mind.
Read more: How To Remove Decking Oil From Pavers
Conclusion
Removing an oil tank from your basement is a complex and labor-intensive process that requires careful planning, adherence to safety protocols, and compliance with environmental regulations. By following the step-by-step guide outlined in this article, you can successfully navigate through each stage of the removal process.
Throughout the journey, it is crucial to assess the situation, obtain the necessary permits, empty the oil tank, disconnect the tank and clean up the area, remove the tank safely, and properly dispose of it. Additionally, inspecting and repairing the basement ensures that any damages are addressed and the space is restored to a functional and safe condition.
It is important to highlight that removing an oil tank can be a challenging task and may require professional assistance. If you are unsure about any step or if safety is a concern, do not hesitate to consult with experienced contractors or environmental specialists.
Throughout the entire process, prioritize safety by wearing appropriate protective gear, following safety guidelines, and adhering to local regulations. Properly disposing of the oil tank and addressing any environmental concerns demonstrate your commitment to protecting the environment and maintaining the well-being of your community.
Remember, always consult with local authorities, research relevant regulations, and be mindful of the impact of oil tank removal on the environment. By doing so, you can successfully remove an oil tank from your basement, improve the safety and functionality of the space, and contribute to a healthier and more sustainable living environment.
With the right knowledge and careful execution, you can successfully complete the oil tank removal process and enjoy the benefits of a clean and renovated basement space.
Frequently Asked Questions about How To Remove Oil Tank From Basement
Was this page helpful?
At Storables.com, we guarantee accurate and reliable information. Our content, validated by Expert Board Contributors, is crafted following stringent Editorial Policies. We're committed to providing you with well-researched, expert-backed insights for all your informational needs.


0 thoughts on “How To Remove Oil Tank From Basement”