Home>Articles>How To Remove Stripped Screws To Salvage Your Home Improvement Project

Articles
How To Remove Stripped Screws To Salvage Your Home Improvement Project
Modified: December 7, 2023
Learn how to remove stripped screws and salvage your home improvement project with our informative articles.
(Many of the links in this article redirect to a specific reviewed product. Your purchase of these products through affiliate links helps to generate commission for Storables.com, at no extra cost. Learn more)
Introduction
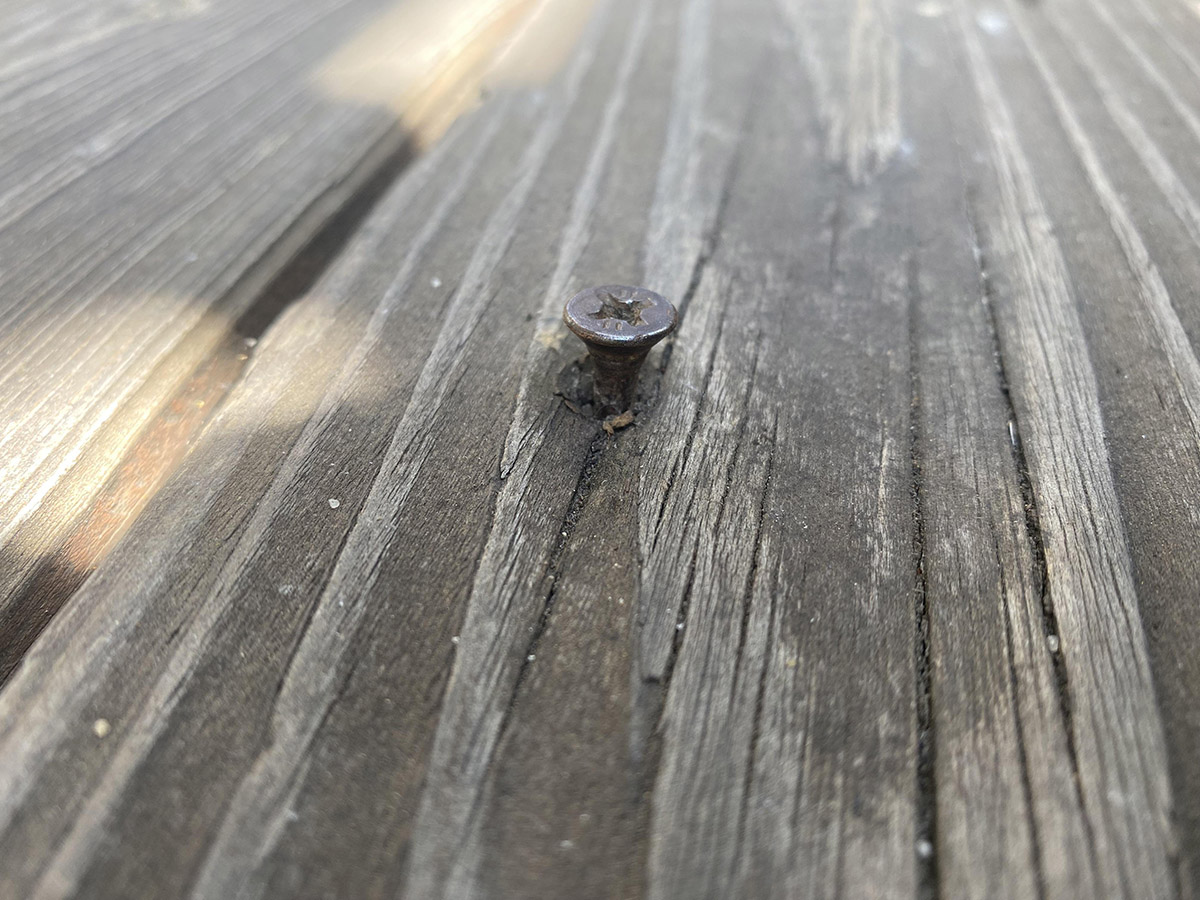
Dealing with stripped screws can be frustrating, especially when you’re in the middle of a home improvement project and need to remove them quickly. Whether you’re replacing a hinge, fixing a door handle, or assembling furniture, encountering a stripped screw can derail your progress.
A stripped screw occurs when the grooves in the screw head become worn, making it difficult to grip with a screwdriver or drill bit. This can happen due to over-tightening, using the wrong tool, or simply using a low-quality screw. While it might seem like a major setback, there are several methods you can employ to safely and successfully remove stripped screws.
In this article, we will explore six effective techniques to help you remove stripped screws and salvage your home improvement project. These methods range from simple, everyday items you may already have lying around the house to specialized tools specifically designed for this purpose.
Before we dive into the methods, let’s gather the necessary tools and materials you’ll need for the job.
Key Takeaways:
- Don’t let stripped screws ruin your DIY project. Use everyday items like rubber bands and hot glue, or specialized tools like a Dremel, to remove them effectively and salvage your home improvement plans.
- With patience and the right tools, you can conquer stubborn stripped screws. From rubber bands to pliers and even a Dremel tool, there’s a method for every situation. Don’t let stripped screws derail your progress – tackle them head-on and enjoy the satisfaction of a successfully completed project.
Tools and Materials Needed
Before attempting to remove a stripped screw, it’s important to have the right tools and materials on hand. Here’s a list of what you’ll need:
- Screwdriver – Choose a screwdriver with a large enough head that fits snugly into the stripped screw. Consider using a manual screwdriver instead of a power drill, as it provides more control.
- Hammer and Chisel – These tools can be used to create a new grip on the screw head by tapping a chisel into the damaged area.
- Drill and Extractor Set – If the other methods don’t work, using a drill paired with an extractor set can help remove the stripped screw.
- Pliers or Vice Grips – These tools can be used to grip the screw head tightly and give you more leverage to turn it.
- Hot Glue Gun – Hot glue can provide an adhesive grip on the stripped screw, allowing you to remove it more easily.
- Dremel Tool – A Dremel tool with a cutting or grinding attachment can help create new slots on the screw head for a better grip.
Additionally, you might want to have some lubricant, such as WD-40 or penetrating oil, if the screw is rusty or stuck due to corrosion. This can help loosen the screw and make the removal process smoother.
Now that you have all the necessary tools and materials, let’s move on to the different methods you can use to remove stripped screws.
Method 1: Rubber Band
If you don’t have any specialized tools at your disposal, a simple rubber band can work wonders when it comes to removing a stripped screw. Here’s how to use this method:
- Choose a wide rubber band that can easily wrap around the head of the stripped screw.
- Place the rubber band over the stripped screw, making sure it covers the entire head.
- Insert your screwdriver into the screw head, applying downward pressure while turning it counterclockwise.
- The rubber band will create friction between the screwdriver and the screw head, providing a better grip and allowing you to turn the screw out.
If the rubber band slips or doesn’t provide enough grip, you can try using multiple rubber bands or folding the rubber band to increase its thickness. This method is effective for smaller stripped screws but may not work as well for larger or severely damaged screws.
Once you have successfully removed the stripped screw using the rubber band method, you can continue with your home improvement project without any further delays.
If the rubber band method doesn’t work for your particular situation, don’t worry. There are still several other methods you can try to remove a stripped screw. Let’s move on to method 2: Hammer and Chisel.
Method 2: Hammer and Chisel
If the rubber band method didn’t provide enough grip to remove the stripped screw, you can try using a hammer and chisel to create new slots in the screw head. Here’s how:
- Place the chisel in one of the existing slots on the stripped screw head.
- Tap the chisel gently with a hammer to create a new groove in the screw head.
- Repeat this process for each slot on the screw head until you have multiple new grooves.
- Once the new grooves are created, insert your screwdriver into one of the slots and turn it counterclockwise to remove the screw.
The new slots provide fresh grooves for the screwdriver to grip onto, increasing your chances of successfully removing the stripped screw. Remember to apply steady pressure while turning the screwdriver to maintain a secure grip.
If you encounter resistance or the screw still won’t budge, you can try tapping the screwdriver with a hammer to provide additional force. However, be careful not to damage the surrounding surface or strip the screw further.
If this method doesn’t work for your stripped screw, don’t worry. We still have a few more techniques to explore. Let’s move on to method 3: Drill and Extractor Set.
Method 3: Drill and Extractor Set
If the previous methods didn’t work, a drill and extractor set can come to the rescue. This method is particularly useful for stubborn or severely stripped screws. Here’s how to use this technique:
- Select a drill bit that is slightly smaller than the center of the stripped screw.
- Place the drill bit into the center of the screw head and drill slowly and carefully. The goal is to create a small pilot hole in the screw.
- Switch the drill bit to a screw extractor from the extractor set.
- Insert the extractor into the pilot hole and turn it counterclockwise using a wrench or pliers. The extractor will grip onto the screw and help remove it.
It’s important to match the size of the extractor to the size of the pilot hole and choose an extractor that has reverse threads to grip the stripped screw effectively.
If you’re having difficulty creating a pilot hole or the extractor isn’t gripping the screw properly, you may need to try a larger drill bit or a different extractor size. It’s crucial to apply steady pressure and avoid excessive force when using the drill and extractor to prevent further damage or breaking the extractor inside the screw.
Continue turning the extractor counterclockwise until the stripped screw is completely removed. Once it’s removed, you can proceed with your home improvement project smoothly.
If you’re still struggling with the stripped screw, don’t worry. We have a few more methods up our sleeve. Let’s move on to method 4: Pliers or Vice Grips.
Use a rubber band between the screw head and the screwdriver to increase grip. If that doesn’t work, try using a screw extractor or drilling a small hole to remove the stripped screw.
Read more: Secret Life Of Salvaged Materials
Method 4: Pliers or Vice Grips
When all else fails, pliers or vice grips can be your best friends in removing a stripped screw. This method is straightforward and requires minimal additional tools. Here’s what you need to do:
- Select a pair of pliers or vice grips that can securely grip the stripped screw head.
- Position the jaws of the pliers or vice grips around the edges of the screw head, ensuring a firm grip.
- Apply steady pressure and turn the pliers or vice grips counterclockwise to loosen and remove the stripped screw.
Using pliers or vice grips allows you to exert greater force on the screw, making it easier to turn and remove. It’s important to choose pliers or vice grips with a strong grip and teeth that securely hold onto the screw head without slipping.
If the screw is tightly lodged or stubborn, you can use a combination of pliers or vice grips and a screwdriver. Insert the screwdriver into the screw head and use it as leverage, while still gripping the screw head with the pliers or vice grips, to increase your turning power.
If the screw still won’t budge, you can try applying heat to the screw head using a heat gun or a handheld torch. The heat can help expand the metal and loosen the screw, making it easier to remove.
If you’re unable to remove the stripped screw using pliers or vice grips, don’t give up just yet. There are still a couple more methods that you can try. Let’s move on to method 5: Hot Glue.
Method 5: Hot Glue
Hot glue might not be the first thing that comes to mind when dealing with a stripped screw, but it can be surprisingly effective in providing extra grip. Here’s how you can use hot glue to remove a stripped screw:
- Heat up a hot glue gun and insert a glue stick into the gun.
- Apply a generous amount of hot glue onto the head of the stripped screw.
- Allow the hot glue to cool and harden, creating a makeshift grip around the screw.
- Insert a screwdriver into the hardened hot glue and turn it counterclockwise to remove the stripped screw.
The hot glue acts as an adhesive grip, allowing the screwdriver to have a better hold on the smooth surface of the stripped screw head. It’s important to ensure that the hot glue fully hardens before attempting to turn the screw, as applying force prematurely may cause the hot glue to break apart.
If the hot glue method doesn’t work on the first attempt, you can try reapplying another layer of hot glue and letting it harden again. Multiple layers of hot glue can provide an even stronger grip on the stripped screw.
Once you’ve successfully removed the stripped screw using hot glue, you can proceed with your home improvement project without any further delays.
If the hot glue method doesn’t solve your stripped screw problem, don’t fret. We have one more method to explore. Let’s move on to method 6: Dremel Tool.
Method 6: Dremel Tool
If you have a Dremel tool with a cutting or grinding attachment, you can use it to create new slots or grooves on the stripped screw head, providing better grip for removal. Here’s how to use the Dremel tool method:
- Attach a cutting or grinding attachment to your Dremel tool, ensuring it’s secure.
- Carefully position the Dremel tool over the screw head and start cutting or grinding a new groove into the stripped screw.
- Create multiple new grooves around the screw head until you have enough traction for the screwdriver to grip.
- Insert the screwdriver into one of the new grooves and turn it counterclockwise to remove the stripped screw.
When using the Dremel tool, it’s crucial to wear safety goggles and follow the manufacturer’s instructions for proper usage. Take your time and make precise cuts or grinds to avoid damaging the surrounding surface and ensure the new grooves provide a secure grip.
If you don’t have a Dremel tool, you can try using a small hacksaw or a rotary file as an alternative. These tools can help you create new slots or grooves on the stripped screw head for better grip and removal.
Once you’ve successfully removed the stripped screw using the Dremel tool method, you can continue with your home improvement project without any further setbacks.
Now that you’re armed with these six effective methods for removing stripped screws, you can tackle any upcoming home improvement project with confidence. Remember to choose the method that best suits your situation and be patient as you work to salvage your project. With the right tools and techniques, you’ll be able to conquer those stubborn stripped screws and get back to creating the home of your dreams.
Good luck!
Conclusion
Dealing with stripped screws can be a frustrating obstacle in your home improvement journey. However, with the right techniques and tools at your disposal, you can successfully remove them and salvage your project. Throughout this article, we explored six effective methods for removing stripped screws: the rubber band method, hammer and chisel, drill and extractor set, pliers or vice grips, hot glue, and the Dremel tool.
The rubber band method is a simple and accessible solution using everyday items. It provides added grip and can be particularly effective for smaller stripped screws. If the rubber band method doesn’t work, the hammer and chisel method allows you to create new slots in the screw head for better grip and turning.
If the previous methods don’t do the trick, the drill and extractor set method can help you tackle stubborn or severely stripped screws. By creating a pilot hole and using a specialized extractor, you can safely and effectively remove the stripped screw.
Pliers or vice grips can be a lifesaver when it comes to stripped screws. They provide a strong grip and allow for increased leverage, making it easier to rotate and remove the screw. Hot glue, on the other hand, acts as an adhesive grip, providing a makeshift solution. It can be especially useful for screws with smooth surfaces.
If you have access to a Dremel tool with a cutting or grinding attachment, you can create new slots or grooves in the stripped screw head, providing better grip for removal. This method requires precision and care to avoid damage to the surrounding area.
Remember to choose the method that best suits your situation and be patient as you work to remove the stripped screw. With persistence and the right technique, you’ll be able to overcome any stripped screw obstacle and continue your home improvement project. Don’t let stripped screws derail your progress – tackle them head-on and enjoy the satisfaction of a successfully completed project.
Now that you’re equipped with these valuable methods, go forth and conquer those stripped screws with confidence. Happy DIY-ing!
Frequently Asked Questions about How To Remove Stripped Screws To Salvage Your Home Improvement Project
Was this page helpful?
At Storables.com, we guarantee accurate and reliable information. Our content, validated by Expert Board Contributors, is crafted following stringent Editorial Policies. We're committed to providing you with well-researched, expert-backed insights for all your informational needs.


0 thoughts on “How To Remove Stripped Screws To Salvage Your Home Improvement Project”