Home>Articles>How To Remove The Cloudy Finish On A Dining Room Table
Articles
How To Remove The Cloudy Finish On A Dining Room Table
Modified: December 7, 2023
Learn how to remove the cloudy finish on a dining room table with our comprehensive articles. Get step-by-step instructions and expert tips to restore your table's natural shine.
(Many of the links in this article redirect to a specific reviewed product. Your purchase of these products through affiliate links helps to generate commission for Storables.com, at no extra cost. Learn more)
Introduction
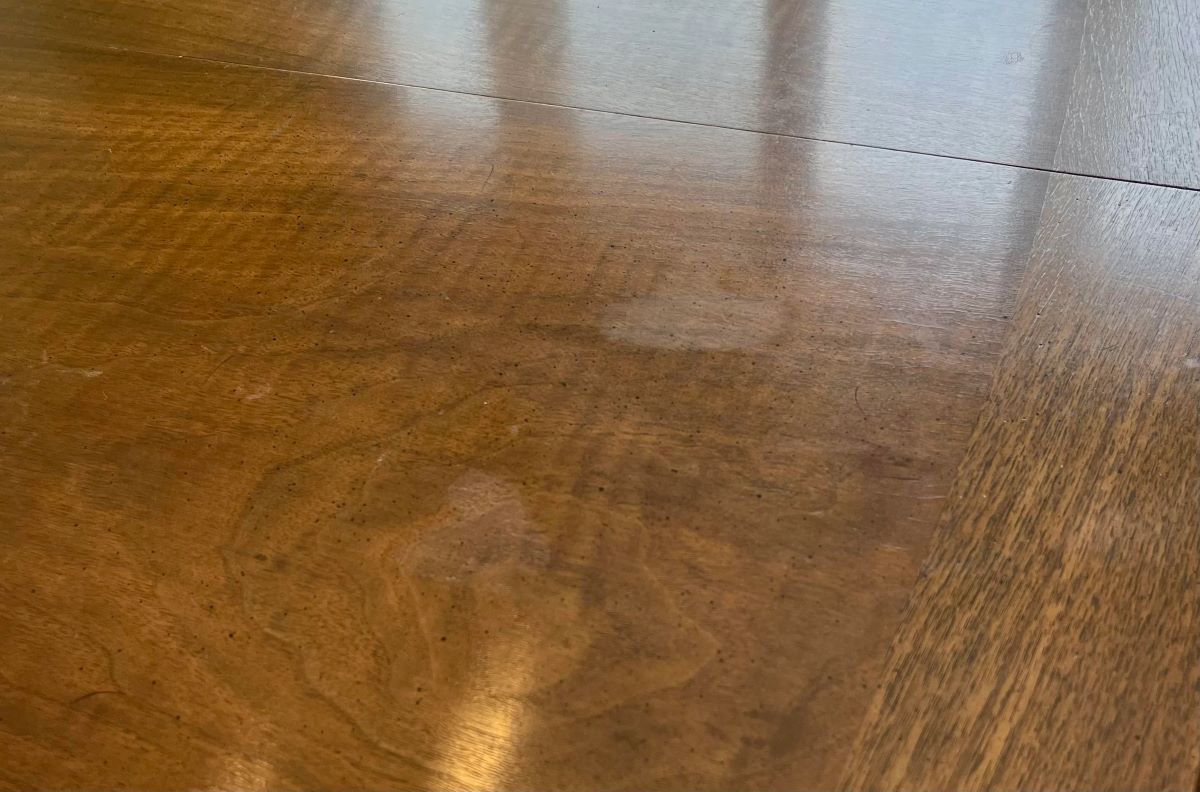
A dining room table is not only a functional piece of furniture but also a beautiful centerpiece in your home. However, over time, the finish on the table can become cloudy, leaving it looking dull and unappealing. This cloudy finish is often caused by a buildup of dirt, grime, and oils, or by using the wrong cleaning products.
If your dining room table has lost its shine and is suffering from a cloudy finish, don’t worry. In this article, we will guide you through the process of removing the cloudy finish and restoring the table to its former glory. With a few simple steps and the right materials, you can have your dining room table looking brand new once again.
Key Takeaways:
- Restore the natural beauty of your dining room table by understanding the causes of cloudiness, gathering the necessary materials, and following the proper steps to remove the cloudy finish and protect its longevity.
- Prevent future cloudiness by using gentle cleaning methods, protecting the table from heat and moisture, regularly dusting and cleaning, avoiding prolonged exposure to sunlight, applying protective finishes, and conducting regular maintenance and touch-ups.
Read more: How To Remove Cloudiness From Glassware
Understanding the Cloudy Finish
Before embarking on the journey to remove the cloudy finish from your dining room table, it’s important to understand what causes it. The cloudy or hazy appearance is typically caused by a buildup of residue, oils, and cleaning products on the table’s surface. Over time, these substances can accumulate and create a film that obscures the natural beauty of the wood.
One common mistake that leads to a cloudy finish is using harsh or abrasive cleaning products. These products can strip away the protective layer of the table’s finish, leaving it vulnerable to scratches, stains, and dullness. Additionally, using the wrong cleaning techniques, such as scrubbing vigorously or using excessive amounts of water, can also contribute to a cloudy appearance.
Another factor that can cause a cloudy finish is exposure to excessive moisture or humidity. This can lead to the trapped moisture penetrating the wood and affecting the finish. Additionally, prolonged exposure to sunlight can cause the finish to fade and become cloudy over time.
It’s important to note that not all cloudy finishes are easily removable. In some cases, the cloudiness may have penetrated the wood itself, requiring more intensive restoration techniques. However, for most cloudy finishes caused by surface residue or improper cleaning, the steps we will outline can help restore your dining room table to its original beauty.
Gather the Necessary Materials
Before you start the process of removing the cloudy finish from your dining room table, it’s essential to gather all the necessary materials. Having everything on hand will help streamline the process and ensure that you have everything you need.
Here’s a list of materials you will need:
- Safety goggles
- Protective gloves
- Dust mask
- Sandpaper (various grits)
- Wood finish remover
- Soft lint-free cloths
- Clean water
- Wood cleaner or mild dish soap
- Soft-bristle brush or sponge
- Wood stain (if necessary)
- Wood sealer or finish
- Paintbrush or foam applicator
It’s important to wear safety goggles, protective gloves, and a dust mask throughout the process to protect yourself from any harmful chemicals and particles.
Once you have all the materials ready, you can proceed to the next steps in the process.
Preparing the Work Area
Before you begin the process of removing the cloudy finish from your dining room table, it’s essential to prepare the work area to ensure a safe and efficient process.
Here are some steps to follow when preparing the work area:
- Clear the table: Remove any items from the table, including dishes, tablecloths, and decorations. You want to have a clean and open surface to work on.
- Protect the surrounding area: Place a drop cloth or plastic sheeting under the table to protect the floor or surrounding furniture from any potential drips or spills.
- Ventilate the area: If possible, work in a well-ventilated space or open windows to allow for proper airflow during the process. This will help dissipate fumes from the wood finish remover.
- Cover nearby surfaces: If there are any nearby surfaces or furniture that you want to protect from accidental contact with the wood finish remover or other cleaning solutions, cover them with additional drop cloths or plastic sheeting.
By taking the time to properly prepare the work area, you’ll minimize the risk of damage to other surfaces and ensure a smooth and organized process.
Sanding the Table Surface
Once the work area is prepared, it’s time to start the process of removing the cloudy finish from your dining room table. The first step involves sanding the table surface to remove the top layer of the old finish and any surface imperfections.
Here’s a step-by-step guide to sanding the table surface:
- Start with coarse sandpaper: Begin by using coarse-grit sandpaper, around 80 or 100-grit, to sand the entire table surface. Sand in the direction of the wood grain, applying even pressure. This will help to remove the top layer of the old finish and any rough spots.
- Switch to finer sandpaper: Once the initial sanding is complete, switch to a finer-grit sandpaper, such as 120 or 150-grit. Sand the surface again, this time focusing on smoothing any remaining imperfections and creating a smooth and even surface.
- Sand the edges and corners: Use a sanding block or folded sandpaper to sand the edges and corners of the table. This will ensure that all areas receive the same level of sanding and result in a consistent finish.
- Remove sanding dust: After sanding, use a soft cloth or vacuum cleaner to remove any sanding dust from the table surface. Ensure it is completely clean before moving on to the next step.
It’s important to note that excessive sanding can damage the wood, so be cautious and avoid applying too much pressure or spending too much time in one area. Take breaks and periodically check the surface to ensure you’re achieving the desired level of smoothness.
Once the table surface is properly sanded and free of dust, you can move on to the next step in the process.
Use a mixture of equal parts vinegar and water to gently clean the cloudy finish on your dining room table. Wipe with a soft cloth and buff with a clean, dry cloth for a restored shine.
Applying the Wood Finish Remover
After sanding the table surface, the next step in removing the cloudy finish from your dining room table is applying a wood finish remover. This product will help break down and remove the old finish, allowing you to reveal the natural beauty of the wood.
Here’s how to apply the wood finish remover:
- Read the instructions: Before applying the wood finish remover, carefully read and follow the instructions provided by the manufacturer. Different products may have different application methods, so it’s important to understand the specific guidelines.
- Put on protective gear: Wear safety goggles, protective gloves, and a dust mask to protect yourself from any chemicals or fumes.
- Apply the wood finish remover: Using a clean, lint-free cloth or a brush suitable for the product, apply a liberal amount of wood finish remover to the table surface. Make sure to cover the entire area evenly.
- Follow the recommended timeframe: Allow the wood finish remover to penetrate the old finish according to the manufacturer’s instructions. This can range from a few minutes to several hours, depending on the specific product.
- Scrape off the old finish: Using a plastic scraper or a putty knife, gently scrape off the old finish from the table surface. Work in the direction of the wood grain and be careful not to apply too much pressure to avoid scratching the wood.
- Remove the residue: Once you have scraped off the old finish, use a cloth or sponge dampened with clean water to wipe away any remaining residue or excess wood finish remover. Ensure the surface is clean and free from any chemicals.
It’s crucial to follow the instructions provided by the manufacturer and exercise caution when working with wood finish removers. Some products may require additional steps or precautions, so always refer to the guidelines specific to the product you are using.
With the old finish removed, you’re one step closer to restoring the natural beauty of your dining room table. Next, we’ll move on to the process of removing the cloudy finish itself.
Removing the Cloudy Finish
Now that you have applied the wood finish remover and removed the old finish, it’s time to focus on removing the cloudy appearance from your dining room table. This step will help restore the table’s natural luster and bring back its original beauty.
Here’s how to remove the cloudy finish:
- Apply wood cleaner or mild dish soap: Dilute a small amount of wood cleaner or mild dish soap in water. Dampen a soft-bristle brush or sponge in the solution and gently scrub the table surface in circular motions. This will help remove any remaining residue or traces of the cloudy finish.
- Rinse with clean water: After scrubbing, rinse the table surface with clean water to remove the cleaning solution. Make sure to remove all traces of the cleaner or soap.
- Allow the table to dry: Give the table ample time to air dry or use a clean, lint-free cloth to gently blot away any excess moisture. It’s essential to ensure the table is completely dry before moving on to the next step.
- Inspect the surface: Once the table is dry, inspect the surface for any remaining signs of cloudiness. If you notice any areas that still appear cloudy, you may need to repeat the process of applying the wood finish remover and removing the old finish within those specific areas.
- Consider sanding or staining (if necessary): In some cases, removing the cloudy finish may reveal imperfections or discoloration in the wood. If desired, you can sand those areas once again and apply a matching wood stain to even out the color and achieve a more uniform appearance.
By following these steps, you will effectively remove the cloudy finish from your dining room table and restore its original beauty. Remember to take your time, be thorough in your execution, and pay attention to detail to ensure the best results.
Once you are satisfied with the removal of the cloudy finish, it’s time to move on to the final steps of cleaning and finishing the table.
Cleaning and Finishing the Table
After successfully removing the cloudy finish from your dining room table, it’s important to clean and finish the surface to protect and enhance its appearance. This final step will bring out the natural beauty of the wood and help maintain its longevity.
Here’s how to clean and finish the table:
- Remove any dust or debris: Use a soft cloth or vacuum cleaner to remove any dust or debris from the table surface. Ensure it is completely clean before proceeding.
- Apply wood sealer or finish: Choose a suitable wood sealer or finish based on the type of wood and the desired outcome. Using a paintbrush or foam applicator, apply a thin and even layer of sealer or finish to the entire table surface. Follow the manufacturer’s instructions for drying and curing time.
- Sand between coats (if necessary): If you want to achieve a smoother finish or opt for additional coats of sealer or finish, lightly sand the table surface between each coat. This will help create a more polished and professional appearance.
- Apply additional coats (if desired): Depending on the level of protection and sheen you desire, you can apply multiple coats of sealer or finish. Make sure to follow the recommended drying and curing time between each coat.
- Allow the table to fully cure: Once the final coat is applied, allow the table to fully cure according to the instructions provided by the manufacturer. This usually takes a few days, but the wait is worth it for a durable and long-lasting finish.
After the table has fully cured, it is ready to be used and enjoyed. Regularly clean the table with a soft, damp cloth and avoid using harsh or abrasive cleaners that can damage the finish. Protect the table from excessive heat, moisture, and direct sunlight to maintain its beauty for years to come.
Remember, the cleaning and finishing process may vary depending on the specific products you choose, so be sure to read and follow the manufacturer’s instructions carefully. By taking the time to clean and protect your dining room table, you will ensure its beauty and durability for many gatherings and meals to come.
Tips for Preventing Cloudy Finishes in the Future
Once you have successfully removed the cloudy finish from your dining room table and restored its natural beauty, it’s important to take preventive measures to avoid future cloudiness. By following these tips, you can maintain the pristine condition of your table’s finish:
- Use gentle cleaning methods: Avoid using harsh or abrasive cleaners on your table’s surface. Opt for mild wood cleaners or mild dish soap diluted in water. Use a soft-bristle brush or sponge to gently clean the surface, and always rinse thoroughly afterward.
- Protect the table from heat and moisture: Be cautious of placing hot dishes or cups directly on the table’s surface, as high heat can damage the finish. Use coasters, trivets, or placemats to protect the wood from any moisture or heat-related damage.
- Regularly dust and clean: Regularly dust your dining room table using a soft cloth or vacuum cleaner to remove any surface debris. This will help prevent any buildup that can lead to a cloudy finish over time.
- Avoid prolonged exposure to sunlight: Direct sunlight can cause the finish of your table to fade and become cloudy. Protect your table by using curtains, blinds, or UV-protective film on windows to limit its exposure to harmful UV rays.
- Apply protective finishes: Consider applying a protective topcoat or sealant to your table’s surface. This will provide an extra layer of protection against stains, moisture, and scratches, helping to maintain the clarity and shine of the finish.
- Regular maintenance and touch-ups: Periodically inspect your table’s finish for any signs of wear or damage. Address any scratches or areas of concern promptly by sanding and applying a touch-up coat of finish to prevent further damage and maintain the table’s appearance.
By following these preventive tips and implementing proper care, you can extend the life and beauty of your dining room table’s finish, keeping it free from cloudiness and maintaining its stunning appearance for years to come.
Conclusion
Removing the cloudy finish from your dining room table may seem like a daunting task, but with the right knowledge and techniques, you can restore its natural beauty and bring it back to life. By understanding the causes of cloudiness, gathering the necessary materials, and following the proper steps, you’ll be able to transform your table into a stunning centerpiece once again.
Remember, the key is to approach the process with patience and care. Take the time to properly prepare the work area, sand the surface, and apply the wood finish remover. Scrub away any remaining residue, then clean and finish the table to protect its beauty for the long term.
To prevent future cloudiness, be mindful of the cleaning products you use, protect the table from heat and moisture, regularly dust and clean it, and consider applying protective finishes. By incorporating these preventive measures into your table’s maintenance routine, you’ll ensure that it remains in pristine condition for years to come.
So don’t let a cloudy finish dull the appearance of your dining room table any longer. Roll up your sleeves, gather your materials, and follow the step-by-step process outlined in this article. With a little effort and the right techniques, you’ll be able to admire the natural beauty of your table once again and create a welcoming space for shared meals and cherished memories.
Remember to enjoy the process and take pride in the transformation you’re making. Happy restoring!
Frequently Asked Questions about How To Remove The Cloudy Finish On A Dining Room Table
Was this page helpful?
At Storables.com, we guarantee accurate and reliable information. Our content, validated by Expert Board Contributors, is crafted following stringent Editorial Policies. We're committed to providing you with well-researched, expert-backed insights for all your informational needs.


0 thoughts on “How To Remove The Cloudy Finish On A Dining Room Table”