Articles
How To Remove Vanity Mirror
Modified: December 7, 2023
Learn how to remove a vanity mirror in just a few simple steps with our informative articles. Discover expert tips and tricks for a hassle-free process.
(Many of the links in this article redirect to a specific reviewed product. Your purchase of these products through affiliate links helps to generate commission for Storables.com, at no extra cost. Learn more)
Introduction
Welcome to our comprehensive guide on how to remove a vanity mirror. Whether you’re remodeling your bathroom or simply upgrading your vanity, removing a mirror can be a daunting task. However, with the right tools and knowledge, you can successfully remove your mirror and prepare your space for the next step.
Before you begin the removal process, it’s important to note that vanity mirrors can vary in size, weight, and installation method. Some mirrors are secured to the wall with clips or screws, while others may be glued or mounted with adhesive. This guide will provide general instructions that should work for most vanity mirrors. However, it’s always recommended to check the specific instructions provided by the mirror manufacturer.
Removing a vanity mirror requires careful attention and precaution to avoid any damage to the mirror itself or the surrounding area. By following the steps outlined in this guide, you’ll be able to remove your mirror safely and efficiently.
Key Takeaways:
- Safely and efficiently remove a vanity mirror by gathering supplies, preparing the work area, disconnecting power, removing clips or screws, detaching the mirror, and optionally cleaning, patching, and installing a new mirror.
- Prioritize safety and follow local regulations when disposing of the old mirror, whether in the trash or recycling. Successfully completing the process can refresh your bathroom’s look and contribute to a cleaner environment.
Read more: What Is A Vanity Mirror
Step 1: Gather Supplies
Before you begin the mirror removal process, it’s important to gather the necessary supplies. Having the right tools on hand will make the task easier and more efficient. Here are the essential supplies you’ll need:
- Gloves: Wearing gloves will protect your hands from any broken glass or sharp edges.
- Safety goggles: It’s crucial to wear safety goggles to safeguard your eyes during the removal process.
- Drop cloth: Place a drop cloth on the floor beneath the mirror to catch any falling debris and protect the surface.
- Protective covering: Use a thick blanket or cardboard to cover the vanity or countertop, preventing any damage from falling debris.
- Utility knife or putty knife: These tools will be handy for cutting through any adhesive or caulk.
- Plastic bags or containers: Prepare plastic bags or containers to collect any small hardware, such as clips or screws, that were used to secure the mirror.
- Ladder or step stool: Depending on the height of your vanity mirror, you may need a ladder or step stool to reach it safely.
- Adhesive removal solution (if applicable): If your mirror is glued to the wall, you may need an adhesive removal solution to dissolve the glue.
- Wall patching materials (if needed): If you plan to patch the wall after removing the mirror, gather the necessary materials, such as spackling compound and sandpaper.
By ensuring you have all the necessary supplies before beginning the mirror removal process, you’ll save time and avoid any unnecessary interruptions. With your supplies in hand, you’re ready to move on to the next step: preparing the work area.
Step 2: Prepare the Work Area
Before you start removing the vanity mirror, it’s important to prepare the work area to ensure a safe and organized process. Here’s how you can prepare the work area:
- Clear the space: Remove any items from the vanity or countertop that could obstruct your access to the mirror.
- Protect the surrounding area: Use painter’s tape to cover any fixtures, edges, or surfaces around the mirror that you want to protect from accidental damage.
- Lay down a drop cloth: Place a drop cloth on the floor beneath the mirror to catch any falling debris and protect the surface.
- Secure the edges: If the mirror has any loose or broken edges, use masking tape to secure them before proceeding with the removal.
- Turn off the lights: If your vanity mirror is connected to a light fixture, switch off the power to avoid any risk of electric shock during the removal process.
Preparing the work area is crucial to ensure safety and protect the surrounding surfaces. By taking these precautions and setting up the work area properly, you’ll minimize the risk of accidents and make the mirror removal process smoother.
Once you’ve prepared the work area, you’re ready to move on to the next step: disconnecting the power (if applicable).
Step 3: Disconnect Power (If Applicable)
Before you proceed with removing the vanity mirror, it’s important to ensure your safety by disconnecting the power if the mirror is connected to a light fixture. Follow these steps to disconnect the power:
- Locate the electrical breaker: Find the circuit breaker in your home that controls the power to the vanity mirror or bathroom lights.
- Switch off the breaker: Turn off the specific breaker that corresponds to the mirror or bathroom lights. You may need to consult your electrical panel diagram to identify the correct breaker.
- Check for power: After switching off the breaker, test the mirror and lights to confirm that they are no longer receiving power.
- Use a non-contact voltage tester: If you want to be extra cautious, use a non-contact voltage tester to verify that there is no electricity flowing to the mirror or light fixture.
By disconnecting the power, you eliminate the risk of electric shock while working with the mirror. This step is crucial for your safety, especially if the mirror is directly connected to an electrical source. Once you ensure that the power is disconnected, you can proceed with the next step: removing the mirror clips or screws.
Step 4: Remove the Mirror Clips or Screws
After disconnecting the power and ensuring your safety, you can now focus on removing the mirror from its mounting. The method of attachment will determine whether you need to remove clips or screws. Follow these steps to remove the mirror clips or screws:
- Identify the attachment method: Inspect the edges of the mirror to determine how it is secured to the wall. Look for either mirror clips or screws that hold the mirror in place.
- Remove the mirror clips: If your mirror is held with clips, use a screwdriver or a power drill to gently and carefully remove the screws that secure the clips to the wall. Take note of the location of each clip for easy reinstallation if desired.
- Detach the mirror from the clips: Once the clips are removed, carefully lift the mirror away from the wall, ensuring that it doesn’t tip or fall.
- Remove the screws: If your mirror is attached with screws, use a screwdriver or a power drill to unscrew and remove them. Keep the screws in a safe place to avoid misplacing them.
When removing the mirror clips or screws, it’s important to handle them with care to avoid any damage or injury. If you plan to reuse the mirror or mounting hardware, make sure to keep everything organized and in a secure location. With the mirror clips or screws removed, you can now proceed to the next step: detaching the mirror from the wall.
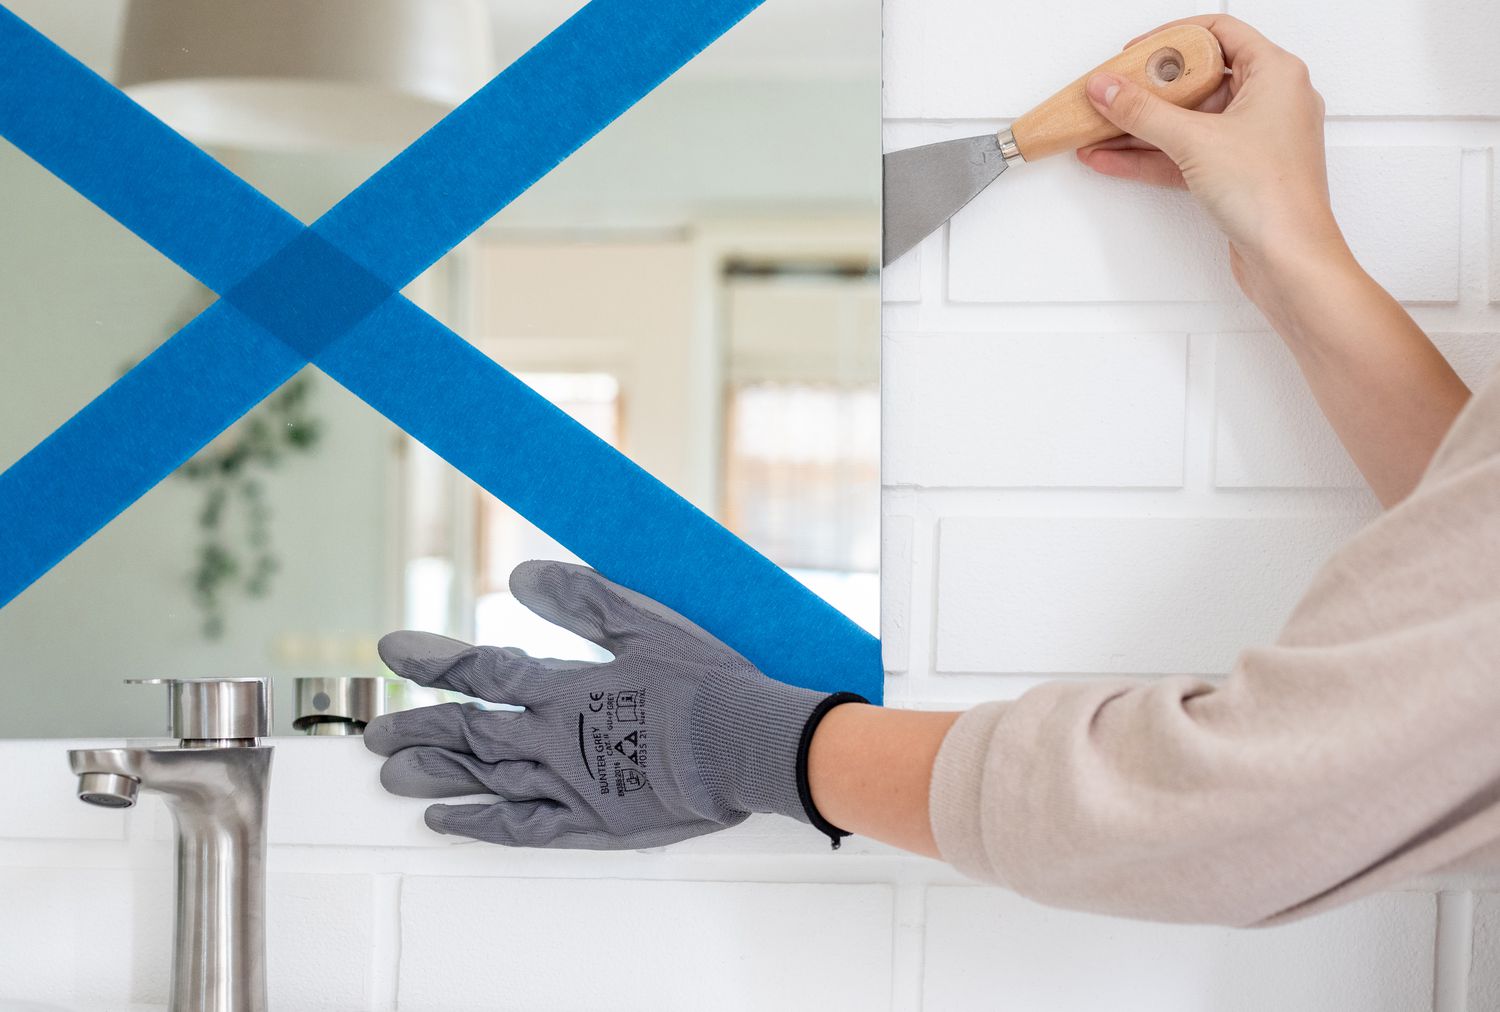
When removing a vanity mirror, start by removing any screws or brackets holding it in place. Use a putty knife to carefully pry the mirror away from the wall, being cautious not to break it. Wear gloves and eye protection for safety.
Read more: How To Install Vanity Mirror
Step 5: Detach the Mirror from the Wall
Once you have removed the mirror clips or screws, it’s time to detach the mirror from the wall. Depending on the method of installation, you may need to use caution and follow these steps:
- Assess the adhesive or caulk: If your mirror is also secured to the wall with adhesive or caulk, carefully examine the edges of the mirror to determine the extent of the attachment.
- Apply heat (if necessary): If you find that the mirror is bonded to the wall with adhesive, you can use a hairdryer or a heat gun to apply gentle heat along the edges. This will help loosen the adhesive and make it easier to remove the mirror.
- Start detaching the mirror: Begin by inserting a putty knife or a utility knife into the gap between the mirror and the wall. Slowly and carefully pry the mirror away from the wall, working your way around the edges.
- Apply steady pressure: With one hand, apply light pressure to the mirror while using the knife with the other hand. Take your time and work slowly to avoid any sudden movements that could break or damage the mirror.
- Continue detaching the mirror: As you work your way around the mirror, gradually create enough space to allow the entire mirror to detach from the wall. Be patient and cautious, ensuring not to damage the mirror or the wall.
- Lower the mirror safely: Once the mirror is completely detached from the wall, carefully lower it down onto a soft surface, such as a blanket or a drop cloth, to prevent any potential damage or injury.
Detaching the mirror from the wall requires precision and delicacy to avoid any accidents or mishaps. If you encounter any resistance or difficulty during the process, consider seeking assistance from a professional to prevent any damage to yourself or the mirror. With the mirror successfully removed, you can now decide whether you want to clean and patch the wall or install a new mirror in its place, which will be covered in the next steps.
Step 6: Clean and Patch the Wall (Optional)
After removing the vanity mirror, you may choose to clean and patch the wall before installing a new mirror or proceeding with your bathroom renovation. Cleaning and patching the wall will ensure a smooth and professional-looking finish. Follow these steps to clean and patch the wall:
- Remove any adhesive residue: If there is any remaining adhesive or caulk on the wall, use a putty knife or adhesive remover to scrape it off gently. Be careful not to damage the wall surface.
- Clean the wall surface: Use a mixture of warm water and mild soap to clean the wall where the mirror was mounted. Wipe down the surface with a soft cloth or sponge, removing any dust or debris.
- Inspect for damage: Check the wall for any cracks, holes, or other damage that needs to be repaired. If necessary, use a spackling compound or wall patching product to fill in the damaged areas.
- Sand and smooth the patched areas: Once the compound has dried, use fine-grit sandpaper to smooth down the patched areas. This will create a seamless surface for painting or applying a new finish.
- Prime and paint (if applicable): If you plan to paint the wall or apply a new finish, prime the patched areas and paint the entire wall as needed. Allow the paint to dry completely before moving on to the next step.
Cleaning and patching the wall is an optional step but can greatly improve the overall appearance of your bathroom. Taking the time to properly clean and repair any damage will ensure that your new mirror or renovation project starts on a fresh and clean slate. Once the wall is cleaned and patched, you can move on to the next step.
Step 7: Install a New Mirror (Optional)
If you’ve decided to replace the vanity mirror, this step will guide you through the process of installing a new mirror. Installing a new mirror can add a fresh and stylish touch to your bathroom. Follow these steps to install a new mirror:
- Measure and mark the wall: Use a tape measure to determine the desired height and center of the new mirror. Mark these measurements on the wall using a pencil.
- Prep the wall surface: Ensure that the wall surface is clean and free from any debris or dust. If necessary, patch any holes or imperfections and allow the compound to dry and sand it smoothly.
- Apply adhesive or mounting hardware: Depending on the type of mirror you have, apply a suitable adhesive to the back of the mirror or install mounting hardware according to the manufacturer’s instructions.
- Position and align the mirror: Carefully position the mirror on the wall, aligning it with the previously marked measurements. Ensure that the mirror is level and centered.
- Secure the mirror: If using adhesive, press the mirror firmly against the wall, applying steady pressure. If using mounting hardware, follow the instructions provided to securely attach the mirror to the wall.
- Allow the adhesive to cure (if applicable): If you’ve used adhesive, allow it to cure for the recommended duration as specified by the manufacturer. This ensures a strong and sturdy bond.
Installing a new mirror can be a rewarding and transformative process for your bathroom. Remember to follow the manufacturer’s instructions and take necessary precautions to ensure a secure and stable installation. With the new mirror in place, you can move on to the final step: disposing of the old mirror properly.
Step 8: Dispose of the Old Mirror Properly
Once you have successfully removed the old mirror and installed a new one, it’s important to dispose of the old mirror properly. Glass and mirrors can be dangerous if not handled correctly, so follow these guidelines for safe disposal:
- Check local regulations: Before disposing of the mirror, check your local government’s regulations regarding the disposal of glass and mirrors. Some areas may have specific instructions or recycling programs in place.
- Wrap the mirror: Carefully wrap the old mirror in thick blankets or bubble wrap to prevent it from breaking during transport. Use packing tape to secure the wrapping in place.
- Use protective gloves: Put on protective gloves to avoid any risk of injury from broken glass or sharp edges.
- Handle with care: Lift and transport the wrapped mirror with caution. Avoid dropping or mishandling it to prevent any accidents or injuries.
- Dispose of the mirror: If local regulations allow, you can dispose of the wrapped mirror in your regular trash. However, it’s always best to check with your local waste management facility or recycling center for specific instructions.
- Recycle if possible: If recycling options are available in your area, consider recycling the mirror at a designated glass recycling facility. This helps to reduce waste and promotes environmental sustainability.
It’s important to prioritize safety when disposing of the old mirror. Whether you choose to dispose of it in the trash or recycle it, always exercise caution and follow local regulations. By properly disposing of the old mirror, you contribute to a cleaner and safer environment.
Congratulations! You have successfully completed the process of removing a vanity mirror and, if desired, installing a new one. By following the detailed steps in this guide, you can safely and efficiently tackle this task. Whether you’ve undertaken this project as part of a bathroom renovation or simply for maintenance purposes, your bathroom will now have a refreshed look. Enjoy your newly transformed space!
Read more: How To Size A Vanity Mirror
Conclusion
Removing a vanity mirror may seem like a daunting task, but with the right knowledge and tools, it can be a manageable project. We have provided you with a comprehensive step-by-step guide to help you successfully remove a vanity mirror and, if desired, install a new one. By following these steps, you can ensure a safe and efficient process while achieving your desired results.
Throughout the process, it’s important to prioritize safety by wearing protective gear and taking necessary precautions. Additionally, be mindful of the specific instructions provided by the mirror manufacturer and adhere to any local regulations when disposing of the old mirror.
Whether you’re remodeling your bathroom or simply updating your vanity area, removing a vanity mirror can make a significant impact. It provides an opportunity to enhance the aesthetic appeal of your space while creating a fresh and stylish atmosphere. Furthermore, updating your mirror can be a simple yet effective way to revitalize your bathroom without undergoing a full renovation.
We hope that this article has equipped you with the knowledge and confidence to successfully tackle mirror removal. Remember to personalize your approach based on the specific requirements of your mirror and consult with professionals when necessary.
Now it’s time to roll up your sleeves, gather your supplies, and embark on your mirror removal journey. Enjoy the process and the transformation it brings to your bathroom!
Frequently Asked Questions about How To Remove Vanity Mirror
Was this page helpful?
At Storables.com, we guarantee accurate and reliable information. Our content, validated by Expert Board Contributors, is crafted following stringent Editorial Policies. We're committed to providing you with well-researched, expert-backed insights for all your informational needs.


0 thoughts on “How To Remove Vanity Mirror”