Articles
How To Store A Camelbak
Modified: August 25, 2024
Learn the best methods for storing your Camelbak articles to ensure they remain clean and ready for your next adventure. Keep your gear in top shape with these helpful tips.
(Many of the links in this article redirect to a specific reviewed product. Your purchase of these products through affiliate links helps to generate commission for Storables.com, at no extra cost. Learn more)
Introduction
Having a Camelbak is a convenient and practical way to stay hydrated during outdoor activities such as hiking, biking, and camping. However, proper care and storage are essential to ensure the longevity and functionality of your Camelbak. In this article, we will guide you through the steps on how to store a Camelbak properly.
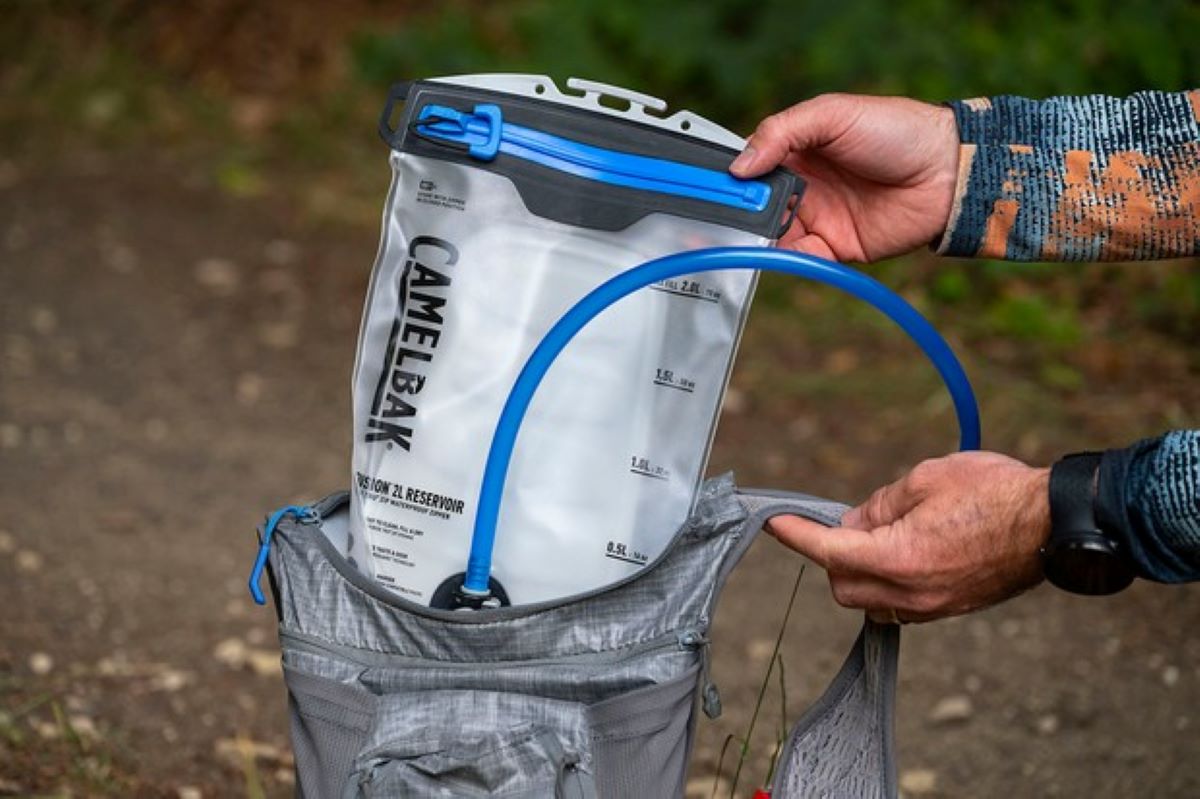
A Camelbak is a hydration backpack that consists of a water reservoir and a drinking tube. The reservoir is designed to be lightweight, durable, and easy to carry, making it an ideal choice for outdoor enthusiasts. To ensure that your Camelbak is in optimal condition for your next adventure, it is important to clean, dry, and store it correctly.
By following our step-by-step guide, you will learn how to maintain your Camelbak and keep it ready for use whenever you need it. Let’s dive into the details of each step to ensure that your Camelbak is well-maintained and ready for your next outdoor adventure.
Key Takeaways:
- Properly cleaning, drying, and storing your Camelbak is essential for maintaining its functionality and longevity. Regular maintenance and thorough cleaning ensure your hydration system is always ready for your next outdoor adventure.
- Disassembling your Camelbak allows for thorough cleaning and inspection of each component, ensuring optimal performance and longevity. Proper storage and regular maintenance are key to keeping your hydration system in top shape.
Read more: How To Store Store-Bought Bread
Step 1: Cleaning the Camelbak
Before storing your Camelbak, it is crucial to clean it thoroughly to remove any dirt, bacteria, or residue that may have accumulated during your outdoor activities. Follow these steps to ensure a proper cleaning:
- Start by emptying the reservoir completely. Remove any leftover water or liquid from the reservoir and drinking tube.
- Next, detach the drinking tube from the reservoir, making sure to disconnect it from any other components such as the bite valve or hose. Rinse the tube thoroughly with warm water to remove any dirt or debris. Use a cleaning brush designed for hydration packs to scrub the inside of the tube, paying particular attention to the valves and connectors.
- Now, let’s focus on cleaning the reservoir. Fill it halfway with warm water and add a tablespoon of mild dish soap. Use the cleaning brush to scrub the inside of the reservoir, ensuring that you reach all the corners and crevices. Pay extra attention to areas that may come into contact with your mouth, such as the drinking opening and the bite valve.
- After scrubbing the reservoir, rinse it thoroughly with clean water to remove any soap residue. Make sure to flush out all the soap from every part of the reservoir, including the filling port and the drinking tube connector.
- Once you have finished rinsing, allow the reservoir and the drinking tube to air dry completely. Hang them upside down or prop them open to ensure proper ventilation and drying. Avoid using a heat source or direct sunlight, as this may damage the materials.
By following these steps, you will ensure that your Camelbak is cleaned thoroughly, preventing any mold or bacteria growth during storage. Now that your Camelbak is clean and dry, let’s move on to the next step: disassembling the Camelbak.
Step 2: Drying the Camelbak
Properly drying your Camelbak after cleaning is essential to prevent mold and bacteria growth. Follow these steps to ensure your Camelbak is thoroughly dried:
- After cleaning the Camelbak, shake out any excess water from the reservoir and drinking tube.
- Use a clean towel or paper towel to blot and absorb any remaining moisture from the inside of the reservoir and the drinking tube. Be thorough and ensure all surfaces are dry.
- To further aid in the drying process, hang the Camelbak upside down in a well-ventilated area. This will allow any remaining moisture to evaporate naturally. Avoid using any external heat sources as this may damage the materials.
- Leave the Camelbak to dry completely before proceeding to the next step. The drying time may vary depending on the environmental conditions, but it is generally recommended to leave it for at least 24 hours to ensure all moisture is gone.
It’s important to note that properly drying your Camelbak prevents the growth of mold and bacteria, which could lead to health issues and affect the functionality of the hydration system. Now that your Camelbak is clean and dry, let’s move on to the next step: disassembling the Camelbak.
Step 3: Disassembling the Camelbak
Disassembling your Camelbak before storage allows for easier maintenance and ensures that all components are properly cleaned. Follow these steps to disassemble your Camelbak:
- Start by removing the drinking tube from the reservoir. Detach it from any other components such as the bite valve or hose.
- Inspect the drinking tube for any signs of damage or wear. If you notice any cracks, leaks, or discoloration, it may be time to replace the tube.
- Next, remove the bite valve from the drinking tube. Most bite valves can be easily pulled off by applying gentle pressure. Check the valve for any debris or buildup and clean it if necessary.
- If your Camelbak has a filter or a bladder, ensure they are also removed and cleaned separately if needed.
- Once you have disassembled the Camelbak, set aside all the components in a clean and dry area. Keep them organized and easily accessible for the next step: storing the Camelbak.
By disassembling your Camelbak, you can thoroughly clean and inspect each component, ensuring that your hydration system stays in good working condition. Now that you have disassembled the Camelbak, let’s move on to the next step: storing the Camelbak.
When storing a Camelbak, make sure to clean and dry it thoroughly before storing it in a cool, dry place. Avoid storing it near direct sunlight or heat sources to prevent damage to the materials.
Step 4: Storing the Camelbak
Proper storage of your Camelbak is crucial to maintain its functionality and longevity. Follow these steps to ensure your Camelbak is stored correctly:
- Begin by finding a clean and dry area for storage. It’s important to choose a location away from direct sunlight, extreme temperatures, and moisture to prevent any damage to the materials and components.
- If possible, store your Camelbak in an upright position to help preserve its shape and prevent any potential leaks. Placing it in a dedicated storage bag or hanging it on a hook can help keep it organized and easily accessible.
- Ensure that all components, including the reservoir, drinking tube, bite valve, and any other removable parts, are completely dry before storing them. Moisture left in the Camelbak can lead to mold and unpleasant odors.
- If you have a larger Camelbak backpack, make sure to remove any additional items or gear from the pack before storage. This will help prevent unnecessary strain on the backpack and maintain its shape.
- Consider using desiccant packs or silica gel packets inside the storage bag to absorb any excess moisture and help maintain a dry environment. This can be particularly useful in areas with high humidity.
By following these steps, you can ensure that your Camelbak is stored properly, reducing the risk of damage and maximizing its lifespan. Now that you have stored your Camelbak, let’s move on to the final step: regular maintenance tips.
Read more: How To Store Basil From Grocery Store
Step 5: Regular Maintenance Tips
To keep your Camelbak in excellent condition, regular maintenance is essential. Here are some additional tips to help you maintain your Camelbak:
- Inspect your Camelbak before each use to ensure there are no leaks, cracks, or signs of wear on the reservoir, drinking tube, or bite valve. If you notice any damage, it may be necessary to replace the affected component.
- Regularly clean your Camelbak, even if it hasn’t been used for some time. This helps prevent any buildup of bacteria and ensures that it is ready for your next adventure. Follow the steps outlined in the “Cleaning the Camelbak” section above.
- After each use, thoroughly dry your Camelbak to avoid any mold or mildew growth. Allow all components to air dry before storing them.
- Consider using specialized cleaning tablets or solutions designed for hydration systems to deep clean your Camelbak periodically. These products can help remove stubborn residue and maintain the cleanliness of your system.
- Avoid using abrasive cleaning agents or tools when cleaning your Camelbak, as they can damage the materials. Stick to mild soap and brushes specifically designed for hydration packs.
- If you won’t be using your Camelbak for an extended period, such as during the winter months, make sure to give it a thorough cleaning, drying, and storing it in a cool, dry place.
- Periodically inspect and replace any worn-out or damaged components, such as the drinking tube or bite valve, to ensure optimal performance.
By following these regular maintenance tips, you can prolong the life of your Camelbak and ensure that it is always ready for your next outdoor adventure. Now that you have learned how to clean, dry, disassemble, store, and maintain your Camelbak, you can enjoy the benefits of a well-maintained hydration system for years to come.
Conclusion
Properly storing your Camelbak is crucial for maintaining its functionality and ensuring that it is ready for your next outdoor adventure. By following the steps outlined in this guide, you can keep your Camelbak clean, dry, and well-maintained.
Start by thoroughly cleaning your Camelbak, both the reservoir and the drinking tube, using mild dish soap and warm water. Rinse them thoroughly to remove any soap residue and allow them to air dry completely. Remember to disassemble your Camelbak to clean and inspect each component individually.
Once your Camelbak is cleaned and dried, it’s time to store it properly. Find a clean and dry area away from direct sunlight and extreme temperatures. Store your Camelbak in an upright position, ensuring that all components are dry and free from moisture. Consider using desiccant packs or silica gel packets to absorb any excess moisture.
Regular maintenance is also important for keeping your Camelbak in top shape. Inspect your Camelbak before each use, clean it regularly, and dry it thoroughly after each use to prevent mold and bacteria growth. Consider using specialized cleaning solutions or tablets for deep cleaning, and periodically inspect and replace any worn-out or damaged components.
By following these guidelines, you can ensure that your Camelbak stays clean, functional, and ready to keep you hydrated during your outdoor activities. So, take care of your Camelbak, and it will take care of you on your adventures!
Frequently Asked Questions about How To Store A Camelbak
Was this page helpful?
At Storables.com, we guarantee accurate and reliable information. Our content, validated by Expert Board Contributors, is crafted following stringent Editorial Policies. We're committed to providing you with well-researched, expert-backed insights for all your informational needs.


0 thoughts on “How To Store A Camelbak”