Articles
How To Store A Kneaded Eraser
Modified: October 28, 2024
Learn how to properly store a kneaded eraser in this informative article. Find out the best methods to keep your erasers fresh and pliable.
(Many of the links in this article redirect to a specific reviewed product. Your purchase of these products through affiliate links helps to generate commission for Storables.com, at no extra cost. Learn more)
Introduction
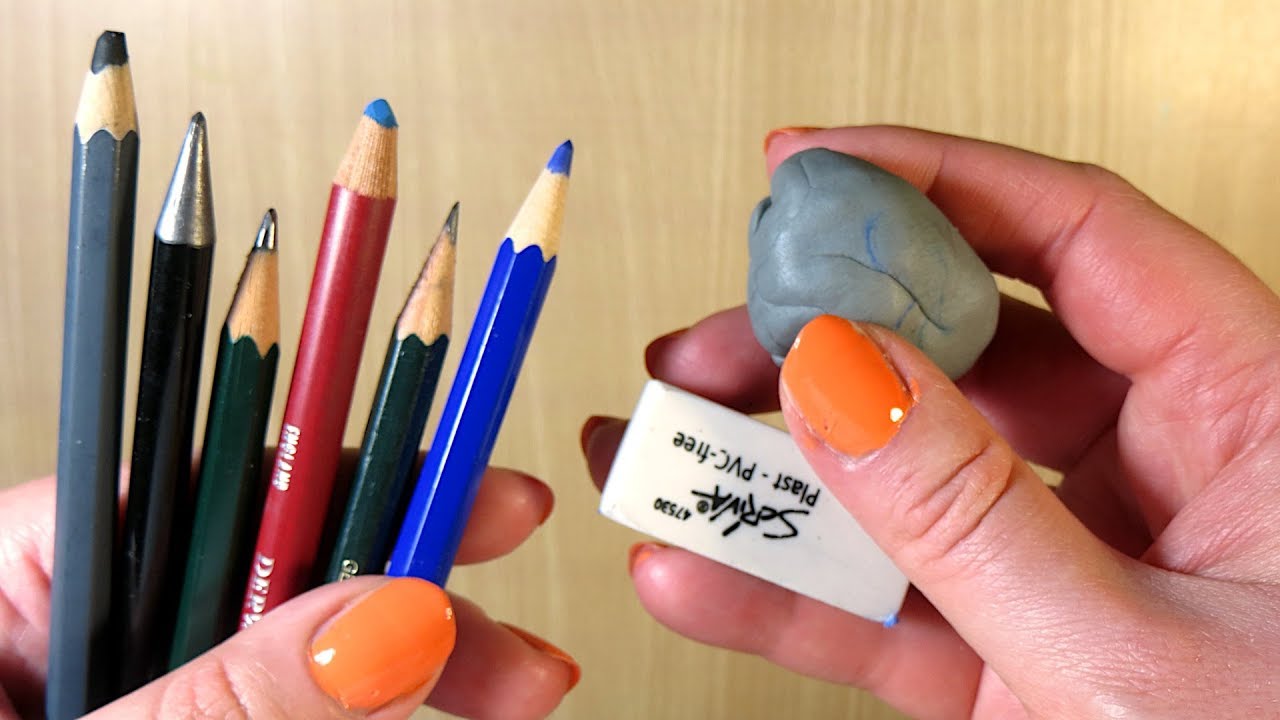
Keeping your kneaded eraser clean and properly stored is essential to ensure its longevity and effectiveness. A kneaded eraser is a unique type of eraser that is commonly used by artists and students to remove graphite, charcoal, and other dry media from paper or drawing surfaces. Unlike traditional erasers, a kneaded eraser can be molded and kneaded into various shapes, making it a versatile tool for precise erasing.
Although kneaded erasers are known for their ability to be reshaped and reused, they can accumulate dirt, dust, and debris over time. By taking a few simple steps to clean and store your kneaded eraser, you can extend its lifespan and maintain its erasing performance.
In this article, we will explore different methods to store a kneaded eraser and keep it in optimal condition. From basic cleaning techniques to using unique storage solutions, we will cover various approaches to ensure your kneaded eraser stays in top-notch shape.
Whether you are an artist who relies on a kneaded eraser for detailed drawings or a student using it for everyday writing and sketching, following these storage methods will help you keep your kneaded eraser ready for precise erasing whenever you need it.
Key Takeaways:
- Keep your kneaded eraser clean and ready for use by following simple storage methods such as wrapping with plastic, using a plastic container, or storing with baking soda to maintain its effectiveness and longevity.
- Whether you’re an artist or student, proper storage of your kneaded eraser is crucial for maintaining its performance. From plastic wrap to airtight jars, these methods ensure your eraser stays clean and ready for precise erasing.
Read more: How To Store Dry Erase Markers
Materials Needed
Before we dive into the different methods of storing a kneaded eraser, let’s gather the materials that will be useful for the process:
- A kneaded eraser
- Plastic wrap
- A plastic container
- Silica gel packets
- Zip-lock bags
- A pencil case
- Baking soda
- An airtight jar
These materials will help us clean and store the kneaded eraser in various ways, ensuring its cleanliness and longevity.
Now that we have the necessary materials ready, let’s move on to the step-by-step process of storing a kneaded eraser.
Step 1: Cleaning the Eraser
Before storing your kneaded eraser, it’s essential to clean it to remove any accumulated dirt, graphite, or charcoal. Cleaning the eraser will ensure that it maintains its effectiveness in erasing and doesn’t transfer any unwanted residue onto your artwork or paper.
Here’s how you can clean your kneaded eraser:
- Take the kneaded eraser and gently knead it in your hand. This will help loosen any loose particles and debris.
- If the eraser has visible dirt or marks, you can lightly stretch and fold it to expose the clean inner parts.
- Next, press the eraser against a clean surface, such as a piece of white paper or a clean table, and roll it. The friction against the surface will help remove any embedded dirt or pigment.
- Repeat the rolling process until the eraser no longer leaves any visible marks on the surface.
- If the eraser still has stubborn stains or marks, you can use a small amount of mild soap or detergent and gently rub it on the affected area with your fingers.
- Rinse the eraser under lukewarm water to remove any soap residue.
- Gently squeeze out any excess water from the eraser.
- Finally, use a clean towel or paper towel to pat the eraser dry. Avoid rubbing it vigorously, as this may damage the texture and shape of the eraser.
Once your kneaded eraser is clean and dry, you can proceed to the next step of storing it properly.
Step 2: Wrapping with Plastic Wrap
To protect your kneaded eraser from dust, dirt, and debris, wrapping it with plastic wrap is a simple yet effective method. This method creates a barrier that prevents outside elements from coming into contact with the eraser, keeping it clean and ready for use.
Here’s how you can wrap your kneaded eraser with plastic wrap:
- Take a piece of plastic wrap, approximately twice the size of your kneaded eraser.
- Place the eraser in the center of the plastic wrap.
- Gently fold the plastic wrap around the eraser, covering it completely. Make sure there are no openings or gaps where dust can enter.
- Press the folded edges of the plastic wrap firmly against the eraser to secure it in place.
- If there is excess plastic wrap, you can trim it off to neaten the appearance.
Now that your kneaded eraser is wrapped in plastic wrap, it is protected from external elements. This method is particularly useful if you plan to store your eraser in a pencil case or a small storage container where it may come into contact with other items.
Note: When using the wrapped eraser, simply remove the plastic wrap before kneading and using it for erasing. Store the plastic wrap separately so that you can rewrap the eraser after each use.
Step 3: Using a Plastic Container
If you prefer a more secure storage option for your kneaded eraser, using a plastic container can be an excellent choice. A plastic container provides additional protection against moisture, dust, and damage, ensuring that your eraser remains clean and in optimal condition.
Follow these steps to store your kneaded eraser using a plastic container:
- Select a clean and dry plastic container that is spacious enough to accommodate your kneaded eraser without squishing or deforming its shape.
- Ensure that the plastic container has a tight-fitting lid to keep out dust and moisture.
- Place your clean and wrapped kneaded eraser in the plastic container.
- Seal the container tightly with the lid to create an airtight seal.
- Label the container with the contents and date if necessary.
Storing your kneaded eraser in a plastic container provides a safe and enclosed environment, preventing any potential damage or contamination. It is also handy when you need to transport your eraser outdoors or to different locations, as the container keeps it secure and protected.
Remember to keep the plastic container in a cool and dry place away from direct sunlight, extreme temperatures, or excessive humidity. This will ensure that your kneaded eraser stays in optimal condition for an extended period.
Read more: Why Do Cats Knead Pillows
Step 4: Storing with Silica Gel
Moisture can be a problem for any drawing tool, including kneaded erasers. To prevent your eraser from becoming damp or sticky, storing it with silica gel can help absorb any excess moisture in the storage environment.
Here’s how you can store your kneaded eraser with silica gel:
- Choose a small, airtight container that can easily fit your kneaded eraser.
- Place a packet or a few silica gel beads inside the container.
- Make sure the silica gel does not come into direct contact with the eraser.
- Put your kneaded eraser into the container.
- Seal the container tightly to create a moisture-free environment.
- Store the container in a dry place, away from any moisture sources.
Silica gel is a desiccant that effectively absorbs moisture, keeping the storage environment dry and preventing any moisture-related issues for your kneaded eraser. It’s commonly used in various products for moisture control, like medicine bottles and food packaging.
Remember to replace the silica gel periodically according to manufacturer instructions, as it loses its moisture-absorbing properties over time.
Storing your kneaded eraser with silica gel ensures that it remains dry and ready for use whenever you need it while extending its longevity.
Store a kneaded eraser in a clean, airtight container to prevent it from drying out and collecting dirt. Keep it away from direct sunlight and extreme temperatures.
Step 5: Using a Zip-lock Bag
A zip-lock bag is a convenient and affordable option for storing your kneaded eraser. It provides a protective barrier against dust, dirt, and moisture, while also keeping your eraser easily accessible.
Follow these steps to store your kneaded eraser using a zip-lock bag:
- Ensure that your kneaded eraser is clean and dry.
- Place the eraser inside the zip-lock bag, making sure it fits comfortably without being too squished or misshapen.
- Zip the bag securely to create an airtight seal.
- Consider labeling the bag with the contents and date.
- If desired, you can place the zip-lock bag with the eraser in another container or pencil case for added protection.
The zip-lock bag is a versatile storage option as you can easily remove and use the eraser whenever needed. It also prevents the eraser from coming into contact with other items that may transfer debris or leave marks on the eraser’s surface.
Remember to store the zip-lock bag in a cool, dry place away from extreme temperatures or excessive humidity to maintain the quality of your kneaded eraser.
Using a zip-lock bag is a simple yet effective method to store your kneaded eraser, allowing for convenient access while protecting it from external elements.
Step 6: Storing in a Pencil Case
If you want a portable and organized solution for storing your kneaded eraser along with other art supplies, using a pencil case is an ideal choice. It keeps your eraser protected, easily accessible, and prevents it from getting lost among your other tools.
Here’s how you can store your kneaded eraser in a pencil case:
- Select a pencil case that has enough space to accommodate your kneaded eraser without compressing or deforming it.
- Place your clean and wrapped kneaded eraser inside the pencil case.
- Position the eraser in a way that it doesn’t get squished by other items in the case.
- Ensure that the pencil case closes securely to prevent the eraser from falling out.
- Consider organizing your other art supplies, such as pencils, pens, and brushes, along with your eraser in the pencil case for convenience.
Storing your kneaded eraser in a pencil case keeps it protected from dust, debris, and damage, especially when you’re carrying your art supplies for travel or outdoor sketching sessions. It also helps you keep all your essential tools in one place, making it easy to find everything you need for your artistic endeavors.
Remember to clean and wrap your kneaded eraser before placing it in the pencil case to ensure that it remains clean and doesn’t transfer any residue onto your other art supplies.
Using a pencil case for storing your kneaded eraser provides a practical and organized solution, making your eraser readily available and safe from external elements.
Step 7: Storing with Baking Soda
Baking soda is a household ingredient known for its moisture-absorbing properties. Storing your kneaded eraser with baking soda can help prevent it from becoming damp or sticky, especially in humid environments.
Here’s how you can store your kneaded eraser with baking soda:
- Obtain a small, airtight container that can comfortably accommodate your kneaded eraser.
- Place a small amount of baking soda at the bottom of the container.
- Set your clean and dry kneaded eraser on top of the layer of baking soda.
- Ensure that the baking soda does not come into direct contact with the eraser.
- Seal the container tightly to create a moisture-free environment.
- Store the container in a cool, dry place away from humidity.
Baking soda acts as a natural desiccant, absorbing excess moisture in the air and helping to maintain a dry environment. This prevents your kneaded eraser from becoming too sticky or losing its effectiveness.
Remember to replace the baking soda periodically, following the manufacturer’s instructions, as its moisture-absorbing properties will diminish over time.
By storing your kneaded eraser with baking soda, you can ensure that it remains dry and in optimal condition, ready for your next erasing task.
Step 8: Using an Airtight Jar
If you want maximum protection for your kneaded eraser while keeping it easily accessible, using an airtight jar is an ideal storage method. The airtight seal will prevent any dust, dirt, or moisture from reaching the eraser, ensuring its cleanliness and longevity.
Follow these steps to store your kneaded eraser using an airtight jar:
- Choose a clean and dry airtight jar that is spacious enough to accommodate your kneaded eraser without squishing or deforming its shape.
- Ensure that the jar has a secure and reliable sealing mechanism to keep out any external elements.
- Make sure that the interior of the jar is clean and free from any residual moisture or debris.
- Place your clean and wrapped kneaded eraser into the airtight jar.
- Seal the jar tightly to create an airtight environment.
- Store the jar in a cool, dry place away from direct sunlight, extreme temperatures, or excessive humidity.
Using an airtight jar provides excellent protection for your kneaded eraser. It not only keeps the eraser clean and safe from external elements but also reduces the risk of the eraser drying out or becoming too soft due to environmental factors.
Additionally, the transparency of the jar allows you to easily see the eraser inside, making it convenient to locate and retrieve it whenever needed.
Remember to clean and wrap your kneaded eraser before placing it in the airtight jar to maintain its cleanliness and prevent any potential transfer of debris.
Storing your kneaded eraser in an airtight jar ensures maximum protection and ease of access, keeping it in optimal condition for all your erasing needs.
Conclusion
Properly storing your kneaded eraser is essential to preserve its effectiveness, cleanliness, and longevity. By following the steps outlined in this article, you can ensure that your kneaded eraser remains in optimal condition for erasing graphite, charcoal, and other dry media.
We began by emphasizing the importance of cleaning the eraser before storage to remove any dirt, debris, or pigment. This step ensures that the eraser stays clean and avoids leaving unwanted marks on your artwork or paper.
We then explored various storage methods, including wrapping the eraser with plastic wrap to create a protective barrier against dust and storing it with silica gel to absorb moisture. These methods help maintain the cleanliness and pliability of the eraser.
Using a plastic container provides a secure and enclosed environment, while storing the eraser in a zip-lock bag offers convenience and accessibility. Both options protect the eraser from external elements and potential damage.
If you prefer a portable storage solution, storing the eraser in a pencil case is a great choice. It keeps the eraser organized and prevents it from getting lost among your other art supplies.
For added moisture control, storing the eraser with baking soda or using an airtight jar creates a moisture-free environment, ensuring the eraser remains dry and in optimal condition for erasing.
In conclusion, keeping your kneaded eraser clean and stored properly is crucial for maintaining its performance and extending its lifespan. Whether you’re an artist, student, or someone who frequently uses kneaded erasers, implementing these storage methods will help keep your eraser in top-notch shape, ready to erase with precision whenever you need it.
So, take the necessary steps to store your kneaded eraser and enjoy the benefits of a clean and effective erasing tool for all your artistic and writing endeavors.
Frequently Asked Questions about How To Store A Kneaded Eraser
Was this page helpful?
At Storables.com, we guarantee accurate and reliable information. Our content, validated by Expert Board Contributors, is crafted following stringent Editorial Policies. We're committed to providing you with well-researched, expert-backed insights for all your informational needs.


0 thoughts on “How To Store A Kneaded Eraser”