Articles
How To Store Baking Sheets
Modified: August 17, 2024
Learn the best way to store your baking sheets and keep them organized with these helpful articles on how to declutter your kitchen and maximize storage space.
(Many of the links in this article redirect to a specific reviewed product. Your purchase of these products through affiliate links helps to generate commission for Storables.com, at no extra cost. Learn more)
Introduction
When it comes to baking, having the right tools is essential. Baking sheets, also known as cookie sheets or baking pans, play a crucial role in achieving perfect cookies, pastries, and other baked goods. However, once you’re done baking, the question arises: how do you store these baking sheets efficiently?
Storing baking sheets properly not only keeps them organized but also helps extend their lifespan. It ensures that they remain in good condition and are easily accessible for your next baking adventure. In this article, we will guide you through the steps to store your baking sheets effectively, maximizing their durability and convenience.
So, let’s dive into the world of baking sheet storage and discover the best ways to keep your baking sheets tidy and ready for your next baking masterpiece.
Key Takeaways:
- Efficiently store baking sheets by cleaning them thoroughly, choosing the right storage method, and utilizing dividers or racks to keep them organized and easily accessible. Avoid stacking heavy items on top to maintain their quality and durability.
- Create a designated baking area, keep baking sheets within easy reach, and regularly maintain the storage system to ensure hassle-free baking sessions. By following these steps, you can extend the lifespan of your baking sheets and enjoy an efficient baking experience.
Read also: 12 Best Toaster Oven Baking Sheet For 2025
Step 1: Clean your baking sheets
Before storing your baking sheets, it is crucial to clean them thoroughly. Baking sheets often accumulate grease, food particles, and baked-on residue, which can affect their performance and longevity. Follow these steps to ensure your baking sheets are spotless:
- Start by soaking your baking sheets in warm, soapy water. This will help loosen any stuck-on debris.
- Use a non-abrasive scrub brush or sponge to gently scrub away any residue. Avoid using harsh chemicals or abrasive materials, as these can damage the surface of your baking sheets.
- If there are stubborn stains or burnt-on food, you can create a paste using baking soda and water. Apply the paste to the affected areas and let it sit for a few minutes before scrubbing it away.
- Rinse the baking sheets thoroughly with clean water to remove any soap or residue.
- Dry the baking sheets completely before storing them. Moisture can lead to rust or unpleasant odors.
By properly cleaning your baking sheets before storage, you ensure that they are free from dirt and grime, allowing them to perform at their best in future baking endeavors.
Step 2: Choose an appropriate storage method
Once your baking sheets are clean and dry, it’s time to decide on the best storage method for your specific needs. Here are a few options to consider:
- Flat storage: This method involves storing your baking sheets in a flat position, either stacked horizontally or vertically. It’s a popular choice if you have limited space, as it allows for easy access and takes up minimal room.
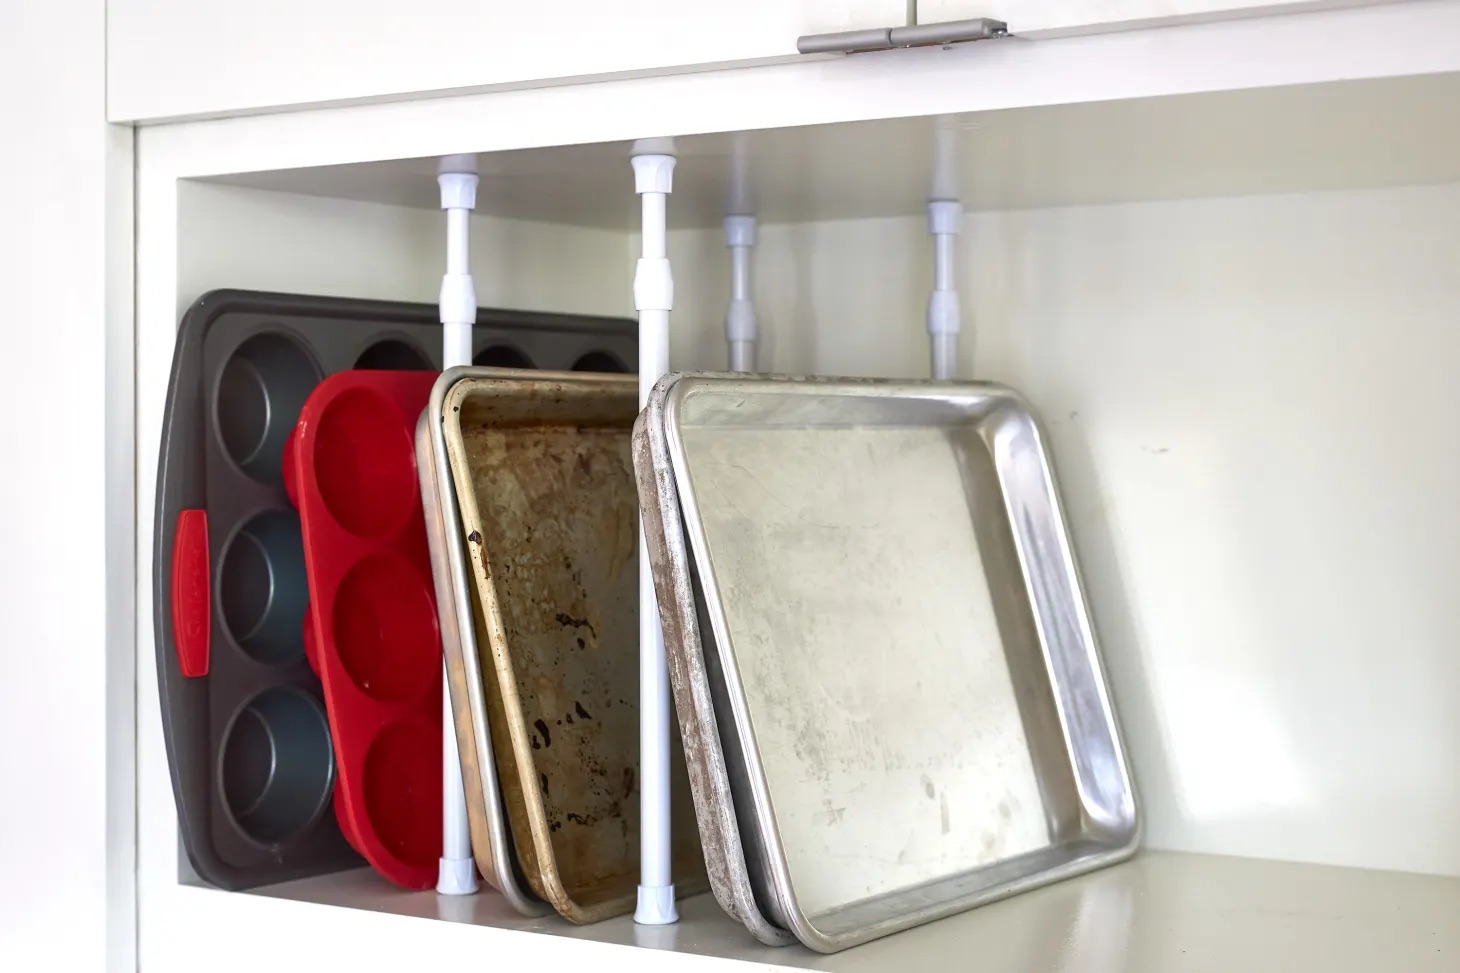
- Upright storage: If you have ample vertical space in your kitchen cabinets or pantry, storing your baking sheets upright can be a great option. This method prevents them from warping or getting scratched, and it also allows for quick identification.
- Hanging storage: For those who want to maximize space and showcase their baking sheets as a decorative element, hanging storage can be a creative solution. You can hang them on hooks or install a wall-mounted rack specifically designed for baking sheet storage.
Consider your kitchen layout, available storage space, and personal preferences when choosing a storage method for your baking sheets. Regardless of the method you choose, make sure it provides proper support and protection to prevent any damage to the sheets.
Next, let’s move on to step 3, where we’ll discuss stacking the baking sheets vertically for efficient storage.
Step 3: Stack the baking sheets vertically
Stacking your baking sheets vertically is an efficient way to save space and easily access the sheet you need without having to sift through a pile of stacked sheets. Here’s how to do it:
- Begin by gathering your baking sheets and aligning them in a neat stack.
- If your baking sheets have handles or rims, place them all facing the same direction for a more stable stack.
- Gradually tilt the stack of baking sheets vertically, keeping them aligned and making sure they are secure.
- Place the vertically stacked baking sheets in a designated storage area, such as a cabinet or drawer, ensuring they are stable and won’t topple over.
Vertical stacking not only saves space but also prevents any scratches or dents that can occur when sheets are nested horizontally. It makes it easier to grab the specific baking sheet you need without causing any disruption to the others.
In the next step, we’ll explore the option of using a baking sheet organizer to further streamline your storage system. Read on to learn more!
Step 4: Use a baking sheet organizer
If you want to take your baking sheet storage to the next level, consider investing in a baking sheet organizer. These organizers are specifically designed to keep your baking sheets neatly in place and make them easily accessible. Here’s how you can make the most of a baking sheet organizer:
- Choose a baking sheet organizer that suits your storage needs. There are various options available, including adjustable dividers, wire racks, or even specially designed drawer inserts.
- Measure your baking sheets and select an organizer that can accommodate their size and quantity.
- Place the organizer in your chosen storage area, ensuring it is stable and secure.
- Arrange your baking sheets within the organizer, using the dividers or slots to keep them upright and separated.
- Consider organizing your baking sheets by size or type for easier retrieval.
A baking sheet organizer not only keeps your sheets organized but also prevents them from shifting or sliding, minimizing the chances of damage while in storage. It provides a designated space for each sheet, making it a breeze to find the one you need when it’s time to bake.
In the next step, we’ll explore different storage locations for your baking sheets, so you can find the perfect spot in your kitchen. Keep reading for more information.
Read more: How To Store Baking Pans
Step 5: Store in a cabinet or drawer
One common and convenient option for storing baking sheets is to keep them in a cabinet or drawer in your kitchen. This keeps them easily accessible while keeping your countertops free from clutter. Here’s how to store them in a cabinet or drawer:
- Choose a cabinet or drawer that is easily accessible and spacious enough to accommodate your baking sheets.
- If storing in a cabinet, remove any items that may obstruct the space or cause damage to the sheets.
- If storing in a drawer, organize the drawer with dividers or compartments to keep the baking sheets neat and prevent them from sliding around.
- Place your baking sheets in the cabinet or drawer vertically or horizontally, depending on the space available and your personal preference.
- Consider using non-slip shelf liners or drawer liners to prevent the sheets from moving or scratching each other.
Storing baking sheets in a cabinet or drawer ensures that they are protected from dust and other kitchen elements. It also keeps them within easy reach, allowing you to grab the necessary sheet effortlessly when you need it.
In the next step, we’ll discuss using dividers or racks to enhance organization and maximize space. Stay tuned!
To store baking sheets, use a vertical organizer or a file holder to keep them upright and easily accessible. This will save space and prevent them from getting scratched or damaged.
Step 6: Consider using dividers or racks
To further streamline your baking sheet storage, consider using dividers or racks to keep your sheets organized and maximize the available space. Here’s how you can make the most of dividers or racks:
- If storing your baking sheets horizontally, place dividers or adjustable wire racks between each sheet to keep them separated and prevent them from scratching each other.
- If storing them vertically, consider using vertical dividers to create individual slots for each baking sheet. This ensures they remain upright and easy to grab.
- Make sure the dividers or racks fit snuggly in your storage area, providing stability and preventing any movement or shifting of the sheets.
- Arrange your baking sheets based on size or type, making it easier to locate the sheet you need without disturbing the others.
Using dividers or racks not only keeps your baking sheets organized but also minimizes the risk of damage. By creating separate compartments for each sheet, you can maintain their pristine condition and easily access the one you need for baking purposes.
In the next step, we’ll discuss the importance of designating a specific baking area for your sheets. Keep reading to find out more!
Step 7: Store in a designated baking area
Creating a designated baking area in your kitchen is not only aesthetically pleasing but also makes it more convenient to store and access your baking sheets. Here’s how you can create a designated baking area:
- Identify a specific area in your kitchen that is dedicated to baking. This can be a countertop, a section of a cabinet, or a designated pantry shelf.
- Clean and declutter the chosen area to make space for your baking essentials.
- Keep your baking sheets within reach by storing them in the designated baking area. Consider using dividers or racks to keep them organized and easily accessible.
- Pair your baking sheets with other baking essentials like measuring cups, mixing bowls, and baking utensils to create a cohesive and efficient baking station.
- To add a personal touch, consider decorating the area with a themed placemat, a small potted plant, or a decorative sign.
Having a designated baking area not only keeps your baking sheets organized but also creates a functional and inviting space for your baking endeavors. It allows you to have all your baking essentials in one place, making the baking process more enjoyable and efficient.
In the next step, we’ll discuss the importance of not stacking heavy items on top of your baking sheets to prevent any damage. Continue reading for more information.
Step 8: Avoid stacking heavy items on top
When storing your baking sheets, it’s important to avoid stacking heavy items on top of them. Placing heavy objects on your baking sheets can lead to warping, bending, or even cracking. Follow these guidelines to protect your baking sheets:
- Ensure that the storage area you choose for your baking sheets is sturdy and can support the weight of the items placed on top.
- Avoid placing heavy pots, pans, or kitchen appliances on top of your baking sheets. Instead, consider storing them separately or in another location.
- If you have limited space and need to stack items, place lighter items on top of the baking sheets to minimize the risk of damage.
- If you must stack heavy items on top temporarily, place a protective layer, such as a cloth or silicone mat, between the objects to prevent direct contact and potential scratches.
By avoiding the stacking of heavy items on your baking sheets, you can preserve their integrity and ensure they remain in good condition for years to come. This simple precaution will extend the lifespan of your baking sheets and maintain their functionality.
In the next step, we’ll discuss the importance of keeping your baking sheets within easy reach. Keep reading to find out more!
Read more: How To Store Baked Cake
Step 9: Keep baking sheets within easy reach
When storing your baking sheets, it’s important to keep them within easy reach for convenience during your baking adventures. Here are some tips to ensure your baking sheets are easily accessible:
- Store your baking sheets in a location that is close to your oven or baking area. This will minimize the time and effort required to retrieve them when you need to use them.
- If you have a large collection of baking sheets, consider storing the most commonly used ones in a more accessible spot, such as in a cabinet near your baking area or on a designated shelf.
- Organize your baking sheets in a way that allows you to quickly identify and grab the one you need. This can be done by using dividers, labels, or organizing them by size or type.
- Regularly monitor and rearrange your storage system to ensure that the baking sheets you use most frequently are easily within reach, while the ones you use less often are stored in a more accessible but still convenient location.
By keeping your baking sheets within easy reach, you can streamline your baking process and save time when reaching for the right sheet. It also reduces the likelihood of having to search for misplaced sheets or causing unnecessary frustration.
In the final step, we’ll discuss the importance of regularly cleaning and maintaining your baking sheet storage system. Let’s explore the final step together!
Step 10: Regularly clean and maintain your storage system
To ensure that your baking sheets remain in good condition and your storage system stays organized, it’s crucial to regularly clean and maintain both the sheets and the storage area. Here’s how to keep everything in top shape:
- Periodically inspect your baking sheets for any signs of damage, such as warping or corrosion. Replace any sheets that are no longer in good condition.
- Clean your storage area regularly, removing any crumbs, dust, or debris that may have accumulated. Wipe down surfaces and shelves to keep everything clean and organized.
- If using dividers or racks, make sure they are securely in place and not causing any scratching or damage to the baking sheets.
- Check for any signs of moisture or humidity in the storage area. Excess moisture can lead to rust or unpleasant odors. Consider using moisture absorbers or silica gel packs to prevent these issues.
- Take the time to reorganize your baking sheets if needed. As your collection grows or your baking needs change, adjust the storage system accordingly to ensure efficiency and accessibility.
Regularly cleaning and maintaining your baking sheet storage system will not only keep everything in optimal condition but also make it more enjoyable to use. It will ensure that your baking sheets remain in top-notch shape and ready for your next baking endeavor.
By following these steps to store and maintain your baking sheets, you can keep them organized, readily accessible, and in excellent condition for years to come. Happy baking!
Feel free to refer back to this article whenever you need a reminder on how to store your baking sheets effectively.
ConclusionStoring your baking sheets properly is essential for maintaining their quality, accessibility, and durability. By following these steps, you can ensure that your baking sheets are organized, protected, and readily available for your baking adventures:
- Clean your baking sheets thoroughly before storing them to remove any grease or residue.
- Choose an appropriate storage method that suits your space and preferences.
- Stack the baking sheets vertically to save space and prevent scratches.
- Consider using a baking sheet organizer to keep your sheets neat and accessible.
- Store your baking sheets in a cabinet or drawer, keeping them within easy reach.
- Use dividers or racks to enhance organization and maximize space.
- Create a designated baking area in your kitchen for convenience and efficiency.
- Avoid stacking heavy items on top to prevent damage to your baking sheets.
- Ensure that your baking sheets are easily accessible for a seamless baking experience.
- Regularly clean and maintain your storage system to keep everything in top shape.
By implementing these storage tips, you can extend the lifespan of your baking sheets and enjoy hassle-free baking sessions. Remember to regularly assess and adjust your storage system to accommodate changes in your baking needs.
Whether you’re an occasional baker or a seasoned pro, an organized and well-maintained storage system for your baking sheets will contribute to a more enjoyable and efficient baking experience. So, put these tips into practice and let your baking adventures continue!
Frequently Asked Questions about How To Store Baking Sheets
Was this page helpful?
At Storables.com, we guarantee accurate and reliable information. Our content, validated by Expert Board Contributors, is crafted following stringent Editorial Policies. We're committed to providing you with well-researched, expert-backed insights for all your informational needs.


0 thoughts on “How To Store Baking Sheets”