Articles
How To Store Divinity Candy
Modified: December 7, 2023
Learn the best methods for storing divinity candy and keep it fresh for longer with our helpful articles.
(Many of the links in this article redirect to a specific reviewed product. Your purchase of these products through affiliate links helps to generate commission for Storables.com, at no extra cost. Learn more)
Introduction
Divinity candy is a classic treat known for its sweet and fluffy texture. Made with a few simple ingredients, it is a delightfully indulgent confection that is often enjoyed during the holiday season or as a special homemade gift. While divinity candy is delicious to eat, it is essential to store it properly to maintain its freshness and texture. In this article, we will guide you through the process of storing divinity candy to ensure that it stays in perfect condition for as long as possible.
Before we delve into the storage methods, let’s take a quick look at the ingredients and equipment you will need to make divinity candy. This will give you a better understanding of the candy itself and its delicate nature.
Ingredients:
- 2 cups granulated sugar
- 1/2 cup light corn syrup
- 1/2 cup water
- 2 large egg whites
- 1 teaspoon vanilla extract
- 1/2 cup chopped nuts (optional)
Equipment Needed:
- Large saucepan
- Candy thermometer
- Electric mixer or stand mixer
- Baking pan or dish
- Parchment paper
Now that you have an idea of what goes into making divinity candy, let’s move on to the proper storage techniques that will help preserve its taste and texture.
Key Takeaways:
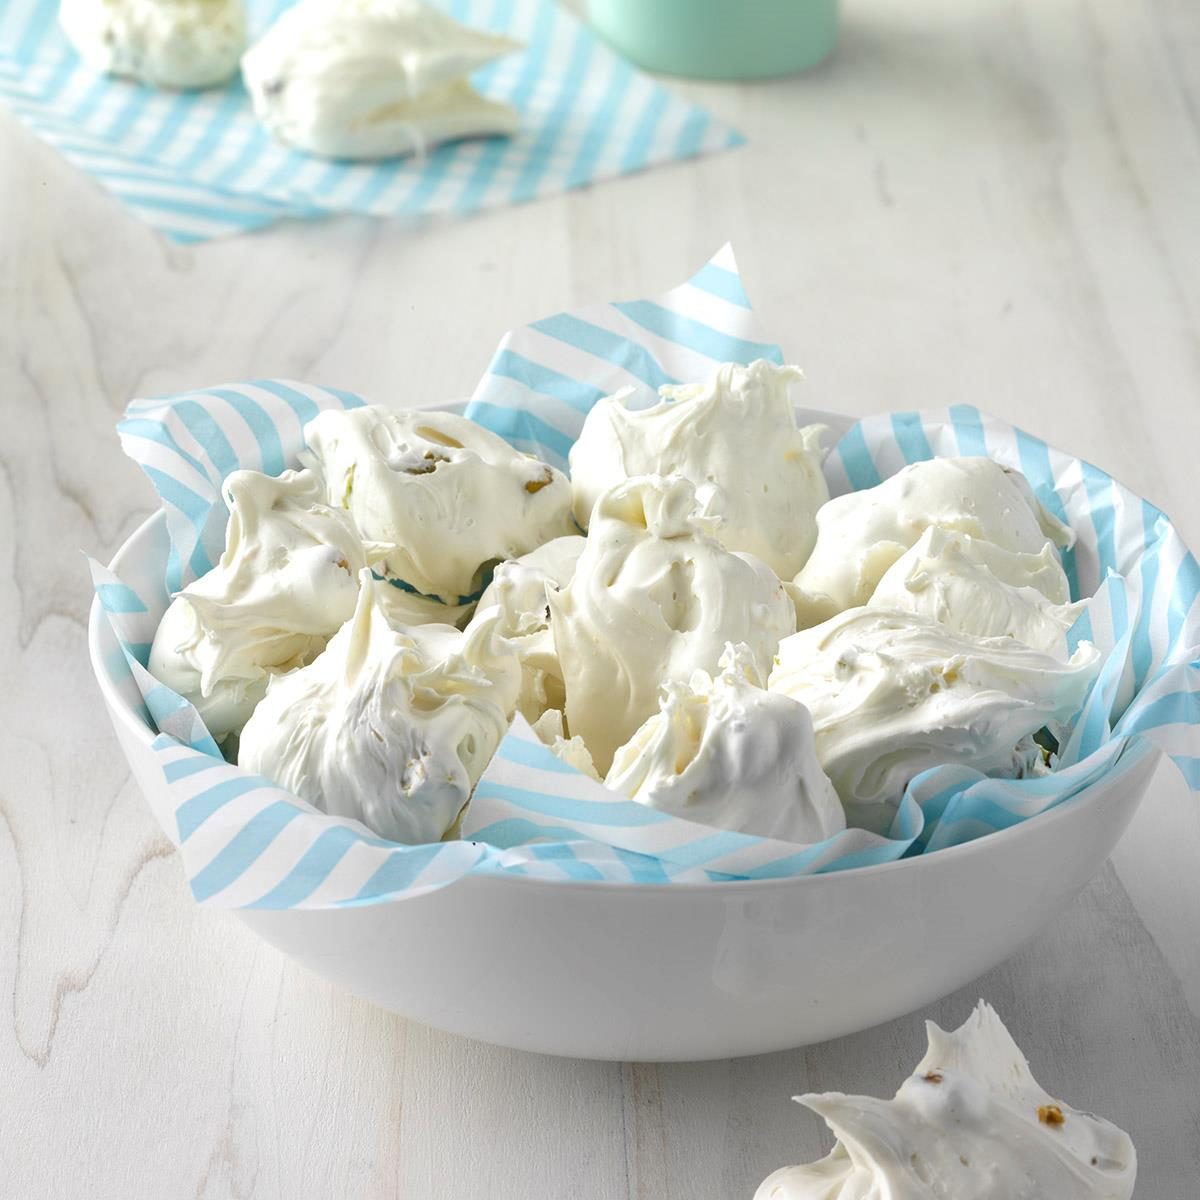
- Store divinity candy in an airtight container with parchment paper layers to maintain its fluffy texture and delicious flavor for up to two weeks at room temperature. Avoid refrigeration to prevent moisture absorption.
- After mastering the art of making divinity candy, ensure its longevity by storing it in a cool, dry place away from direct heat or moisture. Share the joy of this classic treat with loved ones and savor each fluffy bite.
Read more: How To Store Candied Fruit
Ingredients
Divinity candy is made with just a handful of simple ingredients that come together to create a deliciously sweet treat. Here are the ingredients you will need to make divinity candy:
- Granulated Sugar: The base of divinity candy is made with granulated sugar. It provides the sweetness and structure to the candy.
- Light Corn Syrup: Light corn syrup is added to the sugar mixture to prevent the candy from becoming grainy. It also helps to give the divinity a smooth and velvety texture.
- Water: Water is used to dissolve the sugar and corn syrup, creating a syrupy mixture that will eventually become the divinity candy.
- Egg Whites: Egg whites are the secret ingredient that gives divinity candy its light and airy texture. They are beaten until stiff peaks form and then incorporated into the sugar syrup mixture.
- Vanilla Extract: Adding a teaspoon of vanilla extract enhances the flavor of the divinity candy, giving it a subtle and aromatic sweetness. You can also experiment with other flavors like almond or peppermint extract for variation.
- Chopped Nuts (optional): If you prefer some added crunch and flavor, you can include chopped nuts in your divinity candy. Popular choices include pecans, walnuts, or almonds, but feel free to use whichever nuts you prefer or omit them entirely if you have nut allergies.
With just these few ingredients, you can create a batch of delectable divinity candy that will surely satisfy your sweet tooth.
Equipment Needed
To make divinity candy, you will need a few essential tools and equipment that will help you prepare and store the candy effectively. Here are the necessary items you will need:
- Large Saucepan: A large saucepan is necessary for cooking the sugar syrup mixture. Choose a saucepan that is big enough to accommodate the bubbling mixture and has high sides to prevent any overflow.
- Candy Thermometer: A candy thermometer is essential for achieving the correct temperature while cooking the divinity candy. This will ensure that the sugar mixture reaches the desired consistency for the candy to set properly.
- Electric Mixer or Stand Mixer: Beating the egg whites until stiff peaks form is a crucial step in making divinity candy. An electric mixer or stand mixer will make this task much easier and quicker. Make sure to use a whisk attachment for the best results.
- Baking Pan or Dish: Prepare a baking pan or dish by greasing it lightly with cooking spray or lining it with parchment paper. This will provide a surface for shaping and cooling the divinity candy.
- Parchment Paper: Parchment paper is indispensable when it comes to preventing the candy from sticking to the pan or dish. It also makes it easier to remove the divinity candy once it has cooled and set.
By having these tools and equipment ready before you start making your divinity candy, you will ensure that the process goes smoothly and that you have everything you need to store the candy properly.
Step 1: Prepare the Pan
The first step in making divinity candy is to prepare the pan or dish where you will shape and cool the candy. Follow these steps to ensure that your divinity candy doesn’t stick to the pan:
- Choose a non-stick baking pan or line a regular baking pan with parchment paper. Both options will prevent the candy from sticking to the bottom and sides.
- If you’re using a non-stick pan, no extra preparation is needed. Simply ensure that the pan is clean and dry before proceeding.
- If you’re using parchment paper, cut a piece that is slightly larger than the dimensions of your pan. Place it inside the pan, allowing it to hang over the sides. This will make it easier to lift the candy out of the pan later.
- Lightly grease the bottom and sides of the pan with cooking spray or a small amount of vegetable oil. This extra layer of lubrication will further prevent the candy from sticking.
Once you have prepared the pan, set it aside while you move on to the next steps of making the divinity candy. Having a properly prepared pan will ensure that the candy easily releases from the pan once it has cooled and set, making the storing process much more convenient.
Step 2: Prepare the Parchment Paper
Once you’ve prepared the pan for your divinity candy, it’s time to prepare the parchment paper. This step is essential to prevent the candy from sticking to the paper and ensuring easy removal. Follow these steps to prepare the parchment paper:
- Tear off a piece of parchment paper that is slightly larger than the size of your pan. This will allow for some overhang, making it easier to lift the candy out of the pan later.
- Place the parchment paper on a clean, flat surface and smooth out any creases or wrinkles.
- Grease the parchment paper lightly with cooking spray or a small amount of vegetable oil. This will further prevent the candy from sticking to the paper.
- Press the greased parchment paper into the prepared pan, ensuring that it lines the bottom and sides completely. Pat it down gently to remove any air bubbles that may have formed.
Preparing the parchment paper allows for easy release of the divinity candy once it has cooled and set. The greased surface prevents the candy from sticking, making it effortless to lift the entire batch out of the pan for proper storage.
Read more: How To Store Candy Apples
Step 3: Combine the Ingredients
Now that you have prepared the pan and parchment paper, it’s time to start combining the ingredients for your divinity candy. Follow these steps to ensure a smooth and well-blended mixture:
- In a large saucepan, combine the granulated sugar, light corn syrup, and water. Stir the mixture gently to combine the ingredients.
- Place the saucepan over medium heat and cook the mixture, stirring occasionally, until it reaches a temperature of 250°F (121°C) on a candy thermometer. This stage is known as the soft ball stage, where the syrup forms a soft, pliable ball when dropped into cold water.
- While the sugar mixture is cooking, separate the egg whites and place them in the bowl of an electric mixer or stand mixer. Beat the egg whites on high speed until stiff peaks form.
- Once the sugar mixture reaches the soft ball stage, carefully and slowly pour it into the beaten egg whites while the mixer is still running on low speed. Be cautious as the hot syrup may splatter.
- Continue beating the mixture on high speed for about 7-10 minutes or until the mixture becomes stiff and glossy. It should hold its shape when piped or spooned.
- Add the vanilla extract (and chopped nuts, if desired) to the mixture and gently fold it in until well combined.
Combining the ingredients in the right order and technique is crucial to achieving the perfect texture and consistency for your divinity candy. Be sure to follow these steps carefully to create a fluffy and delicious confection.
Store divinity candy in an airtight container at room temperature. Place wax paper between layers to prevent sticking. Keep away from heat and moisture to maintain its texture.
Step 4: Cook the Mixture
Once you have combined all the ingredients for your divinity candy, it’s time to cook the mixture to the desired temperature. Follow these steps to ensure that the candy reaches the perfect consistency:
- Place the saucepan with the combined ingredients over medium heat on the stovetop.
- Stir the mixture constantly while it heats up to prevent it from scorching or caramelizing unevenly.
- Continue heating and stirring until the temperature reaches 250°F (121°C) on a candy thermometer. This temperature indicates that the candy has reached the soft ball stage, where the syrup forms a soft, pliable ball when dropped into cold water.
- Keep a close eye on the temperature, as reaching the desired stage is crucial for the texture of the divinity candy. It should take approximately 5-7 minutes for the mixture to reach the proper temperature.
- Once the mixture reaches 250°F (121°C), remove the saucepan from the heat immediately to prevent the mixture from overcooking and hardening.
It is important to be attentive while cooking the divinity candy mixture to ensure that it reaches and maintains the correct temperature. This will yield a perfectly fluffy and delicate texture for your homemade candy.
Step 5: Beat the Mixture
After cooking the divinity candy mixture to the desired temperature, the next step is to beat it to achieve a light and airy texture. Follow these steps to ensure that your divinity candy turns out fluffy and delicious:
- With your electric mixer or stand mixer ready, transfer the cooked candy mixture into a large mixing bowl. You want to use a bowl that provides enough space for the mixture to expand as it gets beaten.
- Start beating the mixture on low speed for a couple of minutes. This will help it cool slightly and stabilize before increasing the speed.
- Gradually increase the speed to high and continue beating the mixture for about 7-10 minutes, or until it becomes stiff and glossy.
- You will notice that the mixture starts to lighten in color and thickens. It should hold its shape when spooned or piped.
- Be sure not to overbeat the mixture, as it can become grainy and lose its fluffiness. Stop beating once it reaches the desired consistency.
Beating the mixture is a crucial step in creating the distinctive texture of divinity candy. The combination of cooking the syrup and beating it creates airy and marshmallow-like candy that is melt-in-your-mouth delicious. Take your time during this step to ensure the best results.
Step 6: Shape the Divinity
Once you have achieved the perfect texture by beating the divinity candy mixture, it’s time to shape it into the desired form. Follow these steps to create beautifully shaped divinity candy:
- Prepare a pastry bag with your desired tip, or use a spoon if you prefer a more rustic appearance for your divinity candy.
- If using a pastry bag, fill it with the beaten divinity mixture. If using a spoon, simply scoop portions of the mixture onto a prepared baking pan or dish.
- If you’re using a pastry bag, pipe small portions of the mixture onto the prepared pan or dish. You can create classic drop shapes or make swirls for a more decorative appearance.
- If using a spoon, drop dollops of the mixture onto the pan or dish, leaving a bit of space between each portion to prevent sticking.
- Work quickly, as the divinity candy can start to set as it cools.
Shaping the divinity candy allows you to create visually appealing treats that are both delicious and beautiful. Feel free to get creative with different shapes and designs to make your divinity candy extra special.
Read more: How To Store Candied Walnuts
Step 7: Let it Cool
After shaping the divinity candy, it’s important to let it cool and set properly before attempting to store or handle it. Follow these steps to ensure that your divinity candy cools down properly:
- Place the pan or dish with the shaped divinity candy in a cool, dry area away from any direct heat or drafts. Allow it to sit undisturbed for at least 2-3 hours or until it is completely cooled and set.
- During the cooling process, the divinity candy will firm up and become less sticky to the touch.
- Resist the temptation to touch or move the candy until it has completely cooled. This will help maintain its shape and prevent any sticking.
Cooling is a crucial step in the divinity candy-making process, as it allows the candy to solidify and develop its characteristic texture. Be patient and give it ample time to cool completely before proceeding to the next step.
Step 8: Store the Divinity Candy
Proper storage is key to maintaining the freshness and quality of your divinity candy. Follow these steps to store your divinity candy so that it can be enjoyed for days to come:
- Once the divinity candy has completely cooled and set, carefully remove it from the pan or dish. If using parchment paper, gently lift the edges of the paper to release the candy.
- Place the divinity candy in an airtight container or a resealable plastic bag. Make sure the container is clean and dry before adding the candy.
- Layer pieces of parchment paper or wax paper between the divinity candy layers to prevent pieces from sticking together.
- Store the divinity candy in a cool, dry place, away from direct sunlight, heat, or moisture. A pantry or a cupboard is an ideal storage spot.
- Avoid storing divinity candy in the refrigerator, as the moisture can cause it to become sticky and lose its delicate texture.
- Divinity candy can be stored for up to two weeks at room temperature, but it is best enjoyed within the first week for optimal texture and flavor.
- If you live in a particularly humid climate, you may want to consider storing the divinity candy in the refrigerator to prevent moisture absorption. Just be aware that the texture may change slightly and become chewier.
By following these storage steps, you can ensure that your divinity candy remains fresh, delicious, and ready to be enjoyed whenever you have a craving for a sweet and fluffy treat.
Conclusion
Divinity candy is a delightful confection that brings a touch of sweetness and nostalgia to any occasion. By following the steps outlined in this article, you can create your own batch of fluffy and delicious divinity candy at home. From preparing the pan and parchment paper to combining the ingredients and shaping the candy, each step plays a crucial role in achieving the perfect texture and taste.
Once your divinity candy is shaped and cooled, it’s important to store it properly to maintain its freshness. Ensuring that it is stored in an airtight container, in a cool and dry place, away from direct heat or moisture, will help preserve its quality and flavor. Remember to separate layers of the candy with parchment paper or wax paper to prevent sticking.
Whether you enjoy divinity candy as a holiday treat, a homemade gift, or simply a delightful indulgence, the proper storage techniques will ensure that it maintains its deliciousness for days to come. Take the time to savor each fluffy bite and share the joy of this classic candy with your loved ones.
Now that you have mastered the art of storing divinity candy, you can proudly indulge in this sweet treat whenever the craving strikes. So, gather your ingredients, pull out your candy thermometer, and get ready to enjoy the fluffy and mouthwatering delight of homemade divinity candy!
Frequently Asked Questions about How To Store Divinity Candy
Was this page helpful?
At Storables.com, we guarantee accurate and reliable information. Our content, validated by Expert Board Contributors, is crafted following stringent Editorial Policies. We're committed to providing you with well-researched, expert-backed insights for all your informational needs.


0 thoughts on “How To Store Divinity Candy”