Articles
How To Store Mealworms For Geckos
Modified: December 7, 2023
Learn how to properly store mealworms for your geckos with our informative articles. Get expert tips and advice to keep your geckos healthy and well-fed.
(Many of the links in this article redirect to a specific reviewed product. Your purchase of these products through affiliate links helps to generate commission for Storables.com, at no extra cost. Learn more)
Introduction
Welcome to our guide on how to store mealworms for geckos. Mealworms are a staple food for many gecko species, providing essential nutrients and protein that contribute to their overall health and wellbeing. Proper storage of mealworms is crucial to maintain their freshness and nutritional value, ensuring that they remain a nutritious food source for your geckos.
In this article, we will walk you through the process of storing mealworms for geckos, covering everything from choosing the right container to creating an ideal environment for their long-term storage. We will also discuss the importance of maintaining proper temperature and humidity levels, providing the correct food and water, regular cleaning and maintenance, and monitoring the health and wellness of your mealworms. By following these tips and guidelines, you can ensure that your geckos receive high-quality and nutritious mealworms for their dietary needs.
Without further ado, let’s dive into the details of storing mealworms for your gecko companions!
Key Takeaways:
- Ensure your geckos have a constant supply of high-quality mealworms by choosing the right container, creating an ideal environment, and maintaining proper temperature and humidity levels. Regular monitoring and harvesting ensure your geckos receive optimal nutrition.
- Storing mealworms for your geckos offers convenience, cost-savings, and control over their diet. By providing a clean habitat, monitoring their health, and harvesting mealworms for feeding, you can ensure a reliable and nutritious food source for your geckos’ overall health and happiness.
Read more: Why Is My Gecko Trying To Climb The Glass
Why Store Mealworms?
Mealworms are a convenient and nutritious food source for geckos. They are rich in protein, vitamins, and minerals, making them an essential part of a gecko’s diet. By storing mealworms, you can ensure a constant supply of this valuable food item for your geckos, regardless of their availability in local pet stores or breeding facilities.
By storing mealworms, you can also save money in the long run. Buying in bulk and storing them allows you to take advantage of bulk discounts and reduce frequent trips to the store. Additionally, storing mealworms reduces the risk of them becoming unavailable when you need them, such as during times of shortage or unexpected circumstances.
Another benefit of storing mealworms is that it allows you to control their quality. By carefully selecting the type of mealworms you purchase and storing them properly, you can ensure that your geckos receive the healthiest and most nutritious mealworms possible. This is particularly important for geckos with specific dietary needs or health conditions.
Storing mealworms also gives you the flexibility to provide a varied diet for your geckos. You can store different sizes of mealworms to accommodate geckos at different life stages or with varying feeding preferences. This variety in mealworm sizes can encourage natural foraging behaviors and keep your geckos engaged during mealtime.
Finally, by storing mealworms, you have the peace of mind that you are well-prepared for your geckos’ feeding needs. Whether you are going on vacation, have a busy schedule, or simply want to ensure a constant supply of mealworms, having a dedicated storage system in place guarantees that you can always provide your geckos with the nourishment they require.
Overall, storing mealworms for your geckos offers numerous benefits, including convenience, cost-savings, and control over their quality. It allows you to meet their dietary needs consistently and ensures that they receive high-quality, nutritious food for their overall health and wellbeing.
Choosing the Right Container for Storage
When it comes to storing mealworms for geckos, choosing the right container is essential for maintaining their quality and ensuring their longevity. The container you select should be suitable for mealworms’ needs, offering a hygienic and comfortable environment for them. Here are some factors to consider when choosing a container for mealworm storage:
- Airflow: Mealworms require adequate airflow to prevent moisture buildup and the growth of mold or bacteria. Choose a container with ventilation holes or a mesh lid to ensure proper airflow.
- Size and Capacity: Consider the number of mealworms you plan to store and their growth rate. Select a container that provides ample space for them to move around comfortably without overcrowding.
- Material: Opt for a container made of non-toxic and durable materials, such as plastic or glass. Avoid containers with sharp edges or rough surfaces that could harm the mealworms.
- Lid: Ensure that the container has a secure and tight-fitting lid to prevent escapes and keep out pests or other insects that may contaminate the mealworms.
- Transparency: Choosing a transparent container allows you to monitor the condition of the mealworms without disturbing their environment. It also enables you to easily differentiate between mealworms and pupae.
One popular choice for mealworm storage is a plastic container with a tight-fitting lid. These containers are readily available, affordable, and provide suitable airflow and protection for the mealworms inside. Ensure that the lid has small ventilation holes to maintain the necessary airflow while keeping out larger pests.
Another option is using glass or plastic jars with mesh or breathable fabric secured over the opening. These jars provide excellent visibility and ventilation for the mealworms. However, ensure that the mesh or fabric is tightly secured to prevent any escapes.
Regardless of the type of container you choose, it is essential to sterilize it before using it to store mealworms. Clean the container thoroughly with warm water and mild soap, rinse it well to remove any residue, and allow it to dry completely. This step helps eliminate any potential contaminants that could harm the mealworms.
Overall, selecting the right container for mealworm storage is crucial to creating a safe and optimal environment for the mealworms. Consider their needs regarding airflow, space, material, lid security, and transparency to ensure the best conditions for storing mealworms for your geckos.
Creating the Ideal Environment for Mealworms
Creating the ideal environment for mealworms is essential for their health, longevity, and overall well-being. By providing them with the right conditions, you can ensure that they remain active, healthy, and readily available as a food source for your geckos. Here are some key factors to consider when creating the ideal environment for mealworms:
- Substrate: Start by providing a suitable substrate for your mealworms. The commonly used substrate is wheat bran, which provides a nutritious base for the mealworms to live in. Fill the container with enough substrate to allow the mealworms to burrow and move around comfortably.
- Moisture: Mealworms require a certain level of moisture to thrive. However, excessive moisture can cause fungal growth and harm the mealworms. Aim for a substrate that is slightly moist but not soggy. Regularly check and adjust the moisture level to ensure it remains within the appropriate range.
- Temperature: Mealworms are cold-blooded creatures, and their metabolic rate is heavily influenced by temperature. The ideal temperature range for mealworms is generally between 75°F and 85°F (24°C and 29°C). Ensure that the storage area or room maintains a stable temperature within this range to promote optimal growth and development.
- Lighting: Mealworms do not have specific lighting requirements, as they are naturally found in darker environments. However, providing a consistent light-dark cycle can help regulate their activity and reproduction. Aim for a 12-14 hours light and 10-12 hours dark cycle using ambient room lighting.
It is crucial to regularly monitor and adjust the conditions within the mealworm storage container. Check the moisture level of the substrate every few days and add or remove moisture as needed. Observe the temperature regularly using a thermometer and make any necessary adjustments to maintain the desired temperature range.
Additionally, ensure that the mealworm storage container is kept in a relatively dark and quiet area. This helps reduce stress on the mealworms and promotes their natural behavior. Avoid exposing the container to direct sunlight or extreme temperature fluctuations, as this can negatively affect the mealworms’ overall health.
By providing the ideal environment for mealworms, you are creating a suitable habitat that supports their growth, reproduction, and overall well-being. This not only ensures a consistent supply of nutritious mealworms for your geckos but also helps maintain the health and vitality of the mealworms themselves.
Maintaining Proper Temperature and Humidity Levels
Maintaining proper temperature and humidity levels is crucial for the well-being and longevity of stored mealworms. These factors directly impact the mealworms’ growth, metabolism, and overall health. By ensuring optimal temperature and humidity conditions, you can promote their well-being and provide nutritious mealworms for your geckos. Here are some guidelines for maintaining proper temperature and humidity levels:
- Temperature: The ideal temperature range for storing mealworms is between 75°F and 85°F (24°C and 29°C). This temperature range promotes their growth and development while keeping them active and healthy. Use a thermometer to regularly monitor the temperature inside the storage area and make any necessary adjustments to maintain the desired range.
- Humidity: Mealworms require a certain level of moisture to thrive. However, excessive humidity can lead to mold growth and harm the mealworms. Aim for a humidity level between 50% and 70%. Regularly check the moisture of the substrate and adjust as necessary to maintain the appropriate humidity level. If the humidity is too high, you can add dry substrate to absorb excess moisture or increase airflow to help dry out the environment.
There are several methods you can use to maintain the proper temperature and humidity levels:
- Choosing the right location: Place the mealworm storage container in a suitable area of your home where the ambient temperature and humidity levels are within the desired range. Avoid areas that are prone to extreme temperature fluctuations or high humidity, such as near vents, windows, or kitchen appliances.
- Using a heat source: In colder climates or during winter months, you may need to provide additional heat to maintain the temperature within the desired range. Consider using a heat mat or heat lamp designed for reptile habitats. Place the heat source underneath or near the container, ensuring that it does not come into direct contact with the container or pose a fire hazard. Use a thermostat to regulate the temperature and prevent overheating.
- Using a dehumidifier: If the humidity within the storage container is consistently too high, consider using a dehumidifier in the room or area. This can help reduce excess moisture and maintain the optimal humidity level for the mealworms.
Regular monitoring of the temperature and humidity levels is essential to ensure that the conditions remain suitable for the mealworms. Make necessary adjustments, such as increasing or decreasing heat or moisture, to maintain the desired ranges. Remember that mealworms are sensitive to temperature and humidity changes, so try to maintain a stable environment as much as possible.
By maintaining proper temperature and humidity levels, you can create an environment that supports the health and well-being of the mealworms. This, in turn, ensures a constant supply of nutritious mealworms for your geckos to enjoy.
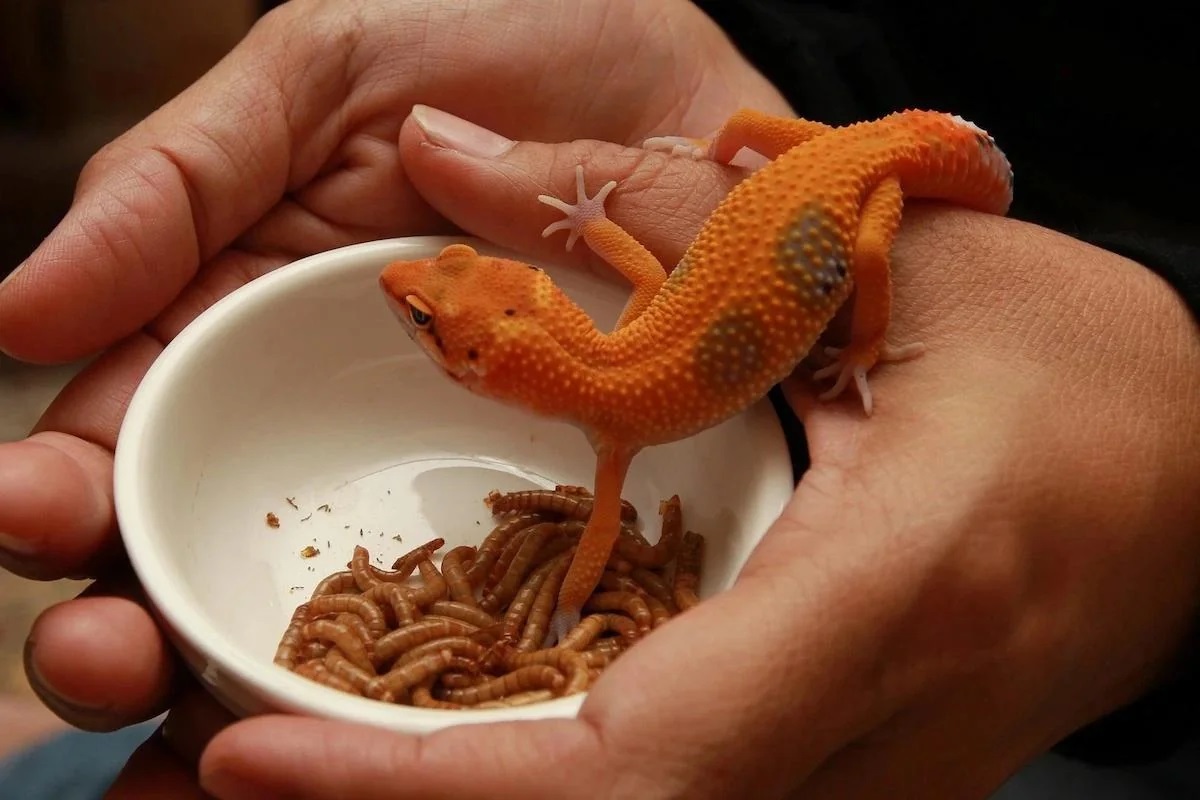
Store mealworms for geckos in a well-ventilated container with a lid to prevent escape. Keep them at room temperature and provide a small amount of food such as oats or vegetables to keep them healthy and nutritious for your gecko.
Read more: How To Store Store-Bought Bread
Providing the Correct Food and Water for Mealworms
Providing the correct food and water for mealworms is essential for their growth, health, and overall well-being. Proper nutrition ensures that the mealworms remain a nutritious food source for your geckos. Here are some guidelines on how to provide the correct food and water for mealworms:
- Food: Mealworms require a nutritious diet to thrive. The primary food source for mealworms is their substrate, usually made of wheat bran or oats. The substrate provides essential nutrients that contribute to their growth and overall health. Ensure that the substrate is fresh and of high quality, free from contamination or mold.
- Additional Food: While the substrate is the main food source for mealworms, you can also supplement their diet with fresh fruits and vegetables. Apples, carrots, sweet potatoes, and leafy greens are excellent choices. Chop or grate the fruits and vegetables into small, easily consumable pieces and provide them to the mealworms. Remove any uneaten fresh food after 24 hours to prevent spoilage.
- Water: Mealworms obtain most of their moisture from the food they consume. However, it is important to maintain a proper level of hydration for their overall health. You can provide moisture by including dampened sections of the substrate in the storage container. Spray the substrate lightly with water, ensuring that it remains moist but not soggy. Monitor the moisture level regularly and adjust as needed to prevent excessive dryness or excessive moisture.
In addition to providing the correct food and water, it is essential to keep the storage container clean to maintain a healthy environment for the mealworms. Remove any dead mealworms or uneaten food promptly to prevent mold or bacterial growth. Regularly inspect the container for any signs of contamination or pests and take necessary measures to address the issue.
By providing a nutritious diet and proper hydration, you are ensuring that the mealworms remain healthy and nutrient-rich for your geckos. This not only benefits the mealworms themselves but also contributes to the overall health and well-being of your geckos as they consume these nutritious mealworms.
Regular Cleaning and Maintenance of Mealworm Storage Container
Regular cleaning and maintenance of the mealworm storage container are essential to ensure a hygienic environment for the mealworms and optimize their health and well-being. Proper cleaning practices help prevent the growth of harmful bacteria, fungi, and parasites, ensuring that the mealworms remain healthy and safe for your geckos. Here are some guidelines for the regular cleaning and maintenance of the mealworm storage container:
- Remove debris: Regularly remove any feces, shed skins, and leftover food from the substrate. Use a small spoon or scoop to gently handle the mealworms and remove any debris. This helps maintain cleanliness and prevents the buildup of waste materials that can harbor bacteria and attract pests.
- Replace the substrate: Periodically replace the substrate to prevent any mold, bacteria, or stale conditions. Discard the old substrate and thoroughly clean the container before adding fresh substrate. This step promotes a clean and healthy environment for the mealworms.
- Clean the container: Regularly clean the mealworm storage container with a mild soap and warm water. Use a soft sponge or cloth to gently scrub the container, ensuring that you reach all corners and surfaces. Rinse the container thoroughly to remove any soap residue. Allow it to air dry completely before adding fresh substrate and returning the mealworms.
- Inspect for pests: During cleaning, inspect the container for any signs of pests, such as mites or beetles. If you notice any infestation, take immediate action to address the issue. Remove any contaminated substrate or affected mealworms and consult with a vet or entomologist for appropriate pest control measures.
- Monitor for health concerns: Regularly monitor the mealworms for any signs of illness, disease, or stress. Look out for changes in behavior, appetite, or appearance. If you notice any abnormalities, separate the affected mealworms from the healthy ones and consult with a reptile veterinarian for proper diagnosis and treatment.
It is important to establish a regular cleaning schedule for the mealworm storage container. The frequency of cleaning may vary depending on the number of mealworms, the size of the container, and the overall conditions inside. Generally, aim to clean the container and replace the substrate every 4-6 weeks or as needed to maintain cleanliness and hygiene.
By practicing regular cleaning and maintenance of the mealworm storage container, you are creating a clean and optimal environment for the mealworms. This promotes their health, reduces the risk of contamination or infection, and ensures that the mealworms remain a nutritious and safe food source for your geckos.
Monitoring Mealworm Health and Wellness
Regular monitoring of mealworm health and wellness is crucial for ensuring the quality and nutritional value of the mealworms for your geckos. By keeping a close eye on their condition, you can identify any potential issues early on and take appropriate measures to maintain their well-being. Here are some important aspects to consider when monitoring the health and wellness of your mealworms:
- Appearance: Observe the appearance of the mealworms regularly. Healthy mealworms should have a plump, firm body with shiny and smooth skin. Their coloration may vary depending on their stage of development. If you notice any discoloration, abnormalities, or lesions, it could indicate an underlying health issue.
- Behavior: Pay attention to the mealworms’ behavior and activity levels. They should be active, moving around, and burrowing in the substrate. If you observe lethargy, sluggishness, or a lack of movement, it may be a sign of illness or stress. Similarly, excessive aggression or cannibalism among mealworms can indicate overcrowding or poor environmental conditions.
- Appetite: Monitor the mealworms’ appetite and feeding behavior. They should eagerly consume the provided food, whether it’s the substrate or any additional fresh fruits and vegetables. A significant decrease in appetite or refusal to eat can be indicative of an underlying health issue or improper environmental conditions.
- Growth and Development: Keep track of the growth and development of the mealworms. They should progress through their life stages, including egg, larva, pupa, and adult, in a timely manner. If you notice abnormal growth patterns, stunted growth, or developmental abnormalities, it may indicate nutritional deficiencies or environmental factors that need to be addressed.
- Parasites and Infestations: Regularly inspect the mealworms for signs of parasites or infestations. Look out for mites, beetles, or other unwanted pests that could harm the mealworms. If you notice any signs of infestation, take immediate action to prevent the spread and consult with a vet or entomologist for appropriate treatment options.
It is important to maintain detailed records of the mealworms’ health and wellness to track any changes or trends. Document any observations, including appearance, behavior, feeding habits, and growth patterns. This information can be extremely valuable when seeking professional advice or discussing concerns with a veterinarian.
If you notice any abnormalities or concerns during your monitoring, it is always best to consult with a reptile veterinarian or an entomologist who specializes in mealworms. They can provide guidance, diagnosis, and proper treatment protocols based on their expertise.
By actively monitoring the health and wellness of your mealworms, you can ensure that they remain a reliable and nutritious food source for your geckos’ dietary needs. A proactive approach to their well-being contributes to the overall health and vitality of your geckos.
Harvesting Mealworms for Feeding Geckos
When it comes time to feed your geckos, harvesting mealworms from the storage container is a straightforward process. Proper harvesting ensures that you collect the appropriate quantity of mealworms and deliver them to your geckos in a safe and efficient manner. Here are some steps to follow when harvesting mealworms:
- Selecting the right mealworms: Choose mealworms that have reached the desired size and stage of development for your geckos. This will vary depending on the specific species and the size of your geckos. Mealworms that are plump, active, and have a shell that is neither too soft nor too hard are typically good choices for feeding.
- Separating the mealworms: Use a small spoon or a specialized mealworm scoop to gently separate the mealworms from the substrate. Lift small quantities of the substrate and carefully sift through it, allowing the mealworms to fall through the gaps. Alternatively, you can use a tray with an angled surface. Place the substrate on the tray and tap it gently, causing the mealworms to move downwards while the substrate stays on the surface.
- Discarding excess substrate: Once you have separated the desired number of mealworms, carefully remove any excess substrate that may have lifted along with them. Shake or gently tap the mealworms over the storage container to allow any loose substrate to fall back.
- Preparing the mealworms for feeding: For geckos that prefer moving prey, you can place the harvested mealworms directly into their enclosure. Ensure that the mealworms are within easy reach for your geckos to capture and consume. Alternatively, you can use feeding tongs or tweezers to present the mealworms to your geckos individually.
- Feeding guidelines: Monitor the feeding session closely to ensure that your geckos consume the mealworms without any issues. Avoid overfeeding or leaving uneaten mealworms in the enclosure for an extended period. Uneaten mealworms can nibble on your gecko’s skin or cause stress if left unattended. In general, feed your geckos an appropriate number of mealworms based on their size, age, and dietary requirements.
It’s important to note that mealworms undergo a natural life cycle, progressing from egg to larva (mealworm) to pupa and finally to adult beetles. Should you wish to breed your own mealworms or allow them to complete their life cycle, you would need to separate and transfer the pupae into a separate container with appropriate conditions for their development.
By following these guidelines for harvesting mealworms, you can ensure a smooth and efficient feeding process for your geckos. Regularly replenish your mealworm supply by harvesting as needed, ensuring that your geckos receive the nutrition they require for their growth and overall health.
Remember, always provide fresh water and a balanced diet for your geckos in addition to the mealworms to meet their nutritional needs.
Read more: How To Store Basil From Grocery Store
Conclusion
In conclusion, properly storing and maintaining mealworms for your geckos is crucial for their health, nutrition, and overall well-being. By following the guidelines outlined in this article, you can ensure that your geckos have a consistent supply of high-quality and nutritious mealworms readily available.
Choosing the right container for storage, creating the ideal environment, and maintaining proper temperature and humidity levels are key steps in providing suitable conditions for the mealworms. Additionally, providing the correct food and water, regular cleaning, monitoring their health, and harvesting mealworms for feeding all contribute to their overall care and well-being.
By storing mealworms, you have the convenience of having a constant supply of this valuable food source, saving money, and ensuring that your geckos’ dietary needs are consistently met. Moreover, you have control over the quality and size of the mealworms, allowing for a varied diet and optimal nutrition for your geckos.
Regular monitoring of the mealworms’ health and well-being is essential for detecting any potential issues early on and taking appropriate measures to maintain their vitality. By providing a clean and suitable habitat, you can support their growth, reproduction, and overall health.
When it’s time to feed your geckos, properly harvesting and selecting mealworms ensures that they receive a nutritious meal. Always feed the appropriate number of mealworms to your geckos and monitor their feeding habits closely to avoid overfeeding or leaving uneaten mealworms in their enclosure.
Remember, while mealworms are a valuable food source, they should be accompanied by a balanced diet and access to fresh water for your geckos to maintain optimal health.
By following these guidelines and providing proper care for your mealworms, you are ensuring a reliable and nutritious food source for your geckos. Your efforts will contribute to their overall health, growth, and happiness, allowing them to thrive in their environment.
Frequently Asked Questions about How To Store Mealworms For Geckos
Was this page helpful?
At Storables.com, we guarantee accurate and reliable information. Our content, validated by Expert Board Contributors, is crafted following stringent Editorial Policies. We're committed to providing you with well-researched, expert-backed insights for all your informational needs.


0 thoughts on “How To Store Mealworms For Geckos”