Articles
How To Store Peppermint Bark
Modified: December 7, 2023
Learn how to store peppermint bark properly in this comprehensive guide. Follow these simple steps to keep your homemade peppermint bark fresh and delicious for longer.
(Many of the links in this article redirect to a specific reviewed product. Your purchase of these products through affiliate links helps to generate commission for Storables.com, at no extra cost. Learn more)
Introduction
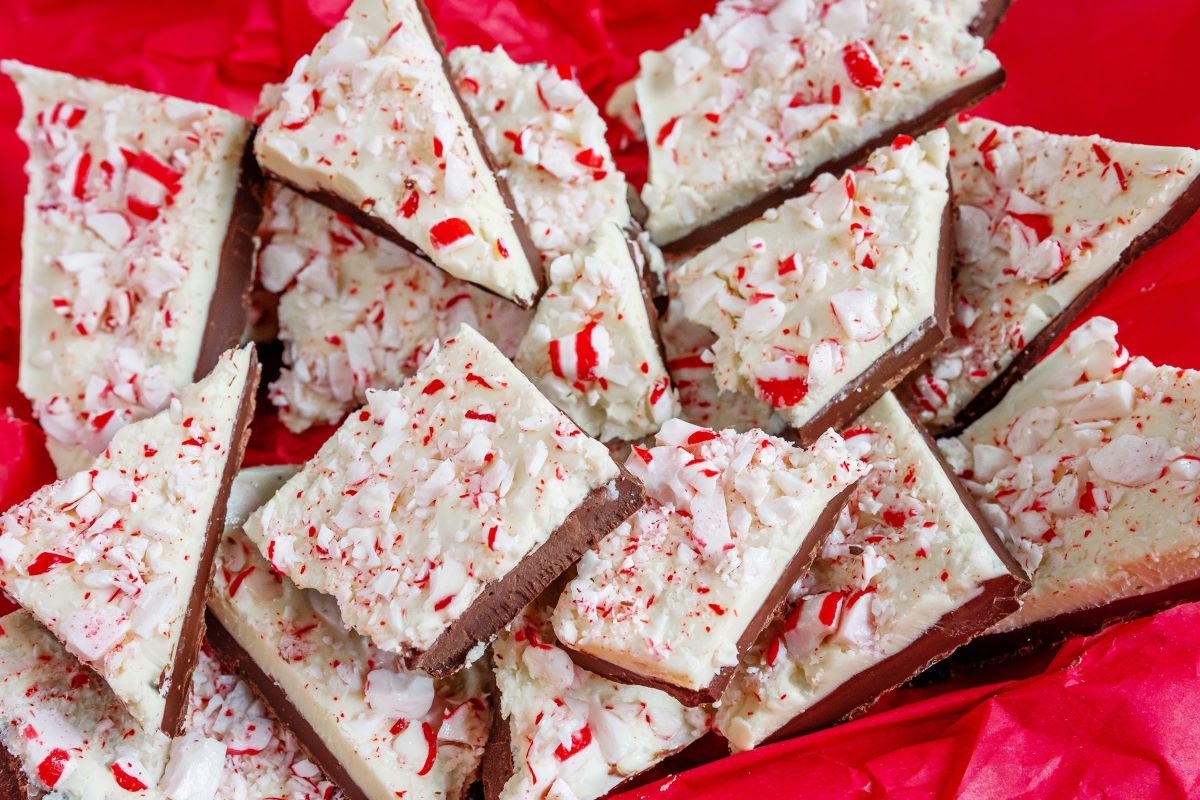
Welcome to this guide on how to store peppermint bark. Peppermint bark is a delicious and festive treat that is especially popular during the holiday season. Made with layers of creamy chocolate and topped with crushed peppermint candy, it’s the perfect combination of rich flavors and refreshing minty goodness.
Whether you’ve made your own peppermint bark or received it as a gift, knowing how to properly store it will help ensure that it stays fresh and maintains its delicious taste for as long as possible. In this article, we will take you through the steps to store peppermint bark so that you can enjoy it for weeks to come.
Before we dive into the storage process, let’s quickly go over the ingredients and equipment you’ll need to make peppermint bark in case you want to try making it yourself.
Key Takeaways:
- Store peppermint bark in an airtight container or resealable plastic bags in a cool, dry place to maintain its freshness and flavor for up to 2-3 weeks. Consider wrapping individual pieces in parchment paper for added protection.
- Enjoy peppermint bark within a few weeks of making or receiving it, as its texture and flavor may deteriorate over time. Label the container or bags with the date of preparation to keep track of its freshness.
Read more: How To Store Chocolate Bark
Ingredients
To make peppermint bark, you will need the following ingredients:
- 12 ounces of semi-sweet or dark chocolate
- 12 ounces of white chocolate
- 1 teaspoon of peppermint extract
- 1/2 cup of crushed peppermint candy or candy canes
It’s important to note that the chocolate can be either in bar form or chocolate chips. Use whichever you prefer or have on hand.
The semi-sweet or dark chocolate provides a rich and intense flavor, while the white chocolate complements it with its creamy and sweet taste. The addition of peppermint extract gives the bark its signature minty kick. And of course, the crushed peppermint candy adds a delightful crunch and visually appealing look.
Now that you have a list of the ingredients, let’s move on to the equipment needed to make peppermint bark.
Equipment
To make peppermint bark, you will need the following equipment:
- Double boiler or microwave-safe bowls
- Spatula or wooden spoon
- Baking sheet or parchment paper
- Sharp knife or your hands for breaking the bark into pieces
- Airtight container or resealable plastic bags for storing
The double boiler is used to melt the chocolate gently and evenly. If you don’t have a double boiler, you can create a makeshift one by placing a heatproof bowl on top of a saucepan with simmering water. Just make sure the bowl fits securely and doesn’t touch the water.
If you prefer to use a microwave, make sure to use microwave-safe bowls and heat the chocolate in short intervals, stirring in between, to avoid overheating and burning.
A spatula or wooden spoon will be useful for mixing and spreading the chocolate mixture on the baking sheet or parchment paper. The baking sheet or parchment paper serves as a surface for the bark to cool and harden.
Lastly, you’ll need a sharp knife or your hands for breaking the bark into pieces once it’s solidified. And to store the peppermint bark, you’ll want an airtight container or resealable plastic bags to keep it fresh and prevent any unwanted odors or moisture from affecting its taste and texture.
Now that you have all the necessary equipment, it’s time to start making the peppermint bark!
Step 1: Melt the chocolate
The first step in making peppermint bark is to melt the chocolate. You can choose to melt the chocolate using a double boiler or in the microwave. Here’s how:
If using a double boiler:
- Fill the bottom pot of the double boiler with water and place it on the stovetop over medium heat.
- Place the top pot of the double boiler on top of the bottom pot.
- Add the semi-sweet or dark chocolate to the top pot and stir occasionally until it melts completely and becomes smooth and glossy.
If using the microwave:
- Break the chocolate into smaller pieces and place them in a microwave-safe bowl.
- Microwave the chocolate in 30-second intervals, stirring in between each interval, until it is melted and smooth. Be careful not to overheat the chocolate to prevent it from burning.
Once the chocolate is melted, it’s time to move on to the next step.
Step 2: Add the peppermint extract
Now that your chocolate is melted and smooth, it’s time to add the peppermint extract. This step will give the peppermint bark its signature minty flavor. Here’s what you need to do:
- Add 1 teaspoon of peppermint extract to the melted chocolate.
- Stir the mixture well, ensuring that the peppermint extract is evenly incorporated into the chocolate.
- Continue stirring for a minute or two to make sure the flavors are well combined.
The peppermint extract adds a refreshing and aromatic taste to the bark. However, it’s important not to add too much extract as it can overpower the other flavors. Stick with the recommended 1 teaspoon, but feel free to adjust it to your personal preference.
With the peppermint extract added, your chocolate mixture is now ready for the next step.
Read more: How To Store Yogurt Bark
Step 3: Spread the chocolate mixture
Now that you’ve added the peppermint extract to the melted chocolate, it’s time to spread the mixture onto a baking sheet or parchment paper. This step will create the base layer of your peppermint bark. Here’s how to do it:
- Line a baking sheet with parchment paper for easy removal later. Alternatively, you can use a non-stick baking mat.
- Pour the chocolate mixture onto the prepared baking sheet.
- Using a spatula or wooden spoon, spread the mixture evenly and smooth it out to create a thin, uniform layer.
- You can shape the bark into a rectangular shape or any desired shape by adjusting the thickness and edges.
Make sure to spread the mixture as evenly as possible to ensure that all parts of the bark will have an equal amount of chocolate. This will ensure a consistent taste and appearance. You can use the back of a spoon to help spread the mixture if needed.
Once you’ve spread the chocolate mixture, it’s time to move on to the next step of the peppermint bark-making process.
Store peppermint bark in an airtight container in a cool, dry place. You can also refrigerate it for longer shelf life, but let it come to room temperature before serving to prevent condensation.
Step 4: Crush the peppermint candy
Now that you have your chocolate layer spread out, it’s time to prepare the crushed peppermint candy that will be sprinkled on top of the bark. Crushing the candy will create small, flavorful pieces that add a delightful crunch to each bite. Here’s how to crush the peppermint candy:
- Unwrap the peppermint candy or candy canes.
- Place them in a plastic bag, ensuring it is securely sealed.
- Using a rolling pin or the flat side of a meat mallet, gently crush the candy inside the bag until you achieve your desired consistency. Some people prefer finer pieces, while others prefer larger chunks.
- Be careful not to hit too hard or the bag may break.
Crushing the peppermint candy will release its fragrant aroma and create texture variation in the bark. This will make each bite of the peppermint bark extra enjoyable.
Once you have crushed the peppermint candy, it’s time to move on to the next step of the peppermint bark-making process.
Step 5: Sprinkle the crushed candy on top
With your chocolate layer smooth and ready, it’s time to add the finishing touch to your peppermint bark by sprinkling the crushed peppermint candy on top. This step will not only enhance the visual appeal of the bark but also provide bursts of minty sweetness with each bite. Here’s how to sprinkle the crushed candy:
- Evenly sprinkle the crushed peppermint candy over the chocolate layer.
- Gently press down the candy pieces into the chocolate to ensure they adhere well.
- You can sprinkle as much or as little candy as you prefer, depending on your taste preferences and desired appearance.
The crushed peppermint candy adds a festive and vibrant touch to the bark, making it visually appealing and inviting. The combination of the smooth chocolate and the crunchy candy creates a delightful texture contrast.
Once you’ve sprinkled the crushed candy on top, it’s time to move on to the next step of the peppermint bark-making process.
Step 6: Let the bark cool and harden
After adding the crushed peppermint candy, it’s important to let the peppermint bark cool and harden before proceeding. This step allows the chocolate to set and ensures that the bark maintains its shape and texture. Here’s what you need to do:
- Place the baking sheet with the bark in the refrigerator or a cool, dry place.
- Allow the bark to cool and harden for at least 1 to 2 hours, or until it is completely firm to the touch.
During the cooling process, the chocolate will solidify and the peppermint candy pieces will adhere to the bark. This will ensure that the bark remains intact when you break it into delicious pieces later on.
If you’re short on time, you can speed up the cooling process by placing the bark in the freezer for about 30 minutes. Just remember to remove it once it’s firm and not frozen solid.
After patiently waiting for the bark to cool and harden, it’s time for the exciting next step – breaking the bark into pieces!
Read more: How To Lay Bark For Play Area
Step 7: Break the bark into pieces
Now that your peppermint bark has cooled and hardened, it’s time to break it into delicious bite-sized pieces. This step allows you to create individual servings or share the bark with friends and family. Here’s how to break the bark into pieces:
- Gently lift the edges of the parchment paper or non-stick baking mat to release the bark from the baking sheet.
- Using your hands or a sharp knife, carefully break the bark into irregular or uniform pieces, depending on your preference.
- If you want to create neat and uniform pieces, use a ruler or straight edge to guide your knife while cutting. On the other hand, if you prefer a rustic look, simply break the bark by hand.
Breaking the bark into pieces allows for easy snacking or gifting. You can package the individual pieces in festive containers or cellophane bags, making them perfect for holiday parties or as thoughtful homemade gifts.
Once you have broken the bark into pieces, it’s time for the final step – storing the peppermint bark to maintain its freshness and flavor.
Step 8: Store the peppermint bark
After breaking the peppermint bark into delectable pieces, it’s essential to store it properly to maintain its freshness and flavor. Here are some methods for storing your peppermint bark:
- Transfer the peppermint bark into an airtight container or resealable plastic bags. Ensure that the container or bags are clean and dry.
- For added protection against moisture and odors, consider wrapping each piece of bark individually in parchment paper before placing them in the container or bags.
- Store the peppermint bark in a cool and dry place, away from direct sunlight and heat sources. A pantry or cupboard works well for this purpose.
- If you live in a warm climate or during hot summer months, it’s best to store the peppermint bark in the refrigerator to prevent melting.
- Properly stored, peppermint bark can stay fresh for up to 2-3 weeks.
It’s important to note that peppermint bark is best enjoyed within a few weeks of making or receiving it, as the texture and flavor may deteriorate over time. However, if stored correctly, it should remain delicious for an extended period.
Remember to label the container or bags with the date of preparation to keep track of its freshness.
Now that you know how to store peppermint bark, you can enjoy your homemade treat or store-bought delicacy for an extended period.
Conclusion
Congratulations! You’ve learned how to store peppermint bark to keep it fresh and delicious for future enjoyment. Properly storing your peppermint bark will ensure that it retains its delightful crunch, minty flavor, and festive charm. Here’s a quick recap of the steps:
1. Melt the chocolate, either using a double boiler or microwave-safe bowls.
2. Add peppermint extract to the melted chocolate and stir well.
3. Spread the chocolate mixture onto a baking sheet or parchment paper.
4. Crush peppermint candy and sprinkle it on top of the chocolate layer.
5. Let the bark cool and harden in the refrigerator or a cool, dry place.
6. Break the bark into desired-sized pieces.
7. Store the peppermint bark in an airtight container or resealable plastic bags in a cool and dry place.
By following these steps, you can enjoy the delightful taste and texture of peppermint bark for weeks to come. It’s perfect for holiday parties, gift-giving, or simply indulging in a festive treat at home.
Remember to label your stored peppermint bark with the date of preparation and be mindful of its freshness. Although it can last up to 2-3 weeks when stored correctly, it’s recommended to consume it within a reasonable timeframe for the best experience.
Now, you have the knowledge and skills to make and store peppermint bark with confidence. So, whether you’re making it from scratch or received it as a gift, you can savor the delightful flavors and share the joy with family and friends.
Enjoy your homemade or store-bought peppermint bark and have a delightful holiday season!
Frequently Asked Questions about How To Store Peppermint Bark
Was this page helpful?
At Storables.com, we guarantee accurate and reliable information. Our content, validated by Expert Board Contributors, is crafted following stringent Editorial Policies. We're committed to providing you with well-researched, expert-backed insights for all your informational needs.


0 thoughts on “How To Store Peppermint Bark”