Articles
How To Store Pole Beans
Modified: October 27, 2024
Learn the best techniques to store pole beans for long-lasting freshness. Our articles provide step-by-step instructions to preserve your pole beans at home.
(Many of the links in this article redirect to a specific reviewed product. Your purchase of these products through affiliate links helps to generate commission for Storables.com, at no extra cost. Learn more)
Introduction
As the gardening season comes to a close, it’s time to harvest your pole beans and start thinking about how to store them for future consumption. Pole beans are a popular vegetable choice for home gardeners due to their prolific growth and delicious flavor. However, improper storage can lead to spoilage and a loss of all your hard work. In this article, we will explore the various methods for storing pole beans, including in the refrigerator, freezing, canning, and drying.
Before diving into the storage methods, it’s important to understand the factors that affect the longevity and quality of pole beans. The first consideration is the freshness and stage of maturity of the beans at the time of harvest. It’s best to pick pole beans when they are still young and tender, before the seeds inside have fully developed. These younger beans have a sweeter flavor and retain their crispness better when stored.
Another important factor to consider is the overall condition of the beans when harvested. Avoid picking beans that are blemished, bruised, or have signs of fungus or insect damage. These damaged beans are more prone to deterioration and should be consumed immediately rather than stored for later use.
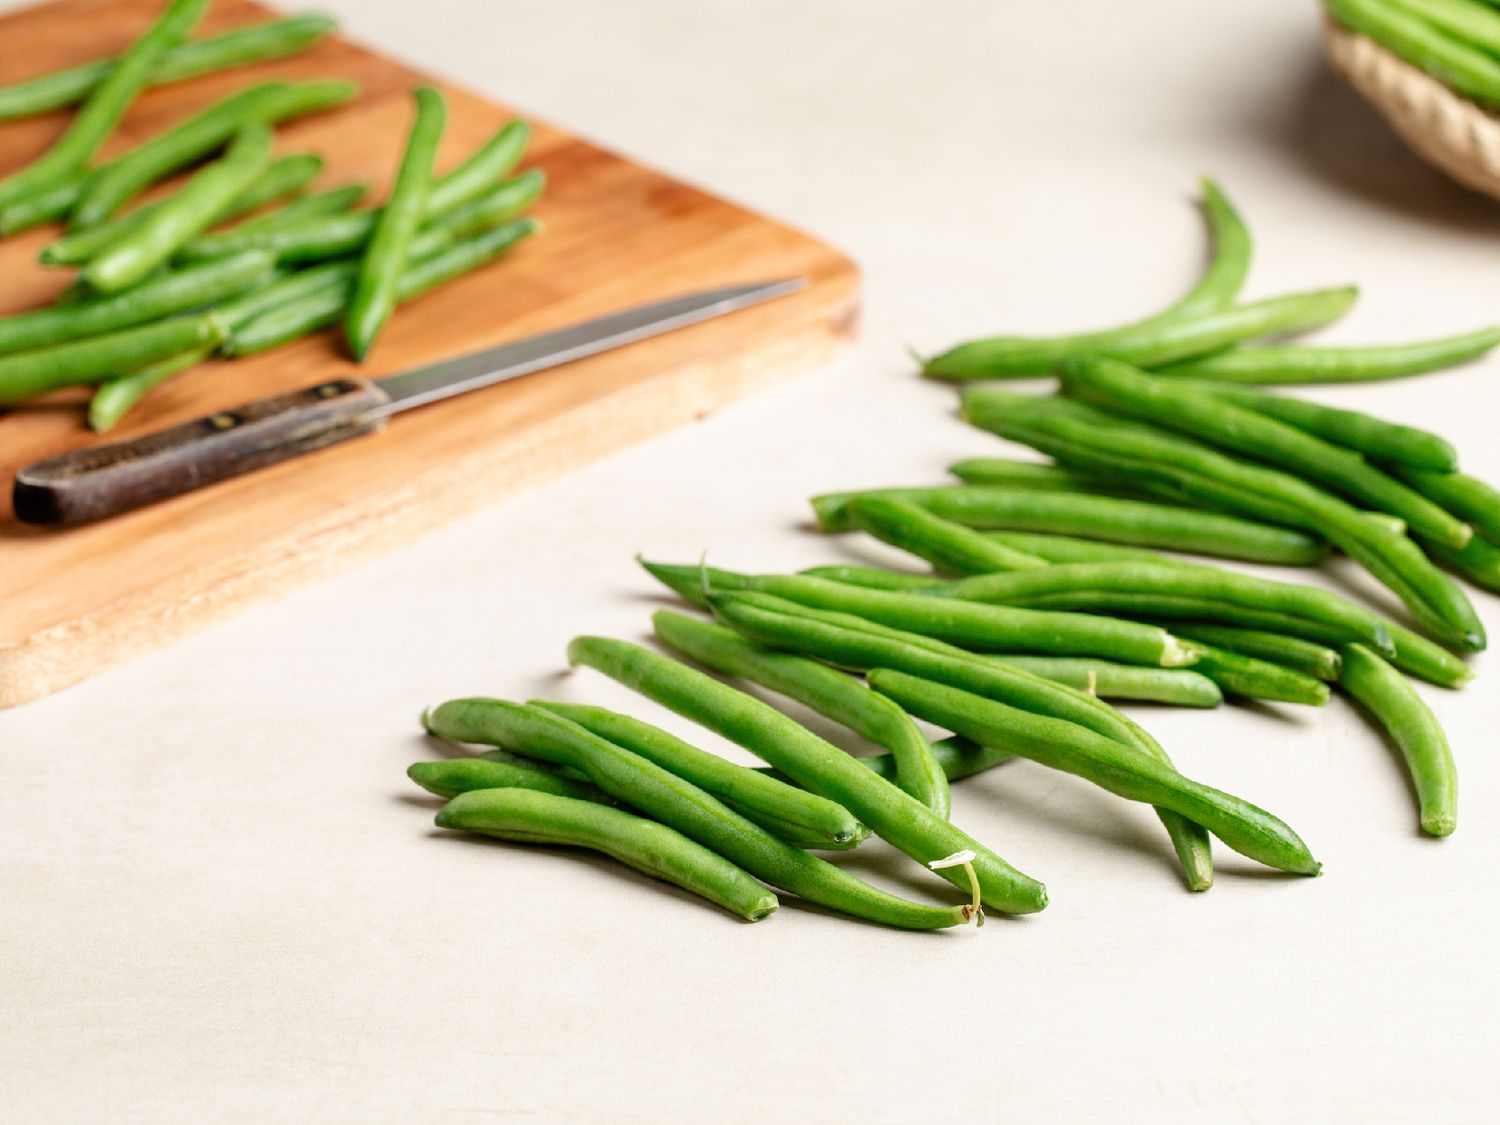
Once you have harvested your pole beans and sorted out the damaged ones, it’s time to prepare them for storage. The preparation process involves cleaning and trimming the beans to ensure their freshness and to remove any impurities.
In the following sections, we will explore the different storage methods available for pole beans and provide tips on how to store them effectively to prolong their shelf life and maintain their flavor and nutritional value.
Key Takeaways:
- Properly storing pole beans is essential for preserving their freshness and flavor. Whether refrigerating, freezing, canning, or drying, each method offers unique benefits for long-term enjoyment.
- Harvesting young, tender beans and choosing the right storage method are key to maximizing the shelf life and quality of pole beans. Proper preparation, labeling, and regular inspection ensure a bountiful and delicious supply year-round.
Read more: How To Store Pole Saw
Choosing the Right Storage Method
When it comes to storing pole beans, it’s important to choose the right method that suits your needs and preferences. There are several options available, each with its own advantages and considerations. Let’s explore these different storage methods:
1. Refrigerator Storage: Storing pole beans in the refrigerator is a simple and convenient method. Place the cleaned and trimmed beans in a perforated plastic bag or airtight container. The perforations allow for proper air circulation and prevent moisture buildup. It’s best to use the crisper drawer, which maintains a slightly higher humidity level, to prevent the beans from drying out. However, keep in mind that pole beans stored in the refrigerator have a relatively short shelf life of approximately one week.
2. Freezing: Freezing is an excellent storage method that allows you to enjoy pole beans year-round. Start by blanching the beans in boiling water for a couple of minutes, then transfer them to an ice bath to cool them quickly and stop the cooking process. Drain the beans and pat them dry before packing them into airtight freezer bags or containers. Label the bags with the date and use them within eight to twelve months for optimal quality. Freezing retains the flavor and texture of the beans, making them an excellent choice for soups, stews, stir-fries, and other cooked dishes.
3. Canning: Canning pole beans is another popular preservation method. The beans are processed and sealed in jars, extending their shelf life for up to one year or more. There are two main canning methods to choose from: water bath canning and pressure canning. Water bath canning is suitable for high-acid foods, while pressure canning is necessary for low-acid foods. When canning pole beans, it’s essential to follow a tested and approved recipe to ensure food safety. Canned beans are versatile and can be used in various recipes or enjoyed as a side dish.
4. Drying: Drying is a traditional method of preserving pole beans, ideal for long-term storage. To dry pole beans, first, wash and trim them, then spread them out in a single layer on a clean, dry surface, such as a drying screen or a baking sheet. Allow the beans to air dry for several weeks until they become crispy and brittle. Once fully dried, store the beans in airtight containers in a cool, dark place. Rehydrate the dried beans before using them in soups, stews, or other recipes that require cooked beans.
Consider your storage needs, available resources, and the intended use of the beans when deciding which method to choose. Each method has its own advantages and considerations, so feel free to experiment and find the one that works best for you.
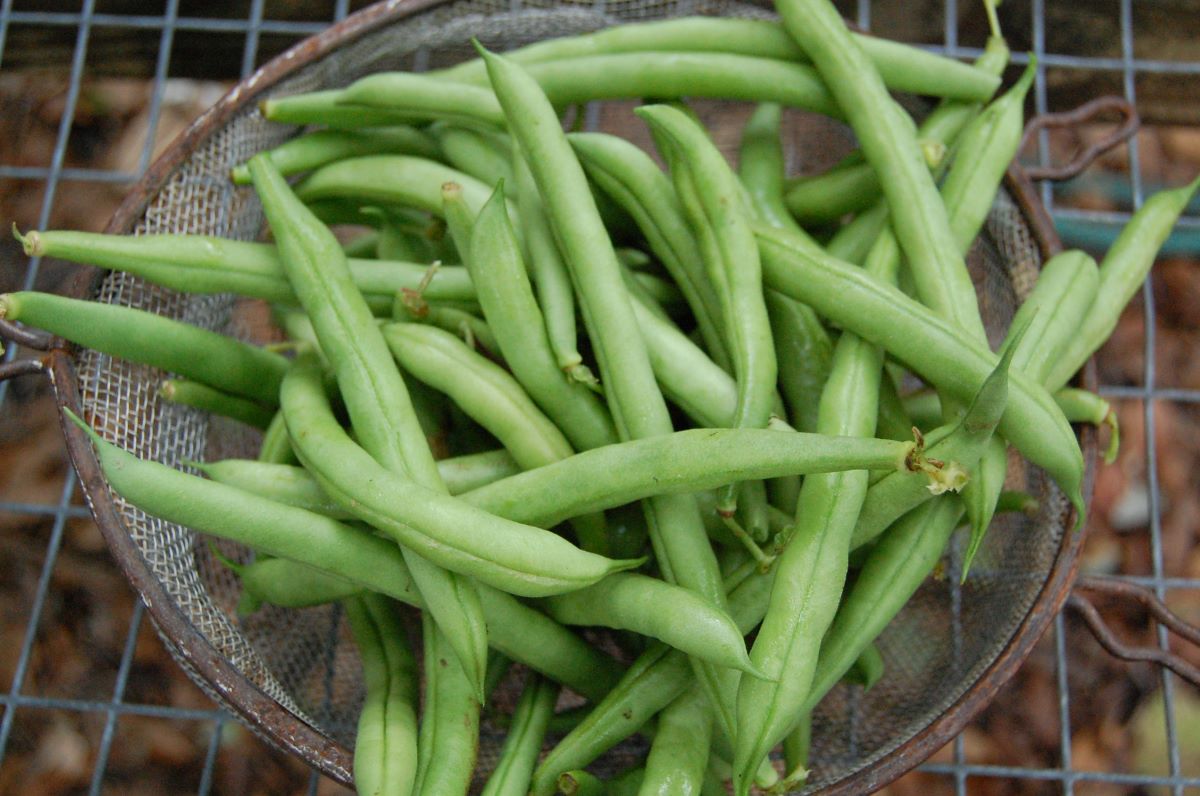
Harvesting Pole Beans
Harvesting pole beans at the right time is crucial for optimal flavor and texture. Unlike bush beans, which produce their crop all at once, pole beans tend to have a more extended harvest period. Here are some tips on when and how to harvest your pole beans:
1. Timing: Pole beans are ready to be harvested when the pods are firm, elongated, and smooth. They should still be tender and snap easily when bent. It’s important to pick the beans regularly, every two to three days during peak harvest periods, to prevent the plants from diverting their energy into seed production. Overripe beans with fully-developed seeds tend to be stringy, tough, and less flavorful.
2. Harvesting Technique: To harvest pole beans, gently hold the stem of the bean plant with one hand and use the other hand to snap off the pod at the junction where it connects to the stem. Be careful not to damage the plant or neighboring pods during the process. Avoid pulling or yanking the beans, as this can harm the plant and affect future harvests.
3. Harvesting Containers: Use a basket or a lightweight bucket to collect the harvested beans. Avoid using heavy containers or bags that can lead to crushing and bruising of the delicate pods. It’s also a good idea to cushion the bottom of the container with a soft cloth or a layer of newspaper to protect the beans from impact.
4. Sorting: After harvesting, take the time to sort and separate the beans based on their size and quality. Remove any damaged, discolored, or overripe beans, as these will not store well and can affect the overall freshness of the remaining beans.
By following these tips, you can ensure that your pole beans are harvested at their peak and ready for storage or immediate consumption. Regular harvesting not only provides you with a steady supply of fresh beans but also encourages the plants to produce more pods, extending your harvest season.
Preparing Pole Beans for Storage
Properly preparing pole beans before storage is essential to maintain their freshness and quality. Here are some steps to follow when preparing your harvested pole beans for storage:
1. Cleaning: Start by rinsing the pole beans thoroughly under cool running water. This helps remove any dirt, debris, or insects that may be present on the surface of the beans. Gently rub the beans with your hands to loosen any stubborn dirt or residue. For particularly dirty beans, you can soak them in a basin of water for a few minutes before rinsing.
2. Trimming: Trim the ends of the pole beans using a sharp knife or kitchen shears. Cut off any stems or tips that appear damaged or discolored. Trimming ensures that the beans are neat and ready for consumption or further storage.
3. Drying: After cleaning and trimming, it’s important to dry the pole beans thoroughly before storing them. Excess moisture on the beans can lead to mold or spoilage. Place the beans on a clean kitchen towel or paper towel and gently blot them to remove any remaining water. Allow the beans to air dry for a few minutes until they are completely dry to the touch.
4. Optional: Snapping or chopping: Depending on your preferred cooking method, you may choose to snap or chop the pole beans into smaller pieces before storing them. This is particularly useful if you plan to use the beans in recipes that call for chopped or sliced beans, such as stir-fries or soups. Snapping the beans into bite-sized pieces or chopping them into uniform lengths can save you time when preparing meals in the future.
Once you have prepared the pole beans by cleaning, trimming, and optionally snapping or chopping them, they are ready to be stored. Consider the storage method that best suits your needs, whether that’s refrigerating, freezing, canning, or drying. Proper preparation ensures that the beans retain their freshness and nutritional value for an extended period, allowing you to enjoy the flavors of your harvest even after the gardening season has ended.
Storing Pole Beans in the Refrigerator
Storing pole beans in the refrigerator is a popular method to keep them fresh for a short period. Follow these steps to effectively store your pole beans in the refrigerator:
1. Perforated Plastic Bag or Airtight Container: Place the cleaned and trimmed pole beans in a perforated plastic bag or an airtight container. The perforations allow for proper air circulation, preventing the build-up of moisture that can lead to spoilage. If using a plastic bag, make a few small holes in it using a fork or skewer. If using a container, ensure that it has a tight-fitting lid to keep the beans contained and protected.
2. Crisper Drawer: Store the pole beans in the crisper drawer of your refrigerator. The crisper drawer offers a slightly higher humidity level, which helps to maintain the beans’ crispness and freshness. Keep in mind that the refrigerator temperature should be set at around 40°F (4°C) to slow down the deterioration process.
3. Separate from Ethylene-Producing Fruits and Vegetables: Pole beans are sensitive to ethylene gas, which is produced by certain fruits and vegetables as they ripen. To prevent premature aging and spoilage, store pole beans away from ethylene-producing produce like apples, bananas, and tomatoes. It’s best to keep the pole beans in their own separate section of the refrigerator.
4. Use Within One Week: Remember that pole beans stored in the refrigerator have a relatively short shelf life. Consume them within one week for optimal flavor and quality. The longer they are kept in the refrigerator, the more they will lose their crispness and become limp.
When ready to use the refrigerated pole beans, inspect them for any signs of spoilage. Discard any beans that appear slimy, discolored, or have a foul odor. Rinse the beans under cool water before cooking or consuming them to remove any remaining dirt or debris.
Storing pole beans in the refrigerator allows you to enjoy their fresh flavor and crunchy texture for a limited time. It’s a convenient method if you plan to use the beans within a week and want to preserve their quality before incorporating them into your favorite dishes.
When storing pole beans, it’s important to keep them in a perforated plastic bag in the refrigerator. This will help maintain their freshness and crispness for up to a week.
Read more: How To Store Fishing Poles
Freezing Pole Beans
Freezing is a great option for preserving pole beans for an extended period while retaining their flavor and texture. Here is a step-by-step guide on how to freeze pole beans:
1. Blanching: Start by blanching the pole beans. Blanching involves briefly cooking the beans in boiling water, followed by quick cooling in an ice bath to halt the enzyme activity that can cause flavor and texture deterioration. Bring a large pot of water to a rolling boil and add the pole beans. Boil them for about 2-3 minutes until they turn bright green and slightly tender.
2. Ice Bath: Prepare a large bowl or basin filled with ice and water. Once the beans have been boiled, use a slotted spoon or tongs to transfer them to the ice bath. This rapid cooling process helps to preserve the beans’ color, texture, and nutrients.
3. Drain and Dry: After the beans have cooled in the ice bath for a few minutes, remove them and drain them thoroughly. Pat them dry with a clean kitchen towel or paper towels to remove excess moisture.
4. Portioning: Divide the blanched and dried pole beans into portion sizes that suit your needs. You can choose to freeze them in individual servings or in larger quantities. Consider how you plan to use the beans in future recipes to determine the portion sizes.
5. Freezer Bags or Containers: Place the pole beans into airtight freezer bags or containers. Squeeze out as much air as possible from the bags before sealing them to minimize freezer burn. Alternatively, you can vacuum seal the bags for extra protection. Label the bags with the date of freezing for easy reference in the future.
6. Freezing: Transfer the sealed bags or containers of pole beans to the freezer. Ideally, lay them flat in a single layer initially to allow for quick and even freezing. Once they are frozen solid, you can stack or arrange them as per your freezer’s available space.
7. Use Within 8-12 Months: Properly frozen pole beans maintain their quality for around 8-12 months. However, for the best flavor and texture, it’s recommended to use them within the first 6-8 months. Keep track of the freezing date and try to rotate your stock accordingly to ensure the freshest beans are used first.
When you are ready to use the frozen pole beans, there’s no need to thaw them beforehand. Simply remove the desired amount from the freezer and add them directly to your recipes. Frozen pole beans are perfect for soups, stews, stir-fries, and other cooked dishes that require a slightly longer cooking time.
By following these steps, you can freeze your pole beans and enjoy their garden-fresh flavors throughout the year.
Canning Pole Beans
Canning is a popular method for preserving pole beans, allowing you to enjoy their flavors long after the gardening season is over. Canned pole beans make a versatile addition to various recipes or can be enjoyed as a standalone side dish. Here’s a step-by-step guide on how to can pole beans:
1. Gather Your Equipment: Before you begin the canning process, ensure you have all the necessary canning equipment. This includes canning jars, lids, bands, a boiling water canner, a jar lifter, a canning funnel, a ladle, and a clean cloth or paper towels for wiping the jar rims.
2. Prepare the Beans: Wash the pole beans thoroughly under cool running water and trim off the ends. Cut the beans into uniform pieces, typically 1-2 inches in length, to ensure even cooking and convenient serving sizes.
3. Boil Water: Fill a large pot with water and bring it to a boil. Submerge the cleaned and trimmed pole beans in the boiling water and blanch them for about 2-3 minutes. Blanching helps to stabilize the color, texture, and flavor of the beans.
4. Prepare the Jars: While the beans are blanching, sterilize your canning jars, lids, and bands. Place the jars in a boiling water canner or a large pot, ensuring they are fully submerged. Boil the jars for 10 minutes to sterilize them. In a separate small saucepan, simmer the lids and bands (not boil) to prevent warping.
5. Pack the Jars: Remove the sterilized jars from the boiling water canner and place a canning funnel on top of each jar. Using a ladle, carefully pack the blanched pole beans into the jars, leaving about 1-inch headspace at the top. Gently tap the jars on a hard surface to remove any air bubbles trapped inside.
6. Add Liquid: Pour boiling water or vegetable broth into each jar, ensuring that the beans are completely covered and maintaining the 1-inch headspace. The liquid helps to preserve the beans and adds flavor to the canning process.
7. Seal the Jars: Wipe the rims of the jars with a clean, damp cloth or paper towel to remove any residue. Place the lids on top of the jars and secure them with the bands, ensuring they are tightened but not overly tight. The bands should be snug but still allow for air to escape during the canning process.
8. Process in a Water Bath Canner: Carefully transfer the filled and sealed jars to the boiling water canner, making sure they are fully submerged and covered by at least 1-2 inches of water. Bring the water to a rolling boil and process the jars for the recommended processing time, typically around 20-25 minutes for pint-sized jars. Adjust the processing time based on your altitude, as higher elevations require longer processing times.
9. Cool and Store: Once the processing time is complete, turn off the heat and allow the jars to sit in the canner for a few minutes. Then, using a jar lifter, carefully remove the jars from the canner and place them on a clean towel or cooling rack. Let them cool completely, undisturbed, for 12-24 hours. As the jars cool, the lids will create a vacuum seal, ensuring the safety and longevity of the canned beans.
Canned pole beans should be stored in a cool, dark place, such as a pantry or cellar. Label each jar with the contents and date of canning for easy identification. Properly canned pole beans can last up to one year or even longer if stored in optimal conditions.
Now you can enjoy the flavors of your homegrown pole beans throughout the year, adding a taste of summer to your favorite recipes.
Drying Pole Beans
Drying your pole beans is a traditional method of preserving them for long-term storage. Dried pole beans are versatile and can be rehydrated and used in soups, stews, and other dishes. Here is a step-by-step guide on how to dry pole beans:
1. Harvest and Prepare the Beans: Harvest the pole beans when the pods are fully mature but still tender. Avoid using overripe beans, as they tend to become tough and stringy when dried. Once harvested, wash the beans and remove any debris or dirt. Trim off the ends of the beans if desired.
2. Air Drying: Before proceeding with air drying, you have two options for preparing your pole beans. You can either leave the beans in their pod or shell them by opening the pods and removing the beans. If you choose to leave them in the pod, ensure that the pods are completely dry and free from moisture to prevent mold. If you decide to shell the beans, spread them out in a single layer on a clean, dry surface.
3. Proper Ventilation: Place the beans in a dry and well-ventilated area. Avoid areas that are damp, humid, or exposed to direct sunlight. Good airflow is crucial in the drying process to prevent mold or mildew growth. Use a drying screen, mesh netting, or a baking sheet to ensure the beans are spread out and not touching each other.
4. Drying Time: Allow the pole beans to air dry completely until they become brittle and have a shriveled appearance. This process can take several weeks, depending on the humidity and temperature of the drying location. Regularly check the beans during the drying period, flipping them occasionally, and removing any beans that show signs of spoilage.
5. Final Drying: Once the pole beans are fully dried, transfer them to an airtight container such as a glass jar or a plastic bag. Store the container in a cool, dark place to protect the beans from light and excessive heat.
6. Hydration: When you are ready to use the dried pole beans, you will need to rehydrate them before cooking. Place the desired amount of beans in a bowl and cover them with water. Soak the beans overnight or for several hours until they become plump and tender. Drain the water before adding the beans to your recipes.
Properly dried pole beans can last for months or even up to a year when stored in suitable conditions. Remember to label the container with the date of drying for easy reference.
Drying pole beans not only preserves them for future use but also concentrates their flavors. It’s a rewarding way to enjoy the taste of your homegrown beans throughout the year and adds a unique texture to your favorite culinary creations.
Tips for Storing Pole Beans Effectively
Proper storage techniques are crucial to maintaining the freshness, flavor, and nutritional value of pole beans. Here are some tips to help you store your pole beans effectively:
1. Harvest at the Right Time: Pick pole beans when they are still young and tender, before the seeds inside have fully developed. Young beans have a sweeter flavor and retain their crispness better during storage. Avoid harvesting beans that are overripe or damaged.
2. Sort and Clean: Take the time to sort through your harvested beans and remove any damaged, blemished, or overripe ones. Cleaning the beans thoroughly by rinsing them under cool running water helps remove dirt and debris that can lead to spoilage.
3. Trim and Dry: Trim the ends of the pole beans and dry them thoroughly before storing. Excess moisture can cause the beans to mold or deteriorate quickly. Pat the beans dry with a clean kitchen towel or paper towels, and allow them to air dry completely before packing.
4. Choose the Right Storage Method: Consider your needs and preferences when choosing a storage method for pole beans. Refrigeration is suitable for short-term storage, freezing is ideal for long-term storage without compromising flavor and texture, canning offers a versatile preserved product, and drying is great for space-saving and long-term storage.
5. Use Appropriate Containers: Use the right containers based on your chosen storage method. Perforated plastic bags or airtight containers work well for refrigeration. Freezer bags or containers are best for freezing. Canning jars and lids with proper seals are essential for canning. For drying, use airtight glass jars or plastic bags.
6. Label and Date: Properly label your storage containers with the contents and date. This helps you keep track of the freshness and allows you to prioritize using the oldest beans first.
7. Store in Optimal Conditions: Maintain the proper storage conditions for each storage method. Keep refrigerated pole beans in the crisper drawer at around 40°F (4°C). Frozen pole beans should be stored in a consistently cold freezer at 0°F (-18°C) or below. Canned pole beans can be stored in a cool, dark pantry or cellar. Dried pole beans should be kept in a cool, dry, and dark place.
8. Inspect Regularly: Periodically check your stored pole beans for any signs of spoilage or deterioration. Discard any beans that appear slimy, discolored, or have an off smell. Keeping an eye on the stored beans helps you maintain the quality and avoid consuming spoiled ones.
Following these tips will help maximize the shelf life and quality of your pole beans, allowing you to enjoy their flavors and benefits long after the harvesting season has ended. Whether you choose to refrigerate, freeze, can, or dry your pole beans, proper storage techniques are key to preserving their freshness and taste.
Read more: How To Store Fava Beans
Conclusion
Learning how to store pole beans effectively is crucial for preserving their freshness and quality. Whether you choose to store them in the refrigerator, freezer, canning jars, or through the drying method, each approach has its advantages and considerations.
When harvesting pole beans, remember to pick them at the right time, opting for young and tender beans over overripe ones. Cleaning and trimming the beans before storage help maintain their freshness and remove any impurities that can lead to spoilage.
In the refrigerator, pole beans can be stored in perforated plastic bags or airtight containers in the crisper drawer. They can last for about a week but should be consumed sooner for optimal flavor and texture.
If you prefer to extend the shelf life even further, freezing is an excellent option. Blanch the beans, cool them rapidly in an ice bath, and then pack them into airtight freezer bags or containers. When properly frozen, pole beans can be stored for up to a year and are perfect for cooked dishes.
Canning pole beans allows for long-term preservation, with water bath canning and pressure canning being the two main methods. Follow approved recipes and proper canning procedures to ensure food safety. Canned pole beans can be stored for up to a year or longer, offering versatility in various recipes.
For a space-saving and longer-term option, drying pole beans is a traditional method. Air dry the beans, either in their pods or shelled, until they are dry and brittle. Store them in airtight containers and rehydrate them before use. Dried pole beans can last several months or more when stored properly.
Remember to label your storage containers with the contents and date to keep track of their freshness. Regularly inspect the stored beans and discard any that show signs of spoilage. Maintaining the proper storage conditions, such as temperature and humidity, is essential for preserving the quality of your pole beans.
By using the right storage methods and applying these tips, you can enjoy the flavors of your homegrown pole beans long after the gardening season has ended. Whether you’re savoring them in a dish or reminiscing about the bountiful harvest, proper storage ensures that your pole beans remain a delicious and nutritious part of your culinary repertoire.
Frequently Asked Questions about How To Store Pole Beans
Was this page helpful?
At Storables.com, we guarantee accurate and reliable information. Our content, validated by Expert Board Contributors, is crafted following stringent Editorial Policies. We're committed to providing you with well-researched, expert-backed insights for all your informational needs.


0 thoughts on “How To Store Pole Beans”