
Articles
How To Store Vinyl Records In Sleeves
Modified: December 7, 2023
Learn how to properly store your vinyl records in protective sleeves to ensure their longevity and prevent damage. Discover essential tips and techniques in this informative articles.
(Many of the links in this article redirect to a specific reviewed product. Your purchase of these products through affiliate links helps to generate commission for Storables.com, at no extra cost. Learn more)
Introduction
Vinyl records have made a massive comeback in recent years, with music enthusiasts rediscovering the warm sound and tangible experience that these analog gems provide. Whether you’re a long-time collector or new to the vinyl scene, it’s important to store your records properly to ensure their longevity and maintain their pristine condition. One crucial aspect of vinyl record storage is the use of protective sleeves.
Choosing the right sleeves for your vinyl records is essential in preserving their quality and protecting them from dust, scratches, and other potential damage. In this article, we will guide you through the process of storing vinyl records in sleeves, offering tips and best practices along the way.
Key Takeaways:
- Properly storing vinyl records in high-quality, acid-free sleeves is essential for preserving their condition and sound quality. Cleaning, handling with care, and organizing the sleeves are crucial steps in maintaining a valuable vinyl collection.
- Protecting vinyl records from dust, moisture, and physical damage requires thoughtful storage practices. Choosing the right sleeves, maintaining a clean environment, and handling records delicately are key to ensuring the longevity of a vinyl collection.
Read more: How To Store Vinyl Records Without Sleeves
Choosing the Right Sleeves for Vinyl Records
When it comes to selecting the ideal sleeves for your vinyl records, there are a few key factors to consider. First and foremost, you want to choose sleeves made from high-quality materials that are acid-free and archival-safe. These sleeves provide a barrier between your records and external elements, preventing moisture, dust, and sunlight from causing damage.
Another important consideration is the type of sleeves you opt for. There are two main types of sleeves commonly used for vinyl records: polyethylene sleeves and paper sleeves. Polyethylene sleeves, also known as “poly” sleeves, are made from a transparent plastic material that is durable and resistant to tearing. These sleeves are great for protecting your records from dust and scratches and are ideal if you want to showcase the album artwork while still keeping the record well-protected.
On the other hand, paper sleeves are made from acid-free paper and are a classic option for storing vinyl records. They offer a more traditional feel and are often preferred by collectors who value authenticity. However, paper sleeves may not provide as much protection against dust and scratches as poly sleeves, so it’s important to handle them with care.
Additionally, consider the size of the sleeves. Make sure you choose sleeves that are properly sized to accommodate your records. Oversized sleeves can allow for movement and potential damage to occur, while sleeves that are too snug can put unnecessary pressure on the vinyl and sleeves, leading to warping or creasing.
Ultimately, the choice between polyethylene sleeves and paper sleeves comes down to personal preference. Some collectors even choose to use a combination of both, with inner sleeves made of polyethylene and outer sleeves made of paper for added protection and aesthetics.
The Importance of Proper Storage
Proper storage is crucial for the longevity and preservation of your vinyl records. Vinyl, being a delicate and fragile medium, is susceptible to various forms of damage if not stored correctly. Here are a few reasons why proper storage is essential for your vinyl records:
Preventing Physical Damage:
Poor storage conditions can result in physical damage to your vinyl records. Storing them improperly can lead to warping, bending, or even breaking of the records. Dust, dirt, and other particles can also accumulate on the surface, causing scratches and affecting playback quality. By using protective sleeves and storing the records in a controlled environment, you can minimize the risk of physical damage.
Protecting Against Moisture and Mold:
Moisture is vinyl’s worst enemy. Exposure to moisture, whether from high humidity or liquids, can result in irreversible damage, such as warping, mold growth, or vinyl deterioration. It is important to store your vinyl records in a dry environment with adequate ventilation to prevent moisture-related issues. Protective sleeves can provide an additional layer of defense against moisture and mold.
Read more: How To Store Vinyl Records
Avoiding Sunlight and UV Damage:
Direct sunlight and exposure to ultraviolet (UV) rays can cause discoloration and fading of album covers and labels. Over time, this can diminish the aesthetic appeal and value of your vinyl records. Storing them in sleeves and keeping them away from direct sunlight will help protect your records from UV damage and preserve their visual appeal.
Preserving Sound Quality:
Vinyl records are cherished for their warm and rich sound quality. However, improper storage can compromise sound quality. Dust and dirt on the record’s surface can create unwanted noise and affect the playback experience. By storing your records in protective sleeves and keeping them free from contaminants, you can help maintain their sound quality for years to come.
Overall, proper storage is essential for protecting your vinyl records from physical damage, moisture, sunlight, and preserving their sound quality. By investing in quality sleeves and adopting good storage practices, you can ensure your vinyl collection remains in excellent condition and enjoy the true beauty of vinyl records for a lifetime.
Preparing Vinyl Records for Sleeve Storage
Before placing your vinyl records into protective sleeves, it’s important to follow a few steps to ensure they are clean and ready for storage. Here is a step-by-step guide on preparing vinyl records for sleeve storage:
Step 1: Clean and Dust the Vinyl Records
Start by cleaning the surface of the vinyl records to remove any dust, dirt, or fingerprints. Using a carbon fiber brush or an anti-static record cleaning brush, gently sweep the brush along the grooves of the record. This helps to eliminate static electricity and remove loose particles that might scratch the surface or affect sound quality.
Read more: How To Store Your Vinyl Records
Step 2: Remove Vinyl Records from Their Original Sleeves
If your vinyl records are still in their original sleeves, carefully remove them by sliding the record out from the side to avoid unnecessary bending or warping. Be mindful not to touch the playing surface of the record with your fingers as the natural oils on your skin can transfer onto the vinyl and potentially degrade its quality over time.
Step 3: Insert Vinyl Records into New Sleeves
Now that your records are clean and free from their original sleeves, it’s time to insert them into new protective sleeves. Hold the record by its edges or use clean cotton gloves to prevent any direct contact with the playing surface. Gently slide the record into the protective sleeve, ensuring that it fits snugly but not too tightly. Avoid forcing the record into the sleeve, as this can cause unnecessary stress on the vinyl.
Step 4: Labeling and Organizing Vinyl Record Sleeves
To keep your vinyl collection well-organized, consider labeling each protective sleeve with relevant information such as the artist, album title, and release year. This makes it easier to locate specific records and prevents unnecessary handling and potential damage from repeatedly pulling them out to identify the contents. Use acid-free labels or a specialized vinyl record labeling system to avoid any adhesive residue that may affect the sleeve or label over time.
By following these steps, you can ensure that your vinyl records are clean, protected, and ready for sleeve storage. Investing a little time and effort in preparing your records will go a long way in preserving their longevity and maintaining their pristine condition.
Step 1: Clean and Dust the Vinyl Records
Properly cleaning and dusting your vinyl records is a crucial step in preparing them for sleeve storage. Dust and dirt particles on the record’s surface can not only affect sound quality but also cause scratches if not removed properly. Here’s a step-by-step guide on how to clean and dust your vinyl records:
Read more: How To Store Vinyl Records Properly
Gather the necessary supplies:
Before you start cleaning your vinyl records, gather the necessary supplies. You will need a carbon fiber brush or an anti-static record cleaning brush, a record cleaning solution (preferably one specifically designed for vinyl records), and a microfiber cloth or lint-free cloth for wiping.
Hold the record securely:
Hold the record securely by placing your fingers along the outer edges or by using a record clamp or holder. This ensures a firm grip and prevents any accidental drops or mishaps that could damage the vinyl.
Brush along the grooves:
Using a carbon fiber brush or an anti-static record cleaning brush, gently brush along the grooves of the record. Start from the outer edge and work your way towards the center in a smooth and consistent motion. This removes any loose dust and dirt particles that may have accumulated on the surface of the record.
Apply the record cleaning solution:
If needed, apply a small amount of record cleaning solution to the brush bristles or directly onto the record’s surface. Be sure to use a cleaning solution that is specifically formulated for vinyl records to avoid any potential damage.
Read more: How To Store 45 RPM Vinyl Records
Brush in a circular motion:
With the cleaning solution applied, continue brushing the record in a circular motion. This helps to dislodge any embedded dirt or grime from within the grooves of the vinyl. Take care not to press too hard, as excessive pressure can damage the record.
Wipe with a microfiber cloth:
After brushing the record, use a clean, microfiber cloth or a lint-free cloth to wipe away any remaining cleaning solution or debris. Ensure that the cloth is soft and non-abrasive to prevent scratching. Gently wipe in a straight motion along the grooves, starting from the outer edge and moving towards the center.
Inspect for cleanliness:
After cleaning and wiping, inspect the record for cleanliness. Check for any visible dust or dirt particles that may have been missed during the cleaning process. If necessary, repeat the cleaning steps to ensure the record is thoroughly clean.
By following these steps, you can effectively clean and dust your vinyl records, removing any debris that may affect sound quality or cause scratches. Remember to handle the records with care throughout the cleaning process to minimize the risk of damage. With clean records, you can proceed to the next step of removing them from their original sleeves and preparing them for storage in protective sleeves.
Step 2: Remove Vinyl Records from Their Original Sleeves
When preparing your vinyl records for sleeve storage, it is important to carefully remove them from their original sleeves. Removing records from their original sleeves allows for proper cleaning and inspection, as well as the opportunity to replace damaged or inadequate sleeves. Here is a step-by-step guide on how to remove vinyl records from their original sleeves:
Read more: How To Organize Vinyl Records
Handle with care:
Before proceeding, make sure to wash your hands and dry them thoroughly. This will help remove any oils or dirt that could transfer onto the playing surface of the record and potentially damage it. Additionally, avoid touching the playing surface directly, as even the cleanest hands can leave behind oils and fingerprints.
Hold the record securely:
Grasp the record firmly by placing your fingers along the outer edges, ensuring a secure grip. This will help prevent accidentally dropping or mishandling the record, which could lead to damage or scratches.
Slide the record out gently:
When removing the record from its original sleeve, do so with a gentle and controlled motion. Avoid pulling or tugging forcefully, as this can cause unnecessary bending or warping of the record. Instead, hold the sleeve open and slide the record out from the side, keeping it parallel to the ground.
Inspect for any damage:
Take a moment to inspect both the record and the original sleeve for any signs of damage or wear. Look for scratches, scuffs, or other imperfections that may affect sound quality or diminish the aesthetics of the record. If the original sleeve is damaged, it may be necessary to replace it with a new, clean sleeve to ensure the record remains protected.
Read also: 14 Best Vinyl Records Storage For 2024
Set aside the original sleeve:
Once the record has been removed, set aside the original sleeve for further inspection or storage. If the original sleeve is in good condition, you may choose to retain it for sentimental or collection purposes. If it is damaged or unsuitable for proper storage, consider replacing it with a new sleeve to provide maximum protection for the record.
By following these steps, you can safely remove your vinyl records from their original sleeves. Taking care and handling the records properly during this process will help protect them from potential damage. Once the records are removed from their original sleeves, they are ready for the next step of inserting them into new protective sleeves for optimal storage and preservation.
Step 3: Insert Vinyl Records into New Sleeves
Once you have removed your vinyl records from their original sleeves, the next step is to insert them into new protective sleeves. Properly fitting and high-quality sleeves will help safeguard your records from dust, moisture, and scratches. Follow these steps to ensure a smooth and safe process:
Read more: How To Organize Vinyl Records
Handle with care:
Before touching your vinyl records, make sure your hands are clean and dry. Gently hold the record by its edges or use clean cotton gloves to avoid direct contact with the playing surface. This precaution prevents any oils, debris, or fingerprints from transferring onto the record, which could affect its quality over time.
Select the appropriate sleeve:
Choose protective sleeves that are specifically designed for vinyl records. Look for sleeves made from materials that are acid-free, archival-safe, and provide adequate protection against dust and moisture. Measure the size of your record to ensure a proper fit. Oversized sleeves can allow the record to move and potentially become damaged, while sleeves that are too tight can put unnecessary pressure on the vinyl and its sleeve.
Read also: 13 Best Vinyl Record Storage For 2024
Open the protective sleeve:
Gently slide open the protective sleeve, being careful not to touch the inner surface that will come into contact with the record. Some protective sleeves come with a resealable flap, while others may require separate sealing options such as tape or adhesive strips. Ensure the opening of the protective sleeve is wide enough to facilitate easy insertion of the record.
Insert the record:
Holding the record by its edges, carefully slide it into the protective sleeve. Ensure that the record is centered within the sleeve and inserted upright to prevent any bending or warping. Take caution not to apply excessive pressure or force during this process to avoid potential damage to the vinyl or sleeve.
Seal the protective sleeve:
If your protective sleeve has a resealable flap, use it to securely seal the sleeve. Alternatively, if your sleeve requires separate sealing options such as tape or adhesive strips, follow the manufacturer’s instructions to ensure a tight seal. Proper sealing will help keep dust, dirt, and moisture out, preserving the condition of the vinyl record.
Repeat for each record:
Repeat the process for each of your vinyl records, one at a time. Take care to handle each record with the same level of caution and attention to detail, ensuring that they are properly inserted and sealed in their respective protective sleeves.
By following these steps, you can safely and effectively insert your vinyl records into new protective sleeves. Remember to handle the records delicately and use high-quality sleeves to provide optimum protection. With each record securely housed in its own protective sleeve, you are one step closer to safeguarding your vinyl collection for long-term preservation and enjoyment.
Read more: How To Store Medical Records
Step 4: Labeling and Organizing Vinyl Record Sleeves
Labeling and organizing your vinyl record sleeves is an essential step in maintaining a well-organized collection. Properly labeled sleeves make it easy to locate specific records and prevent unnecessary handling that can potentially lead to damage. Follow these steps to effectively label and organize your vinyl record sleeves:
Choose a labeling method:
Decide on a labeling method that suits your preference and collection. There are various options available, such as using acid-free labels, pre-printed labels, or specialized vinyl record labeling systems. Select a method that ensures the label adheres securely to the sleeve without causing any damage or leaving adhesive residue.
Prepare the labels:
If you are using adhesive labels, prepare them by writing or printing the necessary information. Include details such as the artist name, album title, release year, or any other pertinent information that will help identify and categorize your records easily.
Label the sleeves:
Take one protective sleeve at a time and affix the label onto the outer surface. Place the label in a visible and easily readable position, such as on the spine or the front of the sleeve. Make sure the label is straight and securely attached to avoid it peeling off or becoming damaged over time.
Read more: How To Store Records Properly
Organize your record sleeves:
Decide on an organizational system that works best for your record collection. You can organize your sleeves alphabetically by artist, chronologically by release year, or by any other method that suits your preference and allows for easy browsing and retrieval of records. Consider using dividers or separators to further categorize your collection and make it more manageable.
Maintain a record catalog:
Consider keeping a separate record catalog that lists the details of each record, such as the artist name, album title, release year, and any additional notes or information. This catalog can serve as a reference tool and guide when organizing and searching for specific records.
Regularly update and maintain:
Stay diligent in updating and maintaining your labeling and organization system. As you acquire new records, ensure they are properly labeled and inserted into the correct sleeves and position in your collection. Regularly review and adjust your organizational system as needed to accommodate changes and additions to your collection.
By following these steps, you can effectively label and organize your vinyl record sleeves, creating a well-structured and easily accessible collection. A properly labeled and organized collection not only enhances the visual appeal but also minimizes unnecessary handling and potential damage to your valuable vinyl records. With a well-organized system in place, you can fully enjoy your vinyl collection with ease and convenience.
Additional Tips for Storing Vinyl Records in Sleeves
Storing vinyl records in sleeves is an important step in protecting and preserving your valuable music collection. To further ensure the longevity and quality of your records, here are some additional tips to keep in mind:
Read more: How To Store Vinyls
Store records in a cool and dry environment:
Extreme temperatures and high humidity can cause significant damage to vinyl records. It is important to store your records in a cool and dry environment to prevent warping, mold growth, and degradation of the vinyl. Avoid placing records near direct sources of heat or sunlight, as these can accelerate deterioration.
Invest in outer protective sleeves:
In addition to the inner sleeves, consider using outer protective sleeves to provide an extra layer of defense for your records. Outer sleeves, typically made from polyethylene or polypropylene, protect against dust, moisture, and other contaminants. They also offer added protection for the album covers and artwork.
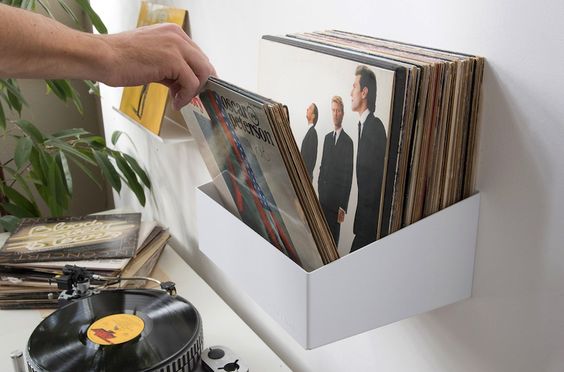
Stack records vertically:
Store your records vertically rather than horizontally to prevent extra pressure on the vinyl and reduce the risk of warping. Avoid stacking them too tightly or overcrowding the storage space, as this can lead to unwanted damage. Leave enough room for air circulation to help maintain the record’s condition.
Keep records away from magnetic fields:
Magnetic fields can interfere with the audio quality of vinyl records. Avoid storing your records near speakers, amplifiers, or other electronic devices that generate magnetic fields. Magnetic fields can cause unwanted noise, distortions, and even permanent damage to the record’s audio fidelity.
Read more: How To Make A Sleeve For A Quilt
Handle records with care:
Whenever you handle your vinyl records, do so with clean hands or wear gloves. Avoid touching the playing surface of the record to prevent the transfer of oils, dirt, or other contaminants. When removing records from their sleeves or playing them on a turntable, hold them by the edges to minimize the risk of smudges, scratches, or fingerprints.
Regularly clean your records:
Even when stored in protective sleeves, dust and dirt can still accumulate on vinyl records over time. Regularly clean your records using a carbon fiber brush or an anti-static record cleaning brush to remove any surface debris. This helps maintain sound quality and prevents any particles from causing harm during playback.
By following these additional tips, you can further enhance the storage and preservation of your vinyl records. Taking these measures will not only help protect your collection, but also ensure optimal sound quality and longevity for your valued vinyl records.
Conclusion
Properly storing vinyl records in protective sleeves is crucial for preserving their condition and prolonging their lifespan. By choosing the right sleeves made of high-quality, acid-free materials, you can protect your records from dust, scratches, moisture, and other potential sources of damage.
Cleaning vinyl records before placing them in sleeves helps to maintain their sound quality and prevent any debris from causing issues during playback. Gently removing the records from their original sleeves and inserting them into new ones ensures that they are properly protected.
Labeling and organizing your record sleeves not only adds a personal touch but also makes it easier to locate specific records in your collection. By implementing an effective organizational system, you can minimize handling and reduce the risk of accidental damage.
Remember to store your records in a cool, dry environment, away from sources of heat, sunlight, and magnetic fields. Stacking records vertically and handling them with care help prevent warping, scratches, and fingerprint marks.
Regular cleaning and maintenance of your records, as well as periodically reviewing and updating your organization system, will ensure that your vinyl record collection remains in excellent condition for years to come.
Preserving the sound quality, visual appeal, and nostalgic value of vinyl records is a labor of love for collectors and enthusiasts. By following these tips and best practices for storing vinyl records in sleeves, you can protect your cherished collection and continue to enjoy the unique experience that vinyl records offer.
So take the necessary steps to care for your vinyl records, invest in high-quality sleeves, and enjoy the timeless beauty of music on vinyl for generations to come.
Frequently Asked Questions about How To Store Vinyl Records In Sleeves
Was this page helpful?
At Storables.com, we guarantee accurate and reliable information. Our content, validated by Expert Board Contributors, is crafted following stringent Editorial Policies. We're committed to providing you with well-researched, expert-backed insights for all your informational needs.


0 thoughts on “How To Store Vinyl Records In Sleeves”