
Articles
How To Make A Sleeve For A Quilt
Modified: December 7, 2023
Learn how to make a sleeve for your quilt with this informative article. Follow our step-by-step guide for easy quilt hanging and displaying.
(Many of the links in this article redirect to a specific reviewed product. Your purchase of these products through affiliate links helps to generate commission for Storables.com, at no extra cost. Learn more)
Introduction
When it comes to displaying your beautiful quilt, a sleeve can be a practical and elegant solution. A quilt sleeve is a fabric strip attached to the back of a quilt that allows you to hang it on the wall. It not only adds a professional finish to your quilt but also makes it easy to showcase your handiwork.
In this article, we will guide you through the process of creating a sleeve for your quilt. Whether you’re a beginner or an experienced quilter, this step-by-step tutorial will help you create a sleeve that is both functional and visually appealing.
Before we get started, let’s take a look at the materials you’ll need for this project.
Key Takeaways:
- Creating a quilt sleeve is a practical and elegant way to display your quilt on the wall. By following this step-by-step guide, you can craft a visually appealing sleeve that adds a professional finish to your handiwork.
- Choosing the right fabric, measuring with precision, and sewing with care are essential for creating a durable and visually appealing quilt sleeve. This practical and creative process empowers you to showcase your quilting skills with pride.
Read more: How To Make A Quilt
Materials Needed
Before you begin making a sleeve for your quilt, gather the following materials:
- Fabric: Choose a sturdy fabric that complements your quilt. The fabric should be wide enough to accommodate the width of your quilt plus a little extra for seams.
- Thread: Select a thread color that matches or blends well with the fabric you’ve chosen for the sleeve. A polyester or cotton thread will work best.
- Scissors: Use a sharp pair of fabric scissors to cut the fabric with precision.
- Ruler or Measuring Tape: You’ll need a ruler or measuring tape to accurately measure the dimensions of your quilt and fabric.
- Pins: Keep your fabric in place by using straight pins. Alternatively, you can use clips or basting spray.
- Sewing Machine: Although it’s possible to sew the sleeve by hand, using a sewing machine will make the process faster and more efficient.
- Iron and Ironing Board: Ironing your fabric before and during the sewing process will ensure smooth and crisp seams.
Once you have gathered these materials, you’re ready to start making your quilt sleeve.
Step 1: Measure and Cut Fabric
The first step in creating a sleeve for your quilt is to measure and cut the fabric for the sleeve. Here’s how:
- Measure the width of your quilt: Use a measuring tape to determine the width of your quilt. Make sure to measure from edge to edge, including any borders or binding.
- Add extra width: To ensure that the sleeve fits your quilt comfortably, add a few extra inches to the width measurement. This will allow the quilt to slide into the sleeve without being too tight.
- Measure the length of your quilt: Next, measure the length of your quilt from top to bottom. Again, include any borders or binding in your measurement.
- Cut the fabric: Based on your width and length measurements, cut a fabric strip for the sleeve. The width of the strip should be the same as the added width measurement, and the length should be at least the same as the quilt length.
- Optional: If you want to ensure that the sleeve is hidden when the quilt is hung, you can cut a fabric strip that is slightly shorter in length than the quilt. This will make the sleeve slightly smaller and hide it behind the quilt when it is hanging.
Remember to use sharp fabric scissors for a clean and precise cut. Also, double-check your measurements before cutting the fabric to avoid any errors.
Once you have cut the fabric strip for the sleeve, you’re ready to move on to the next step: sewing the side seams.
Step 2: Sew the Side Seams
After measuring and cutting the fabric for the sleeve, the next step is to sew the side seams. Here’s how:
- Place the fabric strip flat on your work surface with the right side facing down. The right side is the side that you want to be visible when the sleeve is attached to the quilt.
- Fold the fabric in half lengthwise, matching the raw edges of the fabric strip. Make sure the fabric edges are aligned accurately.
- Pin the raw edges together: Starting at one end, use straight pins to secure the raw edges of the fabric strip. Place the pins perpendicular to the edge, about an inch apart.
- Prepare your sewing machine: Set up your sewing machine with a straight stitch and adjust the stitch length to a medium setting. Ensure that you have the correct thread color loaded in the machine.
- Sew the side seam: Starting at one end, stitch along the pinned edge, removing the pins as you go. Use a ¼ inch seam allowance and backstitch at the beginning and end of the seam to secure it.
- Press the seam open: After sewing the side seam, press the seam open using an iron and an ironing board. This will create a flat and neat finish.
By sewing the side seams, you have created a tube-like structure for your quilt sleeve. The next step will involve creating a casing for inserting the quilt into the sleeve.
When making a sleeve for a quilt, be sure to use a sturdy fabric that can support the weight of the quilt. Sew the sleeve to the back of the quilt, making sure it is securely attached for hanging.
Step 3: Create Casing for Inserting the Quilt
Creating a casing is an essential step in making a sleeve for your quilt. This casing will allow you to easily insert the quilt into the sleeve. Follow these steps to create the casing:
- Turn the fabric tube right side out: Reach into one end of the fabric tube and gently pull the fabric through until the entire tube is flipped right side out. Use a chopstick or a pencil to push out the corners and ensure that the fabric is fully turned.
- Press the fabric: Lay the fabric tube flat and use an iron to press it. Start at one end and work your way down, pressing along the length of the fabric strip. This will help create a crisp and tidy casing.
- Measure the width of the quilt: Take the width measurement of your quilt that you determined in Step 1. Add a few extra inches to account for the quilt’s thickness and ease of insertion.
- Create the casing: Fold over the top edge of the fabric strip, creating a casing that will accommodate the width of your quilt. The width of the casing should match the measurement you just took.
- Pin the casing: Use straight pins to hold the folded edge of the fabric strip in place. Place the pins perpendicular to the edge, spacing them evenly along the length of the fabric.
- Prepare your sewing machine: Set up your sewing machine with a straight stitch and adjust the stitch length to a medium setting. Ensure that you have the correct thread color loaded in the machine.
- Sew the casing: Starting at one end, stitch along the bottom edge of the folded casing, removing the pins as you go. Use a ¼ inch seam allowance and backstitch at the beginning and end of the seam to secure it.
With the casing completed, you’re one step closer to finishing your quilt sleeve. The next step will involve finishing the sleeve edges for a clean and professional look.
Read more: How To Make A Quilt Backing
Step 4: Finish the Sleeve
Finishing the edges of the sleeve will give it a polished and professional appearance. Follow these steps to complete this stage:
- Trim the excess fabric: Use fabric scissors to trim any excess fabric from the raw edges of the sleeve. This will ensure that the edges are even and neat.
- Press the edges: Lay the sleeve flat and use an iron to press the edges, folding them towards the wrong side of the fabric. This will create a clean edge and make it easier to sew.
- Pin the edges: Use straight pins to hold the folded edges in place. Place the pins perpendicular to the edge, ensuring that the fabric is secured.
- Prepare your sewing machine: Set up your sewing machine with a straight stitch and adjust the stitch length to a medium setting. Ensure that you have the correct thread color loaded in the machine.
- Sew the edges: Starting at one end of the sleeve, stitch along the pinned edges, removing the pins as you go. Use a ¼ inch seam allowance and backstitch at the beginning and end of the seams to secure them.
Once you have finished sewing the edges, your quilt sleeve will have a clean and finished look. The final step is to attach the sleeve to your quilt, making it ready to be displayed.
Step 5: Attach the Sleeve to the Quilt
The last step in creating a sleeve for your quilt is to attach it to the back of the quilt. This will allow you to easily hang and display your quilt. Follow these steps to securely attach the sleeve:
- Position the quilt: Lay your quilt flat with the right side facing down. Ensure that it is positioned correctly and aligned properly.
- Place the sleeve: Take the fabric sleeve you created in the previous steps and position it along the top edge of the quilt’s back. The folded edge of the casing should be facing upwards, while the raw edges of the sleeve should be aligned with the top edge of the quilt.
- Pin the sleeve: Use straight pins to secure the sleeve to the back of the quilt. Pin through all layers of fabric, ensuring that the sleeve is straight and taut.
- Prepare your sewing machine: Set up your sewing machine with a straight stitch and adjust the stitch length to a medium setting. Ensure that you have the correct thread color loaded in the machine.
- Sew the sleeve: Starting at one end, stitch along the top edge of the quilt, attaching the sleeve. Remove the pins as you go, and use a ¼ inch seam allowance. Backstitch at the beginning and end of the seam for added stability.
- Optional reinforcement: For extra durability, you can sew a line of stitching across the sleeve at regular intervals. This will help distribute the weight of the quilt evenly and prevent the sleeve from stretching over time.
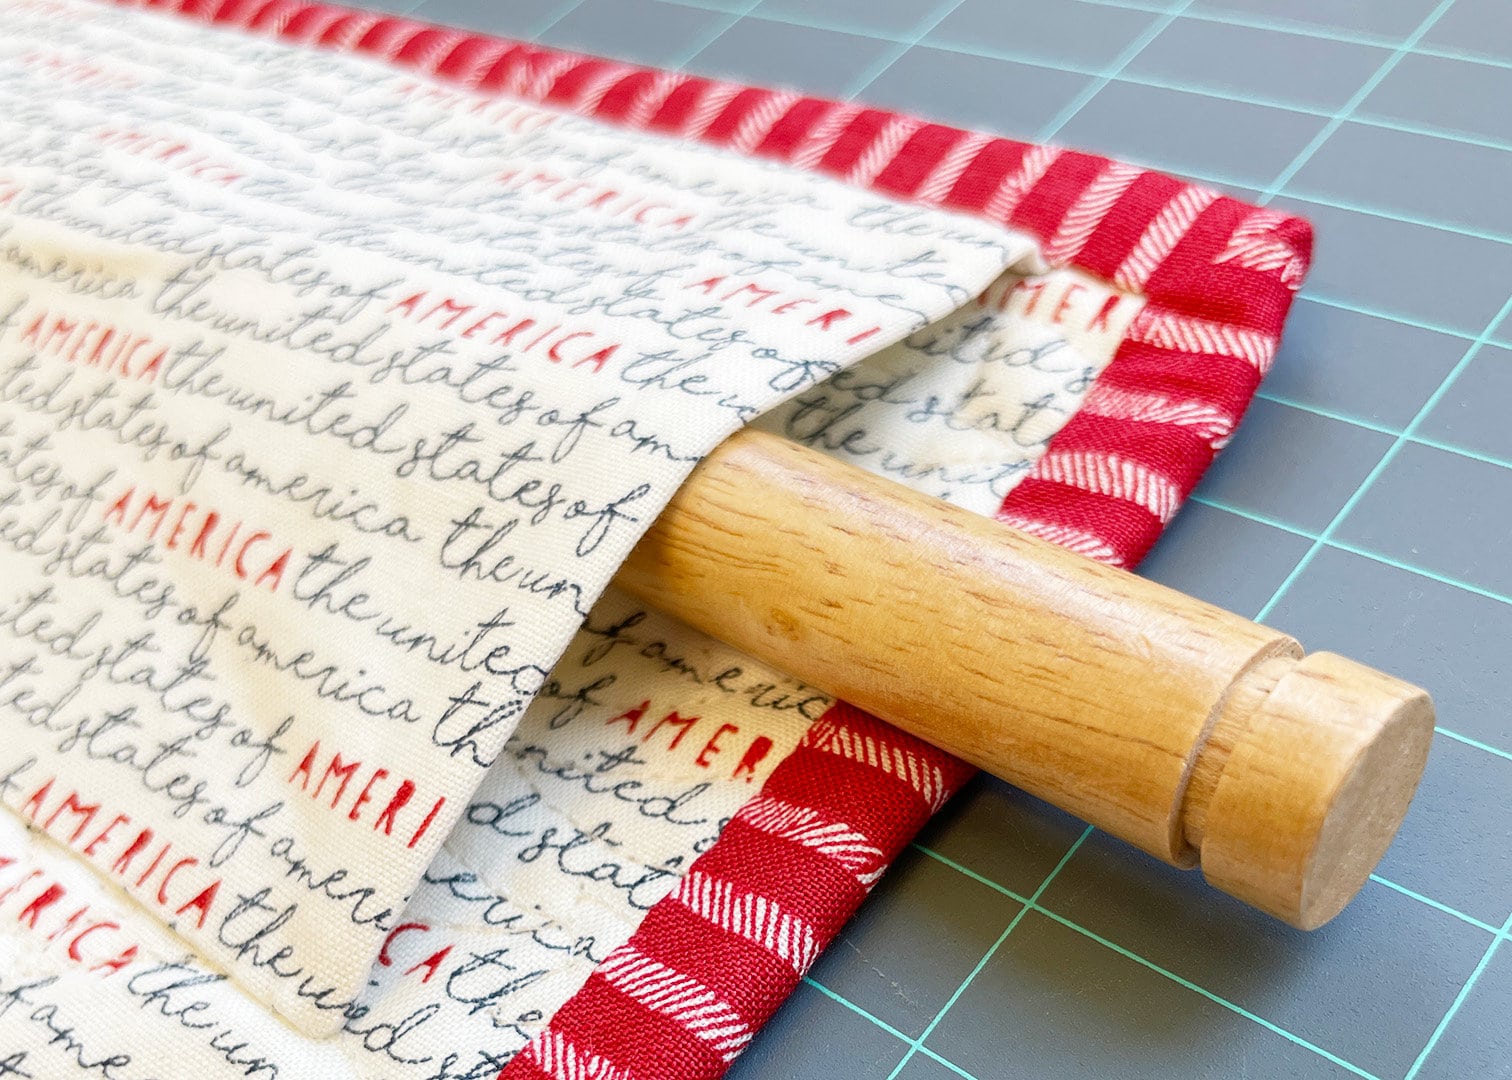
Once you have sewn the sleeve to the quilt, your quilt is now ready to be hung on a wall. Insert a rod or dowel through the casing, and secure it to the wall using appropriate hardware.
Now you have successfully created a sleeve for your quilt, allowing you to display your beautiful work of art with pride.
Conclusion
Congratulations! By following this step-by-step guide, you have learned how to create a sleeve for your quilt. A quilt sleeve not only adds a professional touch to your quilt but also provides a convenient way to display it on a wall.
Throughout this process, you have measured and cut fabric, sewn side seams, created a casing, finished the edges, and attached the sleeve to your quilt. These steps have resulted in a beautifully crafted sleeve that will hold your quilt securely and allow you to showcase your quilting skills.
Remember to choose a fabric that complements your quilt and sew with precision to achieve the best results. Taking the time to properly measure, cut, and sew the sleeve will ensure a durable and visually appealing finished product.
Now that you have completed your quilt sleeve, it’s time to hang your quilt and enjoy the fruits of your labor. Whether you are displaying a precious heirloom, a cherished gift, or a quilt made with love, the sleeve will add the perfect finishing touch.
Thank you for following along with this tutorial. We hope you found it helpful and that it has empowered you to create stunning quilt sleeves for all your future projects. Happy quilting!
Frequently Asked Questions about How To Make A Sleeve For A Quilt
Was this page helpful?
At Storables.com, we guarantee accurate and reliable information. Our content, validated by Expert Board Contributors, is crafted following stringent Editorial Policies. We're committed to providing you with well-researched, expert-backed insights for all your informational needs.






0 thoughts on “How To Make A Sleeve For A Quilt”