Articles
How To Use A Breville Coffee Machine
Modified: February 28, 2024
Learn how to use a Breville coffee machine with our informative articles. Discover expert tips and tricks for brewing the perfect cup of coffee at home.
(Many of the links in this article redirect to a specific reviewed product. Your purchase of these products through affiliate links helps to generate commission for Storables.com, at no extra cost. Learn more)
Introduction
Welcome to the world of coffee perfection with the Breville Coffee Machine. Whether you’re a seasoned coffee connoisseur or just starting your journey into the world of brewing, this machine is designed to make your coffee-making experience extraordinary. With its innovative features and sleek design, the Breville Coffee Machine seamlessly blends style and functionality. In this article, we’ll explore the various aspects of using a Breville Coffee Machine, from setting it up to brewing the perfect cup of coffee.
There’s something magical about the aroma of freshly brewed coffee, and with the Breville Coffee Machine, you can effortlessly recreate that sensory experience in the comfort of your own home. This sophisticated coffee machine is packed with advanced technologies that allow you to control every aspect of the brewing process, from the grind size to the brewing temperature. With its user-friendly interface and intuitive controls, mastering the art of brewing coffee has never been easier.
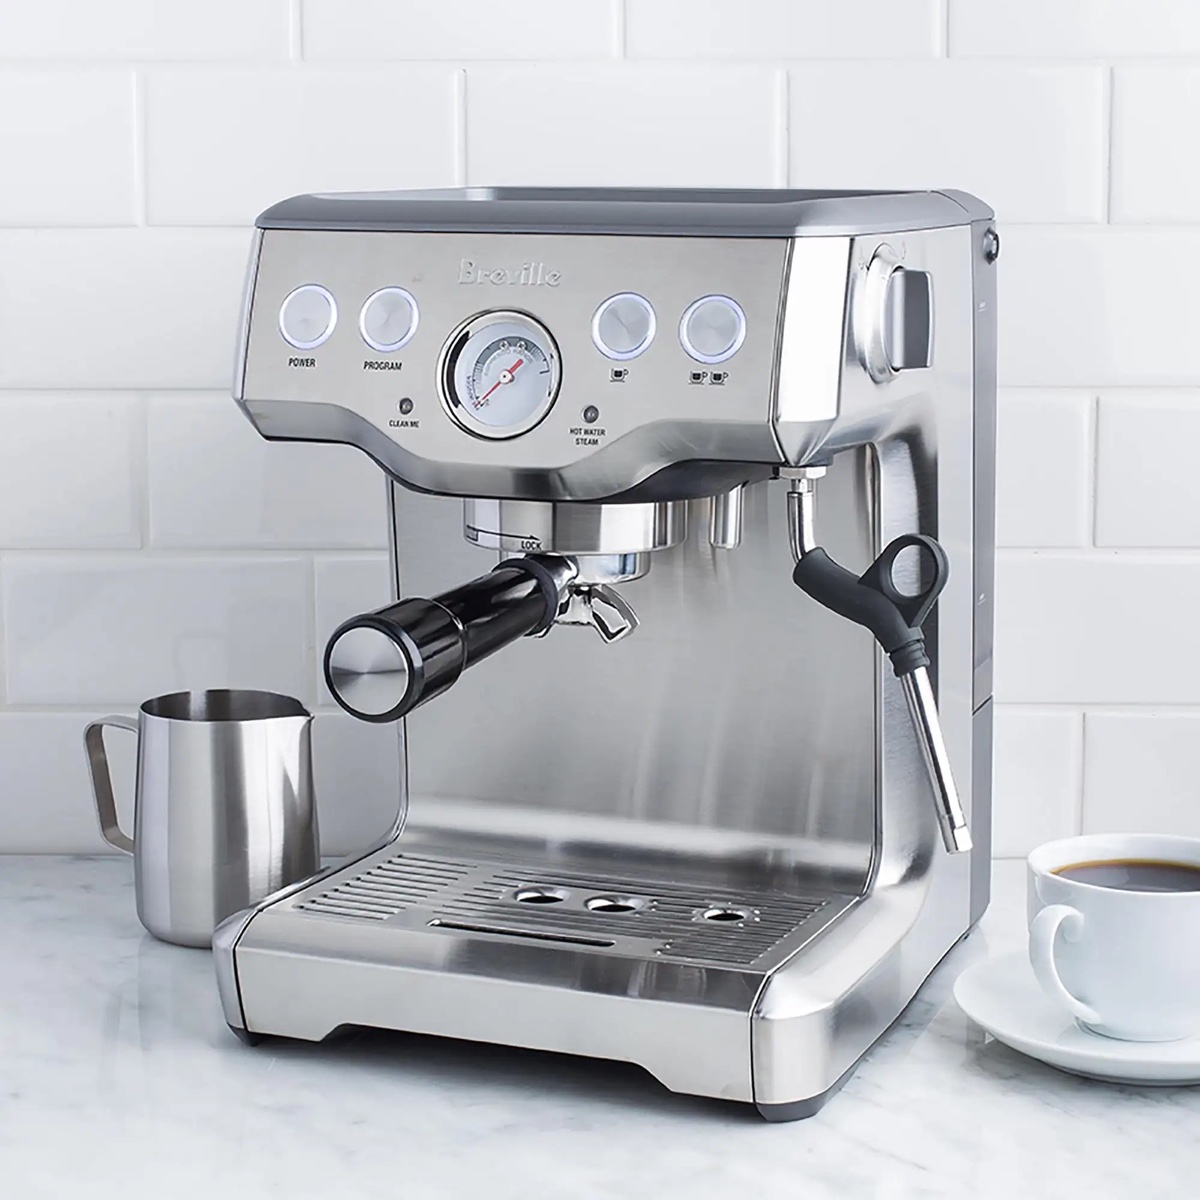
Before we dive into the specifics of using the Breville Coffee Machine, it’s important to understand the components and functionality of this remarkable appliance. The machine consists of a water reservoir, a grinder, a portafilter, and a brew head. These components work together to extract the rich flavors from your coffee beans and deliver a cup of coffee that is robust, aromatic, and full-bodied.
Setting up your Breville Coffee Machine is a breeze. Simply fill the water reservoir with fresh, cold water, and ensure that the grinder is filled with your favorite coffee beans. Adjust the grind size according to your preference, and you’re ready to start brewing. In the next section, we’ll delve into the process of preparing your coffee beans, exploring various techniques for achieving the perfect flavor profile.
Now that we’ve set the groundwork, let’s embark on a journey of discovery and learn how to make the most out of your Breville Coffee Machine. From grinding and tamping to brewing and frothing milk, we’ll cover every step of the process. Along the way, we’ll provide insights and tips to help you elevate your coffee-making skills and create a coffee experience that is truly exceptional.
So, grab your favorite mug, prepare your taste buds for a delightful adventure, and let’s explore the amazing world of coffee with the Breville Coffee Machine.
Key Takeaways:
- Elevate your coffee experience with the Breville Coffee Machine, mastering the art of brewing, frothing milk, and troubleshooting common issues for a delightful home coffee journey.
- Unleash your inner barista and craft customized coffee creations with the Breville Coffee Machine, from perfecting grind size to creating velvety milk textures for cafe-quality beverages.
Read more: How To Descale Breville Coffee Machine
Understanding the Breville Coffee Machine
Before we dive into using the Breville Coffee Machine, it’s essential to have a thorough understanding of its various features and functionalities. This knowledge will help you maximize the machine’s capabilities and ensure consistent and delicious coffee every time.
The Breville Coffee Machine is equipped with advanced technologies that allow you to customize every aspect of the brewing process. One of its key features is the adjustable grind size. By adjusting the grind size, you can control the extraction rate of your coffee grounds. For a bolder and more intense flavor, choose a finer grind size. On the other hand, for a milder and smoother taste, opt for a coarser grind size.
Another remarkable feature of the Breville Coffee Machine is the brewing temperature control. The temperature at which your coffee is brewed significantly impacts its taste. The machine allows you to adjust the brewing temperature to achieve your desired flavor profile, whether you prefer a brighter, more acidic coffee or a smoother, full-bodied brew.
The Breville Coffee Machine also offers a versatile steam wand for frothing milk. With this feature, you can easily create creamy and velvety textures for lattes, cappuccinos, or any milk-based coffee beverages. The steam wand allows you to control the amount of froth and the temperature of the milk, giving you the freedom to experiment and create your favorite coffee creations.
Additionally, the Breville Coffee Machine has a pre-infusion function. This feature gradually increases the water pressure during the brewing process, ensuring an even extraction and enhancing the flavors of your coffee. This gentle and precise extraction method results in a well-balanced and nuanced cup of coffee.
Understanding these features and how they contribute to the overall brewing process will empower you to make the most out of your Breville Coffee Machine. Taking the time to familiarize yourself with its functionalities will not only enhance your coffee-making skills but also allow you to explore and discover new flavors and brewing techniques.
Now that we have a solid understanding of the Breville Coffee Machine, let’s move on to the next step: setting up the machine and preparing your coffee beans. These initial stages are crucial for ensuring a delicious cup of coffee, so let’s dive right in!
Setting Up Your Breville Coffee Machine
Setting up your Breville Coffee Machine is a simple and straightforward process that involves a few key steps. Following these steps will ensure that your machine is properly calibrated and ready to deliver exceptional coffee with every brew.
The first step in setting up your Breville Coffee Machine is to find a suitable location for it. Choose a clean and dry countertop area that is easily accessible. Make sure there is enough clearance above the machine for adding water to the reservoir and removing the portafilter.
Next, plug the machine into a grounded electrical outlet. Ensure that the power cord is not damaged and that it is properly connected to the machine and the outlet. Once plugged in, the machine will begin its initial startup process, indicated by the lights on the control panel.
Now it’s time to fill the water reservoir. Lift the top cover of the machine to reveal the reservoir. Before filling, make sure the water tank is clean and free from any debris. Fill it with fresh, cold water up to the MAX fill line. Then, close the top cover securely.
To secure the portafilter in place, position it into the group head and rotate it in a clockwise direction. The group head is where the water is forced through the coffee grounds during the brewing process. When locked in correctly, the portafilter should feel secure and not move or wobble.
Once the portafilter is locked in, it’s time to preheat the machine. Press the power button, and the machine will start the heating process. It’s essential to allow the machine to preheat fully to ensure optimal brewing temperature. The machine will indicate when it is ready by displaying a solid indicator light or a specific message on the control panel.
While the machine is preheating, take this time to assemble and adjust the grinder. The Breville Coffee Machine is equipped with an integrated grinder that allows you to grind your coffee beans fresh for each brew. Adjust the grind size by turning the grind size dial located on the grinder. A finer setting is ideal for espressos, while a coarser grind is suitable for longer extraction times.
With the machine preheated and the grinder set, it’s time to run a test shot. Place an empty cup under the portafilter and initiate a manual shot by pressing the start/stop button. This test shot will help flush out any residual particles or impurities from the machine and ensure that the water flow is smooth and consistent.
Once the test shot is complete, discard the water and repeat the process one more time. This step will ensure that the machine is fully primed and ready to brew your first delicious cup of coffee.
Now that your Breville Coffee Machine is properly set up, you’re ready to start brewing your favorite coffee. In the next section, we’ll explore the process of preparing your coffee beans, including grinding and tamping techniques, to achieve the perfect flavor extraction. So let’s dive in and unlock the full potential of your Breville Coffee Machine!
Preparing Your Coffee Beans
When it comes to brewing a phenomenal cup of coffee with your Breville Coffee Machine, the quality and preparation of your coffee beans are of utmost importance. Preparing your coffee beans involves selecting the right beans, storing them properly, and understanding the importance of freshness. Let’s explore these aspects in depth to ensure that you are starting your brewing process on the right foot.
The first step in preparing your coffee beans is to choose high-quality beans that suit your taste preferences. Coffee beans come in various origins, roast levels, and flavor profiles, so it’s crucial to experiment and find the flavor notes that resonate with you. Whether you prefer a bold and dark espresso or a light and fruity pour-over, selecting the right beans will lay the foundation for a delicious cup of coffee.
Once you’ve obtained your beans, it’s important to store them properly to maintain their freshness and flavor. Coffee beans are sensitive to light, heat, moisture, and air, which can all degrade their quality. To preserve their freshness, store your beans in an airtight container placed in a cool, dark place, away from direct sunlight and heat sources. Avoid storing them in the refrigerator or freezer, as the temperature fluctuations can negatively affect the flavor.
Before using your coffee beans, it’s recommended to grind them fresh for each brew. Grinding coffee beans just before brewing helps to preserve the flavors and aromas. The Breville Coffee Machine comes equipped with an integrated grinder, allowing you to have full control over the grind size. Experiment with different grind settings to find the perfect balance for your preferred brewing method.
For espresso-based drinks, such as lattes or cappuccinos, a fine grind is typically used to extract the full flavors from the beans. Alternatively, if you’re brewing a pour-over or French press coffee, a coarser grind is ideal to achieve the desired extraction time and flavor profile.
Once you’ve determined the appropriate grind size, it’s time to measure the coffee beans before grinding. A general guideline is to use a ratio of 1:16, where 1 part coffee is used for every 16 parts water. This ratio can be adjusted based on your taste preference, so feel free to experiment and find the perfect strength for your cup of coffee.
After measuring the appropriate amount of coffee beans, place them in the grinder and start the grinding process. It’s important to ensure that the grinder is set to the desired grind size and that the beans are ground consistently. Uneven grinding can result in an inconsistent extraction, leading to a subpar cup of coffee.
With your coffee beans freshly ground, you’re now ready to proceed to the next step: grinding and tamping techniques. These techniques play a vital role in the extraction process, so let’s explore them in detail and uncover the secrets to achieving the perfect cup of coffee with your Breville Coffee Machine.
Grinding and Tamping Techniques
Grinding and tamping are two critical steps in the coffee brewing process that greatly affect the extraction and flavor of your coffee. Mastering these techniques will allow you to achieve a consistent and delicious cup of coffee with your Breville Coffee Machine.
The grind size of your coffee beans is a crucial factor that determines the rate of extraction. For espresso-based drinks, a fine grind size is generally recommended to increase the surface area of the coffee particles. This allows for a faster and more efficient extraction of flavors. On the other hand, for longer extraction methods like pour-over or French press, a coarser grind size is preferred to allow for a slower extraction process.
The Breville Coffee Machine offers multiple grind size options, allowing you to customize the level of fineness to your preference. Experiment with different grind settings and observe the extraction time and flavor profile to find the perfect balance for your taste buds.
After grinding your coffee beans, it’s time to tamp them. Tamping is the process of evenly compressing the coffee grounds into the portafilter. This step ensures that the water flows through the coffee evenly, promoting a consistent extraction and preventing any channeling or unevenness in flavor.
To tamp your coffee grounds effectively, start by distributing the grounds evenly in the portafilter. Use your finger or a distribution tool to level out the coffee bed, ensuring uniformity. This step is crucial to ensure an even extraction and avoid any areas of under-extraction or over-extraction.
Once the coffee grounds are distributed evenly, use a tamper to apply pressure and compact the grounds. Hold the tamper horizontally, place it on top of the coffee bed, and apply even pressure using your hand. The ideal tamp pressure is around 30 pounds or 15 kilograms, but the exact pressure may vary depending on your preference and the specific coffee beans you are using.
When tamping, it’s important to apply a consistent amount of pressure across the coffee bed. Uneven tamping can lead to uneven extraction, resulting in a subpar cup of coffee. Practice tamping techniques to ensure a level and consistent tamp each time.
After tamping, wipe off any excess coffee grounds from the rim of the portafilter to ensure a proper seal. This will prevent any leaks during the brewing process and maintain optimal pressure for extraction.
Now that you’ve mastered the grinding and tamping techniques, it’s time to move on to the brewing process itself. In the next section, we’ll explore the steps involved in brewing your coffee using the Breville Coffee Machine, ensuring that you can savor every sip of a perfectly brewed cup. Let’s dive in!
When using a Breville coffee machine, always make sure to use freshly ground coffee for the best flavor. Adjust the grind size and coffee strength settings to customize your brew to your preference.
Read more: How To Clean Breville Coffee Machine
Brewing Your Coffee
Now that you’ve prepared your coffee beans and mastered the grinding and tamping techniques, it’s time to put your skills to the test and brew a delicious cup of coffee with your Breville Coffee Machine. The brewing process is where all the flavors and aromas of your coffee beans come to life, so let’s explore the steps involved in brewing your coffee to perfection.
Start by ensuring that your machine is preheated and ready for brewing. The Breville Coffee Machine will indicate when it has reached the optimal temperature through a solid indicator light or a specific message on the control panel. This step is crucial for extracting the full flavors from your coffee beans.
Next, secure the portafilter into the group head by rotating it clockwise until it feels secure. This ensures a proper seal and prevents any leaks during the brewing process. Place your pre-warmed cup underneath the portafilter to collect the brewed coffee.
It’s now time to initiate the brewing process. The Breville Coffee Machine offers various brewing options, including both manual and automatic functions. If you prefer manual control, you can start the extraction by pressing the start/stop button. Alternatively, choose the automatic settings to control the shot duration and extraction time.
During the brewing process, closely observe the espresso flowing into your cup. A well-extracted shot should have a golden honey-like consistency, with a slow and steady flow. If the extraction is too fast and watery, adjust the grind size to a finer setting. On the other hand, if the extraction is too slow and sluggish, try a coarser grind size.
Once the desired extraction is achieved, stop the brewing process by pressing the start/stop button or using the automatic settings. Remove the portafilter from the group head, being cautious of the hot surfaces. Congratulate yourself on successfully brewing a delectable shot of espresso.
If you prefer a longer coffee like an Americano, simply dilute the espresso shot with hot water. Adjust the water-to-espresso ratio based on your taste preference to create a milder and more voluminous cup of coffee.
With your espresso shot or Americano ready, it’s time to take a moment to savor the aroma and taste. Appreciate the nuanced flavors, rich body, and delightful notes that your Breville Coffee Machine has extracted from your carefully selected coffee beans.
Now that you have mastered the art of brewing with your Breville Coffee Machine, it’s time to elevate your coffee experience by mastering the art of milk frothing. In the next section, we will explore the process of frothing milk and creating creamy and velvety textures for lattes, cappuccinos, and more. Get ready to indulge in café-quality milk-based beverages from the comfort of your own home.
Frothing Milk
One of the joys of owning a Breville Coffee Machine is the ability to create rich and velvety milk textures for your favorite milk-based coffee beverages. Frothing milk adds a creamy and indulgent touch to lattes, cappuccinos, and other coffee creations. With a few simple techniques, you can master the art of milk frothing and enhance your coffee experience.
Before you begin frothing milk, it’s important to start with cold milk. Whole milk is generally preferred for creating creamy and smooth textures, but you can also use alternative milk options such as almond, soy, or oat milk. Experiment with different milk types to find the one that suits your taste.
Once you have your milk, pour it into a stainless steel frothing pitcher. The amount of milk you use depends on the size of your drink and how much foam you desire. It’s recommended to fill the pitcher no more than halfway to allow room for the milk to expand while frothing.
Now it’s time to froth the milk. The Breville Coffee Machine is equipped with a steam wand that allows you to achieve the perfect froth. Start by placing the steam wand tip just beneath the surface of the milk, at an angle. Turn on the steam wand and allow the steam to gradually incorporate into the milk, creating a whirlpool motion.
As you hear the hissing sound of the steam and see the milk expanding and bubbling, carefully move the wand lower into the milk, still at an angle. This will continue to incorporate air and create the desired foam. Control the angle, depth, and duration of the steam to achieve different levels of frothiness.
As you froth the milk, pay attention to the temperature. The optimal milk temperature for frothing is around 150°F (65°C). Once the desired temperature is reached, turn off the steam wand and remove it from the milk.
Gently tap the frothing pitcher on a flat surface to remove any large bubbles and allow the foam to settle. Swirl the milk in the pitcher to create a smooth and well-integrated texture.
Now, it’s time to pour the frothed milk into your espresso shot or coffee base. The technique you use will depend on the specific drink you are making. For lattes, pour the milk directly into the center of the cup, allowing it to sink below the surface. For cappuccinos, spoon out the foam first and then pour the remaining milk.
With your perfectly frothed milk and espresso shot combined, take a moment to appreciate the art you’ve created. The velvety texture and creamy taste will elevate your coffee experience to new heights.
Remember that milk frothing requires practice and experimentation to achieve the desired results. Don’t be discouraged if it doesn’t come out perfect on your first try. With time and experience, you’ll become a master at frothing milk and creating café-quality beverages at home.
With the knowledge of brewing and milk frothing, you’re now equipped to enjoy a wide range of coffee creations with your Breville Coffee Machine. In the following section, we’ll discuss the importance of cleaning and maintenance to ensure the longevity and optimal performance of your machine. Let’s dive in!
Cleaning and Maintenance
Regular cleaning and maintenance are essential to keep your Breville Coffee Machine in optimal condition and ensure the longevity of its performance. By following a few simple steps, you can keep your machine clean and free from any buildup that may affect the taste of your coffee. Let’s explore the importance of cleaning and maintenance and learn how to keep your Breville Coffee Machine in top shape.
After each use, it’s important to clean the portafilter, the filter basket, and the steam wand. Remove the spent coffee grounds from the portafilter and rinse it thoroughly with warm water. Use a brush to clean the filter basket, removing any residual coffee particles. Wipe down the steam wand with a damp cloth to remove any milk residue.
Regular descaling is an important aspect of maintaining your Breville Coffee Machine. Over time, mineral deposits can build up in the machine’s internal parts, affecting its performance and the quality of your coffee. Follow the manufacturer’s instructions for descaling, using a descaling solution or a mixture of vinegar and water. Be sure to thoroughly rinse the machine afterward to remove any residual solution.
In addition to regular cleaning, it’s important to perform routine maintenance tasks to keep your machine running smoothly. Check the water reservoir regularly and refill it as needed to ensure a steady water supply. Clean the water reservoir periodically with warm, soapy water to remove any buildup or residue.
It’s also essential to clean the grinder regularly to maintain its performance and prevent flavor contamination. Follow the manufacturer’s instructions for cleaning the grinder, as different models may have different methods. Typically, the process involves removing the bean hopper, burrs, and other grinder components for thorough cleaning.
Don’t forget to clean the exterior of your Breville Coffee Machine to keep it looking pristine. Wipe it down with a damp cloth regularly to remove any dirt, spills, or fingerprints. Avoid using harsh chemicals or abrasive materials that may damage the machine’s surfaces.
Regular maintenance not only ensures a clean and hygienic brewing environment but also contributes to the taste and quality of your coffee. By keeping your Breville Coffee Machine clean, you’ll be able to enjoy consistently delicious cups of coffee for years to come.
Lastly, it’s a good idea to refer to the user manual for specific cleaning and maintenance instructions tailored to your Breville Coffee Machine model. These guidelines will provide detailed information on the recommended cleaning frequency and specific steps for maintaining your machine.
Now that you’re equipped with the knowledge of cleaning and maintenance, you can confidently enjoy the full potential of your Breville Coffee Machine and brew exceptional coffee every time. In the final section, we’ll address some common troubleshooting issues and how to resolve them. Let’s continue our journey to becoming coffee aficionados!
Troubleshooting Common Issues
While the Breville Coffee Machine is known for its reliability, occasional issues may arise. Understanding and addressing these common troubleshooting problems will help you resolve any hiccups in your coffee brewing process and ensure a smooth experience. Let’s explore some common issues that you may encounter and how to troubleshoot them.
1. Machine not turning on: If your machine is not turning on, start by checking that it is properly plugged into a grounded electrical outlet. Ensure that the power cord is connected securely to both the machine and the outlet. If the issue persists, check the circuit breaker or try plugging in another device to confirm that the outlet is functioning.
2. Water not flowing through the portafilter: If water is not flowing through the portafilter, it may indicate a clog or blockage in the machine’s internal components. Start by checking if the portafilter is properly locked into the group head. If it is, try removing the portafilter and cleaning it, especially the filter basket, to ensure there are no coffee grounds or debris blocking the flow of water.
3. Inconsistent water temperature: Inconsistent water temperature can affect the quality and taste of your coffee. Check that the machine is fully preheated, as indicated by the control panel or lights. If the issue persists, it may be a sign of mineral deposits in the heat exchange system. Perform a descaling procedure to remove any buildup and restore optimal water temperature.
4. Poor foam quality or no froth: If you are experiencing poor foam quality or no froth when frothing milk, it may be due to various factors. Start by checking that you are using cold milk and that the steam wand is properly positioned just below the surface of the milk. Ensure that you have enough time to froth the milk adequately, as rushing the process can result in subpar foam. Also, check that there is no milk residue or blockage in the steam wand that may be affecting the frothing process.
5. Noisy operation: Unusual noises during operation may indicate a mechanical issue. Check that all components are properly secured and tightened. If the noise persists, consult the user manual or contact Breville customer support for further assistance.
6. Coffee tastes weak or bitter: If your coffee tastes weak, it may indicate an under-extraction, while a bitter taste may indicate over-extraction. Adjust the grind size and brewing time to achieve the desired extraction. Also, ensure that you are using fresh and properly stored coffee beans to ensure optimal flavor.
If you encounter any other issues or have difficulty resolving the problem, consult the user manual or reach out to Breville customer support for assistance. They can provide specific guidance tailored to your machine model and help troubleshoot any persistent issues.
By understanding and troubleshooting these common issues, you can overcome any challenges that may arise during your coffee brewing journey with the Breville Coffee Machine. Now it’s time to put your knowledge into practice, experiment with different flavors and techniques, and enjoy your favorite cup of coffee to the fullest!
With that, we conclude our comprehensive guide on using the Breville Coffee Machine. May your coffee adventures be filled with delicious aromas, delightful flavors, and memorable moments shared with loved ones.
Read more: How To Use The Breville Espresso Machine
Conclusion
Congratulations! You have now become well-versed in the art of using the Breville Coffee Machine. From understanding its features and functionalities to setting it up, preparing your coffee beans, mastering grinding and tamping techniques, brewing your coffee, frothing milk, and performing proper cleaning and maintenance, you have gained the knowledge and skills needed to create exceptional coffee at home.
The Breville Coffee Machine offers a world of possibilities in your coffee journey. With its advanced technologies, intuitive controls, and sleek design, it allows you to unleash your creativity and explore the nuances of coffee brewing. Whether you enjoy a bold and robust espresso or prefer the velvety textures of milk-based beverages, this machine empowers you to craft customized coffee creations that suit your taste preferences.
Remember, the key to achieving the perfect cup of coffee lies in the quality of your coffee beans, the precision in grinding and tamping, and the mastery of frothing milk. By applying the techniques and tips we’ve discussed, you can elevate your coffee experience and delight your senses with each sip.
Additionally, regular cleaning and maintenance are vital for keeping your Breville Coffee Machine in optimal condition. By following the recommended guidelines and performing routine maintenance tasks, you can ensure that your machine performs at its best and continues to deliver outstanding results for years to come.
Should you encounter any troubleshooting issues along the way, you now have the knowledge to address common problems. Remember to refer to the user manual or contact Breville customer support for assistance with any persistent issues.
Now, armed with this comprehensive guide, it’s time to unleash your inner barista and create coffee masterpieces that rival your favorite café. Experiment with different coffee beans, play with various brewing techniques, and share the joy of a perfectly brewed cup of coffee with family and friends.
Embrace the aroma, the flavor, and the artistry of coffee-making with your Breville Coffee Machine. Enjoy every moment of your coffee journey and savor the delightful moments that a great cup of coffee brings. Cheers to your continued enjoyment and exploration of the world of coffee!
Frequently Asked Questions about How To Use A Breville Coffee Machine
Was this page helpful?
At Storables.com, we guarantee accurate and reliable information. Our content, validated by Expert Board Contributors, is crafted following stringent Editorial Policies. We're committed to providing you with well-researched, expert-backed insights for all your informational needs.
0 thoughts on “How To Use A Breville Coffee Machine”