Articles
What Is J Channel For Siding
Modified: May 6, 2024
Discover the importance of J channel for siding installation and maintenance with our informative articles. Gain valuable insights and expert tips to enhance your siding project.
(Many of the links in this article redirect to a specific reviewed product. Your purchase of these products through affiliate links helps to generate commission for Storables.com, at no extra cost. Learn more)
Introduction
J Channel is an essential component of siding installation that is often overlooked but plays a crucial role in achieving a professional and finished look for your home’s exterior. Whether you are a homeowner or a contractor, understanding what J Channel is and its purpose is key to ensuring a successful siding project.
When it comes to siding installation, attention to detail is essential. The right materials and techniques can make all the difference in achieving a visually appealing and long-lasting finish. J Channel is a vital part of this process, serving both functional and aesthetic purposes.
In this article, we will explore the definition of J Channel, its purpose, installation methods, types of materials available, the benefits of using J Channel for siding, potential issues that may arise, and how to properly care for and maintain J Channel.
By the end of this article, you will have a comprehensive understanding of J Channel and its importance in siding installation, enabling you to make informed decisions and achieve professional results for your home or project.
Key Takeaways:
- J Channel is a versatile and essential component of siding installation, providing a polished finish, protection against moisture, and improved energy efficiency. Understanding its purpose and proper installation techniques is crucial for achieving professional results.
- Regular maintenance and care for J Channel are vital for preserving its functionality and appearance over time. By following simple maintenance tips, homeowners and contractors can prolong the lifespan of their siding installation and ensure long-term durability.
Definition of J Channel
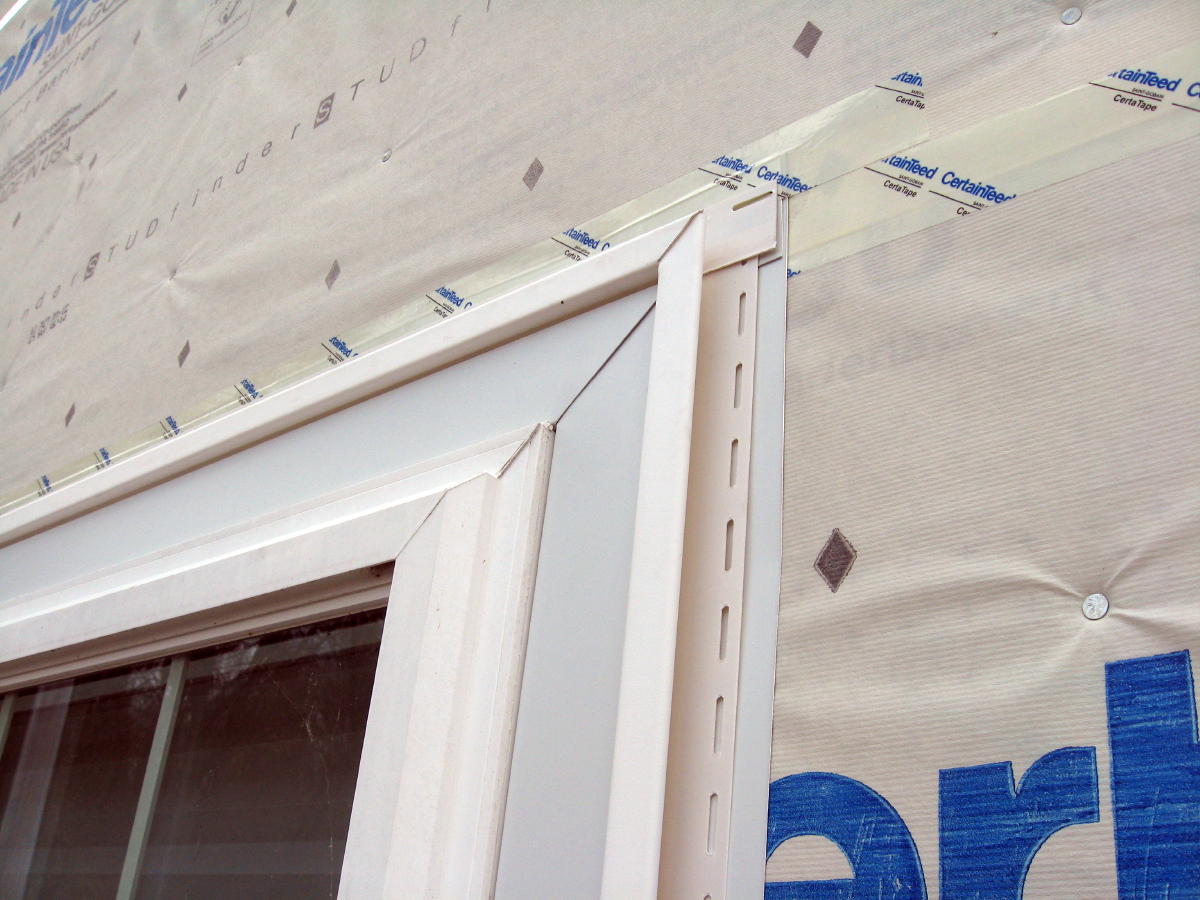
Before delving into the details, it is important to understand what exactly J Channel is. J Channel, also known as J-trim, is a type of vinyl or aluminum siding accessory that serves as a finishing material for siding installations. It is named for its shape, resembling the letter “J.”
J Channel is typically used to create a neat and clean transition between the siding panels and the surrounding door and window frames. It is installed around the perimeter of these openings, providing a snug fit and protecting the edges of the siding from moisture and other external elements.
This trim piece is designed to be versatile and compatible with various siding types, including vinyl, fiber cement, and aluminum. It is available in different sizes and profiles to accommodate different siding thicknesses and architectural styles.
J Channel is typically made from durable and weather-resistant materials such as PVC (polyvinyl chloride) or aluminum. PVC J Channel is popular due to its affordability, ease of installation, and ability to resist warping or damage from exposure to the elements. Aluminum J Channel, on the other hand, offers added strength and rigidity, making it a suitable choice for high-impact areas.
Overall, J Channel serves as a finishing touch to complete the look of your siding installation, ensuring a crisp and professional appearance while also offering protection against potential damage.
Purpose of J Channel
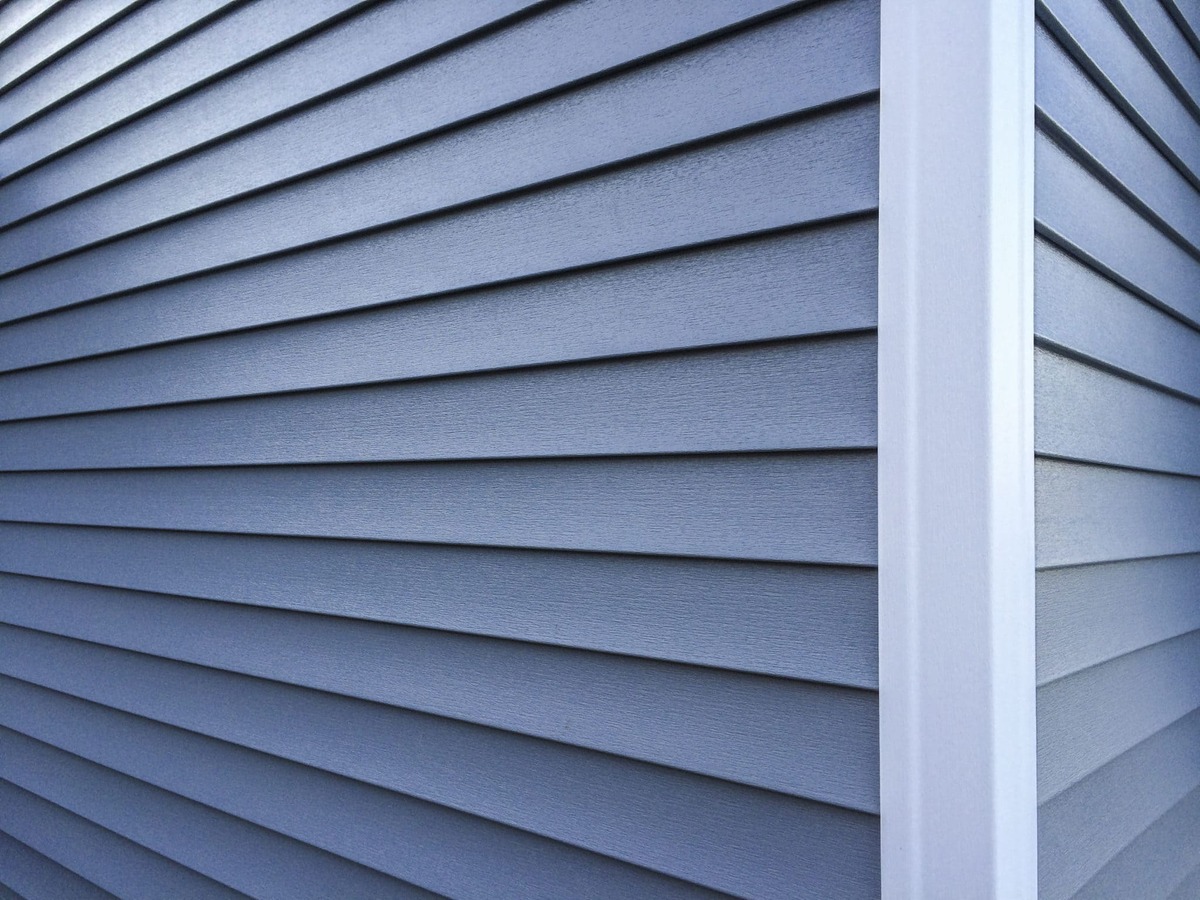
The primary purpose of J Channel is to create a clean and finished look for siding installations by providing a seamless transition between the siding panels and surrounding openings such as doors, windows, and corners.
One of the main functions of J Channel is to conceal the raw edges of the siding panels. When siding is installed, the cut edges can leave exposed and uneven edges. J Channel covers these edges, giving the siding installation a polished and professional appearance.
J Channel also serves as a channel for water runoff. When properly installed, it helps to direct water away from the siding and prevent moisture from seeping behind the siding panels, which can lead to rot, mold, and other water damage. By redirecting water away from the vulnerable areas, J Channel contributes to the longevity and structural integrity of your siding.
In addition to water management, J Channel also provides insulation and helps to improve energy efficiency. It acts as a barrier between the siding panels and the surrounding openings, reducing air infiltration and heat loss. This can result in lower energy costs and a more comfortable indoor environment.
Furthermore, J Channel acts as a protective shield for the edges of the siding. It prevents accidental damage during installation and everyday activities, such as lawn maintenance or harsh weather conditions. By shielding the exposed edges, J Channel helps to maintain the overall quality and longevity of the siding installation.
Lastly, J Channel plays a crucial aesthetic role. It creates a defined border around windows, doors, and corners, enhancing the visual appeal and adding a finishing touch to your home’s exterior. J Channel can be color-matched to the siding panels or used as a contrasting element to create visual interest and complement the architectural style of your home.
In summary, the purpose of J Channel goes beyond just aesthetics. It serves as a protective barrier, water management system, insulation, and visual enhancement to ensure a professional and long-lasting siding installation.
Installation of J Channel
Proper installation of J Channel is essential to ensure its functionality and aesthetic appeal. Here is a step-by-step guide on how to install J Channel for your siding:
- Prepare the surface: Ensure that the surface where the J Channel will be installed is clean, dry, and free from any debris. This will provide a smooth and secure attachment for the J Channel.
- Measure and cut: Measure the length needed for the J Channel and cut it to size using a saw or tin snips. Make sure to account for any corners or angles in the measurement and cut accordingly.
- Start with the corners: Begin by installing J Channel on the corners of the siding installation. Position the J Channel around the corner, ensuring it is plumb and level. Secure it in place using nails or screws, ensuring they are not over tightened to allow for expansion and contraction.
- Install around windows and doors: Next, install the J Channel around the windows and doors. Place the J Channel along the sides and top of the opening, leaving a small gap for expansion. Again, ensure it is level and plumb before securing it with nails or screws.
- Secure the bottom piece: Install the J Channel along the bottom of the siding, aligning it with the previously installed pieces. Make sure it is level and secure it in place with nails or screws.
- Overlap the J Channels: If needed, overlap the J Channel pieces at corners or joints to create a seamless and secure fit.
- Seal the J Channel: Apply a bead of caulk or sealant along the joints and edges of the J Channel to provide additional protection against water infiltration.
- Finish the siding installation: Once the J Channel is installed, continue with the siding installation, placing the siding panels into the J Channel and securing them according to the manufacturer’s instructions.
- Clean and inspect: After the installation, clean off any excess caulk or debris from the J Channel and inspect the entire installation for any loose or damaged sections. Make any necessary repairs or adjustments as needed.
It is important to note that the specific installation steps may vary depending on the type of siding and the manufacturer’s instructions. Always refer to the manufacturer’s guidelines for the recommended installation techniques and best practices.
Properly installed J Channel will not only enhance the appearance of your siding but also offer protection and functionality for years to come.
Types of J Channel Materials
J Channel is available in different materials, each offering unique characteristics and benefits. The choice of material depends on your specific needs, budget, and aesthetic preferences. Here are the most common types of J Channel materials:
- 1. Vinyl: Vinyl J Channel is one of the most popular choices due to its affordability, versatility, and ease of installation. It is made of PVC (polyvinyl chloride), a durable and low-maintenance material that can withstand various weather conditions. Vinyl J Channel is available in a wide range of colors to match or complement your siding, providing a seamless and cohesive look.
- 2. Aluminum: Aluminum J Channel offers added strength, rigidity, and resistance to impact. It is an ideal choice for high-traffic areas or regions with severe weather conditions. Aluminum J Channel is available in different finishes, including smooth and textured options, allowing you to achieve the desired aesthetic for your siding installation.
- 3. Steel: Steel J Channel provides excellent durability and strength. It is resistant to denting and warping, making it a suitable choice for areas prone to impact or heavy-duty applications. Steel J Channel is typically galvanized or coated to enhance its resistance to corrosion and ensure long-lasting performance.
- 4. Fiber Cement: Fiber cement J Channel is a popular choice for those looking for a more environmentally friendly and sustainable option. It is made of a mixture of cement, sand, and cellulose fibers, resulting in a durable and fire-resistant material. Fiber cement J Channel can be painted to match your siding color, offering versatility in terms of customization.
- 5. Wood: Although less common than other materials, wood J Channel provides a natural and traditional look. It is typically made from cedar or pine and can be stained or painted to complement your siding. Wood J Channel requires regular maintenance, including sealing and protecting against moisture and rot.
When choosing the J Channel material for your siding installation, consider factors such as durability, maintenance requirements, compatibility with your siding type, and budget. Consulting with a professional or your siding manufacturer can help you make an informed decision based on your specific needs and preferences.
Regardless of the material you choose, proper installation techniques and regular maintenance will ensure the longevity and performance of your J Channel.
When installing siding, use J channel to create a clean edge and provide a space for the siding to expand and contract with temperature changes. It also helps to divert water away from the structure.
Read more: What Is A J1772 Adapter
Benefits of Using J Channel for Siding
Using J Channel for siding installations offers a range of benefits that contribute to the functionality, durability, and aesthetic appeal of your home’s exterior. Here are some of the key benefits of using J Channel:
- 1. Clean and finished appearance: J Channel provides a clean and polished look to the edges of your siding. It covers the raw cut edges, giving your siding installation a professional and finished appearance.
- 2. Protection against moisture: Properly installed J Channel acts as a barrier, directing water away from the vulnerable edges of your siding. This helps to prevent moisture infiltration, which can lead to rot, mold, and structural issues over time.
- 3. Conceals imperfections: J Channel helps to hide any imperfections or slight gaps between siding panels or around openings such as windows or doors. It creates a seamless transition, enhancing the overall aesthetic of your home’s exterior.
- 4. Improves energy efficiency: By providing an extra layer of insulation around the edges of your siding, J Channel helps to reduce heat loss and air infiltration. This can contribute to increased energy efficiency and lower heating and cooling costs.
- 5. Easy installation: J Channel is relatively easy to install, especially when compared to other trim options. This makes it a preferred choice for homeowners and contractors alike, saving time and effort during the siding installation process.
- 6. Versatility and compatibility: J Channel is compatible with various siding types, including vinyl, fiber cement, and aluminum. It can be easily matched to the color and style of your siding, allowing for seamless integration and customization.
- 7. Protection against impact and damage: J Channel acts as a protective shield for the edges of your siding, preventing accidental damage from everyday activities or harsh weather conditions. It helps to maintain the overall quality and appearance of your siding installation.
- 8. Low maintenance: Once installed, J Channel requires minimal maintenance. Routine cleaning and inspection can help ensure its optimal performance and prolong its lifespan.
Overall, using J Channel for your siding installations not only enhances the visual appeal but also provides added protection, insulation, and longevity. It is a cost-effective and practical solution that ensures a professional finish and peace of mind for years to come.
Potential Issues with J Channel
While J Channel is a valuable component of siding installations, it is important to be aware of potential issues that may arise. Here are some common issues that homeowners or contractors may encounter when using J Channel:
- 1. Improper installation: One of the main issues with J Channel is improper installation. If not installed correctly, J Channel may not provide a secure fit or proper protection against moisture. It is crucial to follow manufacturer guidelines and use proper techniques to ensure a successful installation.
- 2. Water infiltration: If J Channel is not installed properly or if there are any gaps or cracks in the sealant, it may allow water to infiltrate behind the siding. This can result in moisture damage, mold growth, and structural issues if not addressed promptly.
- 3. Warping or buckling: Certain materials, particularly vinyl J Channel, may be prone to warping or buckling if exposed to extreme heat or sunlight over time. This can affect the appearance and functionality of the J Channel, requiring replacement or repair.
- 4. Inadequate insulation: While J Channel can provide some insulation, it may not offer the same level of thermal performance as additional insulation materials. This can result in heat loss or drafts around the edges of your siding.
- 5. Limited color options: Depending on the material and brand, J Channel may have limited color options compared to the range available for siding panels. This can make it challenging to achieve a precise color match, especially if using a non-standard siding color.
- 6. Compatibility issues: Certain types of siding, such as thicker or textured materials, may require specific J Channel profiles or installation techniques. It is important to ensure that the chosen J Channel is compatible with your specific siding type to ensure a proper fit and appearance.
- 7. Maintenance and cleaning: J Channel, like any exterior component, requires routine maintenance and cleaning to prevent the buildup of dirt, debris, or mold. Neglecting proper maintenance can lead to a compromised appearance and potential issues.
Being aware of these potential issues can help you take proactive measures to address them and ensure the long-term performance and durability of your J Channel and siding installation. Regular inspections and prompt repairs can help mitigate any problems that may arise and extend the lifespan of your siding system.
Maintenance and Care for J Channel
Maintaining and caring for your J Channel is essential to ensure its optimal performance and longevity. Here are some tips to help you keep your J Channel in great condition:
- Regular cleaning: Regularly clean your J Channel to remove dirt, debris, and other buildup. Use a mild detergent or soap mixed with water and a soft-bristle brush or sponge. Avoid using abrasive cleaners or brushes that may damage the surface of the J Channel.
- Inspect for damage: Periodically inspect your J Channel for any signs of damage or wear. Look for cracks, dents, warping, or loose sections. Address any issues promptly to prevent further damage or water infiltration.
- Sealant maintenance: Check the sealant around the J Channel for any cracks or gaps. Replace or repair any damaged sealant to ensure proper water resistance and prevent moisture from seeping behind the siding panels.
- Trim vegetation: Trim any vegetation, such as tree branches or bushes, that may come into contact with the J Channel. This will prevent scratching, damage, or interference with the proper functioning of the J Channel.
- Avoid pressure washing: While it is important to clean your J Channel, avoid using a pressure washer as it may force water behind the siding or cause damage to the J Channel. Stick to gentle cleaning methods mentioned earlier.
- Address issues promptly: If you notice any issues with your J Channel, such as loose sections or damaged areas, address them promptly. Tighten or replace loose J Channel and repair any damaged sections to maintain the integrity and visual appeal of the siding installation.
- Consider professional inspection: If you are unsure about the condition of your J Channel or if you notice significant damage, it is best to consult a professional. They can assess the situation, provide expert advice, and make any necessary repairs or replacements.
- Follow manufacturer guidelines: Always refer to the manufacturer’s instructions or guidelines for specific care and maintenance recommendations for your J Channel material. Different materials may have specific requirements, and adhering to these guidelines will help ensure optimal performance.
By following these maintenance tips, you can help prolong the lifespan of your J Channel and ensure its functionality and appearance. Regular care and attention will contribute to the overall longevity and performance of your siding installation.
Conclusion
J Channel is a crucial component of siding installation, providing both functional and aesthetic benefits. Its ability to create a clean and finished look, protect against moisture, and improve energy efficiency makes it an essential part of any siding project. By understanding the definition, purpose, installation techniques, types of materials, benefits, and potential issues with J Channel, you are equipped to make informed decisions and achieve professional results for your home’s exterior.
When installing J Channel, proper techniques and attention to detail are crucial. Ensure that it is securely fastened, properly sealed, and compatible with your specific siding type. Regular maintenance and care, such as cleaning and inspecting for damage, will help extend the lifespan of your J Channel and preserve its functionality and appearance over time.
Ultimately, the use of J Channel not only enhances the overall look and protection of your siding, but also contributes to the longevity and energy efficiency of your home. Its functional benefits, combined with its aesthetic appeal, make it a worthwhile investment for any homeowner or contractor.
When considering a siding project, remember the importance of J Channel and its significant role in achieving a professional and finished look. Whether you are seeking a crisp transition around windows and doors or reliable waterproofing, J Channel is an invaluable tool that will contribute to the long-term beauty and durability of your home’s exterior.
Curious about the latest trends in home exteriors? Dive into our featured piece on vinyl siding, where we spotlight eight standout options set to dominate in 2024. Each selection promises not only to refresh your home’s appearance but also to offer durability and ease of maintenance. Whether you're contemplating a renovation or simply curious about new materials, this article will provide all the insights needed for making an informed decision.
Frequently Asked Questions about What Is J Channel For Siding
Was this page helpful?
At Storables.com, we guarantee accurate and reliable information. Our content, validated by Expert Board Contributors, is crafted following stringent Editorial Policies. We're committed to providing you with well-researched, expert-backed insights for all your informational needs.


0 thoughts on “What Is J Channel For Siding”