Articles
What Goes Under Vinyl Siding
Modified: May 6, 2024
Looking for informative articles on what goes under vinyl siding? Discover essential tips and advice for proper installation and protecting your home's exterior.
(Many of the links in this article redirect to a specific reviewed product. Your purchase of these products through affiliate links helps to generate commission for Storables.com, at no extra cost. Learn more)
Introduction
Vinyl siding is a popular choice for homeowners due to its durability and low maintenance requirements. However, to ensure the longevity and effectiveness of vinyl siding, proper underlayment is crucial. Underlayment serves as a protective layer between the siding and the exterior walls of a house. It provides insulation, moisture barrier, and added structural support.
The purpose of this article is to discuss the importance of underlayment for vinyl siding and explore the different types available. We will also delve into the installation process and highlight key considerations to keep in mind. By understanding these factors, homeowners can make informed decisions about their underlayment choices and maximize the benefits of their vinyl siding.
Proper underlayment not only enhances the performance of vinyl siding but also helps in achieving a more energy-efficient home. It reduces the transfer of heat and cold, keeping the interior temperature stable and comfortable. Additionally, underlayment provides a protective barrier against moisture, preventing water damage and mold growth.
Before we explore the different types of underlayment for vinyl siding, it’s essential to understand their specific functions and benefits. Each type has its own unique characteristics and is designed to address specific concerns related to insulation, moisture control, and structural support. By selecting the appropriate underlayment, homeowners can ensure the long-lasting beauty and functionality of their vinyl siding.
Key Takeaways:
- Proper underlayment for vinyl siding enhances energy efficiency, moisture protection, and durability. It reduces heat transfer, prevents water damage, and provides structural support, ensuring a long-lasting and efficient siding system.
- Selecting the right underlayment based on climate, local codes, and budget is crucial. Professional guidance and proper installation techniques are essential for maximizing the benefits of vinyl siding underlayment.
Read more: How To Find Studs Under Vinyl Siding
Purpose of Underlayment
The primary purpose of underlayment for vinyl siding is to provide a protective barrier between the siding and the exterior walls of a house. It plays a crucial role in enhancing the performance, durability, and energy efficiency of the siding system. Let’s take a closer look at the key purposes of underlayment:
- Insulation: Underlayment helps to insulate the exterior walls, reducing heat transfer in the summer and heat loss in the winter. This not only improves energy efficiency but also helps maintain a comfortable indoor temperature.
- Moisture Protection: Underlayment acts as a moisture barrier, preventing water infiltration and protecting the underlying structure of the house. It helps to redirect water away from the walls, reducing the risk of mold, rot, and other moisture-related issues.
- Structural Support: Underlayment provides added support to the vinyl siding, helping to strengthen and stabilize the entire siding system. It helps to distribute the weight of the siding evenly and reduces the risk of sagging or warping.
- Noise Reduction: Underlayment can also help to reduce outside noise transmission, providing a quieter and more peaceful interior environment.
- Air Infiltration: Underlayment helps to prevent air infiltration through the walls, reducing drafts and improving overall energy efficiency. This can help homeowners save on heating and cooling costs.
By understanding the purpose of underlayment, homeowners can make informed decisions regarding the selection and installation of the appropriate underlayment materials. It is important to choose underlayment that is compatible with vinyl siding and addresses specific concerns related to climate, moisture, and energy efficiency.
Types of Underlayment for Vinyl Siding
When it comes to underlayment for vinyl siding, there are several types available, each with its own unique characteristics and benefits. The choice of underlayment largely depends on factors such as climate, budget, and personal preferences. Here are the most commonly used types of underlayment for vinyl siding:
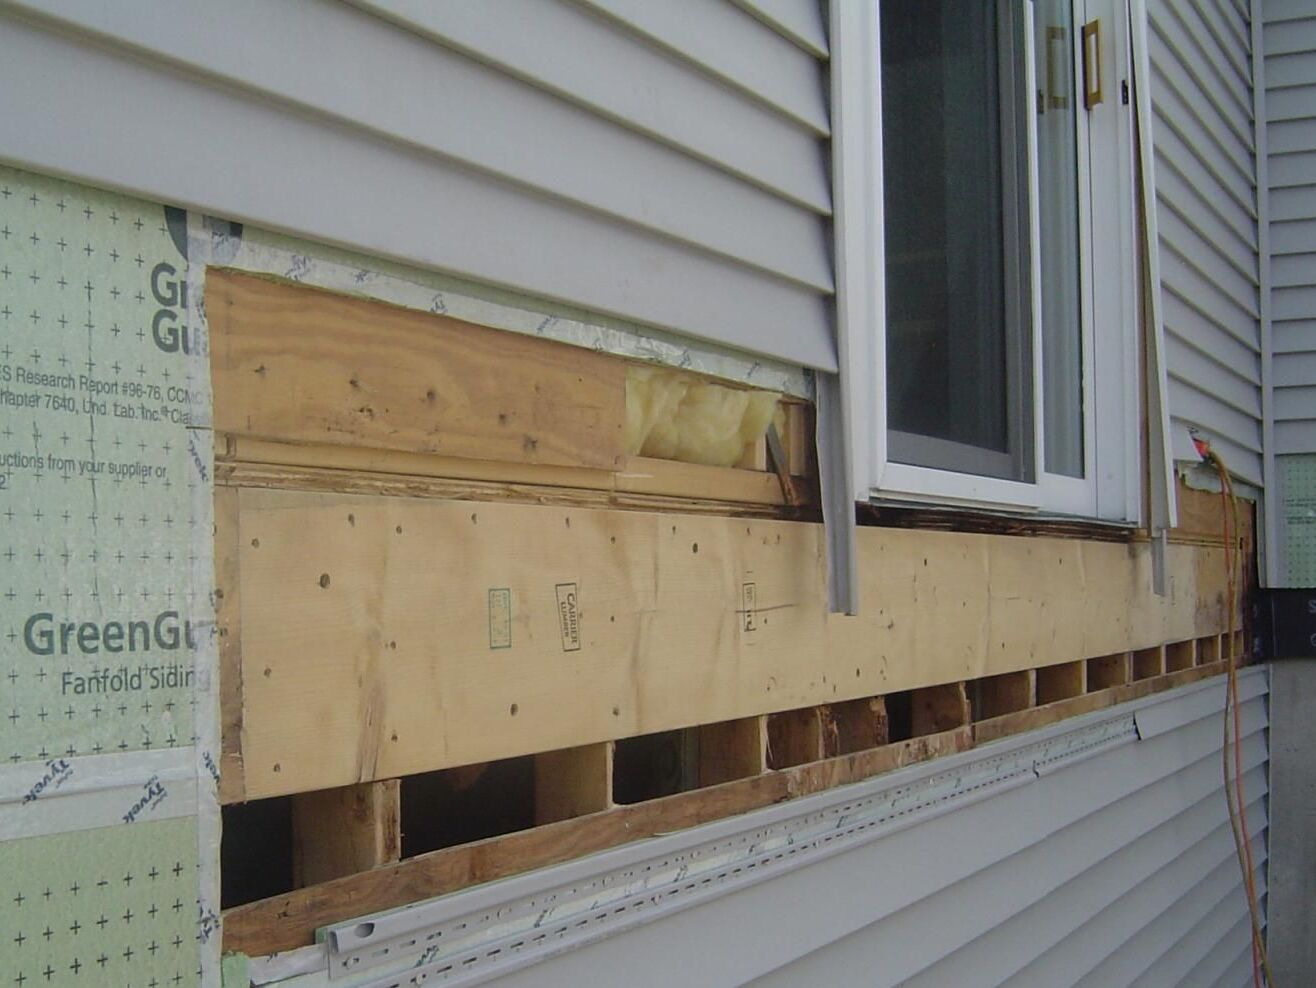
- House Wrap: House wrap is a thin, breathable material that is commonly used as underlayment for vinyl siding. It is made of woven or non-woven synthetic materials, such as polyethylene or polypropylene. House wrap serves as a moisture barrier, preventing water infiltration while allowing water vapor to escape. It also helps to improve energy efficiency by reducing air infiltration and heat transfer.
- Foam Insulation Panels: Foam insulation panels are typically made of expanded polystyrene (EPS) or extruded polystyrene (XPS) foam. These panels provide excellent insulation properties and can improve the energy efficiency of a home. Foam insulation panels are lightweight, easy to install, and offer additional structural support to the vinyl siding. They can also help to reduce noise transmission and act as a vapor barrier.
- Insulated Sheathing: Insulated sheathing is a type of underlayment that combines the benefits of insulation and structural support. It is typically made of rigid foam insulation, sandwiched between two layers of oriented strand board (OSB) or plywood. Insulated sheathing provides excellent insulation properties, helps to reduce thermal bridging, and enhances the overall energy efficiency of a home.
- Vapor Barrier: A vapor barrier is a material that prevents the movement of water vapor through the walls. It is typically made of polyethylene or foil-faced insulation. While a vapor barrier is not always necessary, it can be beneficial in areas with high humidity or where moisture control is a major concern.
It is important to choose the appropriate type of underlayment based on the specific needs and requirements of your home. Factors such as climate, local building codes, and budget should be considered when selecting the underlayment for vinyl siding. Consulting with a professional or contractor can help you make an informed decision and ensure the best results for your home.
House Wrap
House wrap is a commonly used type of underlayment for vinyl siding. It is a thin, breathable material that serves as a moisture barrier and helps improve the energy efficiency of a home. House wrap is typically made of woven or non-woven synthetic materials such as polyethylene or polypropylene.
The primary function of house wrap is to prevent water infiltration while still allowing water vapor to escape. This is important because it helps protect the walls from moisture damage while maintaining proper airflow. By keeping the walls dry, house wrap helps prevent issues such as mold, rot, and decay.
In addition to moisture control, house wrap also offers other benefits. It helps reduce air infiltration, which can lead to energy loss and drafts. By creating a barrier against outside air, house wrap helps improve the overall energy efficiency of a home, reducing heating and cooling costs.
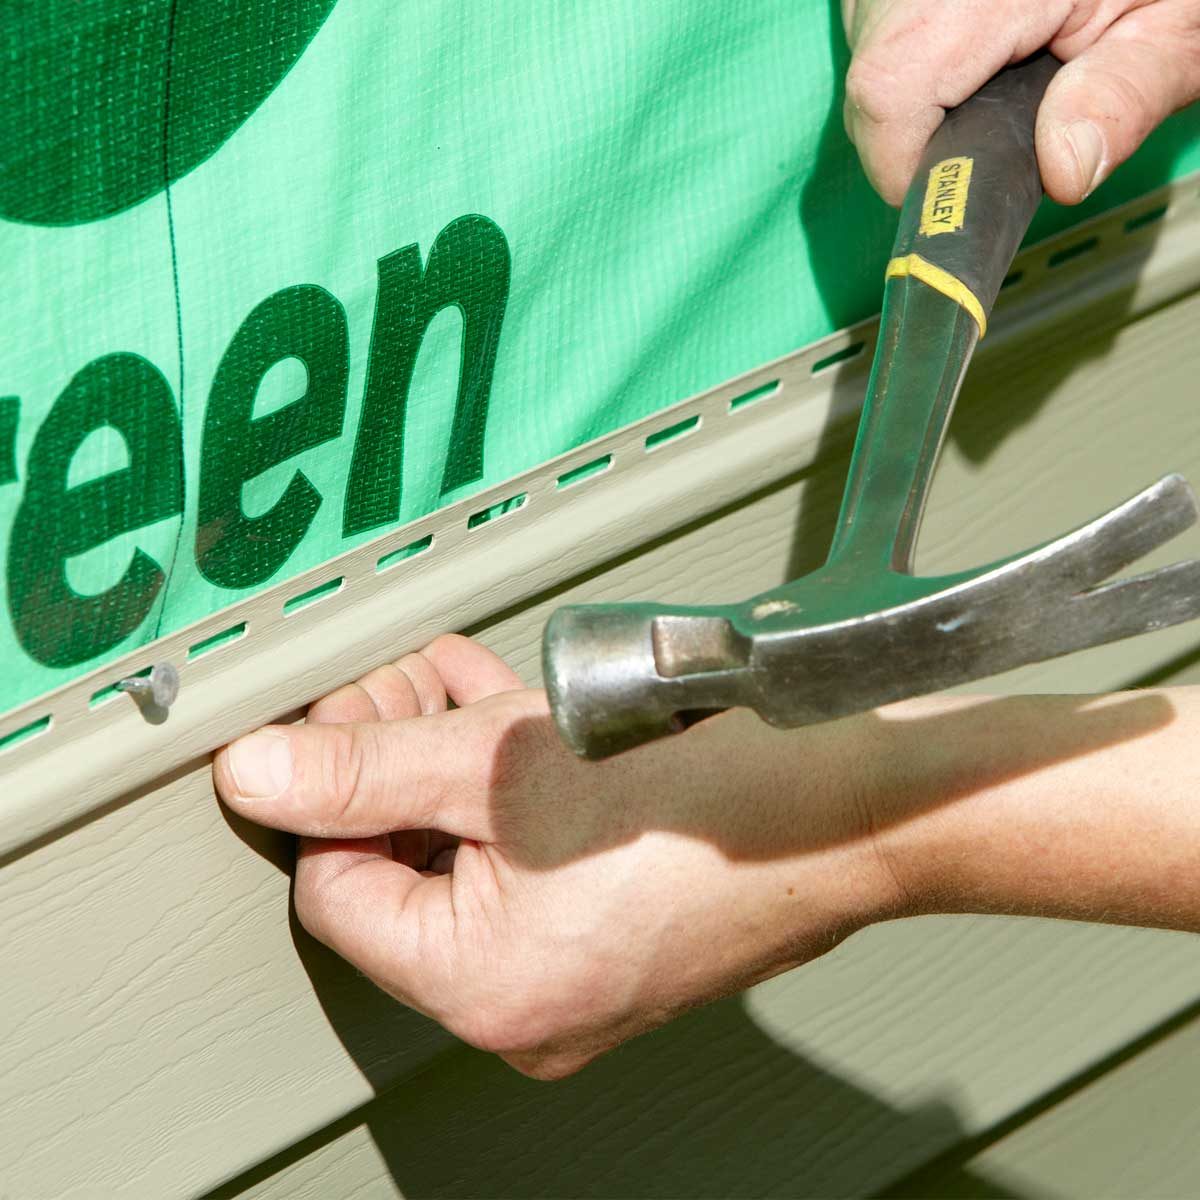
Installing house wrap is crucial for ensuring the long-term durability and performance of vinyl siding. It is typically applied directly to the sheathing or exterior walls before the vinyl siding is installed. The installation process involves overlapping the seams and securing the house wrap using specialized tape or fasteners.
When choosing house wrap, it is important to consider the specific climate and weather conditions of your area. Some house wraps are specifically designed for better resistance to wind and moisture, making them suitable for regions with heavy rainfall or high winds.
Overall, house wrap is a cost-effective and practical choice for underlayment when installing vinyl siding. It provides an essential moisture barrier, improves energy efficiency, and helps protect the structural integrity of the home. By choosing a high-quality house wrap and following proper installation techniques, homeowners can ensure the longevity and performance of their vinyl siding.
Foam Insulation Panels
Foam insulation panels are another popular type of underlayment for vinyl siding. These panels are typically made of expanded polystyrene (EPS) or extruded polystyrene (XPS) foam and provide excellent insulation properties.
The primary function of foam insulation panels is to improve the energy efficiency of a home. By adding a layer of insulation between the siding and the exterior walls, these panels help reduce heat transfer in the summer and heat loss in the winter. This results in a more comfortable living environment and can lead to energy savings by reducing the need for excessive heating and cooling.
In addition to insulation, foam insulation panels also provide added structural support to the vinyl siding. The panels act as a rigid backing, helping to distribute the weight of the siding evenly and reducing the risk of sagging or warping over time.
Foam insulation panels are lightweight and easy to install. They can be cut to size using a utility knife and secured to the exterior walls with adhesive, nails, or screws. The panels are designed to fit snugly and provide a seamless surface for the vinyl siding installation.
Another advantage of foam insulation panels is their ability to reduce noise transmission. The foam material absorbs and dampens sound waves, resulting in a quieter interior environment. This can be especially beneficial for homes located in noisy areas or near busy roads.
When choosing foam insulation panels, it is important to consider the R-value, which measures the thermal resistance of the material. A higher R-value indicates better insulation properties. Climate should also be taken into account when selecting foam insulation panels, as different regions may require different levels of insulation.
Overall, foam insulation panels are a versatile and effective underlayment option for vinyl siding. They provide insulation, structural support, and noise reduction benefits. By incorporating foam insulation panels into the siding installation process, homeowners can enhance the energy efficiency and comfort of their homes while enjoying the long-lasting beauty of vinyl siding.
Read more: What Goes Under A Mattress
Insulated Sheathing
Insulated sheathing is a type of underlayment for vinyl siding that offers a combination of insulation and structural support. It consists of rigid foam insulation sandwiched between two layers of oriented strand board (OSB) or plywood.
The primary purpose of insulated sheathing is to provide insulation to the exterior walls of a home. The rigid foam insulation helps to reduce thermal bridging, which is the transfer of heat through the framing members of the walls. This results in improved energy efficiency and helps to maintain a more stable indoor temperature.
In addition to insulation, insulated sheathing also offers structural support to the vinyl siding. The rigid foam material adds strength to the walls and helps to distribute the weight of the siding evenly. This can help prevent sagging or warping over time, ensuring the longevity and durability of the siding.
Installing insulated sheathing involves securing the panels to the exterior walls before the vinyl siding is installed. The panels are typically attached using nails or screws, and the seams are sealed with a compatible tape or sealant to create a continuous barrier.
One of the advantages of insulated sheathing is its versatility. It can be used in both new construction and remodeling projects. Insulated sheathing is available in various thicknesses, allowing homeowners to choose the level of insulation that best suits their specific needs and climate conditions.
It is important to note that the selection of insulated sheathing should comply with local building codes and regulations. Certain areas may have specific requirements for insulation values and fire ratings. Consulting with a professional or contractor can help ensure compliance with these standards.
Overall, insulated sheathing is a comprehensive underlayment solution for vinyl siding. It provides insulation, structural support, and helps improve energy efficiency. By incorporating insulated sheathing into the siding installation process, homeowners can enjoy the benefits of a well-insulated and durable exterior wall system.
Vapor Barrier
A vapor barrier is a type of underlayment for vinyl siding that helps control moisture levels and protect the walls from water damage. It is typically made of polyethylene or foil-faced insulation.
The primary function of a vapor barrier is to prevent the movement of water vapor through the walls. This is particularly important in areas with high humidity or where moisture control is a major concern. By acting as a barrier, it helps to reduce condensation and moisture buildup within the walls, preventing issues such as mold, rot, and decay.
Vapor barriers are often recommended in climates where the exterior temperature is significantly different from the interior temperature, creating a greater potential for condensation. Additionally, they are commonly used in areas with high moisture levels, such as near bodies of water or in regions prone to heavy rainfall.
When installing a vapor barrier for vinyl siding, it is important to ensure proper placement. The vapor barrier is typically installed on the warm side of the wall, facing towards the interior of the home. This ensures that any moisture that may penetrate the siding is properly directed away from the walls, reducing the risk of damage.
It is worth noting that not all situations require a vapor barrier. In some cases, the inclusion of a vapor barrier can actually trap moisture within the walls, leading to potential issues. Consulting with a professional or contractor can help determine whether a vapor barrier is necessary based on the specific climate and conditions of your home.
When selecting a vapor barrier, you should consider the thickness and effectiveness of the material. Thicker barriers generally provide better moisture control. Additionally, vapor barriers with a high perm rating allow for some moisture transmission, which can be beneficial in certain circumstances to prevent excessive moisture buildup.
Overall, a vapor barrier is an important underlayment option to consider for vinyl siding installation in areas with high humidity or when moisture control is a priority. Proper placement and selection of a suitable vapor barrier can help maintain a healthy and durable wall system, protecting your home from moisture-related issues.
Installation Process
The installation process for underlayment for vinyl siding is critical to ensure its effectiveness in enhancing the performance and durability of the siding system. The following steps outline the general installation process:
- Preparing the Exterior Walls: Before installing the underlayment, make sure the exterior walls are clean, dry, and free from any debris. Repair any damaged areas and ensure the walls are smooth and even.
- Installing House Wrap: If using house wrap as the underlayment, start by unrolling the house wrap and cutting it to the appropriate length. Secure the house wrap to the exterior walls using staples or other recommended fasteners, making sure to overlap the seams by several inches. Trim any excess material.
- Applying Foam Insulation Panels: If using foam insulation panels, measure and cut the panels to fit the dimensions of the walls. Attach the panels to the exterior walls using adhesive or fasteners, following the manufacturer’s instructions. Ensure proper alignment and a secure fit for each panel.
- Installing Insulated Sheathing: For insulated sheathing, cut the panels to size and attach them to the exterior walls using nails or screws. Make sure to line up the edges of each panel and secure them tightly to provide a solid backing for the vinyl siding.
- Attaching Vapor Barrier: If using a vapor barrier, ensure that it is placed on the warm side of the wall, facing towards the interior of the home. Attach the vapor barrier using adhesive or recommended fasteners, making sure to overlap the seams properly.
During the installation process, it is important to pay attention to the details and follow the manufacturer’s guidelines for each type of underlayment. Take care to properly secure the underlayment, ensuring a tight and uniform application across the entire surface of the walls.
As with any construction project, it is advisable to consult with a professional or contractor who is knowledgeable about the specific requirements of your region. They can provide guidance on the correct installation techniques and ensure compliance with local building codes.
By following the proper installation process, homeowners can ensure that the underlayment for vinyl siding is applied correctly, providing the necessary insulation, moisture control, and support for the siding. This will help maximize the benefits of vinyl siding and contribute to a long-lasting and attractive exterior for your home.
Preparing the Exterior Walls
The first step in the installation process of underlayment for vinyl siding is to properly prepare the exterior walls. This crucial step ensures a clean, smooth, and stable surface for the underlayment and eventual siding installation. Follow these guidelines to prepare the exterior walls:
- Clean the walls: Remove any dirt, debris, or loose materials from the walls. Use a hose, pressure washer, or a scrub brush with a mild detergent solution to thoroughly clean the surface. Allow the walls to dry completely before proceeding.
- Inspect for damage: Carefully inspect the walls for any signs of damage, such as cracks, rot, or insect infestation. Repair these issues before proceeding with the underlayment installation. Fill cracks with appropriate filler, replace damaged wood, and treat any infested areas as necessary.
- Smooth the walls: Ensure the walls are smooth and even. Sand down any rough areas or protrusions. Pay special attention to seams, corners, and edges to ensure they are flush and free from any obstacles.
- Level the walls: Use a level or straightedge to check the wall’s surface for levelness. If there are any significant deviations, use shims or other appropriate methods to level the surface. This step is crucial to ensure a proper and even installation of the underlayment.
- Check for insulation: If your home requires insulation, make sure it is properly installed before proceeding with the underlayment. Insulation helps improve energy efficiency and regulates temperature within the home. Consult with a professional to determine the right type and thickness of insulation for your specific climate and building requirements.
Properly preparing the exterior walls sets the foundation for a successful underlayment and vinyl siding installation. Taking the time to clean, repair, and level the walls ensures that the underlayment adheres properly and creates a stable base for the siding. It also helps in identifying and addressing any potential issues that could affect the durability and performance of the siding system.
Remember to always adhere to local building codes and regulations and consult with professionals if you are unsure about any aspect of the preparation process. By following these steps, you can ensure a smooth and effective installation of the underlayment for vinyl siding, leading to a beautiful and long-lasting exterior for your home.
Read more: What Is Vinyl Siding Made Of
Installing House Wrap
Once the exterior walls have been properly prepared, the next step in the installation process of underlayment for vinyl siding is to install the house wrap. House wrap is a thin, breathable material that serves as a moisture barrier and helps improve the energy efficiency of a home. Follow these steps to install the house wrap:
- Measure and cut: Measure the dimensions of the walls and cut the house wrap to fit. Leave a few extra inches of overlap at the top and sides for better coverage and to ensure a watertight seal.
- Position and secure: Start by positioning the house wrap at the bottom of the wall, making sure it is aligned with the bottom plate. Secure the bottom edge with staples or other recommended fasteners, spacing them approximately 6 to 8 inches apart.
- Overlap and seal: For subsequent courses of house wrap, overlap them by several inches. This overlap allows water to properly shed down the wall and helps prevent water infiltration. Use house wrap tape or compatible house wrap sealant to seal the seams and edges, ensuring they are watertight.
- Window and door openings: For window and door openings, carefully cut and extend the house wrap around the openings. Use flashing tape or a compatible sealant to seal the edges and ensure proper waterproofing. Pay attention to corners, ensuring they are properly sealed and protected.
- Trim excess: Once the house wrap is securely installed and sealed, trim any excess material. Use a utility knife or scissors to trim along the edges, ensuring a clean and neat appearance.
House wrap acts as a moisture barrier, preventing water infiltration while allowing water vapor to escape. It also improves the energy efficiency of a home by reducing air infiltration and heat transfer. Properly installing the house wrap is crucial to ensure its effectiveness in protecting the walls and enhancing the performance of the vinyl siding.
Always refer to the manufacturer’s guidelines and local building codes when installing the house wrap. Following the proper installation techniques and ensuring a watertight seal will help create a durable and weather-resistant underlayment for the vinyl siding.
Remember to consult with professionals or contractors if you have any concerns or questions about the installation process. By installing the house wrap correctly, you can provide an additional layer of protection and energy efficiency to your home’s exterior walls.
Applying Foam Insulation Panels
When it comes to underlayment for vinyl siding, foam insulation panels are a popular choice due to their excellent insulation properties. These panels provide added energy efficiency and structural support. Follow these steps to properly apply foam insulation panels:
- Measure and cut: Measure the dimensions of the walls and cut the foam insulation panels to fit. Use a utility knife or appropriate cutting tool to ensure clean and accurate cuts. Take into account any openings for windows, doors, or other obstacles.
- Prepare the panels: Before installing the panels, make sure they are dry and free from any dirt or debris. Inspect them for any damage and replace any faulty panels. Apply adhesive or foam board adhesive tape to the back of each panel, following the manufacturer’s instructions.
- Position and attach: Starting from the bottom, position the first foam insulation panel against the exterior wall. Press it firmly against the wall, ensuring it is level and plumb. Use screws or nails to secure the panel to the wall, placing them at regular intervals according to the manufacturer’s recommendations.
- Overlap and seal: For subsequent panels, overlap the edges by a few inches to create a tight fit and ensure proper insulation. Use adhesive or foam board adhesive tape to seal the joints and edges, creating a continuous barrier. Repeat this process for each panel until the entire wall is covered.
- Window and door openings: When working around window and door openings, carefully cut the foam insulation panels to fit. Ensure a snug fit around the openings and use foam board adhesive tape or caulk to seal any gaps or seams.
Applying foam insulation panels provides excellent insulation and added structural support to the vinyl siding installation. These panels help reduce heat transfer, improve energy efficiency, and enhance the overall comfort of the home.
Always follow the manufacturer’s instructions and local building codes when applying foam insulation panels. Proper installation techniques, including securing the panels tightly and sealing the joints, are essential to ensure optimal performance and effectiveness.
Consult with professionals or contractors if you have any uncertainties or questions regarding the application process. By correctly applying foam insulation panels, you can enhance the insulation properties of your home and contribute to a more energy-efficient living environment.
Make sure to install a moisture barrier, such as house wrap or felt paper, underneath vinyl siding to protect against water infiltration and to improve energy efficiency.
Installing Insulated Sheathing
Insulated sheathing is a popular underlayment option for vinyl siding as it provides both insulation and structural support to the exterior walls. Follow these steps to properly install insulated sheathing:
- Measure and cut: Measure the dimensions of the walls and cut the insulated sheathing panels to fit. Use a circular saw or appropriate cutting tool to ensure clean and accurate cuts. Take into account any openings for windows, doors, or other obstacles.
- Position the first panel: Start at a corner of the wall and position the first insulated sheathing panel against the exterior wall. Ensure that it is plumb and level. Leave a small gap at the bottom to allow for expansion and contraction, as per manufacturer guidelines.
- Secure the first panel: Use nails or screws to secure the first panel to the wall. Space the fasteners according to the manufacturer’s recommendations. Avoid overdriving the fasteners to prevent damaging the panel or compromising its integrity.
- Continue with the remaining panels: Place the next insulated sheathing panel next to the first one, making sure to leave a small gap between the panels for expansion and contraction. Secure it to the wall using nails or screws. Repeat this process for the remaining panels until the entire wall is covered.
- Seal the joints: Use a compatible foam insulation sealant or tape to seal any gaps or joints between the insulated sheathing panels. This helps create an airtight and watertight barrier, enhancing the insulation and moisture resistance properties of the underlayment.
Installing insulated sheathing provides significant benefits to the vinyl siding installation. It improves insulation by reducing thermal bridging and enhances the structural support of the siding system.
Always follow the manufacturer’s instructions and local building codes when installing insulated sheathing. Properly securing the sheathing panels and sealing the joints are essential to ensure optimal performance and durability.
Consulting professionals or contractors can help you determine the most suitable type of insulated sheathing for your specific needs and provide guidance throughout the installation process.
By correctly installing insulated sheathing, you can enhance the energy efficiency and structural integrity of your home, contributing to a comfortable and resilient exterior wall system.
Attaching Vapor Barrier
Attaching a vapor barrier is an important step in the installation process of underlayment for vinyl siding, especially in areas with high humidity or moisture-prone climates. Follow these steps to properly attach a vapor barrier to the exterior walls:
- Prepare the walls: Ensure that the exterior walls are clean, dry, and free from any debris. Repair any damaged areas or cracks in the walls, and make sure they are smooth and even.
- Measure and cut the vapor barrier: Measure the dimensions of the walls and cut the vapor barrier to the appropriate size. Allow for a few extra inches of overlap to ensure complete coverage.
- Position the vapor barrier: Start at the bottom of the wall and align the edge of the vapor barrier with the edge of the wall. Staple or fasten it in place, securing the bottom edge with adequate spacing, typically around 6 to 8 inches apart. Keep the material taut as you proceed.
- Overlap the seams: As you continue up the wall, overlap the seams of the vapor barrier by several inches. This overlap helps create a continuous barrier and prevents moisture from infiltrating the walls. Secure the seams with vapor barrier tape or a compatible adhesive.
- Window and door openings: When working around window and door openings, carefully cut the vapor barrier to fit. Ensure a tight fit around the openings and use vapor barrier tape or caulk to seal any gaps or seams.
- Trim excess material: Once the vapor barrier is securely attached, trim any excess material using a utility knife or scissors. Neatly cut along the edges and corners for a clean and professional finish.
A vapor barrier plays a crucial role in moisture control, preventing the movement of water vapor through the walls. Properly attaching a vapor barrier helps protect the walls from potential moisture damage and maintains a healthy environment within the home.
Always follow the manufacturer’s instructions and local building codes when attaching a vapor barrier. Proper installation techniques, including overlap and airtight sealing of seams, are essential to ensure its effectiveness in creating a moisture-resistant barrier.
Consult professionals or contractors if you have any questions or concerns about the installation process. By correctly attaching a vapor barrier, you can enhance the moisture protection and longevity of your vinyl siding installation.
Read more: What To Clean Vinyl Siding With
Important Considerations
When it comes to selecting and installing underlayment for vinyl siding, there are several important considerations to keep in mind. These factors can impact the performance, durability, and energy efficiency of the siding system. Here are some key considerations to take into account:
- Climate and Weather Conditions: The climate and weather conditions in your area play a significant role in determining the type of underlayment you need. Consider factors such as temperature fluctuations, humidity levels, and the likelihood of extreme weather events. Some underlayment options may offer better resistance to high winds, heavy rainfall, or extreme temperatures.
- Local Building Codes: Always check and adhere to local building codes and regulations. These codes may have specific requirements regarding insulation, moisture barriers, and fire ratings. Make sure the underlayment you choose meets or exceeds these requirements to ensure compliance with local building standards.
- Cost and Budgeting Factors: Determine your budget and consider the cost of different underlayment options. Remember that investing in high-quality underlayment can contribute to the long-term performance and energy efficiency of your home. Consider the lifespan and durability of the underlayment materials to make an informed decision that aligns with your budget.
- Compatibility with Vinyl Siding: Ensure that the underlayment you choose is compatible with vinyl siding. Different types of underlayment have specific compatibility requirements, and using the correct underlayment will ensure a secure and lasting bond with the vinyl siding. Refer to the manufacturer’s recommendations and consult with professionals if you are unsure.
- Professional Consultation: For complex installations or if you are unsure about any aspect of the underlayment process, it is advisable to consult with professionals or contractors. They can assess your specific needs, offer guidance on the best underlayment options, and provide expert installation services to ensure proper performance and adherence to building codes.
By carefully considering these factors, you can make informed decisions about the underlayment for your vinyl siding. Each consideration is vital to achieving the desired performance, moisture protection, insulation, and durability of your siding system.
Take into account your specific climate, local building codes, budget, and the expertise of professionals to ensure that you select the appropriate underlayment and follow the correct installation procedures. By doing so, you can maximize the benefits of your vinyl siding and enjoy a beautiful, energy-efficient, and long-lasting exterior for your home.
Climate and Weather Conditions
When selecting underlayment for vinyl siding, it is crucial to consider the climate and weather conditions of your area. The climate and prevailing weather patterns can have a significant impact on the performance and durability of the siding system. Here are some key factors to consider related to climate and weather conditions:
- Temperature Extremes: If you live in an area with extreme temperature variations, it is important to choose underlayment that can effectively manage these fluctuations. Some underlayment materials are designed to provide better insulation and thermal resistance, helping to regulate the temperature inside your home and prevent energy loss.
- Precipitation Levels: Take into account the amount of rainfall or snowfall your area receives. If you reside in a region with high precipitation levels, it is essential to select underlayment that offers excellent moisture resistance properties. This helps protect the underlying structure of your home from potential water damage, mold, and rot.
- Wind Exposure: Consider the wind patterns in your area, especially if you are prone to high winds or frequent storms. Underlayment that provides wind resistance and can withstand strong gusts can help ensure that the vinyl siding remains securely in place, reducing the risk of damage and maintaining the overall integrity of the siding system.
- Sun Exposure: Evaluate the amount of sun exposure your home receives throughout the year. Prolonged exposure to UV rays can cause fading or damage to the vinyl siding. Some underlayment options include UV protection features that can help mitigate these effects, preserving the color and appearance of your siding.
- Humidity Levels: High humidity levels can lead to moisture-related issues such as mold and mildew growth. In areas with high humidity, it is crucial to choose underlayment that offers reliable vapor barrier properties, preventing excess moisture from penetrating the walls and causing damage to the siding or underlying structure of the home.
By considering the unique climate and weather conditions of your area, you can select underlayment that is specifically designed to withstand and protect against the challenges posed by your environment. Consulting with local professionals or contractors familiar with the regional climate can provide valuable insights and help you make informed decisions.
Keep in mind that different underlayment materials may have varying levels of performance in different climates. Choosing the right underlayment that caters to the specific climate and weather conditions will contribute to the longevity, durability, and overall effectiveness of your vinyl siding.
Local Building Codes
When selecting underlayment for vinyl siding, it is essential to consider and adhere to local building codes and regulations. Local building codes outline the specific requirements and guidelines for construction projects within a particular area. Here are some key reasons why local building codes should be considered:
- Safety and Compliance: Building codes are put in place to ensure the safety and structural integrity of buildings. They provide minimum standards that must be met to protect occupants and prevent potential hazards. Following building codes ensures that the underlayment for vinyl siding meets these safety requirements and successfully passes inspection.
- Moisture Management: Building codes often include specifications for moisture management in construction projects. This includes requirements for moisture barriers and vapor barriers, which play a critical role in preventing water infiltration and maintaining the integrity of the siding system. Adhering to these codes helps protect against moisture-related issues such as mold and rot.
- Fire Resistance: Building codes also address fire safety measures, including requirements for fire-rated materials and fire-resistant construction. Certain underlayment materials may be required to have specific fire ratings to comply with local codes. This helps to enhance the overall fire resistance of the structure, providing an additional layer of protection.
- Insulation Requirements: Building codes often prescribe minimum insulation requirements for exterior walls. These requirements aim to improve energy efficiency and reduce heat transfer. Underlayment materials that offer better insulation properties can help meet these requirements and contribute to a more energy-efficient home.
- Durability and Longevity: Building codes may provide guidelines for the incorporation of durable materials in construction projects. By adhering to these codes, you can ensure that the underlayment selected for vinyl siding is built to withstand the environmental conditions of your area, enhancing the longevity and durability of the siding system.
It is important to consult local building authorities or professionals with knowledge of local codes when selecting underlayment for vinyl siding. They can provide guidance on the specific requirements and ensure that your underlayment choices meet or exceed these codes.
Failing to comply with local building codes can result in serious consequences such as fines, forced correction or removal of non-compliant materials, or even legal issues. Prioritizing compliance with local building codes will not only ensure a safe and structurally sound vinyl siding installation but also provide peace of mind for you as a homeowner.
Cost and Budgeting Factors
When selecting underlayment for vinyl siding, it is essential to consider cost and budgeting factors. Underlayment materials vary in price, and the overall cost will depend on factors such as the size of your project, the type of underlayment chosen, and any additional installation requirements. Here are some key considerations related to cost and budgeting:
- Material Costs: Different underlayment materials have varying costs. Research and compare the prices of different underlayment options to understand the range of available options within your budget. Consider the advantages and disadvantages of each material in relation to cost.
- Long-Term Savings: While some underlayment options may have a higher upfront cost, they could offer long-term savings in terms of energy efficiency and reduced maintenance costs. Consider the potential energy savings that can be achieved with higher-quality underlayment, as this can contribute to lowering utility bills over time.
- Durability and Lifespan: Consider the durability and expected lifespan of the underlayment material before making a decision based solely on cost. Investing in a higher-quality underlayment that may have a slightly higher upfront cost can be a wise choice if it extends the lifespan of your vinyl siding system and provides long-term value.
- Installation Costs: Keep in mind that the cost of underlayment includes not only the material itself but also the cost of installation. Depending on the complexity of the project and the underlayment material chosen, professional installation may be required. Estimate the installation costs in your budget to ensure you consider the total cost of the underlayment.
- Comparing Quotes: Obtain multiple quotes from reputable suppliers and contractors to compare costs. This will help you identify any significant price differences and make an informed decision. However, be cautious of suspiciously low prices, as they may indicate subpar quality or untrustworthy suppliers.
While cost is an important consideration, it shouldn’t be the sole determining factor in your decision-making process. Striking a balance between cost, quality, and long-term value is crucial. Consider your budget limitations and prioritize the underlayment that offers the best combination of affordability, durability, and performance.
Remember, investing in a higher-quality underlayment can enhance the overall effectiveness and longevity of your vinyl siding system, providing greater value in the long run. Consult with professionals to discuss cost-effective options that meet your specific needs and budget requirements. They can help you find a balance between cost and quality, ensuring a successful underlayment and vinyl siding installation.
Read more: What Goes Under Fake Grass
Benefits of Proper Underlayment
Proper underlayment is crucial for maximizing the benefits and performance of vinyl siding. It enhances the insulation, moisture protection, and durability of the siding system, contributing to a more efficient and long-lasting exterior for your home. Here are some key benefits of proper underlayment:
- Enhanced Energy Efficiency: Underlayment improves the energy efficiency of your home by reducing heat transfer and thermal bridging. It helps to regulate the internal temperature, making your home more comfortable year-round. By minimizing energy loss, proper underlayment can lower heating and cooling costs and help reduce your carbon footprint.
- Improved Moisture Protection: Underlayment acts as a moisture barrier, preventing water infiltration and protecting the interior walls from damage. It helps to redirect water away from the walls, maintaining a dry and moisture-free environment. Proper underlayment reduces the risk of mold, rot, and decay, ensuring the longevity of the siding and the integrity of the underlying structure.
- Increased Durability: Underlayment provides an additional layer of protection for the vinyl siding, strengthening its resistance to impact and environmental factors. It helps distribute the weight of the siding evenly, reducing the risk of sagging or warping over time. The added structural support provided by proper underlayment contributes to the overall durability and longevity of the siding system.
- Enhanced Sound Insulation: Underlayment can also help reduce noise transmission from outside. It absorbs and dampens sound waves, creating a quieter and more comfortable living environment. Proper underlayment provides an additional barrier against noise pollution, making your home a peaceful retreat from the outside world.
- Protection Against Air Infiltration: Underlayment helps to prevent air infiltration through the walls by closing gaps and seams. This reduces drafts and improves the overall energy efficiency of your home. By enhancing the airtightness of your exterior walls, proper underlayment helps to maintain a consistent indoor temperature and reduce energy waste.
Proper underlayment is essential for realizing these benefits and ensuring the optimal performance of your vinyl siding. It provides insulation, moisture protection, durability, sound insulation, and increased energy efficiency to create a comfortable and sustainable living environment.
Consult professionals or contractors for guidance in selecting the appropriate underlayment for your specific needs. They can provide expert recommendations based on your climate, local building codes, and budget. By investing in proper underlayment, you can enjoy the long-lasting beauty, comfort, and energy savings that vinyl siding brings to your home.
Enhanced Energy Efficiency
One of the significant benefits of proper underlayment for vinyl siding is the enhanced energy efficiency it provides. The underlayment acts as a barrier, reducing heat transfer and preventing thermal bridging, resulting in a more energy-efficient home. Here’s how proper underlayment contributes to enhanced energy efficiency:
- Reduced Heat Loss: Underlayment helps to insulate the exterior walls, reducing heat loss during colder months. It creates a thermal barrier that prevents the escape of warmth generated within your home, allowing your heating system to work more efficiently and reducing the need for excessive heating.
- Minimized Heat Gain: During hot weather, proper underlayment helps to reduce heat gain by acting as an insulating layer. It prevents solar heat from penetrating the walls, reducing the strain on your cooling system and minimizing energy consumption for air conditioning. By keeping your home cooler, underlayment reduces your reliance on mechanical cooling and decreases energy costs.
- Thermal Bridging Prevention: Underlayment can minimize thermal bridging, which is the transfer of heat through building materials with poor insulation properties, such as studs or framing. By adding a layer of insulation, proper underlayment helps to break the thermal bridge, increasing the overall energy efficiency of the wall system.
- Consistent Indoor Temperature: By reducing heat transfer and thermal bridging, underlayment helps to maintain a more stable and comfortable indoor temperature throughout the year. This creates a more enjoyable living environment and reduces the need for frequent adjustments to your heating or cooling systems.
- Savings on Energy Costs: The enhanced energy efficiency provided by proper underlayment can lead to significant savings on energy costs. By reducing the demand for heating and cooling, underlayment helps to lower utility bills and decrease your overall energy consumption. Over time, these savings can add up and contribute to your household budget.
Proper underlayment plays a crucial role in improving the energy efficiency of your home, contributing to both environmental sustainability and cost savings. When selecting underlayment, consider the R-value, which measures the insulation effectiveness. Higher R-values indicate better insulation properties and greater energy savings.
Consult with professionals or contractors to determine the most suitable underlayment for your specific climate and budget. They can provide expert advice on selecting underlayment materials with optimal insulation properties and guide you in installing them correctly. By enhancing the energy efficiency of your home through proper underlayment, you can enjoy a more comfortable and eco-friendly living space while reducing your carbon footprint and energy expenses.
Improved Moisture Protection
Proper underlayment for vinyl siding offers improved moisture protection, safeguarding your home against potential water damage and the associated issues it can cause. Here are the key ways in which proper underlayment enhances moisture protection:
- Moisture Barrier: Underlayment acts as a moisture barrier, preventing water from infiltrating the walls and underlying structure. It creates a protective layer between the exterior siding and the interior walls, shielding them from the damaging effects of moisture.
- Water Diversion: Underlayment helps to redirect water away from the walls, reducing the risk of water intrusion. It prevents rainwater or melting snow from penetrating the siding and seeping into the wall cavities, mitigating the potential for rot, mold, and structural damage.
- Prevents Mold and Mildew: By effectively blocking moisture infiltration, underlayment helps to prevent the growth of mold and mildew. Mold and mildew thrive in damp environments, and their presence can lead to various health issues for occupants and cause damage to the building materials. Proper underlayment creates a dry and inhospitable environment for these microorganisms.
- Maintains Structural Integrity: Excessive moisture penetration can compromise the structural integrity of the walls and underlying components. By providing a moisture barrier, underlayment helps to preserve the strength and stability of the wall system, preventing potential deterioration and damage due to rot or decay.
- Protects Interior Finishes: Improper moisture protection can result in damage to the interior finishes of your home, such as wallpaper, paint, or drywall. Underlayment acts as a safeguard, preventing moisture-related issues that could lead to costly repairs and replacements of interior materials.
Proper underlayment should be selected based on the specific moisture concerns of your area and the type of vinyl siding being installed. Different underlayment materials offer varying levels of moisture resistance, so it is crucial to choose the most suitable option for your climate and budget.
Consult with professionals or contractors who can assess your specific needs and provide guidance on the optimal underlayment for moisture protection. They can ensure that the underlayment is installed correctly, maintaining its effectiveness in preventing moisture-related problems.
By investing in proper underlayment, you can enjoy peace of mind knowing that your home is protected from moisture intrusion, preserving its integrity, and ensuring a healthy and durable environment for you and your family.
Increased Durability
Proper underlayment for vinyl siding plays a crucial role in enhancing its overall durability. By providing added support and protection, underlayment helps the siding withstand external elements and ensures its long-term performance. Here are the key ways in which proper underlayment increases the durability of vinyl siding:
- Structural Support: Underlayment provides structural support to the vinyl siding, helping to distribute its weight evenly across the exterior walls. This reduces the risk of sagging or warping over time, ensuring that the siding maintains its integrity and aesthetic appeal.
- Impact Resistance: Proper underlayment strengthens the overall resistance of the siding system to impacts from external factors, such as hail, wind-blown debris, or accidental collisions. It acts as an additional layer of protection, helping to shield the siding from damage and maintain its visual appeal.
- Wind Resistance: Underlayment contributes to the wind resistance of the vinyl siding installation. It provides a secure backing that helps the siding withstand high wind speeds without loosening or becoming dislodged. This improves the overall durability of the siding system during severe weather events.
- Longevity: By effectively protecting the underlying structure from moisture, UV rays, and other damaging elements, proper underlayment prolongs the lifespan of the vinyl siding. It helps prevent premature deterioration, preserving the beauty and functionality of the siding for an extended period.
- Protection against Environmental Factors: Underlayment acts as a barrier against environmental factors such as extreme temperatures, UV radiation, and moisture. It shields the siding from these factors, reducing the risk of fading, cracking, warping, or other forms of damage that can compromise the integrity of the siding system.
Proper underlayment should be selected based on its compatibility with vinyl siding and its ability to withstand the specific challenges of your local climate and weather conditions. It is important to choose underlayment materials that are designed to provide durability and resistance to the elements.
Consult with professionals or contractors who can assess your specific needs and recommend underlayment materials that are best suited for your environment. Their expertise can help ensure the proper installation and long-term durability of your vinyl siding.
By investing in proper underlayment, you can feel confident in the longevity and performance of your vinyl siding, knowing that it is backed by an underlayment system that provides essential support, protection, and resistance to external factors.
Read more: What Goes Under Roof Shingles
Conclusion
Proper underlayment is a crucial component of a successful vinyl siding installation. It provides a range of benefits that enhance the performance, durability, energy efficiency, and moisture protection of the siding system. By selecting the appropriate underlayment and following the correct installation procedures, homeowners can enjoy a beautiful and long-lasting exterior for their homes.
Underlayment offers enhanced energy efficiency by reducing heat transfer, improving insulation, and minimizing thermal bridging. This results in a more comfortable indoor environment and reduced energy costs. Additionally, underlayment acts as a moisture barrier, diverting water away from the walls and preventing damage from mold, rot, and decay.
Proper underlayment provides increased durability by offering structural support and impact resistance. It helps the siding withstand harsh weather conditions, such as high winds and hail, maintaining its integrity and visual appeal over time. Furthermore, underlayment protects the siding from environmental factors, such as UV radiation and extreme temperatures, preserving its color and preventing damage.
Considering important factors like climate, local building codes, cost, and professional guidance can aid in making informed decisions and selecting the most suitable underlayment for your home. By investing in quality underlayment and following proper installation techniques, homeowners can ensure the long-term performance, efficiency, and durability of their vinyl siding.
In conclusion, proper underlayment provides essential benefits that enhance the overall performance and lifespan of vinyl siding. It not only increases energy efficiency and moisture protection but also contributes to the durability and aesthetics of your home’s exterior. By prioritizing underlayment and making informed choices, homeowners can enjoy a beautiful and resilient siding system that withstands the elements and provides long-lasting value.
Curious about upgrading your home's exterior? Dive into our latest article on superior house siding options for 2024. Whether you're renovating or building from scratch, understanding different materials and styles will ensure your home stands out while staying protected. From classic looks to modern innovations, find the perfect siding to suit your taste and requirements.
Frequently Asked Questions about What Goes Under Vinyl Siding
Was this page helpful?
At Storables.com, we guarantee accurate and reliable information. Our content, validated by Expert Board Contributors, is crafted following stringent Editorial Policies. We're committed to providing you with well-researched, expert-backed insights for all your informational needs.


0 thoughts on “What Goes Under Vinyl Siding”