Home>Articles>How To Replace J Channel Without Removing Siding
Articles
How To Replace J Channel Without Removing Siding
Modified: August 31, 2024
Discover the step-by-step process of replacing the J channel without removing the siding in these expertly written articles.
(Many of the links in this article redirect to a specific reviewed product. Your purchase of these products through affiliate links helps to generate commission for Storables.com, at no extra cost. Learn more)
Introduction
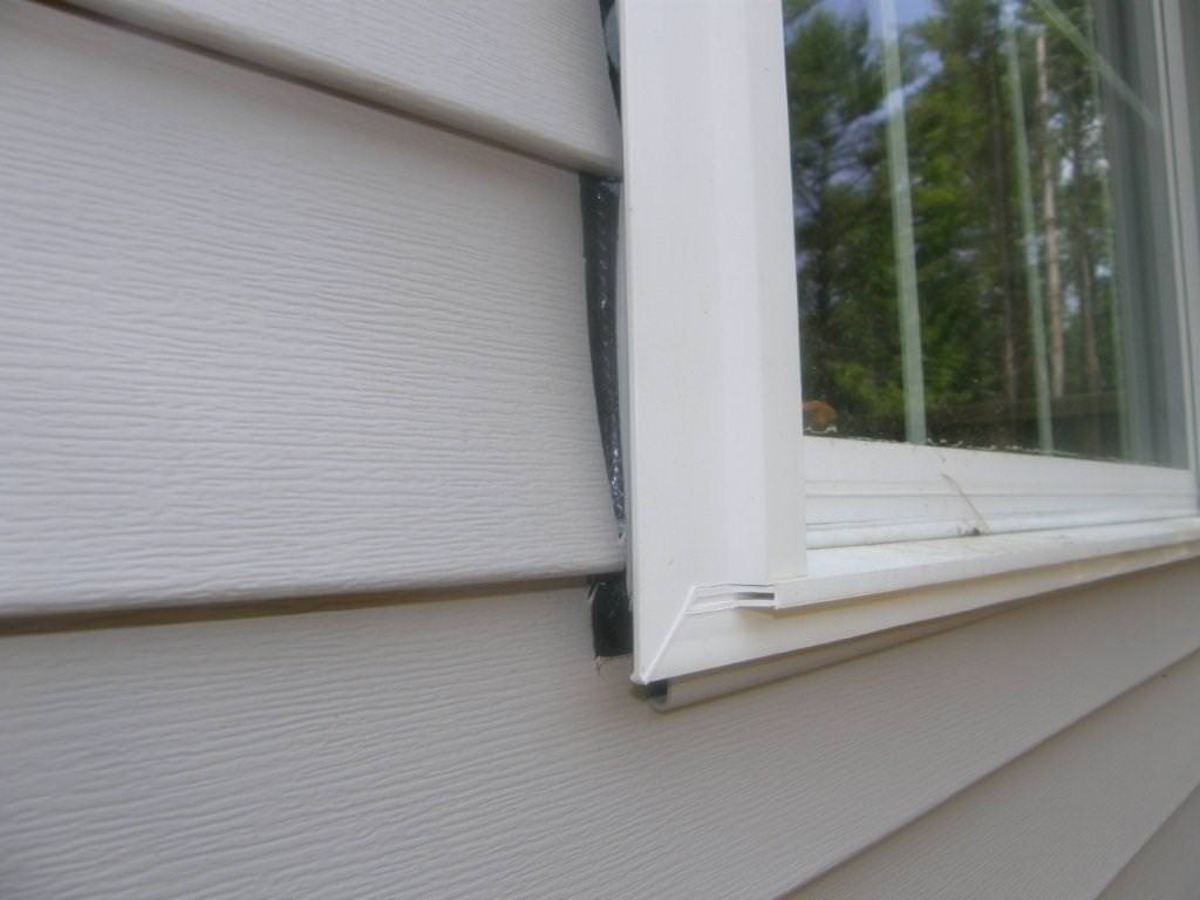
Welcome to our comprehensive guide on how to replace J channel without removing siding. J channel is a vital component of your home’s exterior, as it provides a clean and finished look where your siding meets windows and doors. Over time, J channel may become damaged or worn out due to weather exposure, causing it to lose its effectiveness and aesthetic appeal.
The traditional method of replacing J channel involves removing the siding, which can be a time-consuming and labor-intensive process. However, we will show you a step-by-step approach that allows you to replace the J channel without taking off the siding. This method is not only more efficient but also minimizes the risk of damaging the siding or surrounding areas.
Before we delve into the process, it’s important to note that this guide assumes you have some basic knowledge of home improvement projects and access to essential tools. If you are unsure about any aspect of the project or lack the necessary tools, it is advisable to seek professional assistance.
Now, let’s dive into the step-by-step instructions on how to replace J channel without removing siding, saving you time, effort, and potential headaches!
Key Takeaways:
- Save time and effort by replacing J channel without removing siding. Assess, gather tools, remove old J channel, install new one, attach siding, and add finishing touches for a professional-looking exterior.
- Maintain your home’s aesthetic appeal and protection by following a step-by-step guide for replacing J channel. Secure the new J channel, attach the siding, and perform regular maintenance to preserve your home’s integrity.
Read more: What Is J Channel For Siding
Step 1: Assessing the Condition of the J Channel
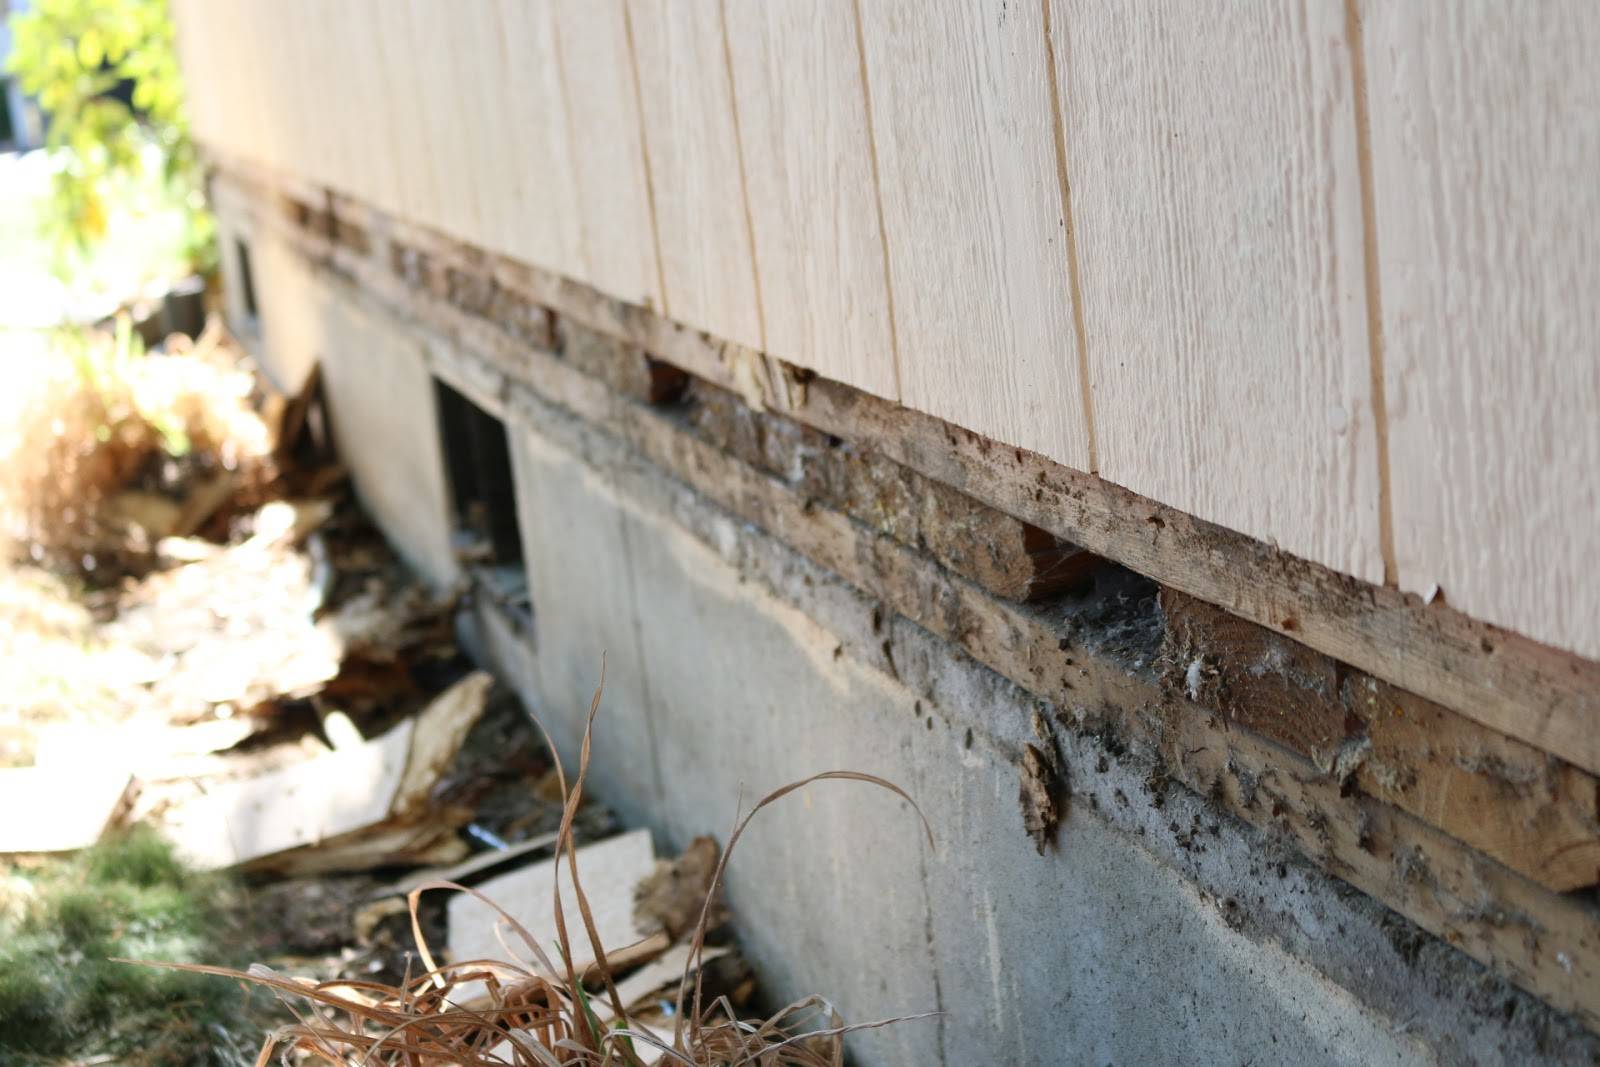
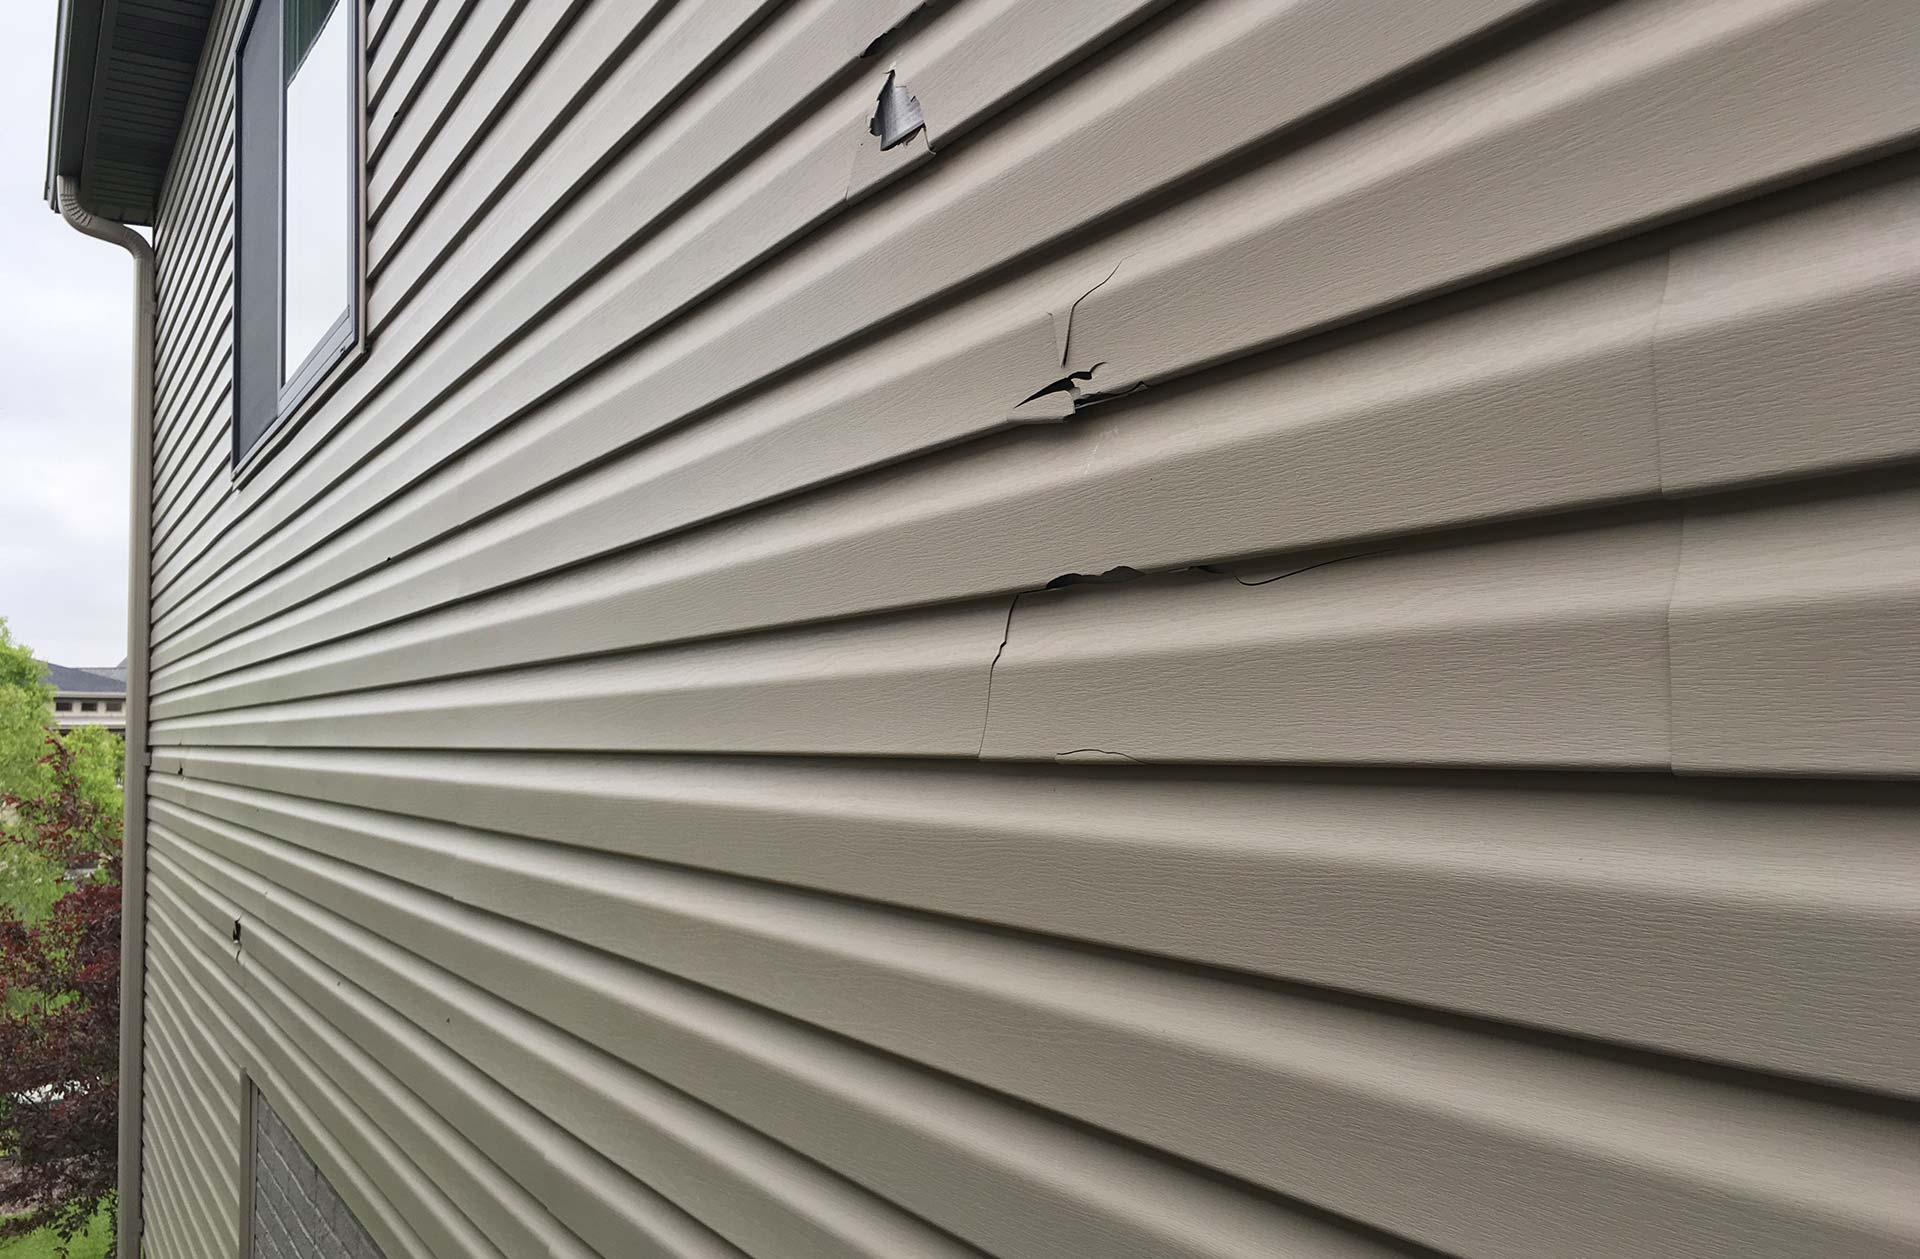
The first step in replacing the J channel without removing the siding is to assess the condition of the existing J channel. Take a close look at the J channel surrounding the windows and doors to determine if there are any signs of damage, such as cracks, warping, or discoloration.
If the J channel is severely damaged or deteriorated, it’s best to remove the siding and replace both the J channel and the siding. However, if the J channel is still in relatively good condition and only requires a few minor repairs or replacements, then proceeding with the method outlined in this guide is a suitable option.
During the assessment, check for any gaps between the J channel and the siding. These gaps can allow water to seep in and cause damage to the underlying structure. Additionally, inspect the caulking around the J channel to see if it needs to be replaced or repaired.
Take note of any areas where the J channel may be loose or detached from the wall. This can lead to further damage if left unaddressed, so it’s important to secure the J channel properly in these areas.
Overall, a thorough assessment of the condition of the J channel will help you determine the extent of the repairs needed and guide your replacement process. If you have any doubts or concerns about the condition of the J channel or the feasibility of replacing it without removing the siding, it’s always a good idea to consult with a professional.
Now that you have assessed the condition of the J channel, let’s move on to step two where we gather the necessary tools and materials for the replacement process.
Step 2: Gathering the Necessary Tools and Materials
Before you begin the process of replacing the J channel, it’s important to gather all the necessary tools and materials. Having everything on hand will help you work efficiently and ensure a smooth replacement process.
Here’s a list of the tools and materials you will need:
- J channel – Make sure to measure the length needed to replace the damaged section accurately.
- Tin snips – Used for cutting and trimming the J channel.
- Utility knife – For cutting through any caulking or sealants.
- Pry bar – Helps in removing any existing J channel or trim.
- Screwdriver – Used to remove any screws or fasteners securing the J channel.
- Hammer – Can be helpful for tapping and securing the J channel in place.
- Siding hooks or zip tool – These tools help you detach the siding from the J channel for replacement.
- Measuring tape – For accurately measuring the length of the J channel and ensuring precise cuts.
- Caulking gun – Used for applying caulk to seal gaps and secure the J channel.
- Silicone caulk – A waterproof sealant for extra protection against water damage.
- Screws or nails – Depending on the type of siding and J channel, you may need screws or nails for installation.
- Safety goggles and gloves – Essential for personal protection while handling tools and materials.
Take some time to gather all these tools and materials before starting the replacement process. It’s also a good idea to ensure that they are in good working condition and that you have enough of each item to complete the project.
By having everything you need on hand, you’ll be prepared to move smoothly from one step to the next without any delays or interruptions.
Now that you have gathered all the necessary tools and materials, it’s time to move on to step three and start removing the old J channel.
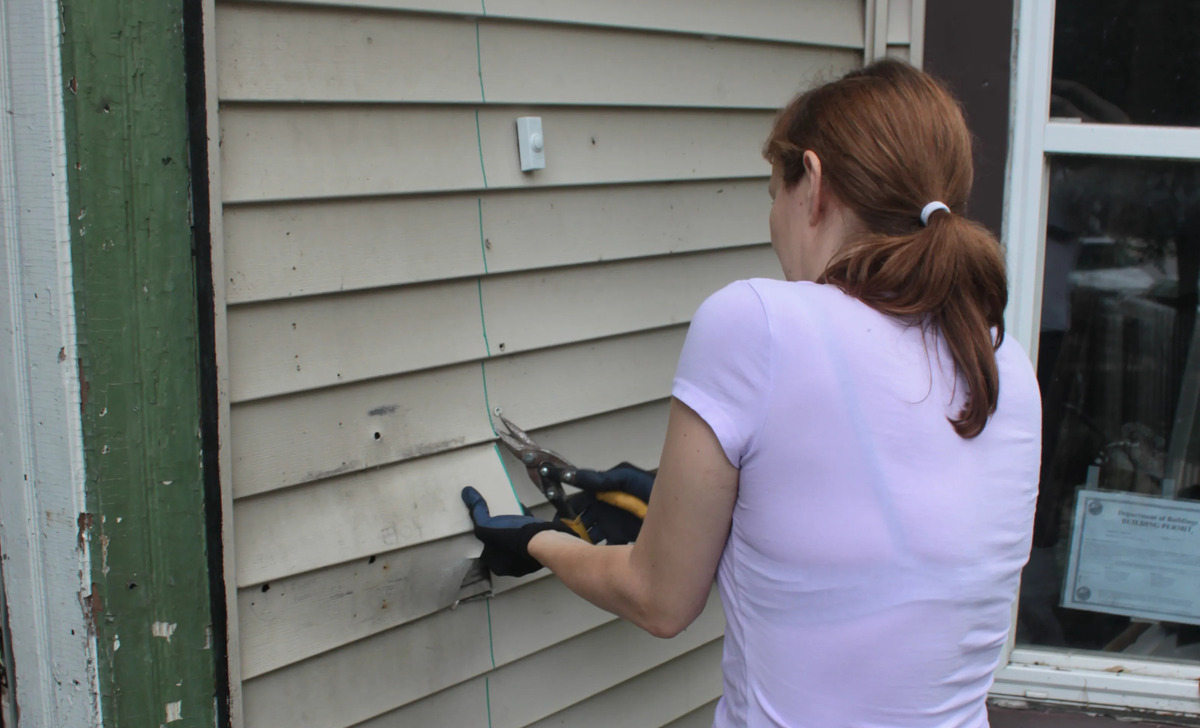
Step 3: Removing the Old J Channel
Now that you have assessed the condition of the J channel and gathered all the necessary tools and materials, it’s time to remove the old J channel. Removing the old J channel is an important step to ensure a clean and proper installation of the new J channel.
Here’s a step-by-step guide on how to remove the old J channel:
- Start by using a pry bar or screwdriver to carefully remove any screws or fasteners securing the J channel to the wall. Be gentle to avoid damaging the surrounding siding.
- Once the fasteners are removed, use a utility knife to cut through any caulking or sealants between the J channel and the siding. This will help in separating the J channel from the siding.
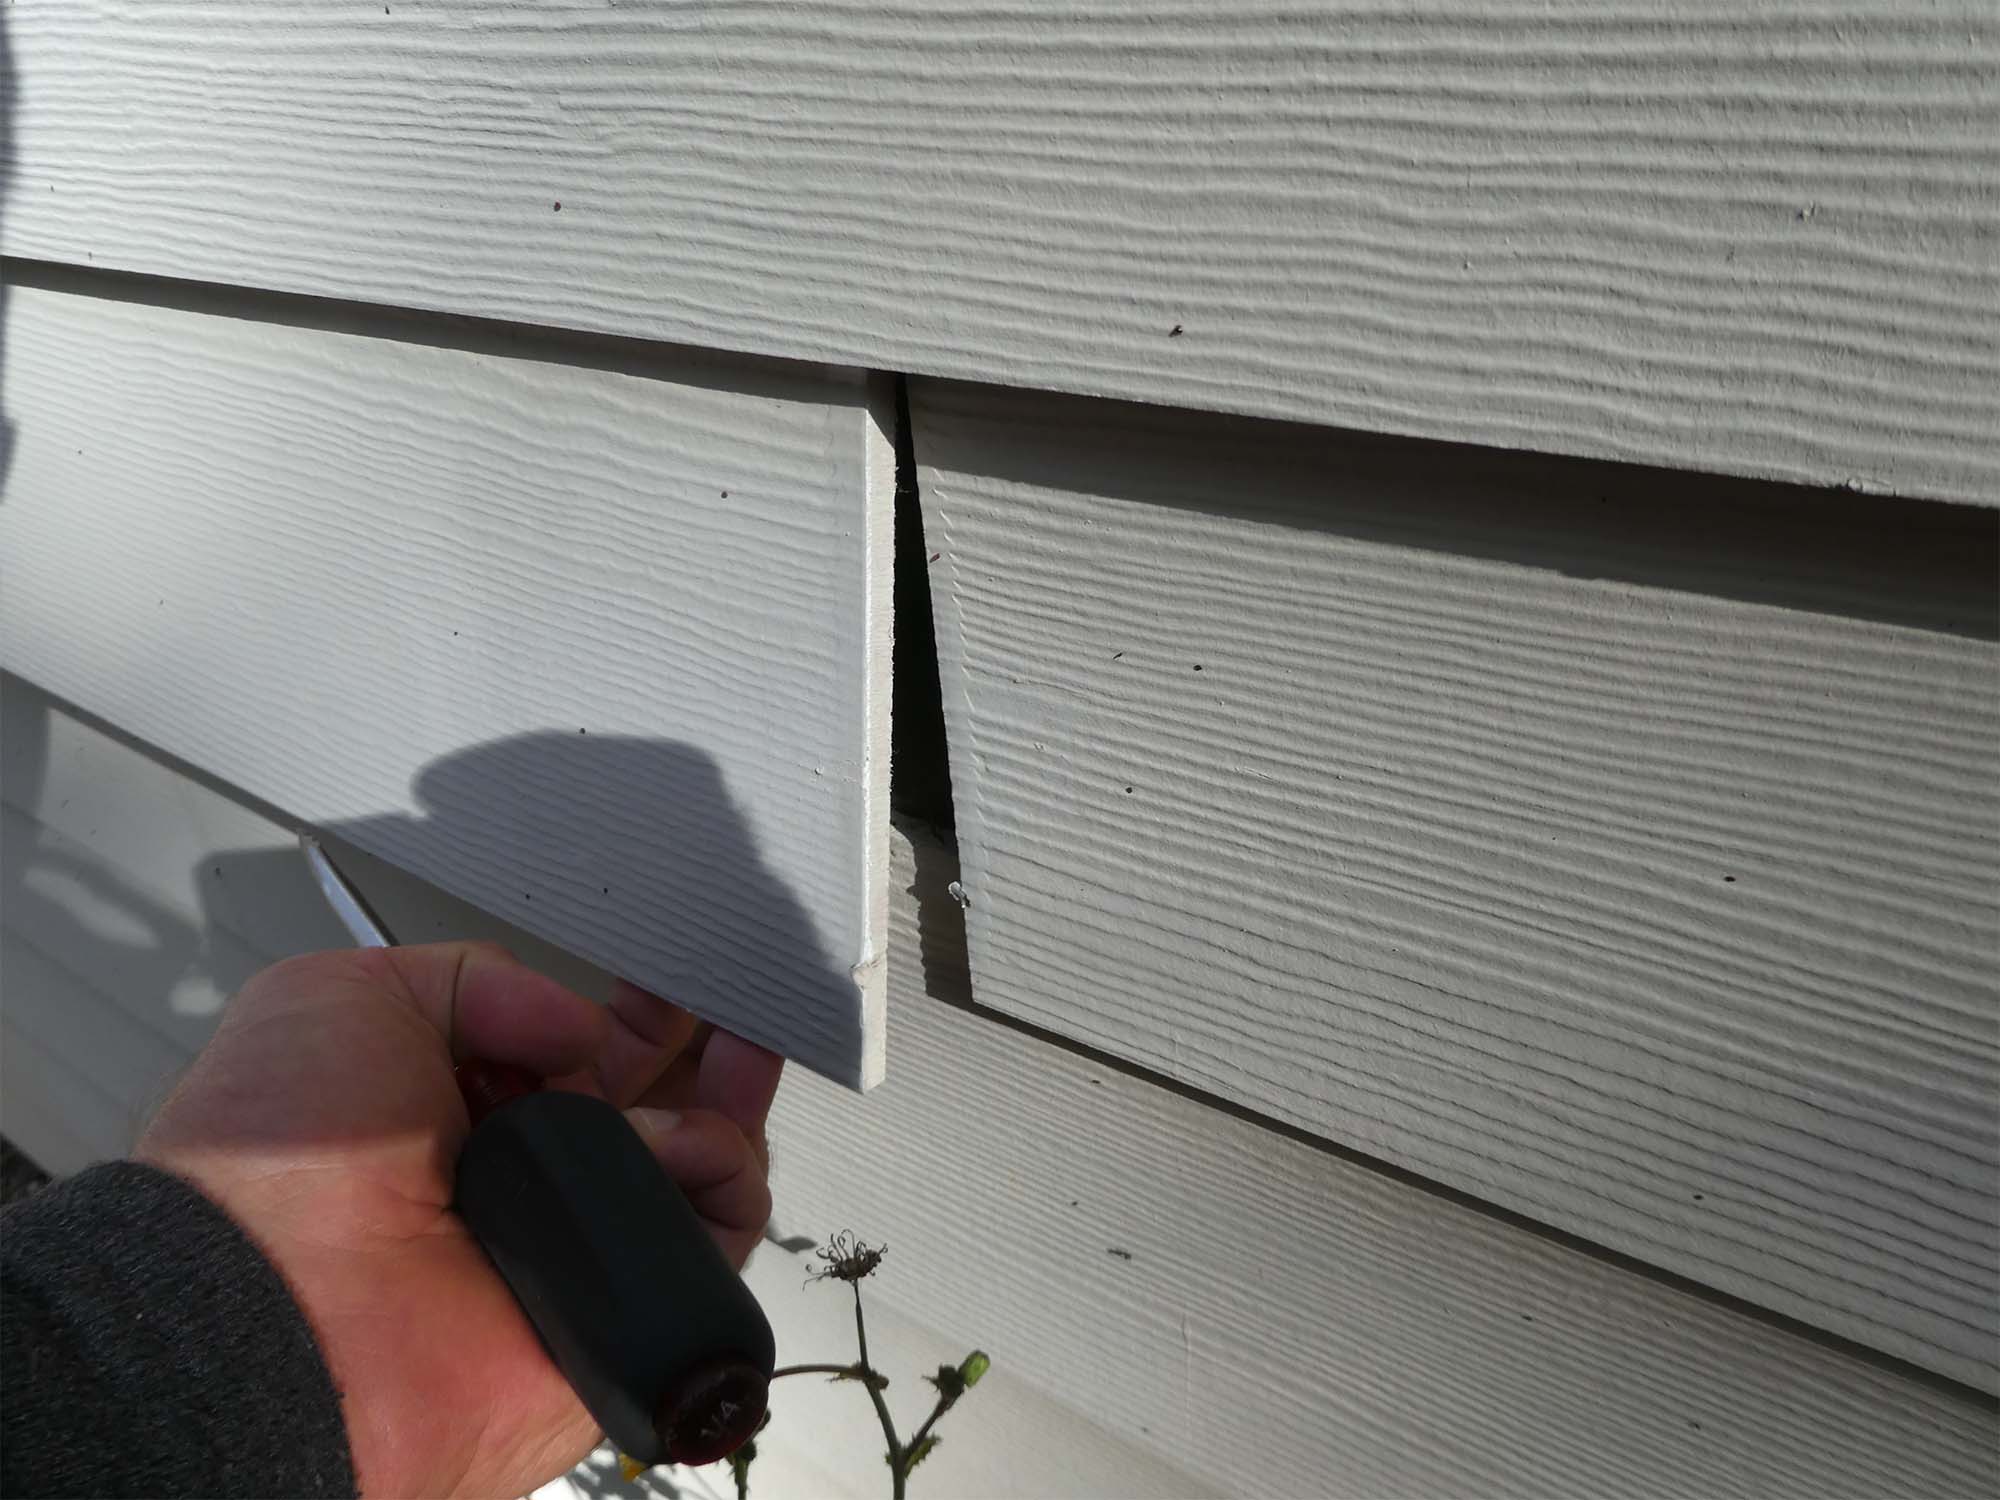
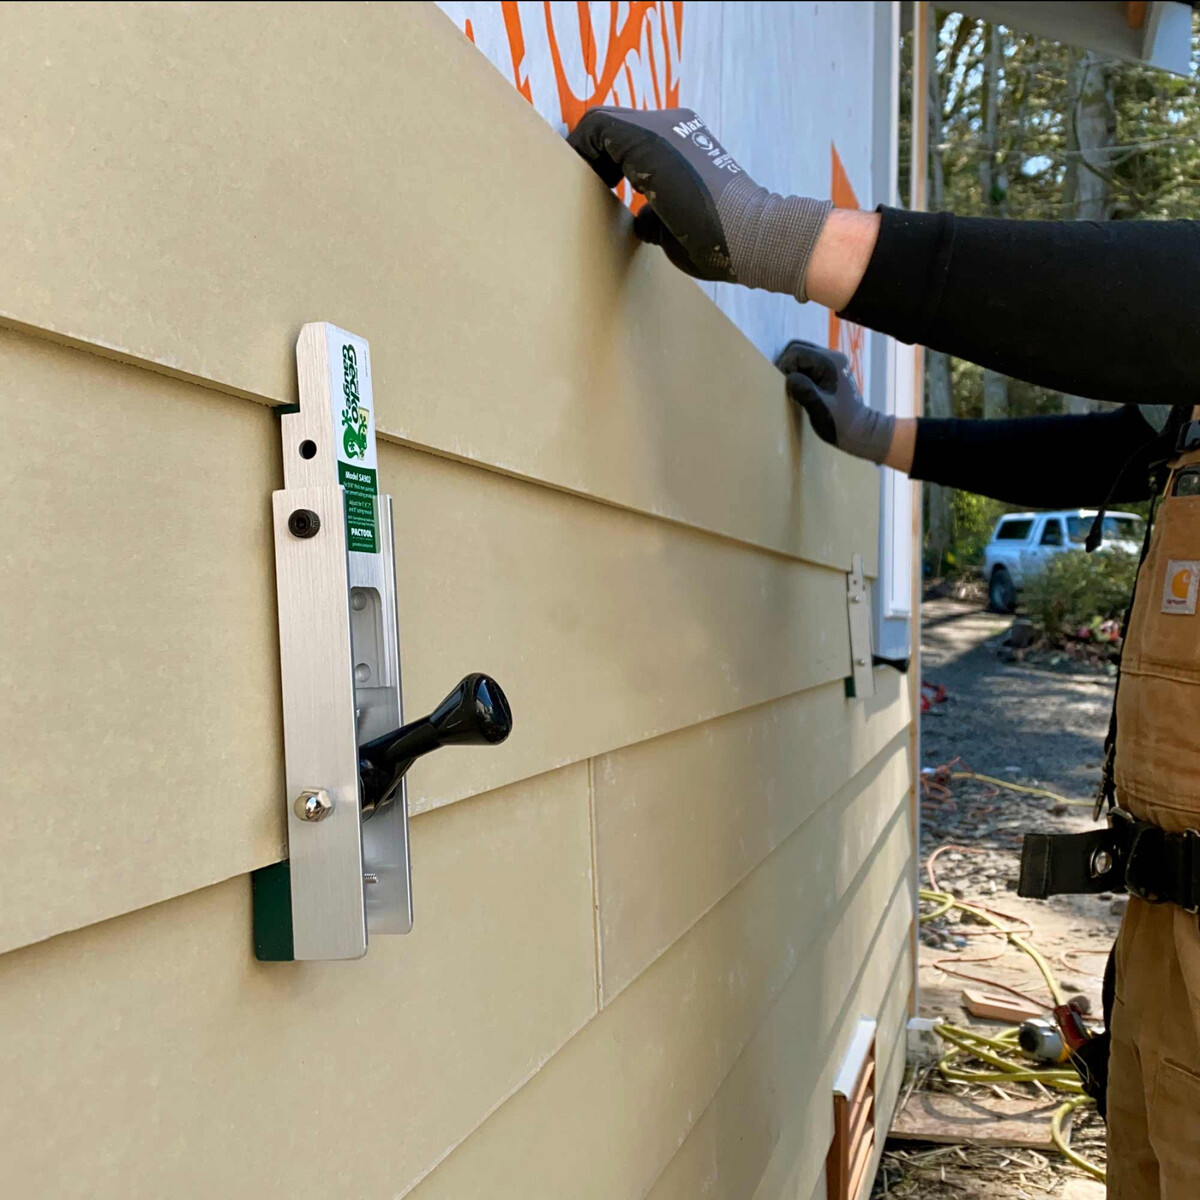
- Using a siding hook or a zip tool, gently detach the siding from the J channel. Start at one end and work your way towards the other, ensuring that the siding is released from the J channel without any damage.
- If there are any sections of J channel that are particularly damaged or cannot be salvaged, use tin snips to cut through the J channel and remove it completely.
- Once the old J channel is removed, inspect the area around the windows and doors for any remaining caulking or debris. Clean the area thoroughly to prepare for the installation of the new J channel.
It’s important to note that during the removal process, you should handle the old J channel with care and avoid damaging the siding or surrounding areas. Take your time to ensure a clean removal, as any mistakes or damage at this stage can affect the overall outcome of the replacement process.
With the old J channel removed, you’re now ready to proceed to step four and begin the installation of the new J channel.
When replacing J channel without removing siding, use a zip tool to unlock the siding from the existing J channel. Slide the new J channel into place and relock the siding. Be careful not to damage the siding during the process.
Step 4: Installing the New J Channel
With the old J channel removed, it’s time to install the new J channel. This step involves measuring, cutting, and securing the new J channel in place.
Follow these steps to install the new J channel:
- Start by measuring the length of the area where you removed the old J channel. Make sure to measure accurately to ensure a proper fit for the new J channel.
- Using tin snips, cut the new J channel to match the measured length. Cut with caution, as you want to ensure straight and clean edges.
- Apply a bead of silicone caulk along the back edge of the J channel. This will help create a watertight seal between the J channel and the wall.
- Position the new J channel in place, making sure it aligns properly with the siding, windows, or doors. Press it firmly against the wall to secure it.
- Using a screwdriver, insert screws or nails through the pre-drilled holes in the J channel to anchor it in place. Be careful not to over-tighten the screws, as it may cause damage to the J channel or the wall.
- Continue this process, securing the J channel along its entire length. Ensure that each section is properly aligned and tightly attached to the wall.
Once the new J channel is installed, visually inspect it for any gaps or loose sections. If you find any areas that are not secure, use a hammer or screwdriver to make any necessary adjustments or tighten the fasteners.
Remember to work carefully and take your time during the installation process to ensure a proper and secure fit for the new J channel. The goal is to create a clean and seamless transition between the J channel and the siding.
With the new J channel installed, you’re almost done! In the next step, we’ll discuss how to attach the siding to the J channel to complete the replacement process.
Step 5: Attaching the Siding to the J Channel
After successfully installing the new J channel, the next step is to attach the siding to the J channel. This ensures a secure and neat finish, giving your exterior a polished appearance.
Follow these steps to attach the siding to the J channel:
- Starting at one end of the J channel, gently slide the siding into the channel groove. Use a siding hook or zip tool to help guide the siding into place, if needed.
- Continue sliding the siding into the J channel, ensuring that it is securely seated and properly aligned throughout the process. Take care to avoid any bending or warping of the siding.
- Work your way along the length of the J channel, making sure each section of the siding is securely attached and fits snugly into the J channel groove.
- Periodically check the alignment and smoothness of the siding as you go. Adjust as necessary to maintain an even and professional appearance.
- If there are any gaps between the J channel and the siding, use a caulking gun to apply a bead of silicone caulk along the edge. This helps seal the gap and provides extra protection against moisture intrusion.
Pay special attention to the corners and intersections where multiple sections of siding meet. Ensure that the siding fits correctly into the J channel and that the corners are neatly aligned and sealed.
Throughout the process, take the time to step back and assess the overall appearance of the siding in relation to the J channel. Make any necessary adjustments to achieve a seamless and visually pleasing result.
Once you have finished attaching the siding to the J channel, take a moment to inspect the entire installation. Look for any loose sections, gaps, or areas that may require additional caulking or adjustments.
Now that the siding is securely attached to the J channel, you’re almost done! In the next step, we’ll cover the final touches and cleanup to complete the replacement process.
Step 6: Finishing Touches and Cleanup
With the J channel installed and the siding securely attached, it’s time to add the finishing touches to complete the replacement process. This step involves some final adjustments, cleaning up any debris, and ensuring the overall appearance is polished.
Follow these steps for the finishing touches and cleanup:
- Inspect the entire J channel installation to ensure it is secure and properly aligned. Make any necessary adjustments by tightening screws or adjusting the position of the J channel.
- Check for any excess caulk or sealant around the J channel or siding. Use a utility knife or scraper to carefully remove any unwanted caulking, ensuring a clean and neat finish.
- Wipe down the J channel and siding with a damp cloth to remove any dirt, dust, or debris that may have accumulated during the installation process.
- Examine the area around the windows and doors for any remaining gaps or cracks. Apply silicone caulk to seal any openings and ensure a watertight seal.
- Finally, dispose of any leftover materials, packaging, and debris properly. Clean up your work area, leaving it neat and tidy.
Take a step back and admire your work. You have successfully replaced the J channel without removing the siding, saving time and effort while maintaining the integrity of your home’s exterior.
Remember to regularly inspect the J channel and siding for any signs of damage or wear. Address any issues promptly to prevent further damage and to maintain the aesthetic appeal of your home.
By following these steps and taking care throughout the process, you can confidently replace the J channel without removing the siding and enjoy a refreshed and visually appealing exterior.
Congratulations on completing the replacement process! Your home now showcases a professionally installed J channel that enhances its overall beauty and protection.
Conclusion
Replacing J channel without removing the siding is a practical and efficient method that allows you to refresh the appearance and functionality of your home’s exterior. By following the step-by-step guide outlined in this article, you can successfully replace the J channel while minimizing the risk of damage to the siding and saving time.
Throughout the process, it’s crucial to assess the condition of the J channel, gather the necessary tools and materials, remove the old J channel carefully, install the new J channel securely, attach the siding, and add the finishing touches. Taking the time to ensure proper alignment and a clean installation will result in a professional-looking finish.
Regular maintenance and inspections of the J channel and siding are essential to preserve the integrity of your home’s exterior. Address any signs of damage or wear promptly to prevent further issues and maintain the aesthetic appeal of your home.
Remember, if you feel unsure about any aspect of the replacement process or lack the necessary tools or experience, it is always wise to consult with a professional. They can provide guidance and ensure a successful replacement of the J channel without compromising the integrity of your home’s exterior.
By following this comprehensive guide, you can confidently replace the J channel without removing the siding, giving your home a refreshed look and protecting it from the elements for years to come.
Thank you for reading!
Ready for more on home exterior upgrades? Dive into our next feature where we showcase the latest trends in home siding. Vinyl siding options have evolved, offering stunning aesthetics and durability. Whether you're thinking about a makeover or just curious about new materials on the market, you won't want to miss our detailed review. Find out which styles are taking 2024 by storm and how they can transform your home's appearance without breaking the bank.
Frequently Asked Questions about How To Replace J Channel Without Removing Siding
Was this page helpful?
At Storables.com, we guarantee accurate and reliable information. Our content, validated by Expert Board Contributors, is crafted following stringent Editorial Policies. We're committed to providing you with well-researched, expert-backed insights for all your informational needs.


0 thoughts on “How To Replace J Channel Without Removing Siding”