Home>Dining>Table Decor>How To Make Christmas Floral Arrangements
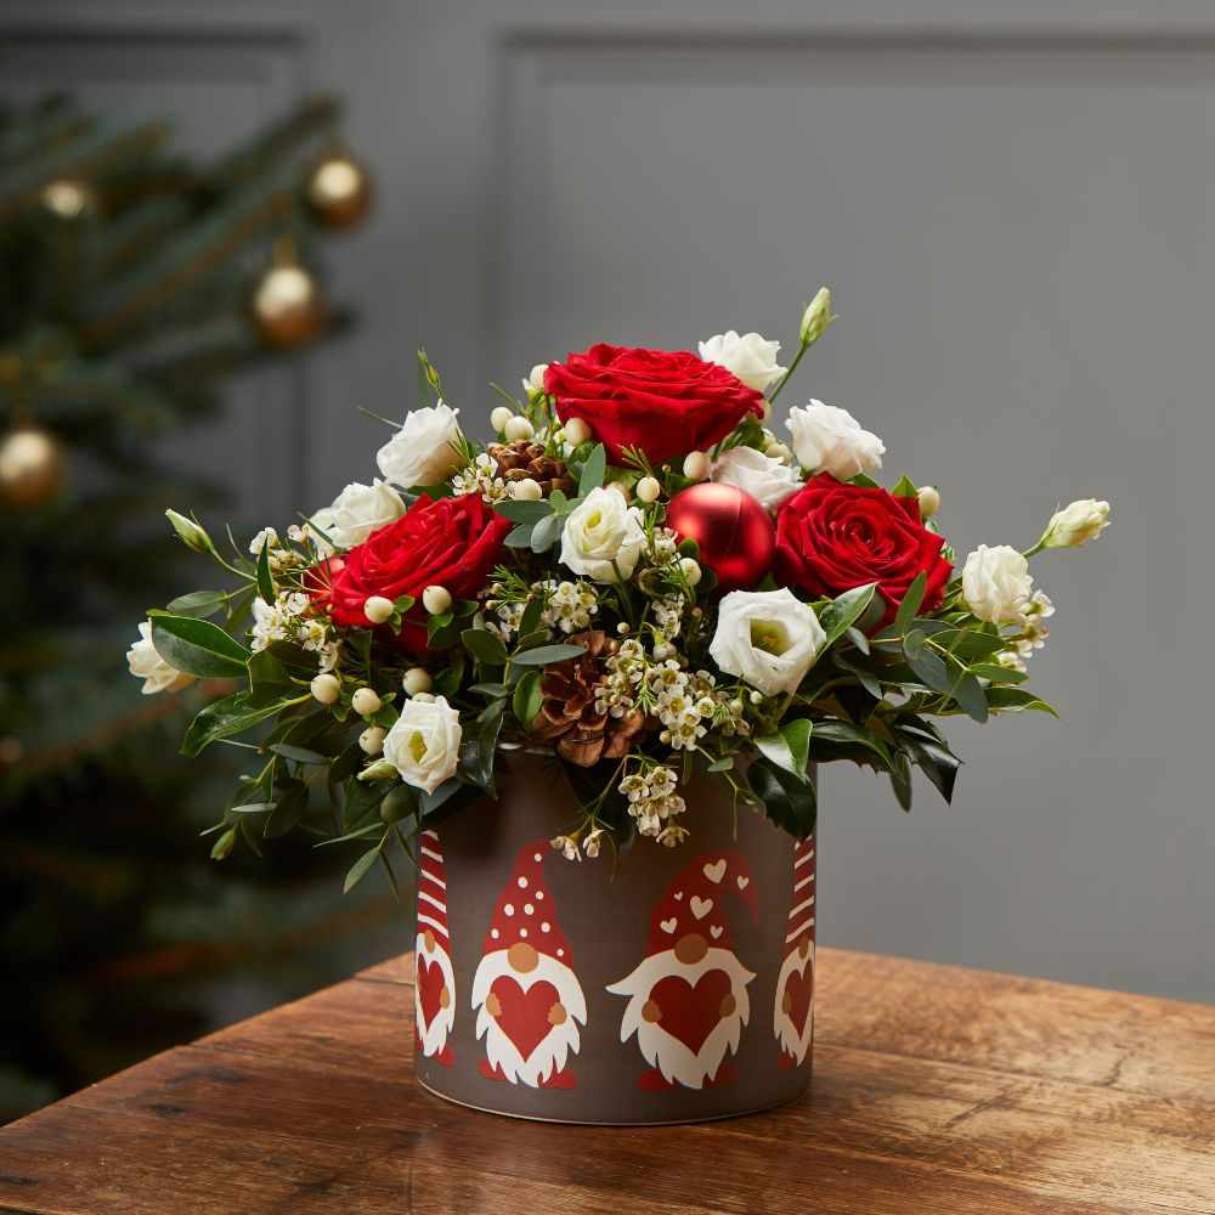
Table Decor
How To Make Christmas Floral Arrangements
Modified: January 9, 2024
Learn how to create beautiful Christmas floral arrangements with our step-by-step guide. Discover tips and ideas for table decor to impress your guests.
(Many of the links in this article redirect to a specific reviewed product. Your purchase of these products through affiliate links helps to generate commission for Storables.com, at no extra cost. Learn more)
Introduction
Christmas is a time of joy, celebration, and festive decorations. When it comes to creating a magical atmosphere in your home during the holiday season, nothing adds beauty and elegance quite like Christmas floral arrangements. From centerpieces to wreaths, these vibrant and fragrant creations bring a touch of nature indoors, creating a warm and welcoming ambiance.
Whether you’re hosting a holiday gathering or simply want to enhance the holiday spirit in your home, learning how to make stunning Christmas floral arrangements is a worthwhile endeavor. In this article, we will explore the art of table decorating and provide you with tips, techniques, and inspiration to create eye-catching arrangements that will impress your guests.
Before diving into the creative world of floral arranging, it’s important to understand the different types of flowers that are well-suited for Christmas arrangements. Traditional choices include poinsettias, amaryllis, holly, and evergreen foliage. These classic flowers and greens evoke the festive spirit and bring a sense of tradition to your designs.
To begin your journey into the world of Christmas floral arranging, you’ll need a few essential tools and materials. These include floral foam, floral tape, wire cutters, and a variety of containers or vases. Having a well-stocked toolbox will make the arranging process smoother and more efficient.
Once you have your tools ready, it’s time to learn some basic techniques for floral arranging. From selecting the right stems to creating a pleasing composition, understanding the fundamentals will set you up for success. With practice and a creative eye, you’ll be able to bring your visions to life.
In this article, we will guide you through the process of creating four different types of Christmas floral arrangements. We’ll start with a traditional centerpiece that will grace your dining table with elegance. Next, we’ll explore a rustic arrangement that will add a cozy and charming touch to any room. Then, we’ll move onto a festive wreath that will welcome guests at your front door. Finally, we’ll learn how to create a stunning garland that can be draped along a mantel or staircase railing.
It’s important to note that the longevity of your Christmas arrangements depends on proper care and maintenance. We will provide you with tips on preserving the freshness and beauty of your flowers, so you can enjoy them throughout the holiday season.
So, let’s immerse ourselves in the world of Christmas floral arranging, and create stunning displays that will make this holiday season truly memorable.
Key Takeaways:
- Bring the beauty of nature indoors with stunning Christmas floral arrangements. From traditional centerpieces to rustic designs, create a warm and inviting atmosphere that captures the essence of the holiday season.
- Master the art of Christmas floral arranging by choosing the right flowers, gathering essential tools, and mastering basic techniques. Preserve the freshness of your arrangements with proper care and maintenance throughout the festive season.
Read more: How To Make Hydrangea Floral Arrangements
Choosing the Right Flowers for Christmas Arrangements
When it comes to creating beautiful Christmas floral arrangements, the selection of flowers plays a crucial role in capturing the holiday spirit. Certain flowers and foliage are synonymous with Christmas, evoking a sense of tradition, elegance, and festivity. Here are some popular choices to consider:
- Poinsettias: Poinsettias are iconic Christmas flowers known for their vibrant red, white, or pink bracts. They symbolize joy, love, and hope, making them perfect for holiday arrangements.
- Amaryllis: Amaryllis blooms in stunning shades of red, white, and pink, and its trumpet-shaped flowers symbolize strength and determination. These bold and beautiful blooms add drama to any Christmas arrangement.
- Holly: Holly is a classic Christmas greenery with glossy leaves and vibrant red berries. It represents everlasting life and is often used to add texture and depth to floral designs.
- Evergreens: Evergreen foliage such as pine, cedar, and spruce adds a touch of rustic charm to Christmas arrangements. Their fresh scent and rich green color symbolize eternal life and bring a sense of nature indoors.
- Roses: While not traditionally associated with Christmas, roses in shades of red, white, and burgundy can add elegance and sophistication to holiday arrangements.
When selecting flowers, consider the color palette you want to achieve. Red, green, and white are traditional Christmas colors, but you can also opt for a more subdued or vibrant look. Experiment with different combinations to create arrangements that reflect your personal style and preferences.
It’s important to choose flowers that are long-lasting and stay fresh throughout the holiday season. Look for blooms with sturdy stems, tight buds, and vibrant colors. Avoid flowers that are wilting or have damaged petals.
Remember that flowers are not the only element in a Christmas arrangement. Incorporating other decorative elements like ornaments, pinecones, berries, and ribbons can add visual interest and enhance the festive appeal.
Lastly, consider the size and scale of your arrangement as you set your table. For table centerpieces, choose flowers that are proportionate to the container and won’t obstruct conversation. For larger displays like wreaths and garlands, opt for flowers and foliage that can create a balanced and visually striking composition.
By carefully selecting the right flowers and greenery, you can create Christmas floral arrangements that capture the essence of the holiday season and bring joy and cheer to your home.
Essential Tools and Materials
Before you begin creating your Christmas floral arrangements, it’s important to gather the essential tools and materials that will aid you in the process. Having the right supplies at hand will not only make the arranging process easier but also ensure that your creations turn out beautifully. Here are some must-have tools and materials:
- Floral Foam: Floral foam is a key component in most floral arrangements as it provides a stable base for the flowers and helps them stay hydrated. It comes in various shapes and sizes and can be easily cut to fit your chosen container.
- Container or Vase: Choose a container or vase that complements the style and size of your arrangement. Glass vases are versatile and allow the beauty of the flowers to shine, while decorative containers can add a festive touch to your design.
- Floral Tape: Floral tape is essential for keeping stems in place and providing additional support. It is often used to create grids or secure floral foam within the container.
- Wire Cutters: Wire cutters are necessary for trimming flower stems, foliage, and any other elements you wish to incorporate into your arrangement. Opt for a pair of sharp, sturdy cutters that can handle different types of materials.
- Waterproof Floral Tape: Waterproof floral tape is especially useful when working with fresh flowers and greenery. It helps ensure a watertight seal between the floral foam and the container, keeping your arrangements hydrated for longer.
- Floral Wire: Floral wire is handy for securing delicate or heavy blooms in place. It can be used to create loops, curls, or hooks to add interest and stability to your designs.
- Ribbon or Twine: Adding ribbon or twine can give a finishing touch to your Christmas arrangements. Choose a color and texture that complements your design and tie decorative bows or accents around the arrangement.
- Pruning Shears: Pruning shears are useful for cutting through thicker stems or branches. They provide clean cuts that allow the flowers to absorb water more efficiently.
In addition to these essential tools, it’s a good idea to have a spray bottle filled with water for misting the flowers and keeping them fresh during the arranging process. You may also want to have a pair of gloves on hand to protect your hands from thorns or sap.
By having these tools and materials readily available, you’ll be well-equipped to create stunning Christmas floral arrangements that will impress everyone who lays eyes on them.
Basic Techniques for Floral Arranging
Mastering the basic techniques of floral arranging is the key to creating beautiful and balanced Christmas floral arrangements. These fundamental skills will help you create cohesive designs that showcase the beauty of the flowers and foliage you’ve chosen. Here are some essential techniques to keep in mind:
- Preparing the Flowers: Start by removing any foliage or thorns that will be below the waterline in your container. Cut the stems at an angle to allow for better water absorption.
- Cutting the Floral Foam: Measure and cut the floral foam to fit snugly into your container. Ensure that it sits at least an inch above the rim of the container to provide stability for your arrangement.
- Creating a Grid with Floral Tape: If your container doesn’t have built-in support for the stems, create a grid using floral tape across the top of the container. This will help hold the flowers in place and prevent them from shifting.
- Establishing the Focal Point: Start by adding the focal flowers to your arrangement. These are typically the largest and most eye-catching blooms that will draw the viewer’s attention. Place them towards the center and at an angle for a more natural look.
- Adding Height and Structure: Insert longer stems or branches to create height and structure in your arrangement. This will add visual interest and balance to the design. Place them at different angles to create depth and dimension.
- Filling in with Filler Flowers: Fill in the gaps and add texture by incorporating filler flowers. These smaller blooms or greenery, such as baby’s breath or ferns, can be placed around the focal flowers to create a full and balanced arrangement.
- Enhancing with Accent Elements: Complete your arrangement by adding accent elements, such as berries, pinecones, or ornaments. These decorative touches add a festive flair and create a cohesive look.
- Checking the Balance: Step back and assess your arrangement from different angles. Make any necessary adjustments to ensure that the arrangement is balanced, with the weight evenly distributed and no gaps or overcrowded areas.
- Maintaining Hydration: Once your arrangement is complete, fill the container with water or floral preservative to keep the flowers hydrated. Check the water levels regularly and add more as needed to prolong the life of your arrangement.
Remember, floral arranging is a creative process, so don’t be afraid to experiment with different textures, colors, and shapes. You have the freedom to create arrangements that reflect your personal style and evoke the holiday spirit. Practice allows you to refine your skills and develop your own unique artistic vision.
With these basic techniques in your toolkit, you’ll be well on your way to crafting stunning Christmas floral arrangements that will impress and delight all who see them.
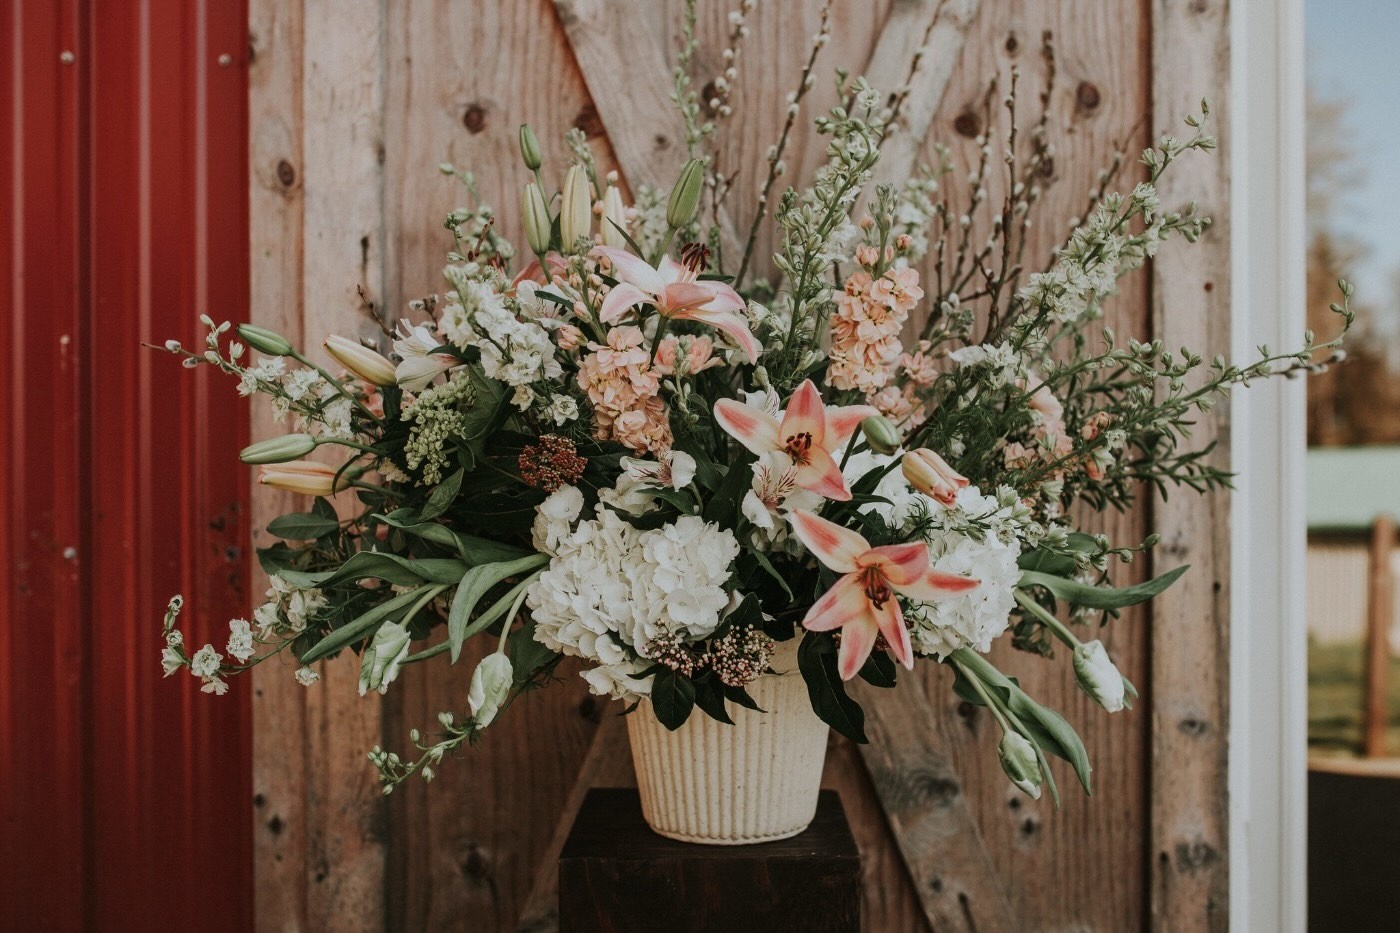
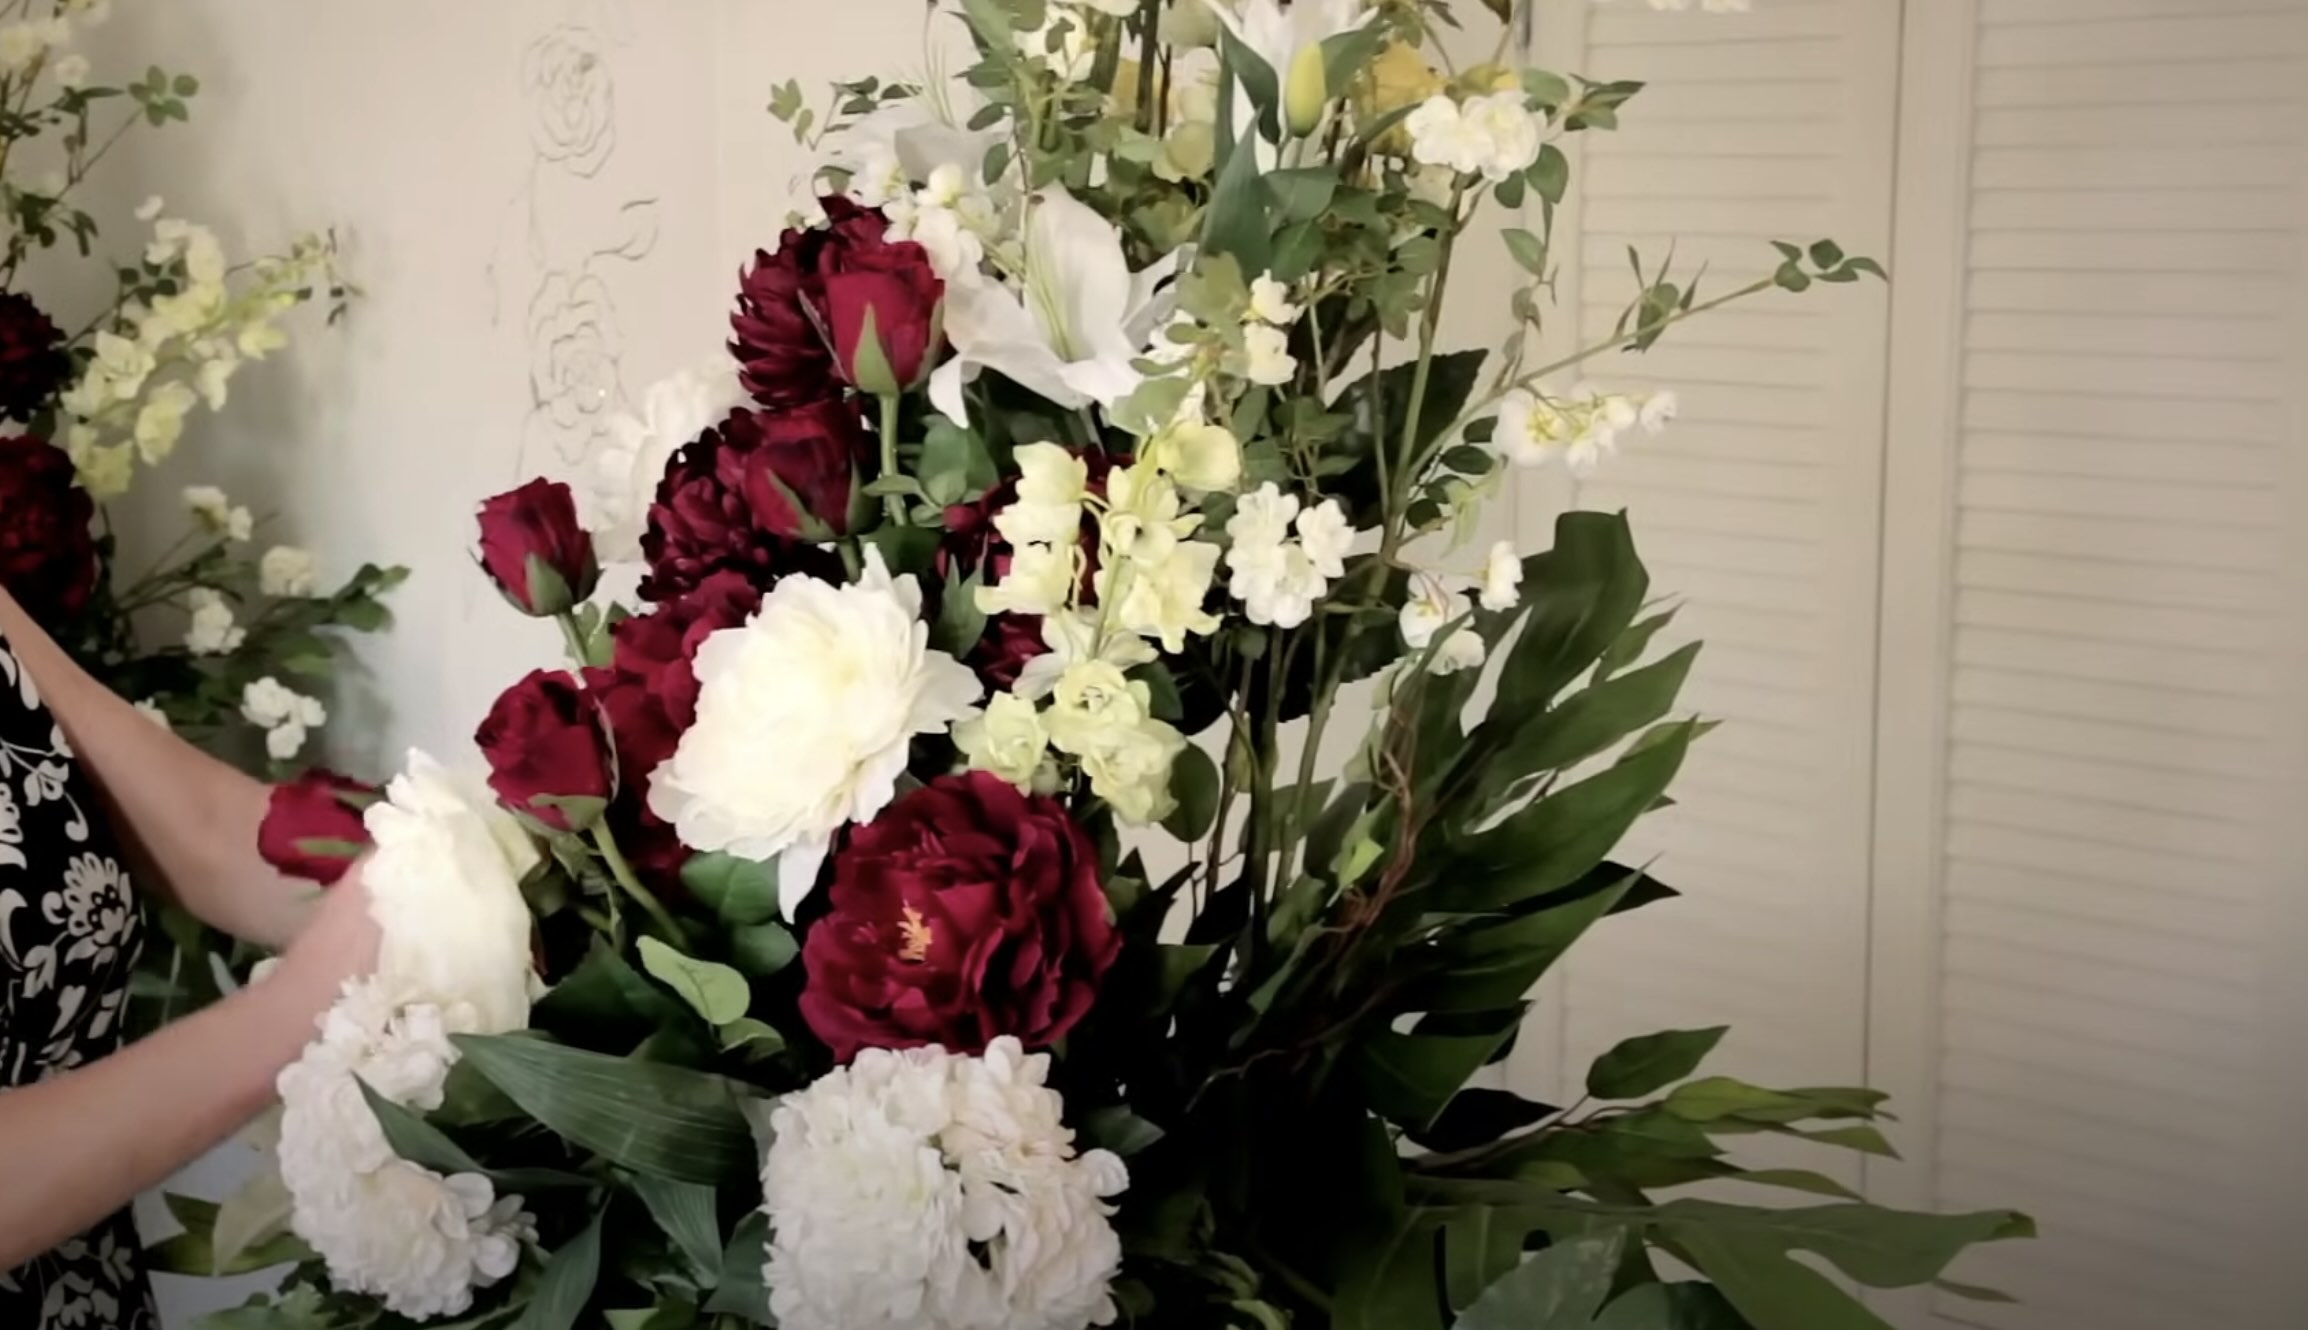
Creating a Traditional Christmas Centerpiece
A traditional Christmas centerpiece is a classic and elegant addition to any holiday table. It sets the stage for a festive gathering and adds a touch of sophistication to the ambiance. Here’s a step-by-step guide on how to create a traditional Christmas centerpiece:
Step 1: Gather Your Materials
Collect the necessary materials, including a container or vase of your choice, floral foam, floral tape, a selection of Christmas flowers such as poinsettias and roses, various evergreen foliage, holly branches, and decorative accessories like ornaments or ribbons.
Step 2: Prepare the Container
Prepare the container by cutting the floral foam to fit inside. Soak the foam in water until it is fully saturated, then place it in the container. Secure it with floral tape to ensure stability.
Step 3: Establish the Structure
Begin by adding evergreen foliage to create a base and establish the overall shape of your centerpiece. Start with longer pieces in the center and gradually work your way outwards, layering the branches to create depth and dimension.
Step 4: Add the Focal Flowers
Place the focal flowers, such as poinsettias or roses, in the center of the arrangement. Position them at varying heights to add visual interest. Angle the stems diagonally for a natural look. These flowers will be the main attraction of your centerpiece.
Step 5: Incorporate Filler Flowers and Greenery
Add filler flowers and greenery, like baby’s breath or ferns, around the focal flowers. Use them to fill in any gaps and create a fuller appearance. Distribute them evenly throughout your arrangement for a balanced look.
Step 6: Enhance with Decorative Accessories
Add decorative accessories like ornaments, ribbons, or pinecones to enhance the festive feel of your centerpiece. Tuck them into the foliage or secure them with floral wire for added visual interest.
Step 7: Check the Balance and Finishing Touches
Step back and assess your centerpiece from different angles. Ensure that the arrangement is balanced, and make any necessary adjustments. Trim any excess foliage or stems that may obstruct the view. Finally, add a finishing touch, such as a decorative bow or sprigs of holly, to complete the centerpiece.
Step 8: Care and Maintenance
Place your traditional Christmas centerpiece in a cool location away from direct sunlight and drafts. Keep the floral foam moist, adding water as needed to ensure the longevity of your arrangement. Remove any wilted flowers or foliage to maintain its freshness.
With these steps, you can create a stunning traditional Christmas centerpiece that will be the centerpiece of attention on your holiday table. Enjoy the beauty and warmth it brings to your celebrations!
When making Christmas floral arrangements, consider using traditional holiday colors like red, green, and white to create a festive look. Incorporate seasonal elements like pinecones, berries, and holly for added texture and interest.
Read more: How To Make Easter Floral Arrangements
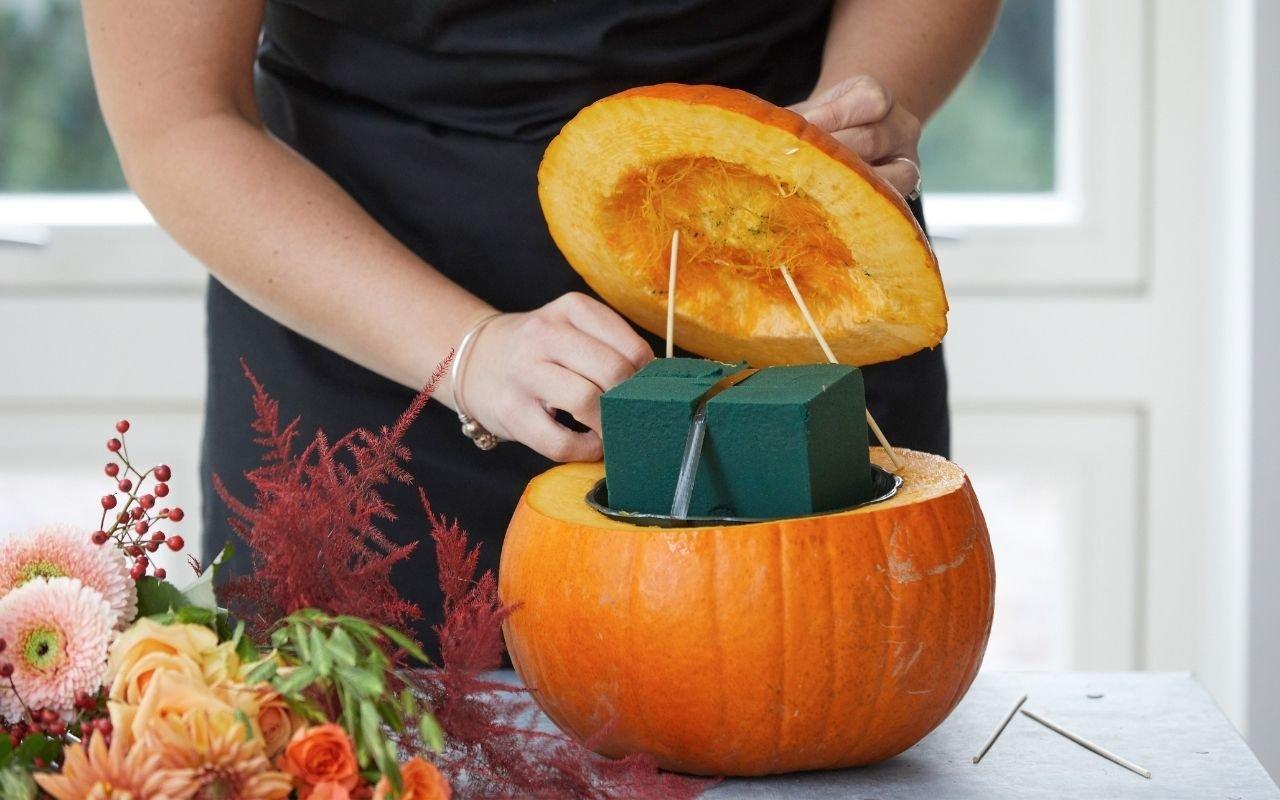
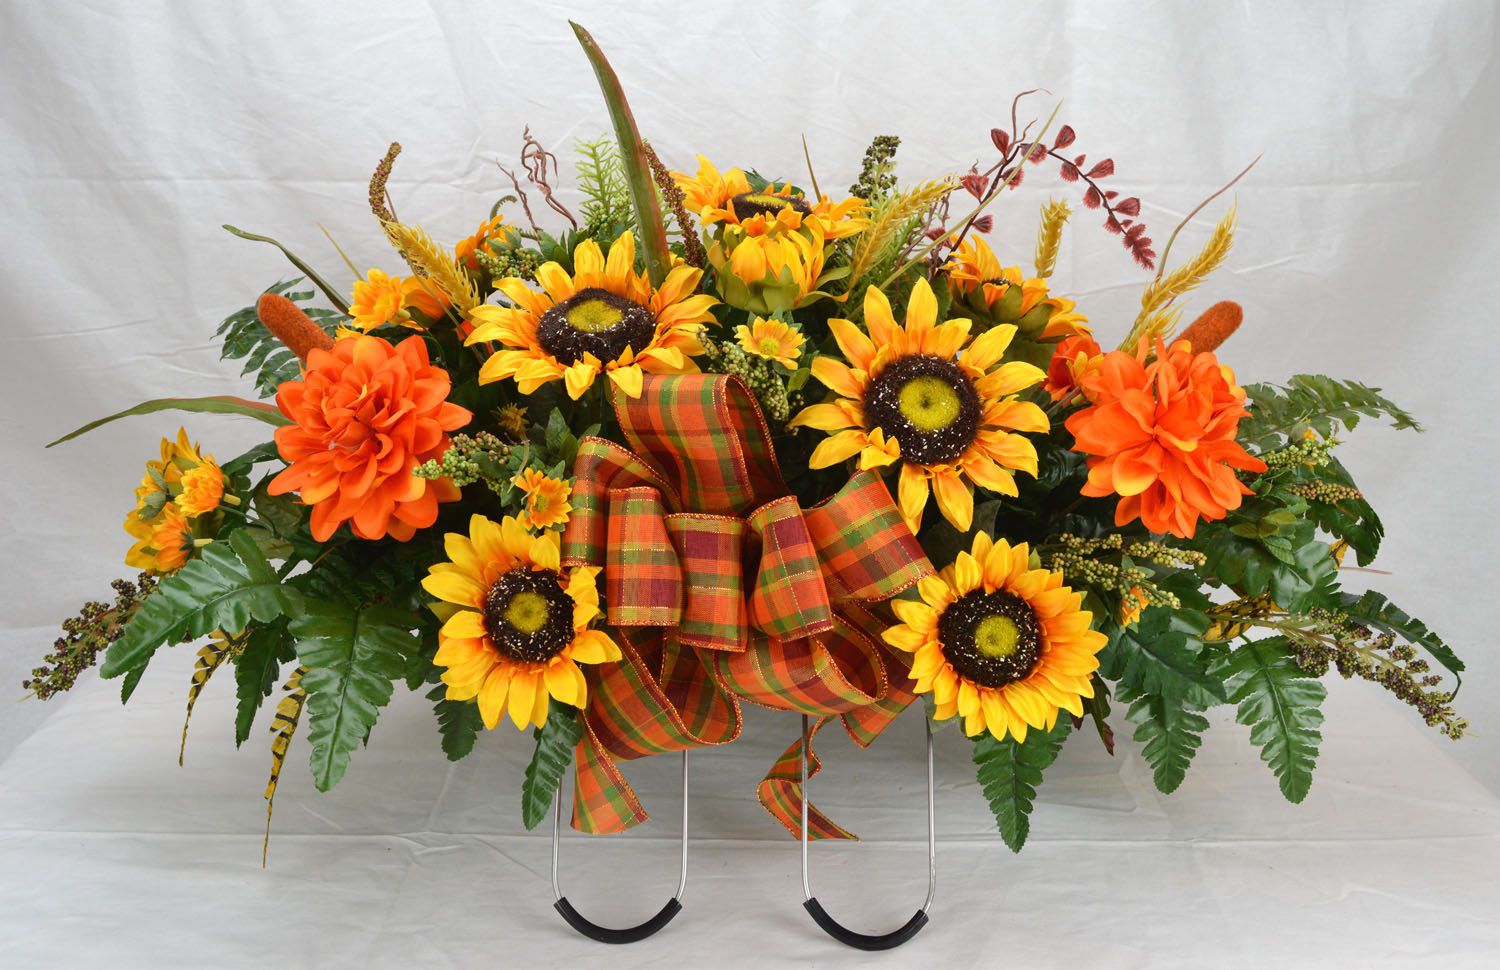
Designing a Rustic Christmas Arrangement
A rustic Christmas arrangement brings a cozy and charming touch to your holiday decor. With natural elements and earthy colors, this style evokes a warm and festive atmosphere. Here’s a step-by-step guide on how to design a rustic Christmas arrangement:
Step 1: Gather Your Materials
Collect the necessary materials, including a container or basket with a rustic feel, floral foam, floral tape, a selection of rustic flowers like sunflowers and dahlias, green foliage such as eucalyptus or wheat stalks, pinecones, berries, twigs, and burlap or plaid ribbon.
Step 2: Prepare the Container
Prepare the container by cutting the floral foam to fit inside. Soak the foam in water until fully saturated, then place it in the container. Secure it with floral tape to ensure stability. If using a basket, line the inside with plastic wrap or a waterproof liner.
Step 3: Establish the Shape and Structure
Begin by adding the green foliage to create a base and establish the shape of your arrangement. Arrange longer pieces in the center and shorter ones around the edges, letting them drape over the container’s rim for a natural and relaxed look.
Step 4: Add the Rustic Flowers
Place the rustic flowers, such as sunflowers or dahlias, in clusters throughout the arrangement. These bold and vibrant blooms will be the focal point of your rustic design. Position them at varying heights and angles to create interest and balance.
Step 5: Incorporate Natural Elements
Add pinecones, berries, twigs, and other natural elements to enhance the rustic feel of your arrangement. Tuck them into the foliage or secure them with floral wire to create depth and texture. Place them strategically to create a visually pleasing composition.
Step 6: Enhance with Ribbon or Burlap
Add a finishing touch to your rustic arrangement by tying a burlap or plaid ribbon around the container or weaving it through the arrangement. This adds a touch of rustic charm and completes the overall look.
Step 7: Check the Balance and Finishing Touches
Step back and assess your rustic Christmas arrangement from different angles. Ensure that the arrangement is balanced, and make any necessary adjustments. Trim any excess foliage or stems that may obstruct the view. Finally, add any final touches, such as a sprig of wheat or a small bird’s nest, to complete the rustic look.
Step 8: Care and Maintenance
Place your rustic Christmas arrangement in a cool location away from direct sunlight and drafts. Keep the floral foam moist by adding water as needed to ensure the longevity of your arrangement. Remove any wilted flowers or foliage to maintain its freshness.
With these steps, you can create a charming rustic Christmas arrangement that brings warmth and a touch of nature to your holiday decor. Enjoy the cozy and festive ambiance it creates throughout the season!
Making a Festive Christmas Wreath
A Christmas wreath is a timeless symbol of holiday cheer and a beautiful way to welcome guests into your home. Creating your own festive wreath allows you to add a personal touch and tailor it to your style. Here’s a step-by-step guide on how to make a festive Christmas wreath:
Step 1: Gather Your Materials
Collect the necessary materials, including a wreath frame (either foam or wire), a selection of evergreen foliage, pinecones, berries, ornaments, ribbon or bow, floral wire, and pruning shears.
Step 2: Prepare the Base
If using a foam wreath frame, soak it in water for a few minutes to hydrate the foam. If using a wire frame, you can skip this step. Set the frame aside to dry partially before continuing.
Step 3: Trim and Arrange Foliage
Trim the evergreen foliage into smaller sprigs or branches. Use a mix of different types of evergreens, such as pine, cedar, and spruce, for texture and variety. Arrange the sprigs around the wreath frame and secure them with floral wire, ensuring full coverage and a balanced look.
Step 4: Add Pinecones and Berries
Tuck pinecones and berries into the arrangement, spacing them evenly throughout the wreath. Secure them with floral wire for added stability. This adds natural elements and texture to your wreath design.
Step 5: Incorporate Ornaments
Add ornaments of various sizes, shapes, and colors to enhance the festive feel of your wreath. Hang them securely among the foliage using floral wire or attach them directly to the wreath frame. Be mindful of the weight and balance to prevent any damage or imbalance.
Step 6: Tie a Bow or Ribbon
Create a bow or tie a ribbon at the top of your wreath, which will serve as a focal point and add a finishing touch. Choose a ribbon that complements your color scheme and style. Secure it to the wreath frame or attach it to a florist pick to insert into the foliage.
Step 7: Check the Balance and Finishing Touches
Step back and assess your Christmas wreath from different angles. Adjust the placement of foliage, pinecones, berries, and ornaments as needed to create a balanced and visually pleasing arrangement. Trim any excess foliage or protruding wire for a clean and polished look.
Step 8: Display and Care
Hang your festive Christmas wreath on your front door, mantel, or any desired location. Be sure to display it in a protected area away from direct sunlight and harsh weather elements. Mist the foliage with water occasionally to maintain its freshness throughout the holiday season.
With these steps, you can create a stunning festive Christmas wreath that adds a touch of holiday magic to your home. Enjoy the warmth and joy it brings as you welcome family and friends into your festive space!
Crafting a Beautiful Christmas Garland
A Christmas garland is a versatile and enchanting decoration that can be draped along a mantel, staircase railing, or used as a stunning centerpiece on a holiday table. Crafting your own Christmas garland allows you to personalize it to match your style and bring festive charm to any space. Here’s a step-by-step guide on how to craft a beautiful Christmas garland:
Step 1: Gather Your Materials
Collect the necessary materials, including a garland base (such as pine or artificial), a selection of fresh or dried foliage and greenery (such as eucalyptus, holly, or ivy), pinecones, berries, ornaments, ribbon or bows, floral wire, and pruning shears.
Step 2: Prepare the Base
If using a fresh garland base, ensure it is properly hydrated by misting it with water. If using an artificial garland, fluff and shape it to give it a fuller appearance. Lay the garland on a flat surface, ready to be adorned.
Step 3: Trim and Arrange Foliage
Trim the foliage and greenery into smaller sprigs or branches. Mix different types of foliage for texture and variety. Arrange the sprigs evenly along the garland base, attaching them with floral wire to ensure they stay in place. Overlap the foliage slightly to create a lush and full appearance.
Step 4: Add Pinecones and Berries
Integrate pinecones and berries into the garland, placing them strategically throughout the arrangement. Attach them securely using floral wire to ensure they stay in place. This brings natural elements and pops of color to your Christmas garland.
Step 5: Incorporate Ornaments and Decorative Accents
Add ornaments, decorative accents, or other embellishments to enhance the festive feel of your garland. Hang ornaments securely among the foliage, attaching them with floral wire or hooks. Be mindful of the weight and balance to avoid any damage or imbalance.
Step 6: Tie Bows or Ribbons
Add bows or ribbons at intervals along the garland to provide a decorative element. Choose ribbons that complement your color scheme and style. Secure them to the garland using floral wire or by tying them directly around the foliage.
Step 7: Check the Balance and Finishing Touches
Step back and assess your Christmas garland from different angles. Ensure that the foliage, ornaments, and ribbons are evenly distributed and creating a balanced appearance. Tuck in any loose ends and trim excess foliage or wire for a polished look.
Step 8: Display and Care
Hang your beautiful Christmas garland along a mantel, staircase railing, or use it as a centerpiece on a holiday table. Secure it with hooks or adhesive clips, ensuring it is safely attached. Mist the fresh foliage with water occasionally to maintain its freshness and vibrancy throughout the holiday season.
With these steps, you can craft a stunning Christmas garland that adds elegance and festive charm to your home. Enjoy the merry and enchanting atmosphere it brings as you celebrate the holiday season with loved ones!
Tips for Preserving and Maintaining Your Christmas Floral Arrangements
After putting in the effort to create beautiful Christmas floral arrangements, it’s important to take steps to ensure their longevity and freshness throughout the holiday season. Here are some helpful tips for preserving and maintaining your Christmas floral arrangements:
- Change the Water Regularly: Fresh water is essential for keeping your flowers hydrated. Change the water in your vases or containers every two to three days to prevent the growth of bacteria and maintain the freshness of your flowers.
- Trim the Stems: Trim the stems of your flowers every few days to facilitate water absorption. Cut about an inch off the bottom of each stem at a 45-degree angle to allow for better water uptake.
- Remove Wilting Flowers: As flowers start to wilt, remove them from the arrangement to maintain the aesthetic appeal and prevent the spread of decay to other blooms.
- Mist the Flowers: Some delicate flowers benefit from a light misting of water to keep them fresh. Use a spray bottle to lightly mist the petals, taking care not to oversaturate them.
- Avoid Placing Arrangements in Direct Sunlight: Direct sunlight can cause flowers to wilt and fade more quickly. Display your floral arrangements away from direct sunlight and in a cool area to prolong their lifespan.
- Keep Arrangements Away from Heat Sources: Exposure to heat sources like fireplaces, heaters, or vents can rapidly dehydrate flowers. Keep your arrangements away from these sources to maintain their freshness.
- Dust and Clean: Dust can accumulate on flowers, foliage, and ornaments over time. Gently wipe off any dust or dirt with a soft cloth or feather duster to keep your arrangements looking pristine.
- Preserve Evergreen Foliage: To keep evergreen foliage fresh and prevent needle drop, mist them with water and store them in a cool, humid place when not in use. This helps maintain their vibrant green color throughout the holiday season.
- Store Flower Arrangements Overnight: If you’re hosting an event and want to enjoy your arrangements for longer, consider storing them in a cool location overnight to extend their lifespan. Just be sure to return them to a suitable display area the next day.
- Consider Using Floral Preservative: Floral preservatives can be added to the water to extend the life of your arrangements. They contain nutrients and bactericides that help keep the water clean, nourish the flowers, and slow down the aging process.
By following these tips, you can ensure that your Christmas floral arrangements stay fresh, vibrant, and beautiful for as long as possible. With proper care and maintenance, you can continue to enjoy the beauty of the holiday season throughout the entire festivities.
Read more: How To Make Bows For Floral Arrangements
Conclusion
Creating stunning and festive Christmas floral arrangements adds a touch of elegance and charm to your holiday celebrations. Whether it’s a traditional centerpiece, rustic arrangement, wreath, or garland, these handmade creations bring the beauty of nature indoors and create a warm and inviting atmosphere.
By choosing the right flowers, gathering essential tools and materials, mastering basic techniques, and incorporating your own personal style, you can craft eye-catching and unique designs. The careful selection of flowers like poinsettias, amaryllis, and holly sets the foundation for capturing the essence of the holiday season.
As you embark on your floral arranging journey, remember to trim stems, change the water regularly, and remove any wilting flowers to maintain the freshness and vibrancy of your arrangements. Mist delicate blooms, keep them away from direct sunlight and heat sources, and gently clean them to ensure they look their best throughout the festivities.
Whether you’re hosting a holiday gathering or simply decorating your home, the art of Christmas floral arranging allows you to express your creativity and add a personal touch to your holiday decor. Creating these beautiful arrangements can be a fun and satisfying experience that brings joy to both you and your loved ones.
Remember to experiment, trust your instincts, and let your imagination guide you. Don’t be afraid to combine different textures, colors, and elements to create arrangements that reflect your unique style and evoke the holiday spirit. With practice, you’ll refine your skills and develop your own signature designs.
So, this holiday season, let the beauty of Christmas floral arrangements illuminate your home and create a festive atmosphere that will be cherished by all. Enjoy the process of creating these wonderful displays and the joy they bring to your loved ones as you celebrate the most wonderful time of the year.
Frequently Asked Questions about How To Make Christmas Floral Arrangements
Was this page helpful?
At Storables.com, we guarantee accurate and reliable information. Our content, validated by Expert Board Contributors, is crafted following stringent Editorial Policies. We're committed to providing you with well-researched, expert-backed insights for all your informational needs.


0 thoughts on “How To Make Christmas Floral Arrangements”