Tableware
How To Paint Wine Glasses
Modified: February 24, 2024
Discover how to paint wine glasses and transform ordinary tableware into beautiful works of art with our step-by-step guide. Get creative with your table settings!
(Many of the links in this article redirect to a specific reviewed product. Your purchase of these products through affiliate links helps to generate commission for Storables.com, at no extra cost. Learn more)
Introduction
Are you looking to add a personal touch to your glassware collection? Painting wine glasses is a fun and creative way to customize your glasses and make them truly unique. Whether you want to create a set of hand-painted glasses for a special occasion or simply want to add some flair to your everyday glassware, this guide will walk you through the step-by-step process of how to paint wine glasses.
Painting wine glasses allows you to unleash your creativity and express your personal style. You can choose from a variety of designs, patterns, and colors to create a look that matches your aesthetic preferences and complements your home decor. Whether you prefer a simple monogram, a floral motif, or a whimsical design, the possibilities are endless.
Not only is painting wine glasses a great way to personalize your glassware, but it also makes for a fantastic DIY gift. Hand-painted glasses are thoughtful and unique presents for birthdays, weddings, anniversaries, or any other special occasion. Your loved ones will appreciate the effort and thoughtfulness that goes into creating a custom-designed wine glass just for them.
To get started with painting wine glasses, you’ll need a few materials and follow a step-by-step process. In the next sections of this guide, we will go over the necessary supplies, as well as the steps involved in preparing the glasses, choosing a design, preparing the paints, and adding the final details. With a little time and creativity, you’ll have your very own hand-painted wine glasses that are sure to impress.
So, let’s gather our materials and dive into the world of wine glass painting!
Key Takeaways:
- Unleash your creativity and personalize your glassware with hand-painted wine glasses. From preparing the surface to adding intricate details, this guide provides a step-by-step process for creating unique and thoughtful gifts.
- Elevate your wine-drinking experience with personalized hand-painted wine glasses. Whether for special occasions or everyday use, follow the steps to unleash your artistic expression and create functional works of art.
Read more: How To Seal Paint On Wine Glasses
Materials Needed
Before you embark on your wine glass painting journey, you’ll need to gather a few essential materials. Here’s a list of what you’ll need:
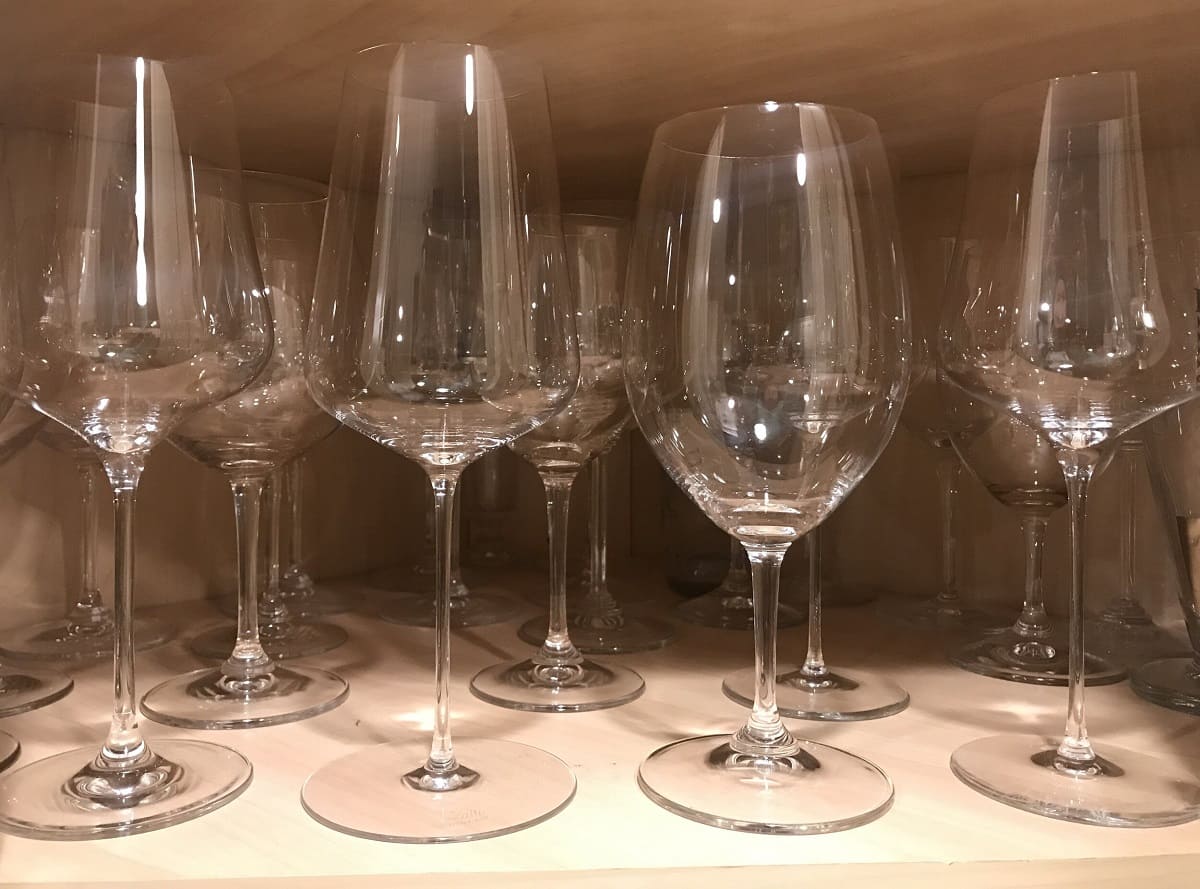
- Wine glasses: Choose clear glass wine glasses with smooth surfaces. You can find them at your local home goods store or online.
- Paints: Opt for paints specifically designed for glass painting. Acrylic enamel paints or glass paints are ideal as they adhere well to glass surfaces and are durable. Select a variety of colors to bring your designs to life.
- Paintbrushes: Invest in a set of paintbrushes with different brush sizes. This will allow you to create various brushstrokes and details in your designs.
- Palette or paint dishes: These will come in handy for mixing and diluting your paints.
- Water container: Fill a small container with water to clean your brushes and thin down the paints if needed.
- Painter’s tape: Use painter’s tape to create clean and crisp edges if you want to paint specific sections of the wine glass.
- Paint pens or markers (optional): If you prefer a more precise and controlled approach, you can use paint pens or markers for outlining or adding intricate details to your designs.
- Protective covering: Lay down newspaper or a drop cloth to protect your work surface from any potential paint spills or splatters.
- Clear sealer (optional): If you want to add an extra layer of protection and durability to your painted wine glasses, consider using a clear sealer specifically designed for glass.
Make sure to gather all the materials before you start painting. Having everything prepared and within reach will make the process smoother and more enjoyable. Now that you have your materials ready, let’s move on to the next step of preparing the wine glasses.
Step 1: Prepare the Wine Glasses
Before you start painting, it’s important to properly prepare the wine glasses to ensure the paint adheres well and the design lasts. Follow these steps to prepare the glasses:
- Wash the glasses: Thoroughly clean the wine glasses with warm soapy water to remove any dirt, dust, or oils. Rinse them well and make sure they are completely dry before proceeding to the next step.
- Prepare the surface: Use rubbing alcohol or glass cleaner and a lint-free cloth to wipe down the surface of the glasses. This will help remove any remaining residue and ensure a clean and smooth surface for the paint to adhere to.
- Mask off any areas (optional): If you want to paint only certain sections of the glass or create clean edges, use painter’s tape to mask off those areas. Press the tape firmly to ensure it adheres well and leaves a clean line.
- Let the glasses acclimate (optional): If the wine glasses were stored in a different temperature environment, let them come to room temperature before you start painting. This will prevent any potential cracking or damage to the glass due to sudden temperature changes.
By following these steps, you’ll ensure that your wine glasses are clean, dry, and properly prepped for painting. This will help the paint adhere better and provide a smooth painting surface. Now that your glasses are prepared, let’s move on to the exciting part – choosing your design!
Step 2: Choose Your Design
Choosing the design for your painted wine glasses is where your creativity truly comes into play. You have the freedom to select a design that reflects your personal style, matches the occasion, or complements your home decor. Here are some ideas to get you inspired:
- Monogram: Paint a monogram of your initial or a loved one’s on the glass. You can choose a script font or a block letter, depending on your preference.
- Floral motifs: Create delicate flowers, leaves, or vines on the wine glass for an elegant and botanical touch.
- Geometric patterns: Experiment with geometric shapes like triangles, stripes, or polka dots for a contemporary and modern design.
- Holiday-themed designs: Paint festive motifs like snowflakes for winter, hearts for Valentine’s Day, or pumpkins for Halloween.
- Quotes or phrases: Write a favorite quote, a meaningful phrase, or a special message on the glass to add a personal touch.
- Abstract art: Let your imagination run wild by creating abstract designs using vibrant colors and bold brushstrokes.
These are just a few ideas to spark your creativity. Feel free to mix and match designs or come up with something completely unique. It can be helpful to sketch out your design on paper before applying it to the wine glass. This will give you a sense of how the design will look and help you make any necessary adjustments.
Remember, there are no rules when it comes to choosing your design. The goal is to have fun and create something that you love. So, take your time and select a design that speaks to you. Once you have your design in mind, it’s time to prepare the paints. Let’s move on to the next step!
Step 3: Prepare the Paints
Before you start painting your wine glasses, it’s essential to prepare the paints so that they are ready to use. Follow these steps to get your paints ready:
- Choose your colors: Select the colors you want to use for your design. Consider the overall aesthetic you’re going for and how the colors will complement each other.
- Squeeze out the paints: Squeeze a small amount of each paint color onto a palette or paint dish. Start with a small amount to avoid wasting paint.
- Blend and mix (optional): If you want to create custom colors or add a gradient effect to your design, you can mix different paint colors together. Use a clean brush to blend and mix the colors until you achieve your desired shades.
- Thin the paints (if needed): Depending on the type of paint you’re using, you might need to thin it down to achieve a smoother application. Follow the instructions on the paint bottle or add a small amount of water or paint thinner to the paint and mix well. Be cautious not to add too much, as it might affect the opacity and adhesion of the paint.
By preparing your paints in advance, you’ll save time and ensure a smoother painting process. Having the colors ready to go will allow you to focus on creating your design without any interruptions.
Now that your paints are prepared, it’s time to start painting your wine glasses! Move on to the next step for a step-by-step guide on how to bring your design to life.
Read more: Which Wine Glass For Which Wine
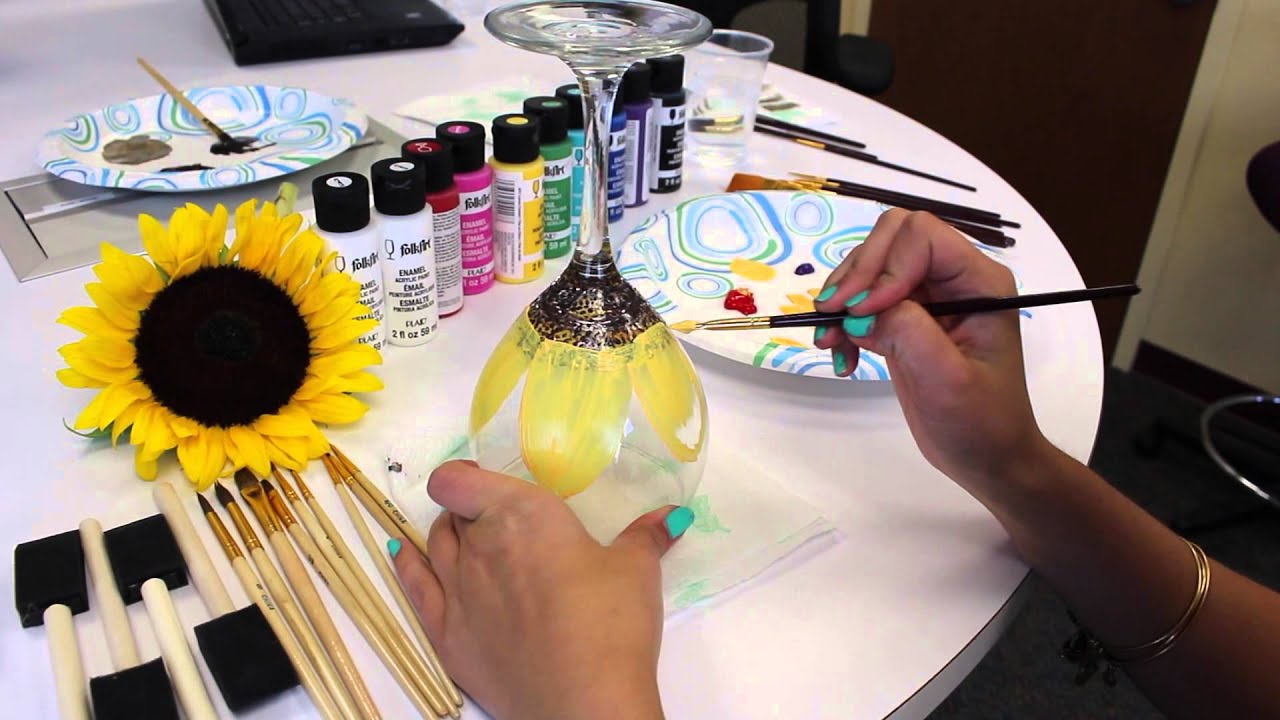
Step 4: Start Painting
Now that you have your prepared wine glasses and paints ready to go, it’s time to bring your design to life by painting the glasses. Follow these steps to ensure a successful painting process:
- Hold the glass securely: Hold the wine glass firmly by the stem or base, ensuring a stable grip. This will help you have better control while painting and prevent any accidental smudging or slipping.
- Dip the brush in the paint: Dip your paintbrush into the paint, making sure to coat the bristles evenly. Remove any excess paint by gently tapping the brush against the edge of the paint dish or palette.
- Apply the paint: Start applying the paint to the glass using gentle and controlled brushstrokes. If you’re painting a specific section or following a design, work carefully to stay within the lines. If you make any mistakes, quickly wipe off the paint with a damp cloth or cotton swab.
- Layer the paint (if needed): Depending on the desired opacity and color intensity, you may need to apply multiple coats of paint. Allow each layer to dry before adding another, ensuring a smooth and even application.
- Experiment with techniques: Get creative with your brushwork! You can use different techniques like stippling, blending, or even creating textured effects with your brush to add depth and dimension to your design. Feel free to explore and find what works best for you.
- Clean your brushes: Clean your paintbrushes thoroughly with water before switching colors or when you’re finished with your painting session. This will prevent the colors from mixing and ensure that your brushes stay in good condition for future use.
As you paint, take your time and enjoy the process. Embrace any imperfections or variations in brushstrokes, as they add character to your hand-painted wine glasses. Remember, this is an opportunity to express your creativity, so don’t be afraid to experiment and make it your own.
Once you have painted your wine glasses, it’s time to add the final touches and accents. Move on to the next step to learn how to take your design to the next level.
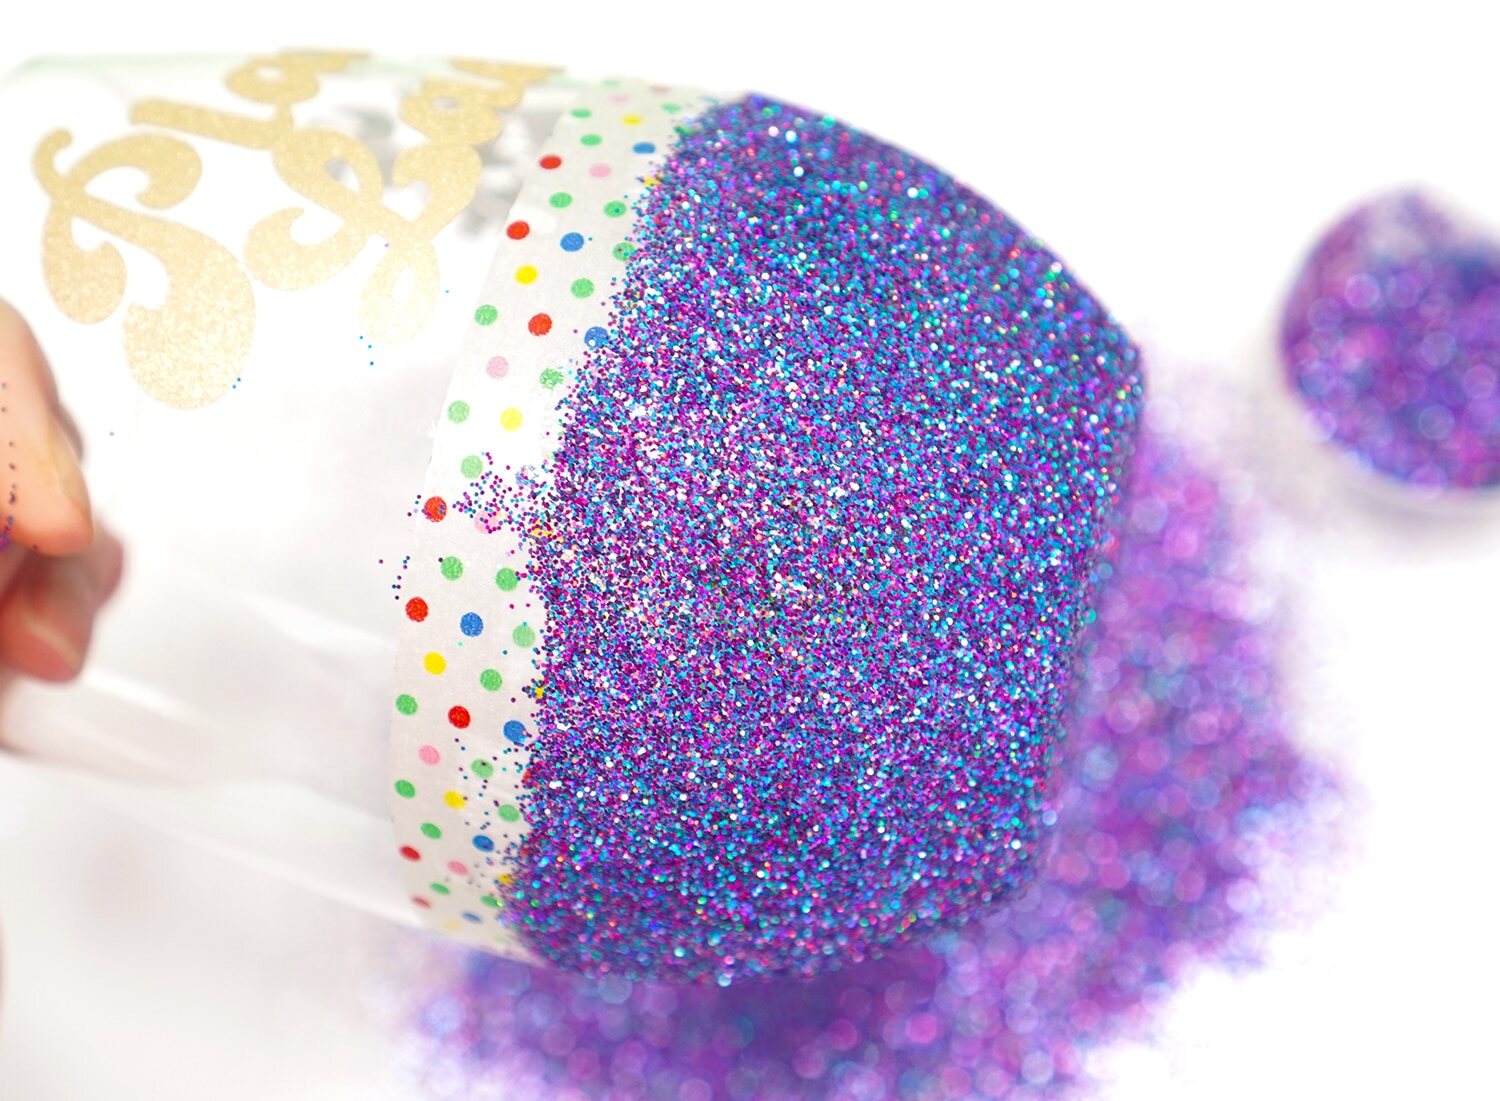
Step 5: Add Details and Accents
Now that you have painted the base design on your wine glasses, it’s time to add some extra details and accents to enhance the overall look. This step allows you to personalize your design and make it truly unique. Follow these steps to add those final touches:
- Choose your additional details: Think about what additional elements you want to incorporate into your design. This can include small patterns, dots, lines, swirls, or any other decorative elements that complement your main design.
- Select a smaller brush: Use a smaller brush or even a paint pen or marker for more precise and intricate work.
- Add the details: Dip your brush or pen into the desired color and carefully add the details to your painted wine glasses. Take your time and work with a steady hand to create clean and precise lines.
- Experiment with accents: Consider adding metallic accents or glitter to certain areas of your design for an extra touch of sparkle and glamour. You can use a metallic paint or apply adhesive and sprinkle glitter over the painted surface.
- Allow the paint to dry: Once you’re satisfied with the additional details and accents, give your wine glasses ample time to dry completely. This will ensure that the design sets properly and doesn’t smudge or smear.
Adding these details and accents will elevate your design and make your hand-painted wine glasses truly stand out. The little touches can make a big difference in the overall appearance and add a touch of personalization.
Now that you’ve completed the design and added all the desired details, it’s time to proceed to the next step and allow the paint to dry fully before moving on to further optional steps.
When painting wine glasses, make sure to clean the surface thoroughly with rubbing alcohol to remove any oils or residue that could affect the paint’s adhesion. This will help ensure a smooth and long-lasting finish.
Step 6: Allow the Paint to Dry
Once you have finished painting and adding all the details and accents to your wine glasses, it’s crucial to allow the paint to dry completely. This step ensures that the paint sets properly and prevents any smudging or damage to the design. Follow these steps to ensure your paint dries effectively:
- Set the glasses in a safe place: Find a location where your wine glasses can sit undisturbed and won’t be at risk of getting knocked over or damaged while the paint dries.
- Give them sufficient time: The drying time will depend on the type of paint used and the atmospheric conditions. It’s best to refer to the instructions on the paint packaging for estimated drying times. Generally, it can take several hours to overnight for the paint to fully dry and set.
- Avoid touching or moving the glasses: During the drying process, it’s crucial not to touch or move the glasses, as this can cause smudges or imperfections in the design. Allow the glasses to sit undisturbed until the paint is completely dry.
- Check for dryness: To make sure the paint is dry, gently touch a small, inconspicuous area of the glass to see if it feels dry to the touch. If it still feels tacky or sticky, give it more time to dry before proceeding.
Patience is key during this step. Rushing the drying process can lead to smudged or damaged designs, undoing all your hard work. So, take a deep breath, resist the temptation to handle the glasses prematurely, and give the paint ample time to dry.
Once the paint is completely dry, you can choose to move on to the optional steps of curing and sealing the design, as outlined in the next steps. These steps can provide additional durability and protection to your hand-painted wine glasses if desired.
Step 7: Cure the Paint (Optional)
While not necessary, curing the paint on your hand-painted wine glasses can provide additional durability and longevity to the design. Curing involves baking the glasses in the oven to set the paint and make it more resistant to chipping or fading. If you choose to proceed with this optional step, follow these guidelines:
- Refer to the paint instructions: Different types of paint may have specific curing instructions. It’s important to read and follow the manufacturer’s guidelines for the best results. Make sure the paint you used is oven-safe and suitable for curing.
- Place the glasses in a cold oven: Arrange the painted glasses securely on a baking sheet or in a baking dish. Preheat the oven to the temperature recommended by the paint manufacturer.
- Allow for gradual temperature change: Once the oven has reached the desired temperature, place the glasses inside and gradually bring them up to the specified temperature. This allows the glass to adjust to the heat and helps prevent cracking or breakage.
- Set the timer: Keep the glasses in the oven for the specified time according to the paint instructions. This typically ranges from 30 minutes to a couple of hours.
- Turn off the oven and let them cool: When the timer goes off, turn off the oven and leave the glasses inside to cool down gradually. Removing them too quickly can also cause the glass to crack due to temperature changes. Once cooled, carefully remove your cured glasses from the oven.
It’s important to note that not all paints require baking for curing. Some may have alternative methods, such as air-drying or using heat guns. Again, always consult the paint manufacturer’s instructions for the specific curing process.
Keep in mind that curing the paint in the oven may slightly alter the appearance of the design or the glass itself. It’s a personal choice whether you want to proceed with this step. If you decide not to cure the paint, allow the glasses to air-dry for an extended period before moving on to the next optional step of sealing the design.
Read more: How To Price Wine By The Glass
Step 8: Seal the Design (Optional)
Sealing the design on your hand-painted wine glasses is an optional step that can help protect the paint and extend its lifespan. A clear sealant creates a protective barrier that guards against scratches, fading, and washing off. If you choose to seal your design, follow these steps:
- Choose an appropriate sealant: Select a sealant specifically designed for glass or ceramics. Look for a clear, non-toxic sealant that is dishwasher-safe and suitable for your painted surface.
- Prepare a well-ventilated area: Work in a well-ventilated space or outdoors, as sealants can emit strong fumes. Lay down newspaper or a drop cloth to protect your work surface.
- Hold the glass securely: Hold the wine glass by the stem or base to keep it steady while applying the sealant.
- Spray or brush on the sealant: Following the instructions on the sealant packaging, either spray the sealant evenly over the painted surface or use a clean brush to apply it in smooth, even strokes. Make sure to cover all painted areas thoroughly.
- Allow for drying and curing time: Set the glasses aside in a safe place and let the sealant dry and cure according to the instructions provided. This can range from a couple of hours to overnight.
- Check for any additional coats (optional): Depending on the brand or type of sealant used, you may need to apply additional coats for optimal protection. Refer to the instructions on the packaging for guidance.
- Let the glasses cure completely: Once all the coats have been applied, allow the glasses to cure fully. This can take a few days to a week, depending on the sealant. Avoid using or washing the glasses until they are fully cured.
Sealing the design adds an extra layer of protection and ensures that your hand-painted wine glasses can withstand everyday use and washing. It will also make it easier to clean the glasses without worrying about the paint wearing off or getting damaged.
After you have sealed your design, your hand-painted wine glasses are ready to be enjoyed! They make perfect gifts or beautiful additions to your own collection. Take a moment to admire your creativity and the unique pieces you have created.
Step 9: Enjoy Your Hand-Painted Wine Glasses!
Congratulations! You have successfully completed the process of painting and customizing your wine glasses. Now it’s time to sit back, relax, and enjoy the fruits of your creativity. Here are a few tips on how to fully savor your hand-painted wine glasses:
- Display proudly: Showcase your beautiful hand-painted wine glasses on a bar cart, in a glass cabinet, or as a centerpiece on your dining table. Their unique design will grab attention and serve as a conversation starter.
- Use and enjoy: Pour your favorite wine or beverage into your hand-painted glasses and relish the experience. The personalized touch will enhance the enjoyment of your drink and make every sip feel special.
- Hand-wash with care: To preserve the integrity of the design, it’s recommended to hand-wash your painted wine glasses. Use mild dish soap and a soft sponge or cloth to clean them gently. Avoid harsh scrubbing or abrasive cleaners that can damage the paint.
- Store properly: When not in use, store your hand-painted wine glasses in a safe place where they won’t bump into other glassware or objects. Consider using soft cloth or felt dividers to protect them from scratches.
- Share the love: Your hand-painted wine glasses make fantastic gifts for friends, family, and loved ones. Spread the joy and share your creativity by gifting these unique and personalized pieces.
Remember, hand-painted wine glasses are not only functional but also serve as a form of art. Each glass is a testament to your creativity and adds a personal touch to your dining or entertaining experiences.
So, pour yourself a glass of wine, raise a toast to your artistic endeavors, and enjoy the satisfaction of using and displaying your hand-painted wine glasses. Cheers to your creativity!
Before wrapping up, here are a few final tips and tricks to help you along your wine glass painting journey:
Tips and Tricks
As you continue to explore the world of wine glass painting, here are some helpful tips and tricks to keep in mind:
- Practice on a spare glass: If you’re new to wine glass painting or trying out new techniques, consider practicing on a spare glass or a plain glass before working on your final design.
- Start with simple designs: If you’re new to painting on glass, begin with simpler designs to build your confidence and skill. As you become more comfortable, you can gradually tackle more intricate and elaborate designs.
- Use light layers: When applying the paint, it’s better to start with thin, light layers and gradually build up the opacity. This helps prevent the paint from pooling or running, resulting in a cleaner finish.
- Clean brushes properly: After each use, clean your brushes thoroughly with water or the appropriate cleaning solution for the paint you’re using. This will help extend the lifespan of your brushes and prevent cross-contamination of colors.
- Experiment with different brush sizes: Don’t be afraid to explore different brush sizes to create a variety of brushstrokes and textures. This adds depth and visual interest to your designs.
- Add depth with shading: If you want to add depth to your design, consider incorporating shading techniques. This involves adding darker shades or subtle gradients to create a three-dimensional effect.
- Practice brush control: The more you practice controlling your brush, the more precise and detailed your designs will become. Experiment with different brush pressures, angles, and strokes to achieve the desired effects.
- Embrace imperfections: Remember that hand-painted art is unique and individualistic. Don’t worry too much about small imperfections or minor mistakes. They add character and charm to your creations.
- Protect your work surface: Always use a protective covering, such as newspaper or a drop cloth, to prevent any accidental paint spills or stains on your work surface.
- Have fun and express yourself: The most important tip of all is to have fun and let your creativity shine. Enjoy the process of painting and let your hand-painted wine glasses be a true reflection of your personal style and artistic expression.
By keeping these tips in mind and allowing yourself room for experimentation and creativity, you’ll continue to improve your wine glass painting skills and create stunning, one-of-a-kind designs.
Now that you have all the knowledge and guidance you need, it’s time to embark on your wine glass painting journey. Let your imagination run wild, and have a wonderful time expressing your creativity through the art of hand-painted wine glasses!
Happy painting!
Conclusion
Painting wine glasses is a delightful and creative way to add a personal touch to your glassware collection if you’re wondering what to do with wine glasses. With a few simple materials and a sprinkle of imagination, you can transform ordinary wine glasses into extraordinary pieces of functional art.
Throughout this guide, we’ve covered every step of the process, from preparing the wine glasses to choosing designs, painting, adding details, and optional steps like curing and sealing. By following these steps and incorporating the tips and tricks, you’ll be able to create stunning hand-painted wine glasses that reflect your unique style and creativity.
Not only are hand-painted wine glasses a fantastic way to express your artistic talents, but they also make memorable and meaningful gifts for special occasions. Whether it’s a wedding, birthday, or housewarming, your customized wine glasses will leave a lasting impression and be cherished by their recipients for years to come.
Remember to take your time, have fun, and allow yourself to experiment with different designs, colors, and techniques. Each brushstroke is an opportunity to express your individuality and create something truly special.
Whether you’re sipping wine with friends, toasting to a celebration, or simply enjoying a quiet evening at home, your hand-painted wine glasses will elevate the experience and bring a touch of artistry to every occasion.
So, gather your materials, unleash your creativity, and let your imagination flow. Start painting and experience the joy of holding a beautiful, hand-painted wine glass that is a reflection of your artistic talents. Cheers to the beauty and joy of hand-painted wine glasses!
Frequently Asked Questions about How To Paint Wine Glasses
Was this page helpful?
At Storables.com, we guarantee accurate and reliable information. Our content, validated by Expert Board Contributors, is crafted following stringent Editorial Policies. We're committed to providing you with well-researched, expert-backed insights for all your informational needs.


0 thoughts on “How To Paint Wine Glasses”