Home>Furniture & Design>Interior Design Trends>How To Use A Glass Cutter
Interior Design Trends
How To Use A Glass Cutter
Modified: October 19, 2024
Learn how to use a glass cutter to create stunning interior design trends. Master the art of cutting glass with our step-by-step guide.
(Many of the links in this article redirect to a specific reviewed product. Your purchase of these products through affiliate links helps to generate commission for Storables.com, at no extra cost. Learn more)
Introduction
Glass cutting is a fundamental skill for anyone involved in DIY projects, home improvement, or crafts. Whether you're creating custom glass pieces for your home or working on a creative project, knowing how to use a glass cutter effectively is essential. This versatile tool allows you to precisely score and cut glass, enabling you to achieve clean and accurate results.
Understanding the principles of using a glass cutter and following the correct techniques can make the process more manageable and enjoyable. With the right guidance, you can confidently tackle glass-cutting tasks and unleash your creativity with this versatile material.
In this comprehensive guide, we will delve into the intricacies of using a glass cutter, from understanding its components to mastering the art of scoring and breaking glass. By the end of this article, you will have the knowledge and confidence to embark on glass-cutting projects with precision and finesse. Let's explore the world of glass cutting and unlock the potential for creating stunning glass pieces.
Key Takeaways:
- Mastering the art of using a glass cutter allows you to create custom glass pieces with confidence and precision, unleashing your creativity in DIY projects and glass artistry.
- Prioritizing safety measures and proper glass preparation sets the stage for a successful and rewarding glass-cutting experience, fostering a secure and focused environment for creative expression.
Read more: How To Store Cookie Cutters
Understanding the Glass Cutter
A glass cutter is a specialized tool designed for scoring and cutting glass with precision. It consists of a small, hardened steel wheel mounted on a metal handle. This wheel, known as the cutting wheel, is the key component responsible for creating a controlled score line on the surface of the glass. The handle of the glass cutter is ergonomically designed to provide a comfortable grip, allowing the user to exert consistent pressure while scoring the glass.
The cutting wheel of a glass cutter is typically made from durable materials such as tungsten carbide or industrial diamond. These materials are chosen for their exceptional hardness, enabling the wheel to maintain a sharp edge and effectively scratch the surface of the glass. The sharpness of the cutting wheel is crucial for achieving clean and precise scores, minimizing the risk of chipping or shattering the glass during the cutting process.
In addition to the cutting wheel, some glass cutters feature a built-in oil reservoir and dispensing system. This oil, often referred to as cutting fluid, serves as a lubricant to reduce friction between the cutting wheel and the glass. By applying a small amount of cutting fluid to the surface of the glass before scoring, the glass cutter can smoothly glide along the intended cutting line, enhancing the overall cutting performance and prolonging the lifespan of the cutting wheel.
Furthermore, modern glass cutters may incorporate additional features such as adjustable pressure settings and swivel heads. These advancements provide users with greater control and flexibility when scoring glass of varying thickness and shapes. The ability to adjust the pressure exerted by the cutting wheel allows for tailored scoring depths, accommodating different types of glass and specific cutting requirements.
Understanding the components and functionality of a glass cutter is essential for mastering the art of glass cutting. By familiarizing yourself with the intricacies of this indispensable tool, you can approach glass-cutting tasks with confidence and precision, unlocking a world of creative possibilities.
Preparing the Glass
Before embarking on the glass-cutting process, it is crucial to prepare the glass surface to ensure optimal cutting conditions and minimize the risk of breakage or imperfections. Proper preparation sets the stage for a successful cutting experience and contributes to the overall quality of the finished glass piece.
-
Cleaning the Glass: Begin by thoroughly cleaning the surface of the glass to remove any dirt, dust, or debris that could interfere with the cutting process. Using a mild glass cleaner or a solution of water and vinegar, wipe the glass with a lint-free cloth to achieve a pristine, debris-free surface. This step is essential for promoting smooth and precise scoring, as any contaminants on the glass could impede the movement of the cutting wheel.
-
Marking the Cutting Line: Once the glass is clean and dry, use a glass marker or a grease pencil to mark the intended cutting line. Precision is key at this stage, as the accuracy of the marked line will directly influence the outcome of the cutting process. Utilize a straightedge or a ruler to guide the marking tool, ensuring a straight and well-defined cutting line.
-
Securing the Glass: To prevent the glass from shifting or sliding during cutting, secure it on a stable and flat surface. Utilize clamps or suction cup tools designed for glass manipulation to hold the glass securely in place. This step is crucial for maintaining stability and preventing accidental movement while scoring the glass.
-
Protective Gear: Prior to commencing the cutting process, it is essential to don appropriate protective gear, including safety glasses and gloves. Safety glasses shield the eyes from potential glass shards or debris, while gloves provide a layer of protection against accidental cuts and enhance grip when handling the glass.
By meticulously preparing the glass and adhering to these essential steps, you establish an optimal environment for successful glass cutting. This meticulous approach sets the stage for a seamless cutting experience, allowing you to focus on executing precise scores and achieving the desired results with confidence and ease.
Using the Glass Cutter
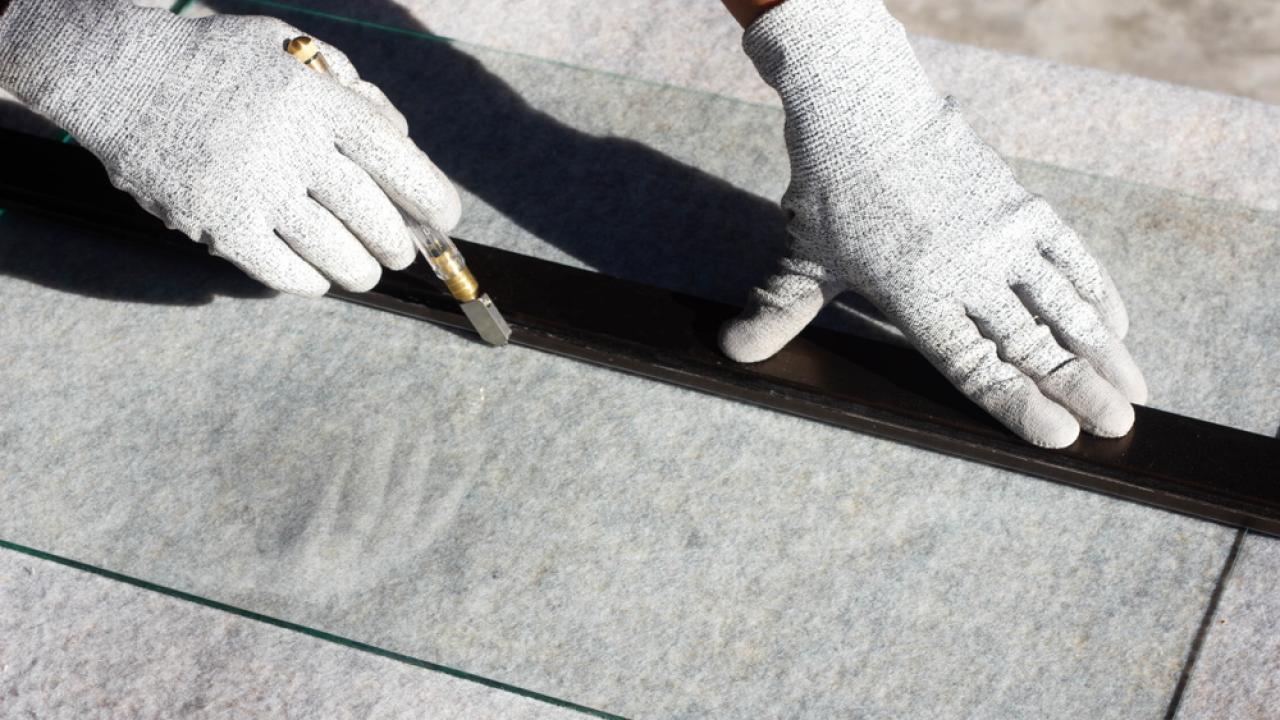
Using a glass cutter effectively requires a combination of technique, precision, and patience. The process of scoring the glass involves creating a controlled fracture line, which serves as the foundation for cleanly breaking the glass along the intended cutting path. Mastering the art of using a glass cutter involves understanding the nuances of scoring and applying the right amount of pressure to achieve optimal results.
To begin, hold the glass cutter firmly, ensuring a comfortable and stable grip. Position the cutting wheel at the starting point of the marked cutting line, aligning it perpendicular to the glass surface. Apply gentle but consistent pressure as you roll the cutter along the marked line. The goal is to create a smooth and continuous score across the glass, maintaining a steady pace and avoiding abrupt stops or hesitations.
As you guide the glass cutter along the marked line, focus on maintaining a consistent pressure to ensure an even and well-defined score. The cutting wheel should scratch the surface of the glass without excessive force, allowing the inherent properties of the glass to dictate the depth of the score. It is essential to avoid pressing too hard, as excessive pressure can lead to uneven scoring and potential glass breakage.
While scoring the glass, aim to complete the entire length of the marked line in a single pass. This continuous motion contributes to a uniform score, minimizing the risk of irregularities that could compromise the integrity of the glass. Once the initial score is complete, refrain from retracing the same line, as this can create unnecessary stress on the glass and potentially lead to an uneven break.
After scoring the glass, it is important to handle the subsequent steps with care and precision. Gently tap the underside of the scored line using a narrow metal object, such as the handle of the glass cutter or a ball-end tapping tool. The goal is to apply controlled pressure along the scored line, gradually encouraging the glass to break along the intended path. Exercise patience and avoid excessive force, allowing the glass to respond to the subtle tapping and gradually yield to the fracture line.
By mastering the art of using a glass cutter, you can confidently approach glass-cutting projects with precision and finesse. The combination of technique, patience, and a steady hand is essential for achieving clean and accurate scores, laying the groundwork for successful glass cutting and the creation of stunning glass pieces.
When using a glass cutter, make sure to score the glass with firm and even pressure. Hold the cutter at a 90-degree angle and only make one pass to avoid chipping. Always wear safety goggles and gloves.
Breaking the Glass
After successfully scoring the glass along the intended cutting line, the next crucial step is breaking the glass along the scored line to achieve the desired shape or size. Breaking the glass requires a delicate balance of controlled force and precision, ensuring a clean and accurate separation along the scored line without causing unintended damage to the glass.
To initiate the breaking process, carefully position the scored glass on a flat and stable surface, ensuring that the scored line is aligned with the edge of the surface. It is essential to provide ample support to the surrounding areas of the glass to prevent unnecessary flexing or bending during the breaking phase. Placing the scored line directly on the edge of the surface allows for controlled pressure to be applied along the score, facilitating the separation of the glass along the intended cutting path.
With the scored line positioned at the edge, gently but firmly apply downward pressure on one side of the glass, focusing on the area adjacent to the scored line. The goal is to gradually encourage the glass to yield to the scored line, initiating the fracture and guiding the separation process. It is crucial to maintain a steady and even distribution of pressure, avoiding sudden or uneven force that could lead to unintended breakage or irregular separation.
As the pressure is applied, the glass will respond to the controlled force, gradually propagating the fracture along the scored line. Exercise patience and attentiveness during this phase, allowing the glass to respond to the applied pressure and guiding the separation process with precision. Avoid abrupt or excessive force, as this can lead to unpredictable breaks and compromise the integrity of the glass.
As the fracture progresses along the scored line, continue to apply gentle and consistent pressure, ensuring that the separation remains controlled and uniform. The goal is to guide the glass to cleanly break along the scored line, resulting in two distinct pieces with smooth and precise edges. Once the separation is complete, carefully inspect the edges of the broken glass to ensure a clean and accurate break, free from jagged or uneven edges.
By mastering the art of breaking the glass with controlled force and precision, you can achieve clean and accurate separations along scored lines, paving the way for the creation of stunning glass pieces with professional-quality finishes. The combination of patience, attentiveness, and controlled force is essential for achieving successful breaks and unlocking the creative potential of glass-cutting projects.
Read more: How To Align Laser Cutter Mirrors
Safety Precautions
When engaging in glass-cutting activities, prioritizing safety is paramount to ensure a secure and risk-free working environment. Implementing appropriate safety precautions not only safeguards against potential injuries but also promotes a smooth and focused glass-cutting experience. Here are essential safety measures to adhere to:
-
Protective Gear: Before commencing any glass-cutting tasks, it is imperative to equip oneself with the necessary protective gear. Safety glasses are essential to shield the eyes from glass shards or debris that may result from scoring and breaking the glass. Additionally, wearing gloves provides a protective barrier against accidental cuts and enhances grip when handling the glass, reducing the risk of slippage or mishandling.
-
Workspace Organization: Maintain a well-organized and clutter-free workspace to minimize the risk of accidents. Clear the work area of any unnecessary items and ensure that the glass-cutting tools and materials are neatly arranged and easily accessible. By creating a tidy and organized workspace, you can navigate the glass-cutting process with enhanced focus and efficiency.
-
Proper Ventilation: When working with glass, especially during cutting and breaking processes, ensure adequate ventilation in the workspace. Proper ventilation helps disperse any glass dust or particles that may be generated during the cutting process, promoting a healthier and more comfortable working environment.
-
Secure Handling: Exercise caution when handling glass sheets, particularly when transporting or positioning them for cutting. Use appropriate lifting techniques to prevent strain or injury, and be mindful of the fragility of the glass to avoid accidental breakage or damage.
-
First Aid Preparedness: In the event of minor cuts or injuries, having a well-equipped first aid kit readily available is essential. Stock the kit with antiseptic solutions, adhesive bandages, and sterile gauze to address any minor injuries promptly and effectively.
-
Disposal of Glass Waste: Properly dispose of glass waste and shards in designated containers or disposal units. Ensure that broken glass pieces are carefully collected and disposed of in a secure manner to prevent potential injuries from sharp edges.
By diligently adhering to these safety precautions, you can create a secure and controlled environment for engaging in glass-cutting activities. Prioritizing safety not only mitigates potential risks but also fosters a focused and productive glass-cutting experience, allowing you to channel your creativity with confidence and peace of mind.
Conclusion
Mastering the art of using a glass cutter opens the door to a world of creative possibilities, enabling individuals to craft custom glass pieces, undertake DIY projects, and explore the realm of glass artistry with confidence and precision. By understanding the intricacies of the glass cutter and embracing the essential techniques of scoring and breaking glass, enthusiasts and artisans can embark on glass-cutting endeavors with a newfound sense of proficiency and creativity.
The journey of using a glass cutter begins with a deep understanding of the tool itself, from the composition of the cutting wheel to the ergonomic design of the handle. By familiarizing oneself with the components and functionality of the glass cutter, individuals can approach glass-cutting tasks with a heightened sense of control and mastery, setting the stage for successful and rewarding outcomes.
Properly preparing the glass surface is a critical step that sets the foundation for a seamless cutting experience. From meticulous cleaning to precise marking and secure positioning, the preparation process ensures optimal cutting conditions and minimizes the risk of imperfections or breakage. This meticulous approach not only enhances the quality of the cutting process but also instills a sense of readiness and focus as individuals embark on their glass-cutting journey.
The art of using a glass cutter extends to the delicate process of scoring and breaking the glass. By applying the right amount of pressure, maintaining a steady hand, and exercising patience, individuals can achieve clean and accurate scores, laying the groundwork for successful breaks and the creation of stunning glass pieces. This combination of technique, precision, and attentiveness forms the essence of using a glass cutter effectively, empowering individuals to unleash their creativity and bring their glass-cutting visions to life.
Furthermore, prioritizing safety measures throughout the glass-cutting process is essential for creating a secure and risk-free working environment. By equipping oneself with the necessary protective gear, maintaining a well-organized workspace, and adhering to proper handling and disposal practices, individuals can engage in glass-cutting activities with confidence and peace of mind, fostering a safe and focused environment for creative expression.
In conclusion, mastering the art of using a glass cutter is a journey that intertwines technique, precision, creativity, and safety. By embracing the nuances of this versatile tool and honing the essential skills of glass cutting, individuals can unlock their creative potential and embark on a fulfilling and rewarding glass-cutting experience. Whether it's crafting custom glass pieces for home decor, undertaking DIY projects, or delving into the realm of glass artistry, the art of using a glass cutter empowers individuals to transform their glass-cutting aspirations into tangible and captivating creations.
Frequently Asked Questions about How To Use A Glass Cutter
Was this page helpful?
At Storables.com, we guarantee accurate and reliable information. Our content, validated by Expert Board Contributors, is crafted following stringent Editorial Policies. We're committed to providing you with well-researched, expert-backed insights for all your informational needs.


0 thoughts on “How To Use A Glass Cutter”