Home>Articles>How To Set Up A VEVOR Vinyl Cutter 34 Inch Vinyl Cutter Machine
Articles
How To Set Up A VEVOR Vinyl Cutter 34 Inch Vinyl Cutter Machine
Modified: March 1, 2024
Discover how to set up a VEVOR Vinyl Cutter 34 Inch machine and optimize your vinyl cutting process with our informative articles.
(Many of the links in this article redirect to a specific reviewed product. Your purchase of these products through affiliate links helps to generate commission for Storables.com, at no extra cost. Learn more)
Introduction
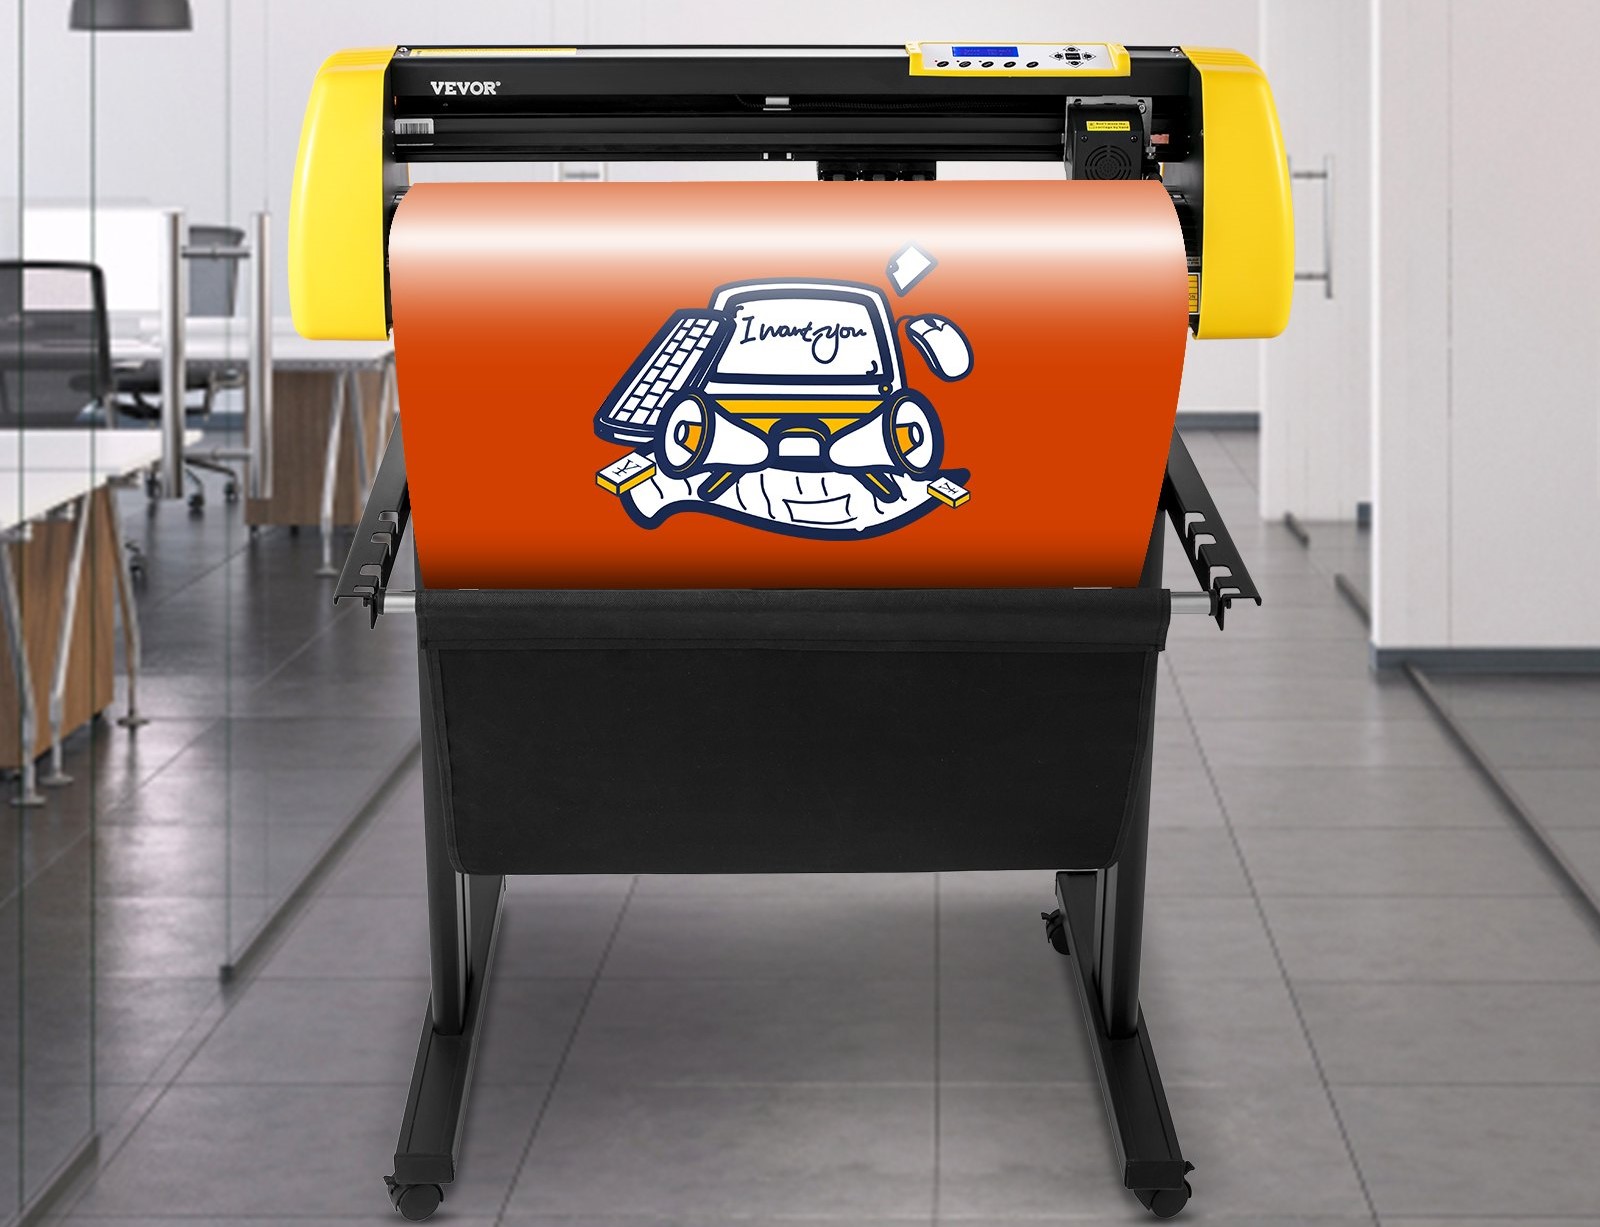
Welcome to the exciting world of vinyl cutting! If you’re a creative individual or a small business owner looking to add a personal touch to your designs, then a VEVOR Vinyl Cutter is the perfect tool for you. With its precision cutting capabilities and user-friendly interface, this machine allows you to cut intricate designs, lettering, and graphics out of vinyl materials with ease.
In this guide, we will walk you through the step-by-step process of setting up your VEVOR Vinyl Cutter. Whether you’re a beginner or have some experience with vinyl cutting, this article will provide you with all the information you need to get started.
Before we dive into the setup process, it’s important to note that the VEVOR Vinyl Cutter 34 Inch is a versatile machine that can be used for a wide range of applications. Whether you’re looking to create custom decals, heat transfers for clothing, signage, or even stickers, this machine has got you covered.
So, let’s get started! In the following sections, we’ll cover unboxing and assembly, connecting the machine to your computer, installing the necessary software, setting up cutting parameters, loading vinyl, adjusting cut settings, performing test cuts, troubleshooting common issues, and finalizing the setup process.
By the end of this guide, you’ll be well-equipped to unleash your creativity and enjoy seamless cutting experiences with your VEVOR Vinyl Cutter. So, without further ado, let’s jump right in and explore the world of vinyl cutting!
Key Takeaways:
- Unleash Your Creativity
With the VEVOR Vinyl Cutter, you can bring your designs to life with precision and ease. From custom decals to heat transfers and more, this versatile machine empowers you to explore endless creative possibilities. - Master Your Craft
By following the comprehensive setup guide and leveraging maintenance tips, you can become a vinyl cutting expert. Embrace experimentation, stay informed, and let your VEVOR Vinyl Cutter be your creative companion.
Read more: How To Make Vinyl Placemats
I. Unboxing and Assembly
Before you can start using your VEVOR Vinyl Cutter, the first step is to unbox and assemble the machine. Here’s a guide to help you navigate through this process.
Unboxing the VEVOR Vinyl Cutter
When you receive your VEVOR Vinyl Cutter, it will come securely packaged to ensure its safety during transportation. Carefully remove the packaging materials and follow these steps:
- Inspect the contents of the package to ensure that all the necessary parts are included. This typically includes the vinyl cutter machine itself, a power cord, a USB cable, a blade holder, a cutting mat, and any additional accessories that may have been included.
- Remove any protective film or packaging from the machine and its parts. Make sure to handle the machine with care to avoid any damage.
- Refer to the user manual provided by VEVOR for any specific instructions or precautions while unboxing the machine.
Assembling the Vinyl Cutter Machine
Once you’ve finished unboxing the machine, it’s time to assemble it. Here’s how:
- Find a suitable location for your vinyl cutter. It’s important to place it on a stable and flat surface that can support the weight of the machine.
- Carefully attach the cutting mat to the machine’s work area. This will provide a stable base for your vinyl material during cutting.
- Next, locate the blade holder. Insert the blade into the holder, making sure it is securely tightened.
- Refer to the user manual to locate the blade adjustment knob. Use this knob to adjust the blade depth, ensuring that it slightly protrudes from the blade holder.
- Connect the power cord to the machine and plug it into a power outlet. The machine should now be ready for power.
That’s it! You have successfully unboxed and assembled your VEVOR Vinyl Cutter. In the next section, we will guide you through the process of connecting your vinyl cutter to a computer.
II. Connecting the Machine
In order to operate your VEVOR Vinyl Cutter, you will need to connect it to a power source and a computer. This section will guide you through the process of powering on the vinyl cutter and establishing a connection with your computer.
Powering On the Vinyl Cutter
Before connecting the vinyl cutter to a power source, double-check that it is correctly assembled and positioned on a stable surface. Once you have done so, follow these steps to power on the machine:
- Locate the power switch on the vinyl cutter. It is typically located on the side or back of the machine.
- Flip the power switch to the “on” position. You may notice a power indicator light illuminating, indicating that the machine has power.
- Allow the vinyl cutter a few moments to initialize and calibrate. You may hear some mechanical noises and see the carriage moving during this process. This is normal.
- Once the machine has finished initializing, it is now powered on and ready for use.
Connecting the Vinyl Cutter to a Computer
In order to control your VEVOR Vinyl Cutter and send designs to be cut, you will need to establish a connection between the machine and your computer. Here are the steps to do this:
- Locate the USB port on the vinyl cutter. It is usually located on the side or back of the machine.
- Take the USB cable that came with your vinyl cutter and connect one end to the USB port on the vinyl cutter.
- Next, take the other end of the USB cable and connect it to an available USB port on your computer.
- Ensure that the USB connection is secure and snug for a stable connection.
- Your VEVOR Vinyl Cutter is now connected to your computer!
With the vinyl cutter connected to your computer, you are now ready to proceed with installing the necessary software to start cutting your designs. The software installation process will be covered in the next section.
III. Installing the Required Software
In order to control your VEVOR Vinyl Cutter and prepare your designs for cutting, you will need to install the necessary software on your computer. This section will guide you through the process of downloading and installing the software.
Downloading the Software
The software required to operate the VEVOR Vinyl Cutter can typically be found on the VEVOR website or included in the package with your machine. Here’s how to download the software:
- Visit the official VEVOR website and navigate to the support or downloads section. Look for the software specifically designed for your model of vinyl cutter.
- Click on the download link for the software. Ensure that you are downloading the latest version available to access all the features and improvements.
- Choose a location on your computer where you would like to save the software installer file.
- Wait for the download to complete. The time it takes will depend on your internet speed and the size of the software.
Read more: How To Use A Glass Cutter
Installing the Software on your Computer
Once you have downloaded the software installer file, follow these steps to install it on your computer:
- Navigate to the location where you saved the software installer file.
- Double-click on the installer file to launch the installation wizard.
- Follow the on-screen prompts to guide you through the installation process. This may include accepting the terms and conditions, choosing a destination folder for the software, and selecting any additional options or components to install.
- Once the installation is complete, you may be prompted to restart your computer. It is recommended to do so for any necessary system changes to take effect.
Congratulations! You have now successfully installed the required software for your VEVOR Vinyl Cutter. In the next section, we will guide you through the process of setting up cutting parameters to ensure optimal results with your machine.
IV. Setting Up Cutting Parameters
To achieve precise and clean cuts with your VEVOR Vinyl Cutter, it is important to set up the cutting parameters correctly. This section will walk you through adjusting the blade depth and setting the cutting speed and force for optimal results.
Adjusting Blade Depth
The blade depth determines how deep the blade will penetrate the vinyl material during cutting. Here’s how to adjust the blade depth:
- Locate the blade holder on your VEVOR Vinyl Cutter. It is typically located near the carriage assembly.
- Loosen the blade holder using the adjustment knob or mechanism provided. This will allow you to adjust the position of the blade.
- Gently slide the blade up or down within the holder to adjust the depth. Start with a shallow depth and gradually increase it if needed.
- Tighten the blade holder securely once you have set the desired depth.
It’s important to find the right balance for the blade depth. If the blade is set too shallow, it may not cut through the vinyl completely. On the other hand, if it is set too deep, it may cut into the cutting mat or damage your work surface.
Setting Cutting Speed and Force
Another important aspect of setting up cutting parameters is the cutting speed and force. These settings determine how fast the vinyl cutter will move and how much pressure it will apply during cutting. Here’s how to set them:
- Access the settings menu or control panel on your VEVOR Vinyl Cutter. This can usually be done through the provided software or directly on the machine itself.
- Locate the options for adjusting the cutting speed and force. The exact method may vary depending on your vinyl cutter model.
- Experiment with different speed and force settings to find the ideal combination for your specific vinyl material. Start with lower values and gradually increase them until you achieve clean and precise cuts without damaging the material.
- Take note of the optimal settings for future reference.
Remember, different vinyl materials may require different speed and force settings. It is recommended to perform test cuts on a small piece of the material you plan to use to ensure the settings are appropriate.
By adjusting the blade depth and setting the cutting speed and force correctly, you will be able to achieve professional and high-quality results with your VEVOR Vinyl Cutter. In the next section, we will guide you through the process of loading vinyl into the machine and preparing it for cutting.
Read more: How To Store Cookie Cutters
V. Loading Vinyl and Preparing for Cutting
Now that you have set up the cutting parameters, it’s time to load the vinyl material into your VEVOR Vinyl Cutter and prepare it for cutting. This section will walk you through the process of unrolling the vinyl roll and loading it into the machine.
Unrolling the Vinyl Roll
Before you can load the vinyl into the cutter, you’ll need to unroll the vinyl roll and prepare it for cutting. Follow these steps:
- Find a clean and spacious workspace to work on. Ensure that there are no obstructions or debris that could interfere with the vinyl roll or the cutting process.
- Place the vinyl roll on the workspace with the vinyl facing up.
- Gently unroll the vinyl, making sure it stays flat and smooth. Take care not to stretch or wrinkle the vinyl.
- Keep unrolling the vinyl until you have enough length to accommodate the design you intend to cut.
Loading Vinyl into the Vinyl Cutter
Once the vinyl roll is unrolled and prepared, it’s time to load it into the Vinyl Cutter. Here’s how:
- Locate the vinyl feed rollers on your VEVOR Vinyl Cutter. These are typically located near the front or top of the machine.
- Open the clamp or release mechanism for the rollers to create an opening.
- Align the edge of the vinyl roll with the rollers, ensuring that the vinyl is centered and straight.
- Gently slide the vinyl into the machine, making sure it is securely held by the rollers.
- Close the clamp or release mechanism to secure the vinyl in place.
Proper alignment and tension are crucial for accurate cutting. Make sure the vinyl is straight and taut between the feed rollers to prevent any deviations during the cutting process.
Now that you have successfully loaded the vinyl into your VEVOR Vinyl Cutter, you are ready to move on to the next steps. In the next section, we will guide you through adjusting cut settings and layout to ensure precise cutting.
VI. Adjusting Cut Settings and Layout
To ensure accurate and precise cutting with your VEVOR Vinyl Cutter, it is important to adjust the cut settings and layout. This section will guide you through selecting the cutting mode, choosing the cutting path, and adjusting the origin point for optimal results.
Read more: How To Make A 120-Inch Round Tablecloth
Selecting the Cutting Mode
The cutting mode determines how the vinyl cutter will process your design. Depending on your specific requirements, you can choose between different modes such as contour cutting, perforation cutting, or cut-through cutting. Here’s how to select the cutting mode:
- Access the settings menu or software provided with your VEVOR Vinyl Cutter.
- Select the cutting mode option from the menu.
- Choose the appropriate cutting mode based on your design and desired outcome.
- Adjust any specific settings or parameters related to the chosen cutting mode.
By selecting the correct cutting mode, you can ensure that the vinyl cutter performs the intended cutting process for your design.
Choosing the Cutting Path
The cutting path refers to the path the vinyl cutter will follow to cut your design. Depending on the complexity of your design and the shape of your vinyl material, you may have different options for the cutting path. Here’s how to choose the cutting path:
- Select the desired cutting path option from the settings menu or software.
- If available, choose the most efficient and logical cutting path that minimizes wasted material and maximizes cutting efficiency.
- Inspect the cutting path preview on the software to ensure it aligns with your design.
Choosing the optimal cutting path can help reduce material waste and improve cutting efficiency, resulting in faster production times and cost savings in the long run.
Adjusting the Origin Point
The origin point represents the starting point of the cutting process on the vinyl material. By adjusting the origin point, you can ensure that the vinyl cutter starts cutting from the desired location. Here’s how to adjust the origin point:
- Locate the origin point adjustment feature in the software or settings menu.
- Select the desired origin point option that corresponds to the starting position you prefer.
- Preview the position of the origin point on the software to verify its accuracy.
Adjusting the origin point helps align the cutting process with the design and positioning of the vinyl material, resulting in precise and accurate cuts.
By adjusting the cut settings, choosing the appropriate cutting path, and adjusting the origin point, you can optimize the cutting process with your VEVOR Vinyl Cutter. In the next section, we will cover the essential steps of performing a test cut and troubleshooting common issues.
VII. Test Cutting and Troubleshooting
Performing a test cut and being able to troubleshoot common issues are essential steps to ensure optimal results with your VEVOR Vinyl Cutter. This section will guide you through the process of performing a test cut and provide troubleshooting tips for common issues that may arise.
Read more: How To Set Up Dinnerware
Performing a Test Cut
Performing a test cut allows you to verify the accuracy of your settings and make any necessary adjustments before cutting your actual design. Here’s how to perform a test cut:
- Choose a small and simple design to use for the test cut.
- Load a piece of scrap vinyl into the machine, ensuring it is properly aligned and secured.
- Send the test design to the vinyl cutter using the software or control panel.
- Observe the cutting process to ensure the blade moves smoothly and follows the desired cutting path.
- Once the test cut is complete, carefully remove the vinyl from the machine and examine the quality of the cut.
- Check for any irregularities such as incomplete cuts, jagged edges, or incorrect dimensions.
By performing a test cut, you can identify and address any issues with your settings or setup, ensuring that your actual designs will be cut accurately.
Troubleshooting Common Issues
Even with proper setup and calibration, you may encounter some common issues while using your VEVOR Vinyl Cutter. Here are some troubleshooting tips for these issues:
- If the blade is not cutting through the vinyl, check the blade depth and adjust it if necessary. Also, ensure that you are using the appropriate cutting force and speed settings.
- If the blade is cutting too deep and damaging the cutting mat or work surface, adjust the blade depth to a shallower setting. The blade should only penetrate the vinyl material, not the cutting mat.
- If the vinyl material is not feeding or moving properly, check for any obstructions or misalignments in the feed rollers or cutting path. Make sure the material is properly secured and tensioned between the rollers.
- If the cut lines are not aligned with your design, double-check the origin point settings and ensure that the software or control panel is correctly configured for the desired cutting location.
- If you encounter any error messages or unusual behavior, consult the user manual or contact the VEVOR customer support for specific troubleshooting guidance.
By addressing these common issues promptly and troubleshooting effectively, you can maintain optimal performance and achieve excellent results with your VEVOR Vinyl Cutter.
In the final section of this guide, we will cover some essential final steps and provide additional tips for maintenance and cleaning.
VIII. Final Steps and Tips
As you reach the final steps of using your VEVOR Vinyl Cutter, there are important considerations to keep in mind. This section will cover removing the cut vinyl, maintenance and cleaning tips, and provide additional resources to further enhance your vinyl cutting experience.
Removing Cut Vinyl
After the cutting process is complete, it’s time to remove the cut vinyl from the machine. Here’s how to do it:
- Carefully lift the cutting blade assembly to move it away from the cut vinyl.
- Gently peel off the excess vinyl surrounding your cut design. Take care not to damage the cut design or leave any unwanted pieces of vinyl on the cutting mat.
- Once you have removed the excess vinyl, carefully lift and peel your cut design from the cutting mat.
- If needed, use a weeding tool or tweezers to remove any small pieces or intricate details from the cut design.
- Inspect the final result to ensure clean and precise cuts.
By following these steps, you can safely remove the cut vinyl and prepare it for further application or use.
Read more: How To Hook Up A Washing Machine
Maintenance and Cleaning Tips
To keep your VEVOR Vinyl Cutter in optimal condition and prolong its lifespan, regular maintenance and cleaning are important. Consider the following tips:
- Regularly clean the cutting mat to remove any debris or adhesive residue. Use a mild detergent, water, and a soft brush to gently clean the mat’s surface.
- Check the blade regularly and replace it when it becomes dull or damaged. A sharp blade ensures clean and precise cuts.
- Keep the machine and its components dust-free by regularly wiping them with a soft, lint-free cloth.
- Store the vinyl cutter in a clean and dry environment, away from extreme temperatures and humidity.
Following these maintenance and cleaning tips will help maintain the performance and longevity of your machine, ensuring consistent and high-quality cutting results.
Additional Resources
To further enhance your vinyl cutting experience and expand your knowledge, here are some additional resources you can refer to:
- Vinyl Cutter manufacturer’s website: Visit the official VEVOR website for additional product information, FAQs, tutorials, and software updates.
- Online communities and forums: Join online communities of vinyl cutting enthusiasts to share experiences, ask questions, and learn from others.
- YouTube tutorials and demonstrations: Browse YouTube for tutorials and demonstrations specific to your VEVOR Vinyl Cutter model.
By exploring these additional resources, you can gain valuable insights, tips, and inspiration to further enhance your vinyl cutting skills and explore new possibilities with your VEVOR Vinyl Cutter.
With the final steps and tips covered, you are now equipped with the knowledge and tools to excel in your vinyl cutting endeavors. Enjoy the creative possibilities and the satisfaction of bringing your designs to life with your VEVOR Vinyl Cutter!
Conclusion
Congratulations on successfully setting up and familiarizing yourself with your VEVOR Vinyl Cutter! With this versatile and powerful machine, you have unlocked a world of creative possibilities in the realm of vinyl cutting. By following the steps outlined in this guide, you have learned how to unbox and assemble the machine, connect it to your computer, install the necessary software, adjust cutting parameters, load vinyl, and perform a test cut. Additionally, you have gained valuable troubleshooting skills and maintenance tips to ensure smooth operation and optimal cutting results.
Whether you’re a hobbyist, a small business owner, or a professional in the industry, the VEVOR Vinyl Cutter empowers you to bring your designs to life with precision and ease. From creating custom decals to designing heat transfers for clothing, signage, stickers, and more, this machine has the versatility to meet your needs and unleash your creativity.
Remember, practice makes perfect! As you continue to use your VEVOR Vinyl Cutter, you’ll become more familiar with its capabilities and how to achieve the best results for your specific projects. Don’t be afraid to experiment and try new techniques to push the boundaries of your creativity.
Lastly, continue to explore resources, such as the manufacturer’s website, online forums, and video tutorials, to expand your knowledge and stay up to date on the latest tips and techniques in the vinyl cutting community. Sharing your experiences with other enthusiasts can also provide valuable insights and inspiration.
Now, armed with your VEVOR Vinyl Cutter and the knowledge gained from this comprehensive guide, it’s time to embark on your vinyl cutting journey. Whether you’re creating unique designs for personal projects or building a business around custom vinyl creations, the possibilities are endless. Embrace your creativity, push the boundaries, and enjoy the satisfaction of transforming your imagination into tangible, precision-cut vinyl creations.
So, go ahead, make your mark, and let your VEVOR Vinyl Cutter be your trusted companion in bringing your visions to life!
Frequently Asked Questions about How To Set Up A VEVOR Vinyl Cutter 34 Inch Vinyl Cutter Machine
Was this page helpful?
At Storables.com, we guarantee accurate and reliable information. Our content, validated by Expert Board Contributors, is crafted following stringent Editorial Policies. We're committed to providing you with well-researched, expert-backed insights for all your informational needs.


0 thoughts on “How To Set Up A VEVOR Vinyl Cutter 34 Inch Vinyl Cutter Machine”