Articles
How To Align Laser Cutter Mirrors
Modified: December 7, 2023
Learn the step-by-step process to align laser cutter mirrors with our detailed articles. Ensure optimal performance and precise cuts in just a few simple steps.
(Many of the links in this article redirect to a specific reviewed product. Your purchase of these products through affiliate links helps to generate commission for Storables.com, at no extra cost. Learn more)
Introduction
In the world of laser cutting, precision is key. Laser cutter mirrors play a crucial role in directing the laser beam accurately, ensuring clean and accurate cuts. However, over time, these mirrors can slip out of alignment due to vibrations, temperature changes, or general wear and tear.
Aligning the laser cutter mirrors is essential for maintaining optimal cutting performance. While it may seem like a daunting task, with the right knowledge and techniques, it can be easily accomplished. In this article, we will guide you through the process of aligning laser cutter mirrors step by step.
Before we get started, it’s important to note that laser cutter models may vary, and it’s always best to consult the manufacturer’s documentation for specific alignment instructions. This article aims to provide a general overview that can be applied to most laser cutter setups.
So, if you’re ready to bring your laser cutter back to its full cutting potential, let’s dive into the world of laser cutter mirror alignment!
Key Takeaways:
- Properly aligning laser cutter mirrors is essential for achieving clean, precise, and consistent cuts. By following a step-by-step process and fine-tuning the alignment, you can unleash the full cutting potential of your machine.
- Regular maintenance and adherence to manufacturer guidelines are crucial for preserving the alignment of laser cutter mirrors. Taking the time to align and maintain these mirrors will ensure optimal cutting performance and professional-level results.
Understanding Laser Cutter Mirrors
Before diving into the process of aligning laser cutter mirrors, it’s important to have a basic understanding of how they function and their role in the laser cutting process.
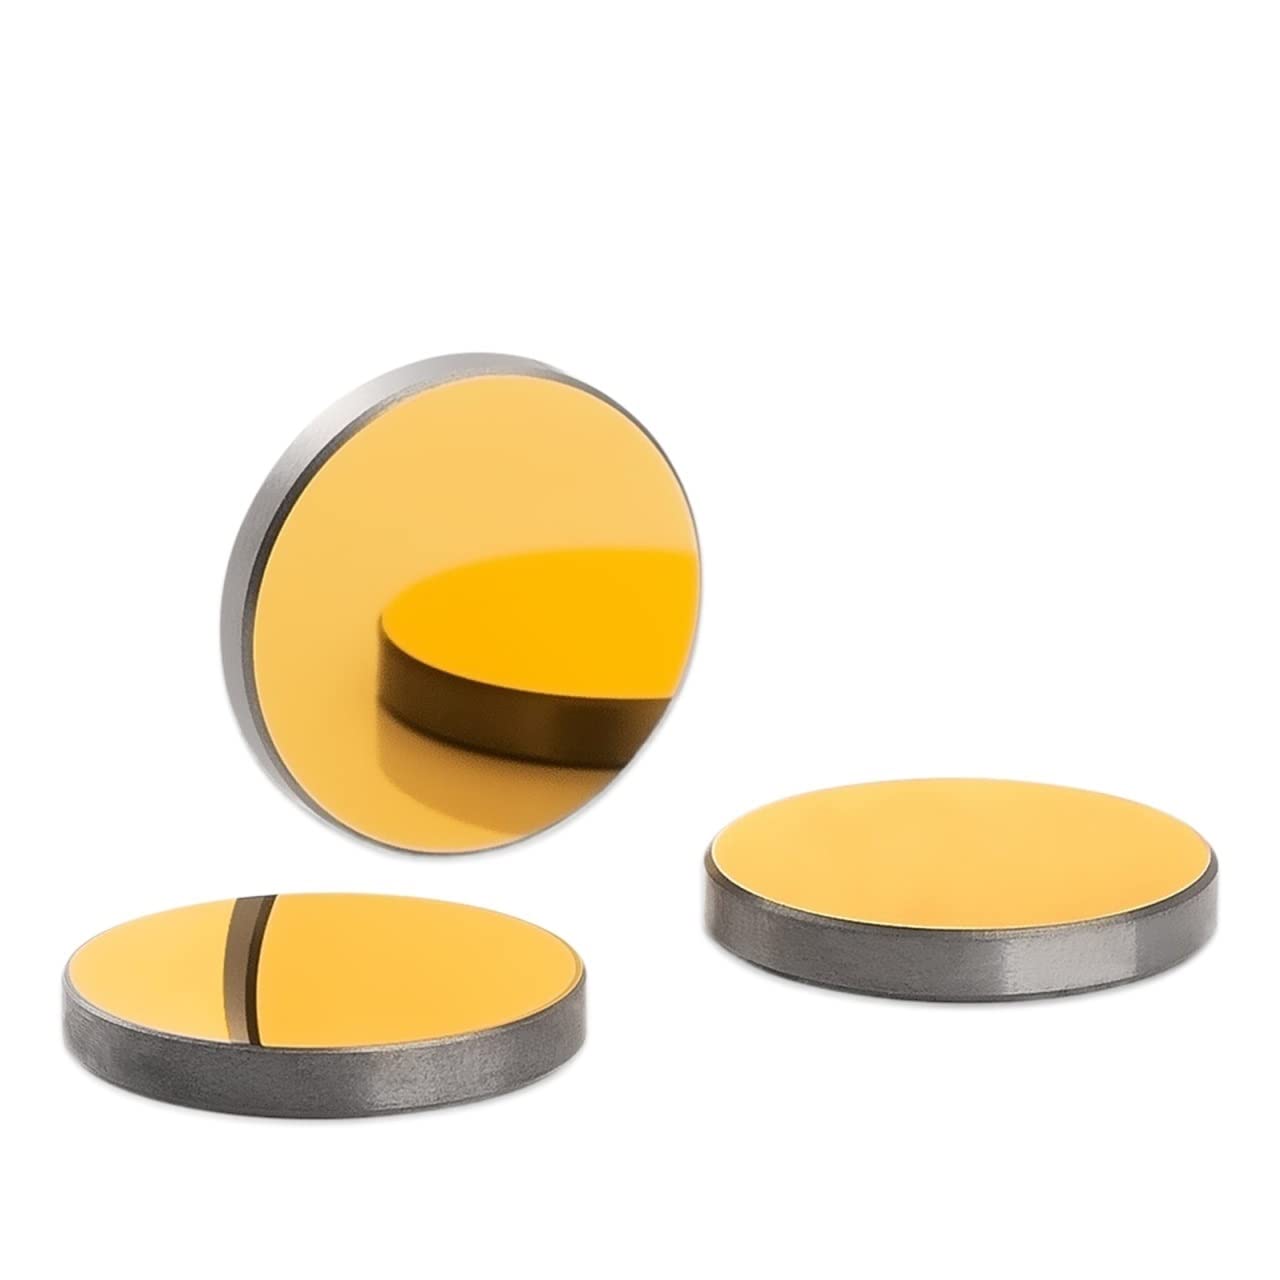
Laser cutter mirrors are typically made of high-quality, low-absorption materials such as silicon or molybdenum. They are designed to reflect the laser beam and guide it through the various components of the laser cutter, ultimately directing it onto the material being cut.
A standard laser cutter setup consists of three mirrors: the input mirror, the bend mirror, and the output mirror. Each mirror has a specific purpose:
- The Input Mirror: The input mirror is positioned at the beginning of the laser path. Its primary function is to reflect the laser beam and direct it towards the second mirror.
- The Bend Mirror: The bend mirror is located at a specific angle to redirect the laser beam towards the third mirror and ultimately onto the material being cut.
- The Output Mirror: The output mirror is the final mirror in the laser path. It reflects the laser beam towards the cutting head where the laser interacts with the material.
When these mirrors are properly aligned, the laser beam will be directed accurately and consistently, resulting in precise cuts. However, if the mirrors are misaligned, the laser beam may deviate from its intended path, leading to inconsistent cutting, poor-quality cuts, and potential damage to the laser and the material being cut.
Now that you have a better understanding of laser cutter mirrors and their role in the laser cutting process, let’s move on to the step-by-step process of aligning them to ensure optimal performance.
Step 1: Preparing for Alignment
Before you begin the process of aligning your laser cutter mirrors, it’s crucial to ensure that you have a clean and organized workspace. Here are some preparatory steps to follow:
- Gather Necessary Tools: You will need a few tools for the alignment process. These may include a laser power meter, a laser dot or line generator, a mirror adjustment tool (such as an Allen wrench), and a clean lint-free cloth for wiping the mirrors.
- Turn off and Unplug: For safety reasons, it’s important to turn off the laser cutter and unplug it from the power source before starting the alignment process. This will prevent accidental activation of the laser beam while working with the mirrors.
- Clean the Mirrors: Use a clean, lint-free cloth to gently clean the laser cutter mirrors. Any dirt, debris, or smudges on the mirrors can affect the accuracy of the alignment process. Ensure that the mirrors are completely dry before proceeding.
- Set Up the Laser Power Meter: If you have a laser power meter, set it up according to the manufacturer’s instructions. This device will help you measure the laser beam power and ensure consistent settings during the alignment process.
- Position the Laser Dot or Line Generator: If you have a laser dot or line generator, position it in the laser path. This will allow you to visualize the laser beam’s trajectory during the alignment process, making it easier to detect any deviations.
By taking the time to prepare your workspace and gather the necessary tools, you are setting yourself up for a smoother and more efficient alignment process. With everything in place, you are now ready to begin aligning the first mirror.
Step 2: Aligning the First Mirror
Now that you have prepared your workspace and gathered the necessary tools, you can begin the process of aligning the first mirror in your laser cutter. Follow these steps:
- Identify the First Mirror: Locate the input mirror, which is usually positioned near the laser source. This mirror is responsible for reflecting the laser beam towards the next mirror in the laser path.
- Adjust the Mirror Position: Using the mirror adjustment tool, carefully adjust the position of the first mirror. The goal is to align the mirror so that it reflects the laser beam accurately towards the second mirror.
- Use the Laser Dot or Line Generator: Activate the laser dot or line generator and observe the laser beam’s trajectory as it interacts with the first mirror. It should follow a straight path towards the next mirror. Adjust the first mirror as necessary to ensure a clean and straight laser beam reflection.
- Check for Reflection Consistency: Ensure that the laser beam reflects consistently with each adjustment you make. You can use a laser power meter to verify that the power of the reflected laser beam remains stable throughout the adjustment process.
- Secure the Mirror in Place: Once you have achieved the desired alignment, securely tighten the screws or fasteners that hold the mirror in place. This will prevent unintentional movement or displacement of the mirror during operation.
Remember to take your time and make small adjustments in order to achieve the most accurate alignment. It’s important to note that the alignment process may require multiple iterations of adjustments and checks to ensure optimal results.
With the first mirror aligned, you can now proceed to the next step, which involves aligning the second mirror in your laser cutter. Let’s dive in!
When aligning laser cutter mirrors, use a laser beam alignment tool to ensure the mirrors are perfectly aligned. This will help to maintain the accuracy and precision of the laser cutting process.
Step 3: Aligning the Second Mirror
With the first mirror aligned, you can now move on to aligning the second mirror in your laser cutter. Follow these steps:
- Identify the Second Mirror: Locate the bend mirror, which is positioned at a specific angle to redirect the laser beam towards the third mirror.
- Adjust the Mirror Angle: Using the mirror adjustment tool, carefully adjust the angle of the second mirror. The goal is to ensure that the laser beam reflects off the second mirror at the correct angle towards the third mirror.
- Use the Laser Dot or Line Generator: Activate the laser dot or line generator and observe the laser beam’s trajectory as it interacts with the second mirror. It should be redirected smoothly towards the third mirror. Adjust the angle of the second mirror as necessary to achieve the desired redirection.
- Check for Reflection Consistency: Ensure that the laser beam reflects consistently with each adjustment you make. Use the laser power meter to verify that the power of the reflected laser beam remains stable throughout the adjustment process.
- Secure the Mirror in Place: Once you have achieved the desired alignment, securely tighten the screws or fasteners that hold the second mirror in place. This will prevent any unintended movement or displacement during operation.
As with aligning the first mirror, take your time and make small adjustments to achieve the most accurate alignment. It’s important to note that the alignment process is an iterative one, and you may need to fine-tune the second mirror alignment after aligning the rest of the mirrors.
With the second mirror aligned, you’re ready to move on to the next step, which involves aligning the third mirror. Keep up the great work!
Read more: How To Use A Glass Cutter
Step 4: Aligning the Third Mirror
After aligning the first and second mirrors, it’s time to proceed with aligning the third mirror in your laser cutter. Follow these steps:
- Identify the Third Mirror: Locate the output mirror, which is the final mirror in the laser path. Its purpose is to direct the laser beam towards the cutting head where it interacts with the material being cut.
- Adjust the Mirror Position: Using the mirror adjustment tool, carefully adjust the position of the third mirror. The goal is to align the mirror so that it reflects the laser beam accurately towards the cutting head.
- Use the Laser Dot or Line Generator: Activate the laser dot or line generator and observe the laser beam’s trajectory as it interacts with the third mirror. It should be directed precisely towards the cutting head. Adjust the third mirror as necessary to achieve a clean and accurate laser beam reflection.
- Check for Reflection Consistency: Ensure that the laser beam reflects consistently with each adjustment. Use the laser power meter to verify that the power of the reflected laser beam remains stable throughout the adjustment process.
- Secure the Mirror in Place: Once you are satisfied with the alignment, securely tighten the screws or fasteners holding the third mirror in place. This step is essential to prevent any accidental movement or displacement during operation.
As with aligning the other mirrors, it is crucial to take your time and make small adjustments to achieve the most accurate alignment. Remember that the alignment process may require multiple iterations to ensure optimal results.
Congratulations! With the third mirror aligned, you’ve made significant progress in aligning your laser cutter mirrors. Now, let’s move on to the next step for fine-tuning the alignment.
Step 5: Fine-Tuning the Alignment
Now that you have aligned the first three mirrors in your laser cutter, it’s time to fine-tune their alignment for optimal performance. Follow these steps to ensure precise and accurate laser cutting:
- Review and Adjust: Take a step back and review the alignment of all three mirrors. Look for any minor discrepancies or deviations in the laser beam’s path. Use the mirror adjustment tools to make small adjustments as needed.
- Test Cuts: Perform test cuts on scrap material to assess the accuracy of the alignment. Pay close attention to the cutting quality and how well the laser follows the designated cutting path. If adjustments are necessary, repeat the alignment process for the specific mirror that needs refinement.
- Iterative Process: Fine-tuning the alignment is often an iterative process. Make small adjustments, test the results, and continue refining until you achieve consistent and precise cutting performance.
- Document Alignment Settings: Keep a record of the alignment settings and any adjustments made during the process. This documentation will be helpful for future reference or if you need to realign the mirrors again in the future.
- Maintain Regular Maintenance: After completing the alignment process, it’s essential to regularly check and maintain the laser cutter mirrors. Perform routine cleaning and inspections to ensure they remain in proper alignment for optimal performance.
By fine-tuning the alignment of your laser cutter mirrors, you are ensuring that the laser beam is accurately directed, resulting in clean and precise cuts on your desired materials.
Now that you have successfully aligned the mirrors and fine-tuned their alignment, you can confidently operate your laser cutter with optimal performance. Congratulations on completing the alignment process!
Finalizing the article, it is important to note that aligning laser cutter mirrors can be a complex task. Consulting the manufacturer’s guidelines and seeking professional assistance if needed is highly recommended to ensure safety and accuracy in the alignment process.
Happy laser cutting!
Conclusion
Aligning laser cutter mirrors is a crucial step in maintaining the optimal performance of your laser cutting machine. By properly aligning these mirrors, you ensure that the laser beam is accurately directed, resulting in clean, precise, and consistent cuts.
In this article, we have covered the step-by-step process of aligning the laser cutter mirrors, including preparing the workspace, aligning the first, second, and third mirrors, and fine-tuning the alignment for optimal performance.
Throughout the alignment process, it is essential to take your time, make small adjustments, and regularly test the cutting performance to achieve the best results. Remember, fine-tuning the alignment may require multiple iterations, but the effort is worth it to ensure accurate and high-quality laser cuts.
Moreover, it is important to consult the manufacturer’s guidelines for alignment instructions specific to your laser cutter model. They provide valuable information and insights that can further assist in the alignment process.
Lastly, regular maintenance of the laser cutter mirrors is necessary to preserve their alignment and overall performance. Routine cleaning and inspections will help identify any issues or misalignments that may occur over time.
By successfully aligning your laser cutter mirrors, you can unleash the full cutting potential of your machine and achieve professional-level results. So, roll up your sleeves, gather the necessary tools, and start aligning those mirrors. Happy laser cutting!
Frequently Asked Questions about How To Align Laser Cutter Mirrors
Was this page helpful?
At Storables.com, we guarantee accurate and reliable information. Our content, validated by Expert Board Contributors, is crafted following stringent Editorial Policies. We're committed to providing you with well-researched, expert-backed insights for all your informational needs.


0 thoughts on “How To Align Laser Cutter Mirrors”