Home>Furniture & Design>Living Room Furniture>How To Repair A Faux Leather Recliner
Living Room Furniture
How To Repair A Faux Leather Recliner
Modified: August 16, 2024
Learn how to repair your faux leather recliner with our comprehensive guide. Get expert tips and advice for fixing your living room furniture.
(Many of the links in this article redirect to a specific reviewed product. Your purchase of these products through affiliate links helps to generate commission for Storables.com, at no extra cost. Learn more)
Introduction
Repairing a faux leather recliner can breathe new life into a beloved piece of furniture. Whether it's a small scratch, a tear, or a loss of luster, knowing how to restore your faux leather recliner can save you money and extend the life of your favorite seat. This comprehensive guide will walk you through the process of assessing the damage, cleaning the faux leather, and making repairs to restore your recliner to its former glory.
Faux leather, also known as synthetic leather or pleather, is a durable and cost-effective alternative to genuine leather. It is commonly used in furniture upholstery due to its versatility and ease of maintenance. However, over time, faux leather can show signs of wear and tear, such as scratches, scuffs, and tears. Additionally, the color and shine of the material may fade, diminishing the overall aesthetic appeal of the recliner.
By learning how to repair a faux leather recliner, you can take proactive steps to address these issues and prevent further deterioration. This guide will equip you with the knowledge and techniques necessary to tackle various types of damage, from minor blemishes to larger tears. With the right approach, you can revitalize your recliner and prolong its lifespan, saving you the expense of purchasing a new piece of furniture.
Whether you're a DIY enthusiast looking to take on a rewarding project or simply want to maintain your furniture in top condition, this guide will provide you with the insights and instructions needed to achieve successful repairs. From assessing the extent of the damage to restoring the color and shine of the faux leather, each step is designed to help you achieve professional-looking results without the need for costly professional services.
Now, let's delve into the process of assessing the damage and understanding the necessary steps to repair and rejuvenate your faux leather recliner. With the right approach and a bit of effort, you can transform your recliner and enjoy its comfort and beauty for years to come.
Key Takeaways:
- Revive your faux leather recliner by assessing, cleaning, and repairing small tears and scratches. With the right approach, you can restore its beauty and prolong its lifespan without costly professional services.
- Maintain your rejuvenated faux leather recliner with regular cleaning, gentle handling, and prompt repairs. By incorporating these practices, you can ensure its longevity and continued appeal in your living space.
Assessing the Damage
Before embarking on the repair journey, it's crucial to thoroughly assess the damage to your faux leather recliner. This initial step will help you understand the extent of the issues and determine the appropriate course of action for restoration.
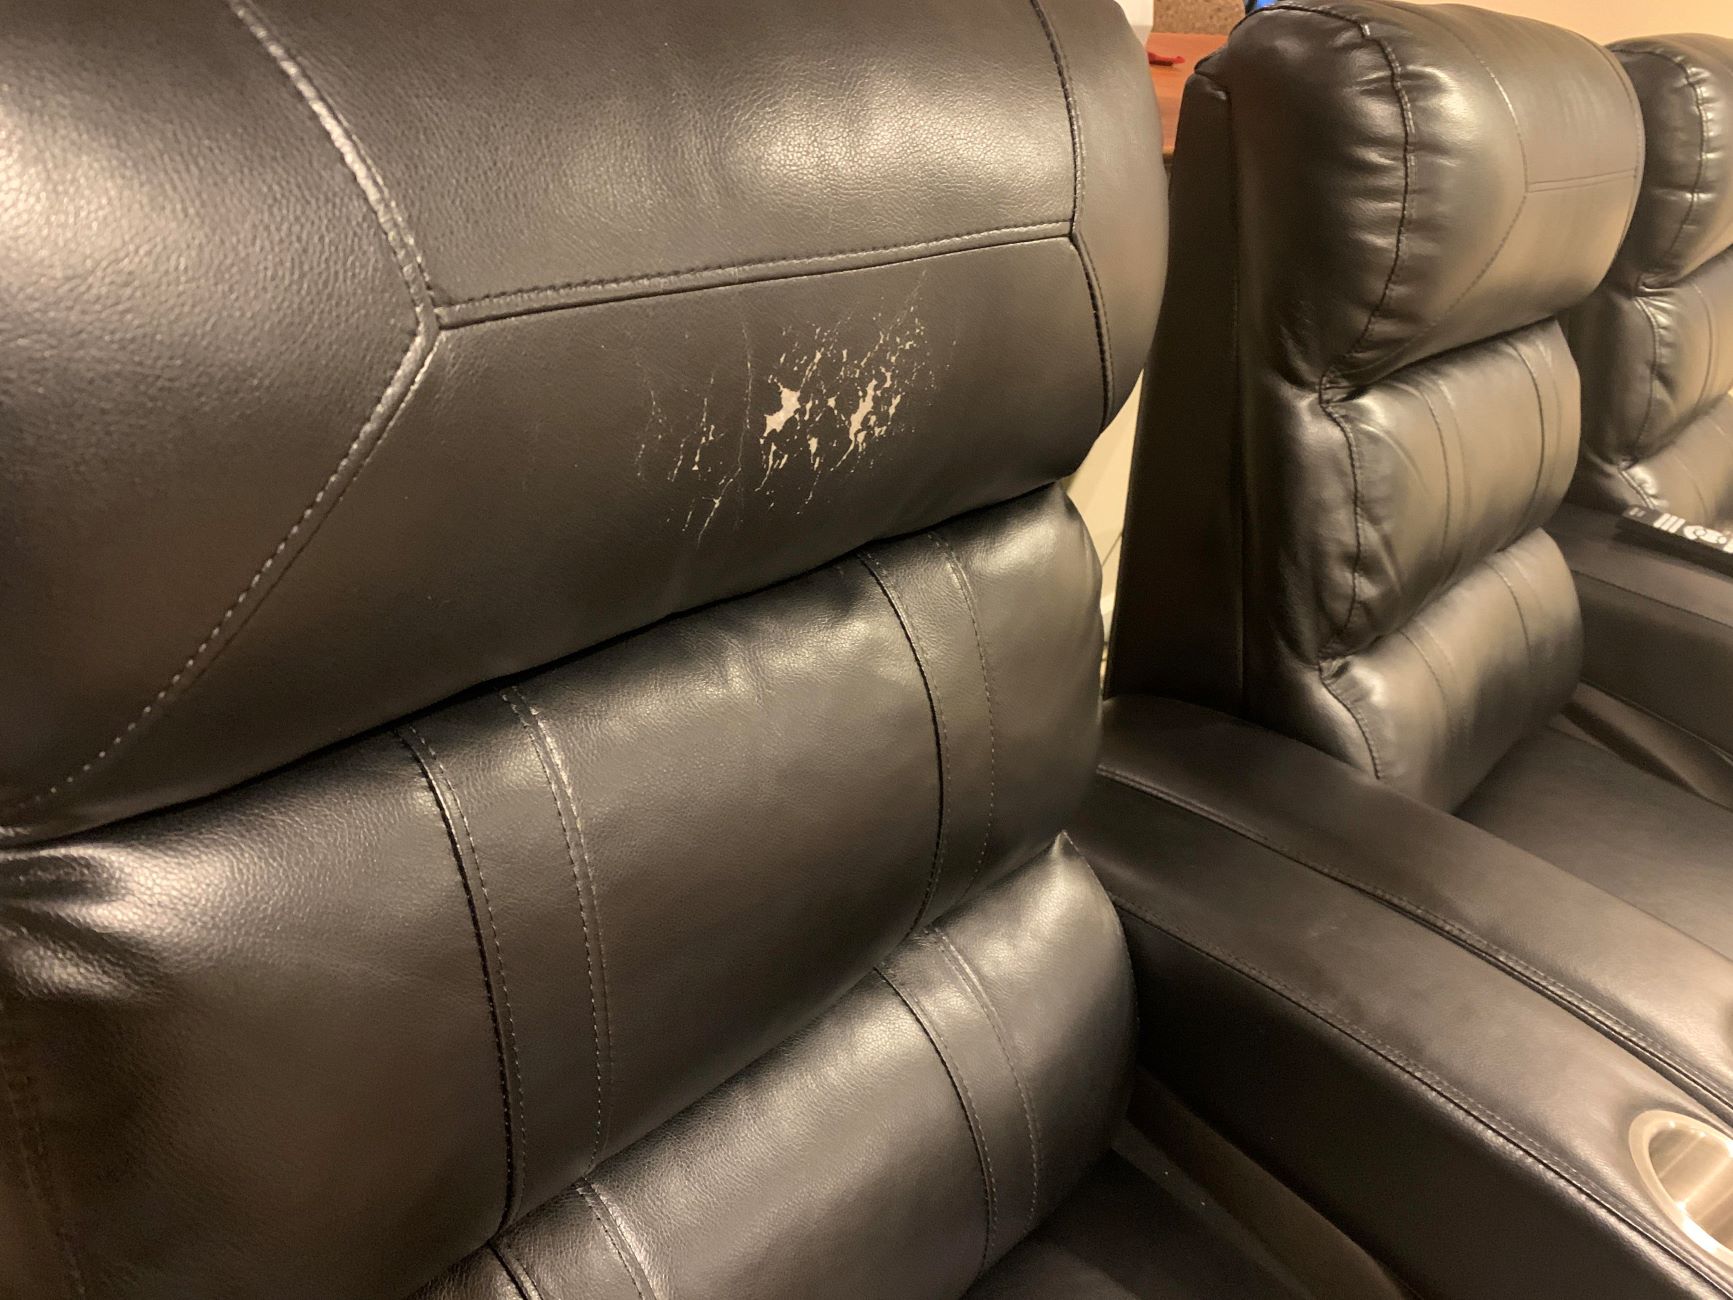
Start by closely examining the surface of the recliner. Look for any visible scratches, scuffs, or tears in the faux leather. Take note of the size and location of each imperfection, as well as any areas where the color or shine has faded. By conducting a detailed assessment, you can prioritize the repairs and plan your approach accordingly.
Next, consider the nature of the damage. Small scratches and minor scuffs may only require simple cleaning and conditioning to restore the recliner's appearance. However, larger tears or significant color loss may necessitate more extensive repair techniques, such as patching or color restoration.
It's also important to assess the overall structural integrity of the recliner. Check for any loose or damaged stitching, as well as the condition of the underlying padding and support. Addressing these structural issues alongside the cosmetic repairs will ensure that your faux leather recliner is fully rejuvenated.
Additionally, take into account the age and usage of the recliner. Older furniture that has seen heavy use may exhibit more pronounced wear and tear, requiring a more comprehensive approach to restoration. Understanding the history of the recliner will provide valuable context for the damage assessment and guide your expectations for the repair process.
Finally, consider your own skill level and available resources. Assess whether you have the necessary tools and materials to carry out the repairs effectively. If certain damages appear beyond your expertise, it may be advisable to seek professional assistance or specialized products for more complex restoration needs.
By thoroughly assessing the damage to your faux leather recliner, you'll gain a clear understanding of the repairs required and be better prepared to tackle each issue with confidence. This proactive approach sets the stage for successful restoration, ensuring that your recliner will soon regain its beauty and functionality.
Remember, a comprehensive assessment is the foundation for a successful repair journey, guiding you toward the most effective solutions for reviving your beloved faux leather recliner.
Cleaning the Faux Leather
Proper cleaning is a fundamental step in the restoration of a faux leather recliner. Over time, dirt, dust, and body oils can accumulate on the surface, dulling its appearance and compromising its integrity. By following the right cleaning techniques, you can effectively remove grime, restore the luster, and prepare the recliner for subsequent repair steps.
To begin, gently vacuum the surface of the recliner using a soft brush attachment to remove loose dirt and debris. This initial step helps prevent particles from being pushed further into the material during the cleaning process. Be thorough in your approach, paying attention to seams, creases, and any recessed areas where dirt may accumulate.
Next, prepare a cleaning solution by mixing a small amount of mild liquid soap or detergent with warm water. Dampen a soft, lint-free cloth with the solution and wring out any excess moisture. It's important to avoid oversaturating the faux leather, as excessive moisture can damage the material.
With the damp cloth, gently wipe the entire surface of the recliner, focusing on one section at a time. Use light, circular motions to lift dirt and grime from the faux leather. Take care not to apply excessive pressure, as this can cause damage to the material. As you clean, periodically rinse the cloth and change the cleaning solution as needed to ensure that you're not spreading dirt around.
After cleaning the entire surface, use a clean, damp cloth to remove any soapy residue. Then, dry the recliner thoroughly with a soft, dry cloth. It's essential to avoid air-drying or using heat sources to accelerate the drying process, as these methods can cause the faux leather to crack or warp.
Once the recliner is dry, consider applying a specialized faux leather conditioner to nourish and protect the material. Follow the product instructions carefully, applying the conditioner in a thin, even layer and allowing it to absorb into the faux leather. This step helps maintain the suppleness of the material and provides a protective barrier against future damage.
By diligently cleaning the faux leather recliner, you'll effectively remove dirt and grime, restore its natural sheen, and create an optimal canvas for subsequent repair efforts. This essential cleaning process sets the stage for successful restoration, ensuring that your recliner will soon regain its beauty and durability.
Repairing Small Tears and Scratches
Small tears and scratches on a faux leather recliner can detract from its overall appearance and compromise its durability. Fortunately, addressing these minor imperfections is achievable with the right techniques and a bit of patience. By following these steps, you can effectively repair small tears and scratches, restoring the aesthetic appeal and structural integrity of your beloved recliner.
Cleaning the Affected Area
Before initiating the repair process, it's essential to ensure that the affected area is clean and free of debris. Use a mild soap and water solution to gently clean the area around the tear or scratch, removing any dirt or grime that could interfere with the repair. Once the area is clean and dry, proceed to the next step.
Read more: How To Store Faux Leather Pants
Applying a Faux Leather Repair Kit
Invest in a high-quality faux leather repair kit, readily available at hardware stores or online. These kits typically contain a color-matched repair compound, a grain paper, and other essential tools for repairing small damages. Begin by carefully following the kit's instructions to apply the repair compound to the tear or scratch, filling it in and smoothing the surface to match the surrounding area.
Blending and Texturing
After applying the repair compound, use the included grain paper or a fine-grit sandpaper to carefully mimic the texture of the surrounding faux leather. This step is crucial for achieving a seamless blend between the repaired area and the rest of the recliner. By gently texturing the surface, you can ensure that the repair seamlessly integrates with the original material, creating a nearly invisible mend.
Color Matching
If the repair kit includes a color-matching component, carefully blend the color into the repaired area to achieve a harmonious match with the surrounding faux leather. Pay close attention to achieving the right hue and tone, ensuring that the repaired section seamlessly blends with the rest of the recliner. This meticulous color matching process is essential for achieving professional-looking results.
Conditioning and Protecting
Once the repair is complete and the color has been matched, consider applying a faux leather conditioner to the entire recliner to nourish and protect the material. This final step helps maintain the suppleness of the faux leather and provides a protective barrier against future damage, ensuring that your recliner remains in top condition for years to come.
By following these detailed steps, you can effectively repair small tears and scratches on your faux leather recliner, restoring its beauty and prolonging its lifespan. With the right approach and attention to detail, you can achieve professional-quality results and enjoy the comfort and elegance of your rejuvenated recliner.
Read more: How To Store Faux Leather Jacket
Patching Large Tears
Addressing large tears in a faux leather recliner requires a meticulous approach to achieve a seamless and durable repair. While these substantial damages may seem daunting, with the right techniques and materials, you can effectively patch large tears, restoring the recliner to its former glory.
Assessing the Damage
Begin by carefully examining the extent of the tear. Measure its length and width to determine the necessary patch size. Additionally, assess the surrounding area for any loose or damaged material that may need to be trimmed or secured before proceeding with the patching process.
Preparing the Patch
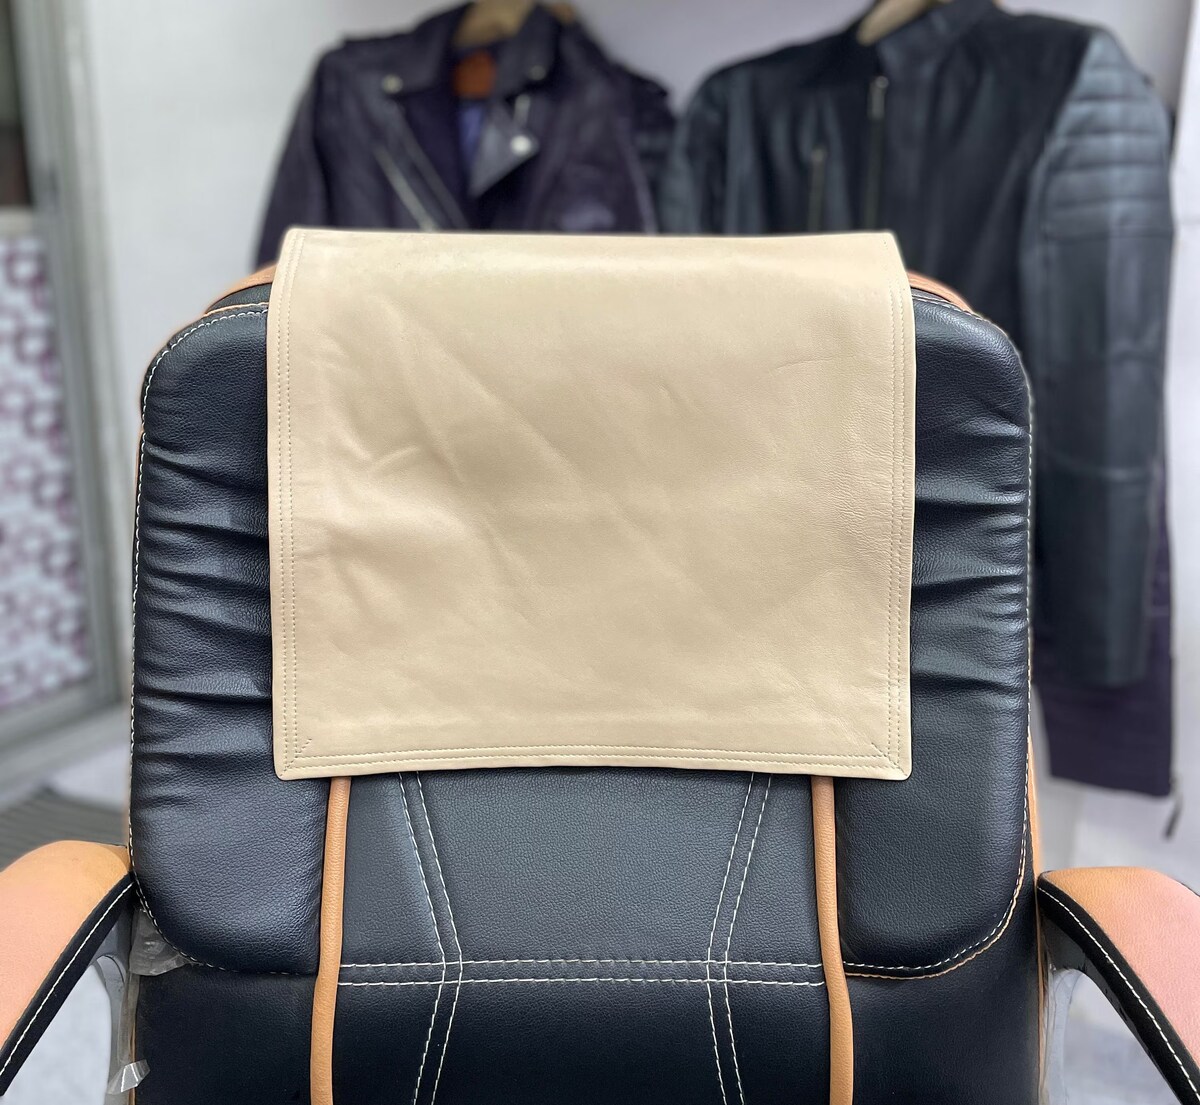
Cut a patch from a matching piece of faux leather or a specialized repair kit. The patch should be slightly larger than the tear to ensure adequate coverage. Round the corners of the patch to prevent sharp edges that could catch or peel over time.
Cleaning and Preparing the Area
Thoroughly clean the area around the tear with a mild soap and water solution, ensuring that it is free of dirt and debris. Use a fine-grit sandpaper to gently roughen the surface of the faux leather around the tear, creating a better bond for the adhesive.
Read more: How To Clean Faux Leather Dining Chairs
Applying Adhesive
Apply a high-quality adhesive specifically designed for faux leather repairs to both the patch and the prepared area around the tear. Follow the adhesive manufacturer's instructions carefully, ensuring even coverage and a secure bond between the patch and the recliner.
Securing the Patch
Carefully position the patch over the tear, ensuring that it aligns seamlessly with the surrounding material. Gently press the patch into place, smoothing out any air bubbles or wrinkles. Use a clean, soft cloth to firmly press the patch and ensure a strong bond with the recliner.
Allowing for Proper Bonding
Allow the adhesive to cure according to the manufacturer's recommendations. This typically involves a waiting period to ensure that the patch forms a durable and long-lasting bond with the faux leather.
Final Touches
Once the patch is securely in place, inspect the repaired area for any remaining imperfections. Trim any excess material if necessary and gently buff the edges of the patch to ensure a smooth transition with the surrounding faux leather. Consider applying a specialized faux leather conditioner to the entire recliner to maintain its suppleness and protect it from future damage.
By meticulously following these steps, you can effectively patch large tears in a faux leather recliner, restoring its structural integrity and aesthetic appeal. With patience and attention to detail, you can achieve a professional-quality repair, ensuring that your recliner remains a cherished and functional piece of furniture for years to come.
Read more: How To Reupholster A Leather Recliner
Restoring Color and Shine
Restoring the color and shine of a faux leather recliner is a crucial step in the overall rejuvenation process. Over time, exposure to sunlight, regular use, and general wear and tear can cause the faux leather to lose its vibrancy and luster. By addressing these issues, you can breathe new life into your recliner, enhancing its visual appeal and prolonging its longevity.
Cleaning and Preparing the Surface
Before restoring the color and shine, it's essential to clean the recliner thoroughly to remove any lingering dirt, oils, or residues that may hinder the restoration process. Use a mild soap and water solution to gently cleanse the entire surface, ensuring that it is free of grime and contaminants. Once cleaned, allow the recliner to dry completely before proceeding with the color restoration.
Choosing the Right Product
Select a high-quality faux leather color restorer and conditioner designed specifically for furniture upholstery. These products are formulated to penetrate the material, replenishing its color and sheen while providing essential nourishment to keep the faux leather supple and resilient. When choosing a color restorer, opt for a shade that closely matches the original color of your recliner for seamless results.
Applying the Color Restorer
Using a clean, soft cloth or applicator pad, apply the color restorer to the entire surface of the recliner in smooth, even strokes. Work methodically, ensuring that the product is distributed uniformly across the faux leather. Pay special attention to areas where the color has faded or worn, applying an extra layer of the restorer as needed to achieve consistent coverage.
Read more: The Best Vegan and Faux Leather Sofa of 2022
Buffing and Polishing
After applying the color restorer, gently buff the recliner with a separate clean cloth to remove any excess product and achieve a smooth, polished finish. This step helps blend the color restorer into the faux leather, enhancing its natural appearance and restoring its original luster. Take care to buff the entire surface evenly, focusing on areas that may require additional attention.
Conditioning and Protecting
Once the color restorer has been applied and buffed, consider using a specialized faux leather conditioner to further enhance the material's suppleness and resilience. Apply the conditioner according to the product instructions, ensuring that it is distributed evenly across the recliner. This final step helps protect the newly restored color and shine, preserving the beauty of the faux leather for the long term.
By following these detailed steps, you can effectively restore the color and shine of your faux leather recliner, revitalizing its appearance and ensuring that it remains a stunning and inviting piece of furniture in your home. With the right approach and the appropriate products, you can achieve professional-quality results, allowing you to enjoy the beauty and comfort of your rejuvenated recliner for years to come.
Final Tips and Maintenance
Maintaining the pristine condition of your faux leather recliner after restoration is essential for ensuring its longevity and continued appeal. Here are some final tips and maintenance guidelines to preserve the beauty and functionality of your rejuvenated furniture:
-
Regular Cleaning: Implement a routine cleaning schedule to prevent the buildup of dirt and grime. Use a soft, damp cloth to wipe down the recliner regularly, ensuring that any spills or stains are promptly addressed to prevent long-term damage.
-
Avoid Harsh Chemicals: When cleaning the faux leather, refrain from using harsh chemicals or abrasive cleaners that can strip away the color and protective finish. Stick to mild soap and water solutions or specialized faux leather cleaning products to maintain the material's integrity.
-
Gentle Handling: Encourage gentle use of the recliner to minimize the risk of scratches, tears, or excessive wear. Educate household members and guests about the care required for faux leather furniture to prevent accidental damage.
-
Sunlight Protection: Position the recliner away from direct sunlight to prevent fading and discoloration. If the furniture is exposed to sunlight, consider using window treatments or UV-protective coatings to shield the faux leather from harmful rays.
-
Periodic Conditioning: Apply a high-quality faux leather conditioner every few months to keep the material supple and resilient. Conditioning helps prevent drying and cracking, preserving the recliner's appearance and comfort.
-
Prompt Repairs: Address any new tears, scratches, or color loss promptly to prevent further deterioration. Utilize the repair techniques and products previously mentioned to maintain the recliner's pristine condition.
-
Professional Maintenance: Consider professional cleaning and maintenance services for deep cleaning and specialized treatments. Professional care can extend the life of your faux leather recliner and address any complex restoration needs.
By incorporating these final tips and maintenance practices into your regular furniture care routine, you can ensure that your faux leather recliner remains a stunning and inviting centerpiece in your living space. With proper care and attention, your rejuvenated recliner will continue to provide comfort and elegance for years to come.
Frequently Asked Questions about How To Repair A Faux Leather Recliner
Was this page helpful?
At Storables.com, we guarantee accurate and reliable information. Our content, validated by Expert Board Contributors, is crafted following stringent Editorial Policies. We're committed to providing you with well-researched, expert-backed insights for all your informational needs.


0 thoughts on “How To Repair A Faux Leather Recliner”