Home>Furniture>Bedroom Furniture>How To Install An Adjustable Base In A Bed Frame

Bedroom Furniture
How To Install An Adjustable Base In A Bed Frame
Modified: January 6, 2024
Learn how to easily install an adjustable base in your bed frame to elevate your sleep experience and enhance the functionality of your bedroom furniture.
(Many of the links in this article redirect to a specific reviewed product. Your purchase of these products through affiliate links helps to generate commission for Storables.com, at no extra cost. Learn more)
Introduction
Welcome to the world of adjustable beds! If you’re looking to enhance your sleep experience and improve your overall comfort, installing an adjustable base in your bed frame is a fantastic option. Adjustable bases allow you to customize your sleeping position, providing relief for various health issues and offering a luxurious level of relaxation.
In this article, we’ll guide you through the step-by-step process of installing an adjustable base in your bed frame. Whether you’re a DIY enthusiast or just want to save money on professional installation, this guide will help you transform your bed into a haven of comfort and convenience.
Before we dive into the installation process, let’s take a moment to understand what an adjustable base is and why it’s worth considering. An adjustable base is a motorized bed frame that allows you to adjust the position of your head and feet. With a touch of a button, you can raise or lower different sections of the bed, providing a range of ergonomic positions to suit your needs.
These versatile bases can help alleviate back pain, improve circulation, reduce snoring, and enhance overall relaxation. They are particularly beneficial for people with medical conditions such as sleep apnea, acid reflux, or poor circulation, as well as those who simply enjoy reading, watching TV, or working on their laptops in bed.
Now that we understand the benefits of an adjustable base, let’s explore how to install one in your existing bed frame. By following these steps, you’ll be on your way to enjoying the personalized comfort and support of an adjustable bed.
Key Takeaways:
- Transform your bed into a haven of comfort and convenience by installing an adjustable base. Enjoy personalized sleeping positions, relief from health issues, and enhanced relaxation.
- Prioritize safety and follow the step-by-step process to securely install and test your adjustable base. Create a solid and comfortable foundation for restful and rejuvenating sleep.
Read more: How To Put A Bed Skirt On An Adjustable Base
Step 1: Gather the necessary tools and materials
Before you begin the installation process, it’s essential to gather all the tools and materials you’ll need. This ensures a smooth and efficient installation process without any interruptions. Here’s a list of the items you’ll need:
- Adjustable base: This is the main component of your new bed setup. Make sure you have the correct size and model that fits your bed frame.
- Bed frame: Ensure that your bed frame is compatible with an adjustable base. Some bed frames may require additional modifications to accommodate the adjustable base.
- Power drill: You’ll need a power drill to attach the adjustable base to the bed frame securely.
- Screws and bolts: Check the manufacturer’s instructions to determine the specific type and size of screws and bolts needed for your adjustable base and bed frame.
- Wrench or pliers: These tools will come in handy for tightening screws and bolts during the installation process.
- Measuring tape: Use a measuring tape to ensure accuracy when positioning the adjustable base within the bed frame.
- Level: A level will help you ensure the adjustable base is aligned correctly, preventing any uncomfortable slopes.
- Additional support brackets (if required): Depending on your bed frame, you may need extra support brackets to secure the adjustable base properly.
Once you have gathered all the necessary tools and materials, you’re ready to move on to the next step. It’s important to have everything prepared before starting the installation process to avoid any unnecessary delays or frustrations.
Step 2: Remove the existing mattress and bedding
Now that you have all the tools and materials ready, it’s time to prepare your bed frame for the installation of the adjustable base. Start by removing the existing mattress and bedding from your bed frame. This will provide you with a clear and unobstructed space to work with.
Before removing the mattress and bedding, make sure to clear any personal items or loose objects from the bed frame. This includes pillows, blankets, and any decorative elements. It’s important to have a clean and clutter-free area to ensure a smooth installation process.
Once the bed frame is free from any obstructions, carefully remove the mattress and place it in a safe location. If your mattress is too heavy or bulky to move on your own, consider asking for assistance or using a dolly or mattress mover to avoid any strain or injury.
After removing the mattress, remove the bedding, including fitted sheets, flat sheets, blankets, and any mattress protectors or covers. Set these aside and make sure to wash them if needed before reinstalling them later.
By removing the existing mattress and bedding, you create a blank canvas for installing the adjustable base. This step ensures that you have ample space to maneuver and position the base correctly within the bed frame.
With your bed frame now empty, you’re ready to move on to the next step: preparing the bed frame for the adjustable base installation.
Step 3: Prepare the bed frame for the adjustable base
Now that you have a clear bed frame, it’s time to prepare it for the installation of the adjustable base. Follow these steps to ensure a sturdy and secure setup:
- Inspect the bed frame: Take a close look at your bed frame to ensure that it is in good condition and capable of supporting the weight of the adjustable base. Check for any cracks, loose joints, or damage that may compromise the stability of the frame. If you notice any issues, consider reinforcing or replacing the bed frame before proceeding with the installation.
- Measure the dimensions: Use a measuring tape to determine the dimensions of your bed frame. You’ll need this information to position the adjustable base correctly within the frame. Note the length, width, and height of the frame, as well as any special considerations such as slats or support beams.
- Ensure compatibility: Verify that the adjustable base is compatible with your bed frame. Check the manufacturer’s guidelines or consult the instruction manual to confirm that the base fits properly and aligns with the dimensions of your bed frame.
- Make any necessary modifications: Depending on your bed frame, you may need to make some modifications to accommodate the adjustable base. This could involve removing or adjusting slats, support beams, or center brackets. Refer to the adjustable base instructions or seek professional advice if needed. Take extra care to ensure that any modifications do not compromise the structural integrity of the bed frame.
- Position the adjustable base: Once you have prepared the bed frame, position the adjustable base within it. Use the measurements you took earlier to align the base centrally and evenly within the frame. Double-check that the base fits securely and that there is enough clearance for adjustments and movement without rubbing against the sides or bottom of the frame.
By properly preparing your bed frame, you ensure a stable foundation for the adjustable base. This step is crucial to create a safe and comfortable sleeping environment.
With the bed frame prepared, you’re now ready to move on to the exciting part: attaching the adjustable base to the frame!
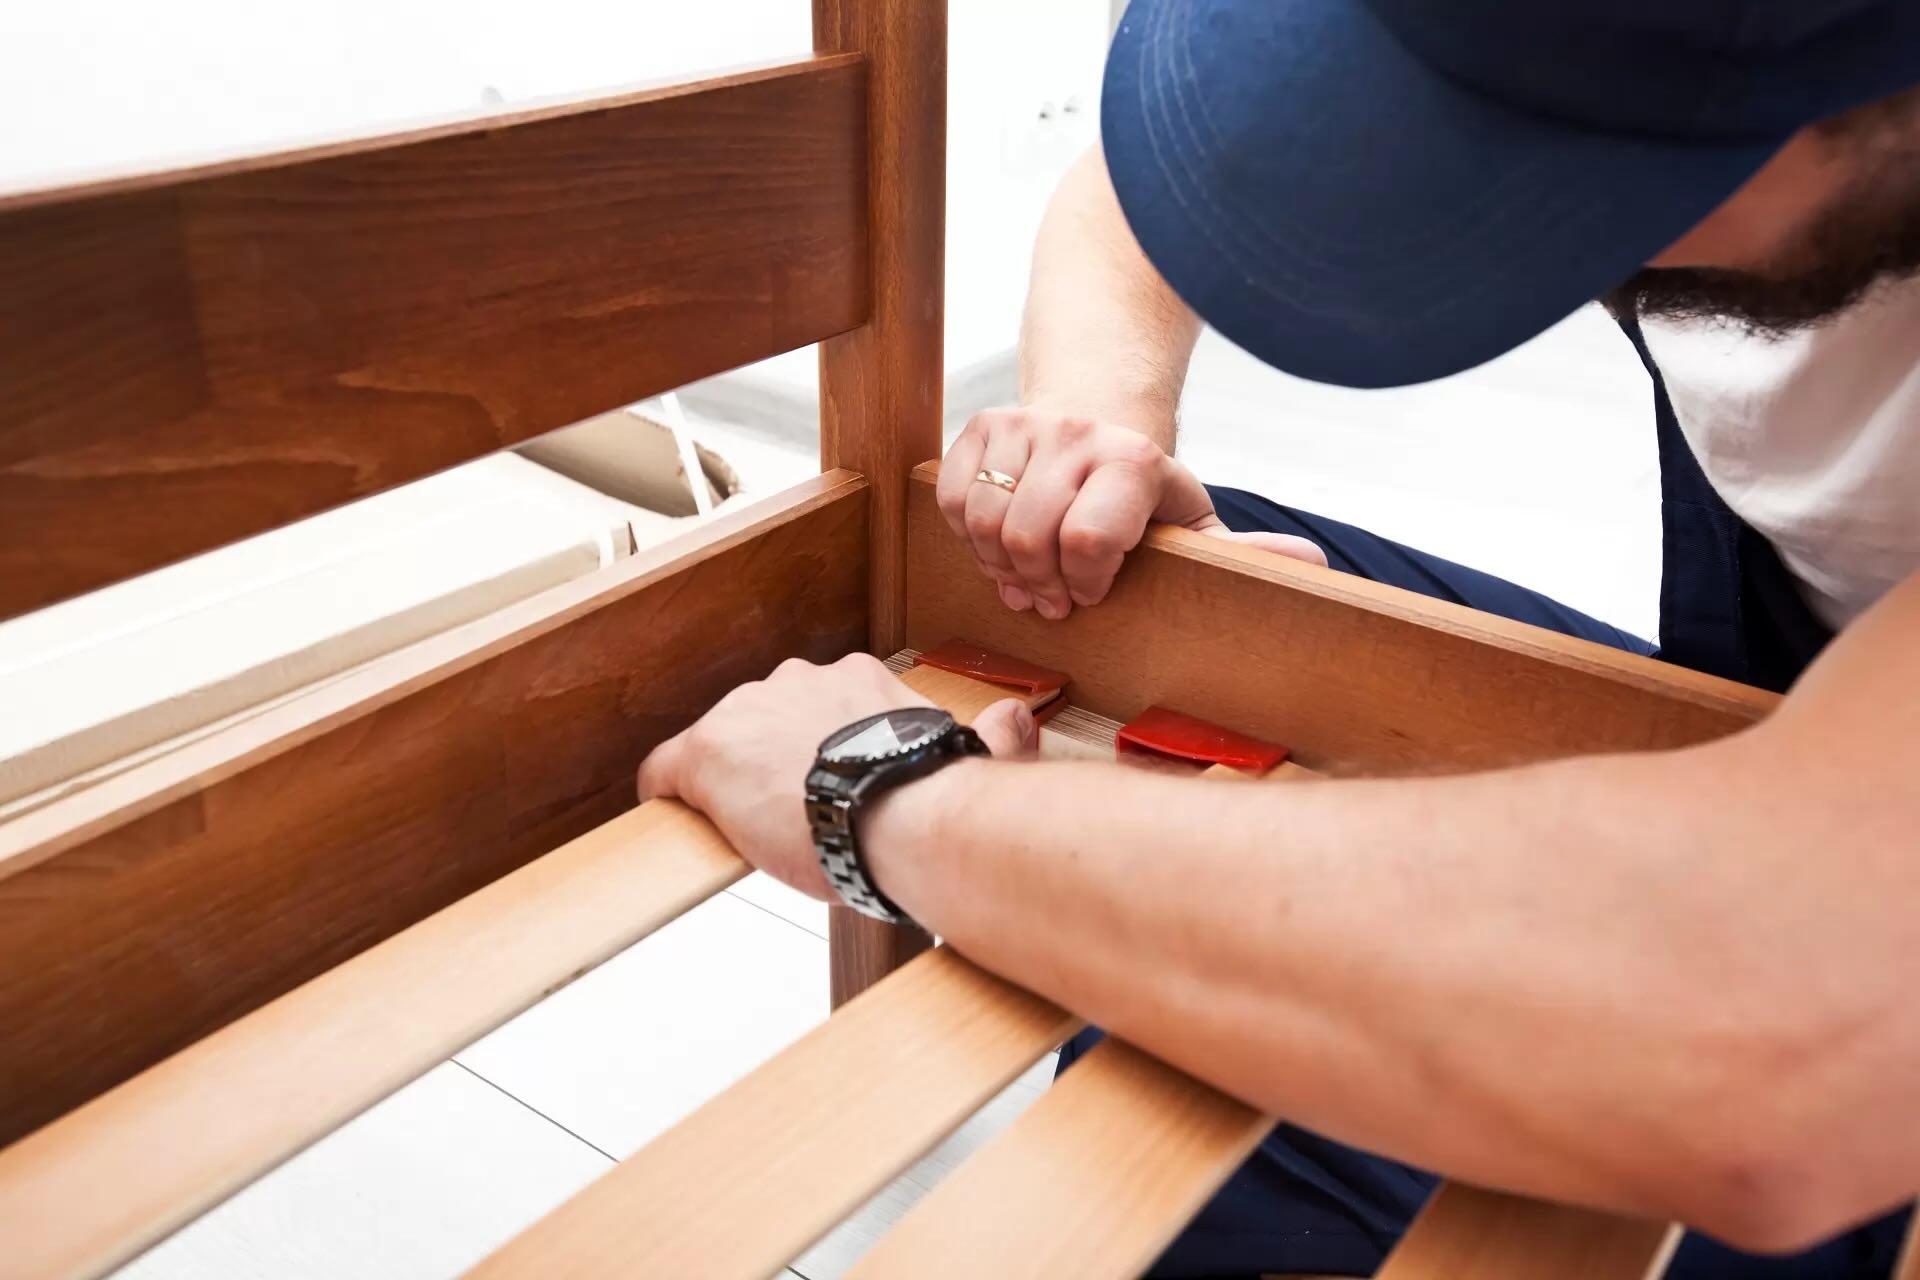
Step 4: Attach the adjustable base to the bed frame
With the bed frame prepared, it’s time to attach the adjustable base to the frame. Follow these steps to securely fasten the base in place:
- Refer to the manufacturer’s instructions: Carefully read the instruction manual provided by the adjustable base manufacturer. It will provide specific guidance on how to attach the base to your bed frame. Familiarize yourself with the steps and any special considerations.
- Position the base: Make sure the adjustable base is aligned correctly within the bed frame. Ensure that it is centered and evenly positioned, leaving sufficient clearance for adjustments and movement.
- Use the power drill: With the base in position, use the power drill and the screws or bolts provided by the manufacturer to secure the base to the bed frame. Follow the recommended screwing pattern and tighten them securely. Be careful not to overtighten and risk damaging the base or the frame.
- Check for stability: Once all the screws or bolts are snugly in place, give the adjustable base a gentle shake to test its stability. It should feel firm and secure within the bed frame. If you notice any wobbling or instability, check and tighten the screws or bolts as necessary.
Attaching the adjustable base to the bed frame is an essential step to ensure a safe and reliable setup. It’s crucial to follow the manufacturer’s instructions and use the appropriate tools and hardware provided to achieve the best results. Taking the time to secure the base properly will prevent any wobbling or shifting during use.
Now that the adjustable base is securely fastened to the bed frame, it’s time to move on to the next step: securing the base in place for added stability.
When installing an adjustable base in a bed frame, make sure to measure the dimensions of both the base and the frame to ensure a proper fit. Also, check for any compatibility issues and follow the manufacturer’s instructions carefully.
Read more: How To Disassemble An Adjustable Bed Frame
Step 5: Secure the adjustable base in place
Now that you have attached the adjustable base to the bed frame, it’s important to take an extra step to secure it in place. This will provide additional stability and prevent any movement or shifting during use. Follow these guidelines to ensure the base is firmly secured:
- Check for additional support brackets: Depending on your bed frame and the specific model of the adjustable base, you may need to use additional support brackets to reinforce the connection between the base and the frame. Refer to the manufacturer’s instructions or consult with a professional if needed.
- Attach the support brackets: If your adjustable base requires support brackets, carefully attach them according to the provided instructions. Use the appropriate screws or bolts to secure them tightly to both the base and the bed frame. Be sure to distribute the brackets evenly around the base to maintain balance.
- Verify stability: Once the support brackets are in place, test the stability of the adjustable base by applying some pressure and gently adjusting it to different positions. Ensure that it remains steady and does not move or shift within the bed frame.
- Use anti-slip pads or grippers (optional): For added security, you can place anti-slip pads or grippers between the adjustable base and the bed frame. These small rubber or foam pads help prevent any sliding or movement. Simply place them under the base legs or contact points.
By taking these steps to secure the adjustable base in place, you can enjoy a worry-free experience without any unnecessary shifting or instability. It’s always better to prioritize safety and ensure that your adjustable bed stays securely in position.
Now that your adjustable base is securely installed and firmly secured within the bed frame, it’s time to move on to the next step: reinstalling the mattress and bedding.
Step 6: Reinstall the mattress and bedding
With the adjustable base securely placed in the bed frame, it’s time to bring back the comfort and coziness by reinstalling the mattress and bedding. Follow these steps to ensure a seamless and comfortable setup:
- Position the mattress: Lift the mattress and carefully position it back onto the bed frame, aligning it centrally. Ensure that the mattress is centered and covers the adjustable base evenly.
- Adjust the corners and edges: Smooth out the corners and edges of the mattress to ensure a neat and even appearance. Tuck in any excess bedding for a tidy look.
- Add a mattress protector: Consider using a mattress protector to prolong the life of your mattress and protect it from spills, stains, and allergens. Place the mattress protector on top of the mattress, ensuring a snug fit.
- Install the fitted sheet: Place the fitted sheet over the mattress, ensuring that it fits securely and stays in place. Smooth out any wrinkles or creases for a comfortable sleeping surface.
- Add additional layers: If desired, add additional layers such as a flat sheet, blankets, or a duvet, according to your personal preference and the prevailing weather conditions.
- Fluff pillows and add decorative elements: Arrange your pillows, fluffing them up for maximum comfort. Add any decorative elements or accent pillows to complete the look and enhance the overall aesthetics of the bed.
By following these steps, you can restore a cozy and inviting atmosphere to your bed. Reinstalling the mattress and bedding ensures that you can enjoy the full benefits of your adjustable base while maintaining comfort and style.
Now that your bed is fully set up, complete with the mattress and bedding in place, it’s time for the final step: testing the functionality of the adjustable base.
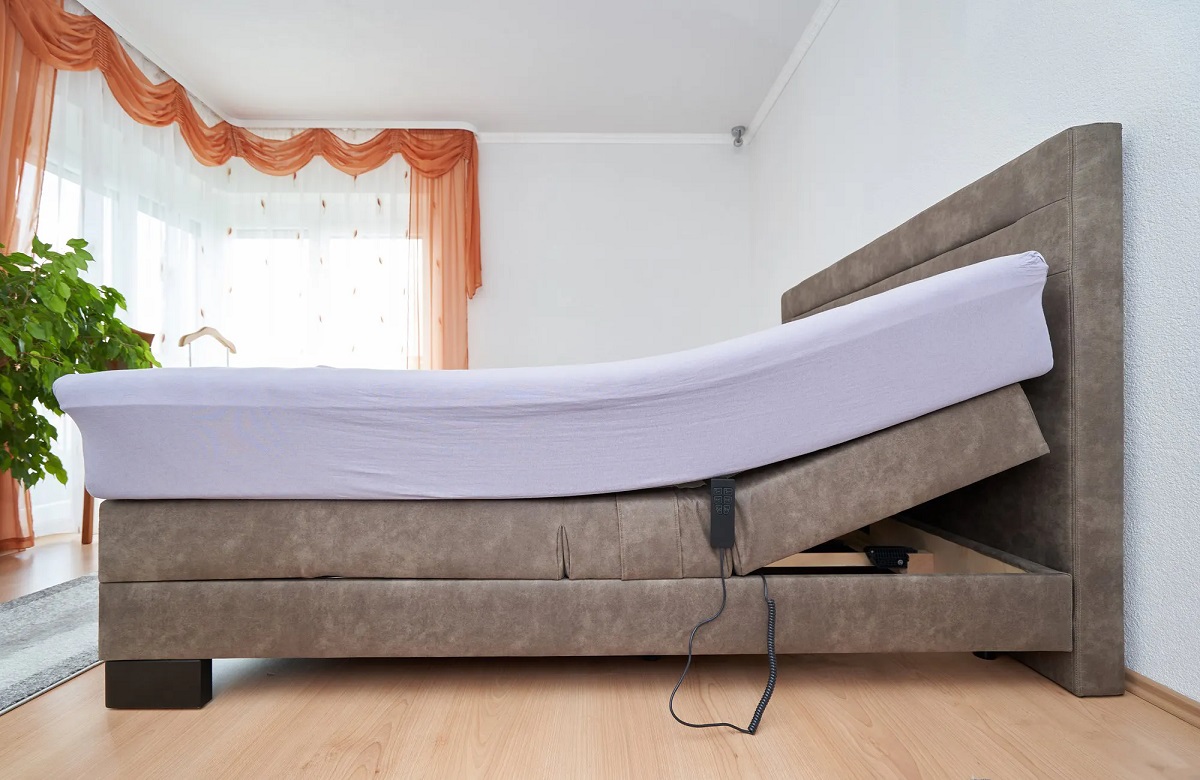
Step 7: Test the functionality of the adjustable base
After installing the adjustable base, it’s important to test its functionality to ensure that it operates smoothly and meets your comfort preferences. Follow these steps to test the adjustable base:
- Check the remote control and power source: Ensure that the remote control is working properly and has fresh batteries. Ensure that the power cord is plugged securely into an outlet and connected to the adjustable base.
- Learn the controls: Familiarize yourself with the different buttons or controls on the remote. Depending on the model, you may have options to adjust the head position, foot position, or both simultaneously. Take note of the specific functions and capabilities of your adjustable base.
- Adjust the head position: Use the remote control to adjust the head position of the adjustable base. Gradually raise or lower the head section to find the most comfortable angle for reading, watching TV, or simply enjoying a relaxing position. Take note of any adjustments that may enhance your comfort.
- Adjust the foot position: Next, use the remote control to adjust the foot position of the adjustable base. Experiment with different angles to find the position that offers the most support and relaxation for your legs and feet.
- Explore additional features: Depending on the model of your adjustable base, you may have access to additional features such as massage functions, under-bed lighting, or preset memory positions. Take the time to explore these features and see how they can enhance your sleep experience.
- Ensure smooth and quiet operation: Throughout the testing process, pay attention to the smoothness and quietness of the adjustable base’s operation. It should move seamlessly without any noticeable noise or resistance. If you notice any issues, refer to the manufacturer’s instructions or contact their customer support for assistance.
By thoroughly testing the functionality of the adjustable base, you can make any necessary adjustments to ensure optimal comfort and usability. Take your time to find the perfect settings that cater to your sleep preferences and create a luxurious sleeping environment.
Congratulations! You have successfully installed and tested your adjustable base. Now, you can enjoy the incredible benefits of a personalized sleeping experience in the comfort of your own bedroom.
Remember to periodically retest the adjustable base and make any adjustments as needed. Regular maintenance and care will ensure its continued functionality for years to come.
Enjoy your new adjustable bed and get ready for nights of restful and rejuvenating sleep!
Conclusion
Congratulations on successfully installing and setting up your adjustable base in your bed frame! By following the step-by-step process outlined in this guide, you have transformed your bed into a haven of comfort and convenience.
An adjustable base offers a range of benefits, from providing relief for various health issues to enhancing relaxation and comfort. With the ability to customize your sleeping position, you can alleviate back pain, improve circulation, reduce snoring, and enjoy a personalized sleep experience tailored to your needs.
Throughout the installation process, it’s important to prioritize safety and follow the manufacturer’s instructions. By gathering the necessary tools and materials, preparing the bed frame, attaching and securing the adjustable base, and reinstalling the mattress and bedding, you have created a solid and comfortable foundation for your adjustable bed.
Testing the functionality of the adjustable base ensures that it operates smoothly and meets your comfort preferences. Take the time to explore the different positions and features, finding the perfect settings for a restful and rejuvenating sleep experience.
Remember to perform regular maintenance and care for your adjustable base to ensure its continued functionality and longevity. Follow any cleaning and maintenance guidelines provided by the manufacturer to keep your adjustable bed in optimal condition.
Now, it’s time to enjoy your new adjustable bed and experience the incredible benefits it has to offer. Say goodbye to restless nights and uncomfortable sleep positions, and say hello to personalized comfort and support.
Thank you for choosing an adjustable base for your bed frame. May you enjoy many nights of restful and revitalizing sleep in your newfound haven of comfort!
Frequently Asked Questions about How To Install An Adjustable Base In A Bed Frame
Was this page helpful?
At Storables.com, we guarantee accurate and reliable information. Our content, validated by Expert Board Contributors, is crafted following stringent Editorial Policies. We're committed to providing you with well-researched, expert-backed insights for all your informational needs.


0 thoughts on “How To Install An Adjustable Base In A Bed Frame”