Home>Garden Essentials>How To Germinate Grape

Garden Essentials
How To Germinate Grape
Modified: August 17, 2024
Learn how to successfully germinate grapes in your garden with our step-by-step guide. Enjoy the fruits of your labor with this helpful tutorial.
(Many of the links in this article redirect to a specific reviewed product. Your purchase of these products through affiliate links helps to generate commission for Storables.com, at no extra cost. Learn more)
Introduction
Welcome to the wonderful world of gardening! If you have a passion for plants and an affinity for all things green, then you’ve come to the right place. In this article, we’ll be diving into the fascinating process of germinating grape seeds.
Grapes are not only delicious fruits, but they can also be a joy to grow in your own backyard. Germinating grape seeds allows you to start your grape vine from scratch, giving you the opportunity to nurture and watch it grow into a beautiful and fruitful plant.
Before we dive into the step-by-step process of germinating grape seeds, let’s take a moment to understand why this process is necessary. Unlike many other plants, grapevines do not grow true to seed. This means that if you were to plant a grape seed directly into the ground, it is unlikely to produce a plant that resembles the parent plant.
By germinating grape seeds, you are giving them the optimal conditions they need to sprout and grow. This allows you to have more control over the characteristics of the resulting plant, ensuring that you can enjoy the specific qualities of the grape variety you desire.
Now that we have a basic understanding of why germinating grape seeds is important, let’s move on to the essential supplies you’ll need to get started.
Key Takeaways:
- Soaking grape seeds and creating a suitable germination bed are crucial for successful germination. With proper care, patience, and attention to detail, you can nurture healthy grape seedlings from the very beginning.
- Transplanting germinated grape seeds into individual containers or your garden allows them to grow into fruitful vines. With dedication and the right conditions, you can enjoy the rewarding experience of growing your own grape plants.
Read more: How Long Grape Tomato Germinate
Step 1: Gather Supplies
Before you begin the process of germinating grape seeds, it’s important to make sure you have all the necessary supplies on hand. Here’s a list of items you’ll need:
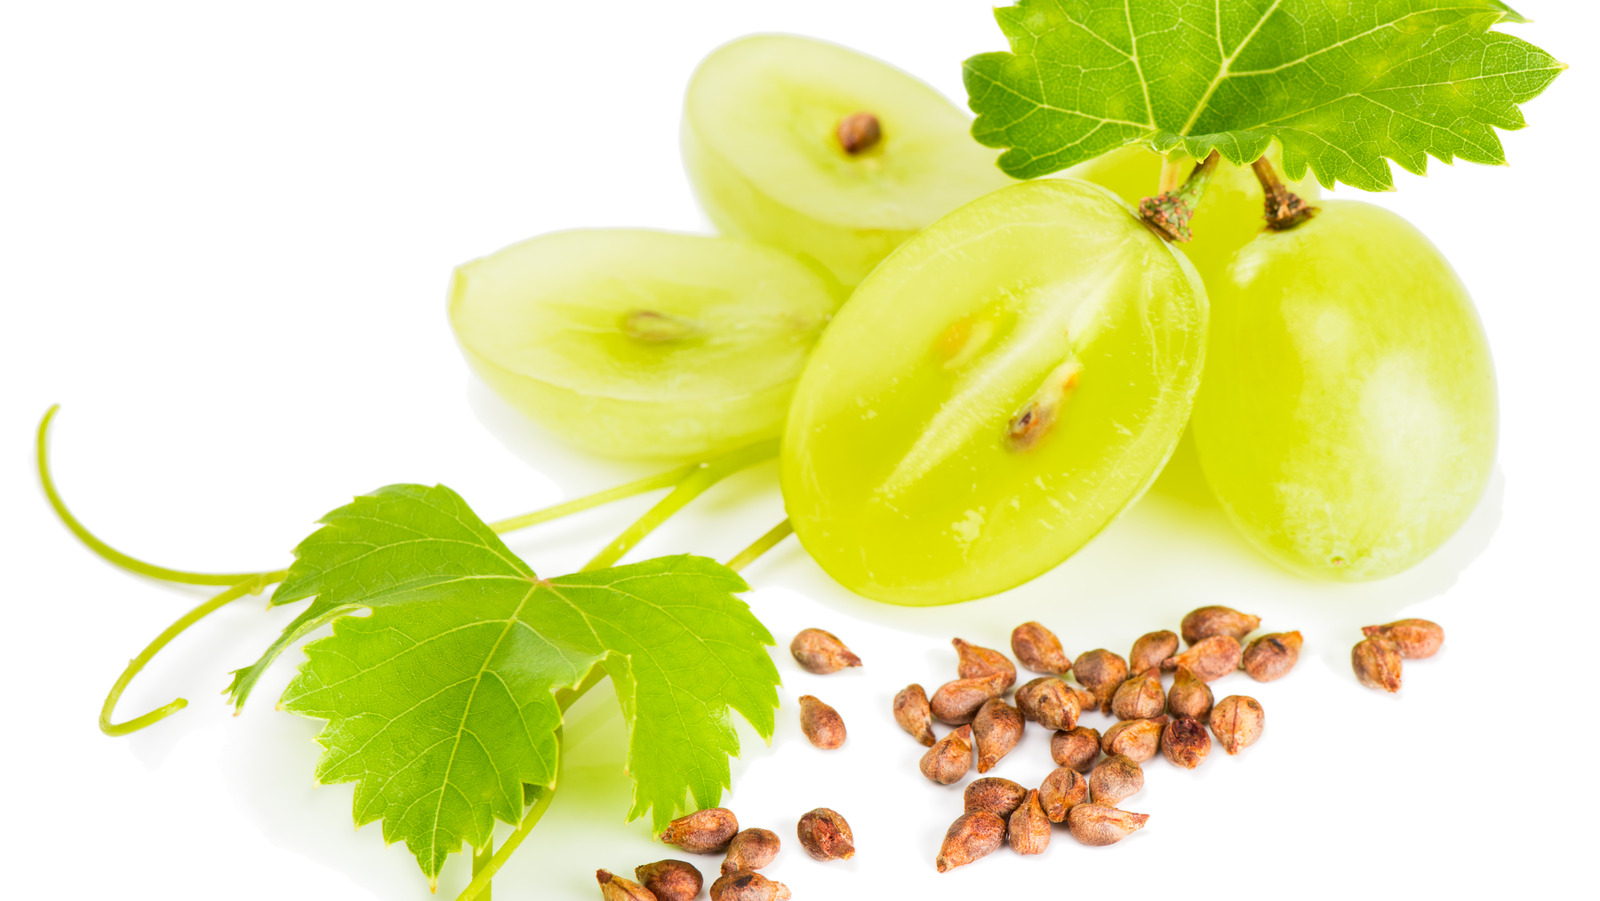
- Grape Seeds: Obtain fresh grape seeds from a reliable source. You can save seeds from grapes you’ve enjoyed or purchase them from a garden center or online supplier.
- Container: Choose a container that is at least 3 inches deep and has drainage holes at the bottom. This will ensure proper water drainage and prevent the seeds from sitting in excess moisture.
- Potting Mix: Use a well-draining potting mix specifically formulated for seed starting. Avoid using heavy garden soil, as it can compact and make it difficult for the seeds to germinate.
- Watering Can or Spray Bottle: You’ll need a method to provide moisture to the germination bed without overwatering. A watering can with a fine rose or a spray bottle works well for this purpose.
- Plastic Wrap or Dome: To create a humid environment that aids in germination, you’ll need a plastic wrap or a dome to cover the container.
- Grow Lights or Natural Light: Grapes seeds require ample light for germination. If you don’t have access to sufficient natural light, consider using grow lights to provide the necessary light spectrum.
- Thermometer: It’s important to maintain the proper temperature for seed germination. A thermometer can help you monitor the temperature levels.
Once you have gathered all the necessary supplies, you’re ready to move on to the next step: soaking the grape seeds.
Step 2: Soak the Grape Seeds
Soaking grape seeds before planting can help hasten the germination process by softening the hard outer shell of the seed. Here’s how to properly soak your grape seeds:
- Fill a small bowl with room temperature water.
- Place the grape seeds in the bowl and let them soak for 24 to 48 hours. This will allow the water to penetrate the seed coat and initiate the germination process.
- After the soaking period, carefully drain the water from the bowl.
- Gently pat dry the soaked grape seeds with a paper towel to remove any excess moisture.
It’s important to note that not all grape seeds will germinate, even after soaking. The success rate can vary, so it’s always a good idea to start with a few extra seeds to increase your chances of success.
Once the grape seeds have been adequately soaked, it’s time to move on to creating a germination bed.
Step 3: Create a Germination Bed
Creating a suitable germination bed provides the ideal environment for grape seeds to sprout and begin their journey towards becoming healthy plants. Follow these steps to create the perfect germination bed:
- Choose a container with drainage holes at the bottom. This could be a seed tray, a shallow container, or even a recycled plastic food container. Make sure to clean and sterilize the container before use.
- Fill the container with a well-draining seed-starting mix. Avoid using regular garden soil, as it can be too heavy and lead to poor drainage. Seed-starting mixes are specifically designed to provide optimal conditions for germination.
- Level the surface of the seed-starting mix and lightly water it to ensure it’s moist but not soaking wet. Excess water can lead to fungal growth and rot the seeds.
- Place the soaked grape seeds on top of the moist seed-starting mix. Make sure they are evenly spaced and not touching each other, as this allows room for the roots to develop.
- Gently press the grape seeds into the soil using your finger or a pen. You want the seeds to be in contact with the soil for better germination, but don’t bury them too deeply.
- Cover the container with a clear plastic wrap or a dome to create a humid environment and retain moisture.
Once you have created the germination bed, it’s time to move on to planting the grape seeds.
Step 4: Plant the Grape Seeds
Now that you have prepared the germination bed, it’s time to plant the grape seeds. Follow these steps to plant the seeds properly:
- Make small indentations in the soil using your finger or a pencil. These indentations should be about 1 inch deep.
- Place one grape seed into each indentation. Gently cover the seeds with a thin layer of soil to fully bury them.
- Water the soil lightly to ensure the seeds are hydrated. Be careful not to overwater, as too much moisture can lead to rotting.
- Label the container with the grape variety and the date of planting. This will help you keep track of the different seeds and their progress.
Now that the grape seeds are planted in the germination bed, it’s time to provide them with the proper lighting and temperature conditions for optimal germination.
To germinate grape seeds, soak them in water for 24 hours, then plant them in well-draining soil and keep them in a warm, sunny spot. Keep the soil consistently moist and the seeds should germinate within 2-8 weeks.
Read more: How To Store Grapes In Freezer
Step 5: Provide Adequate Lighting and Temperature
Proper lighting and temperature are crucial factors for the successful germination of grape seeds. Follow these guidelines to ensure your seeds receive the optimal conditions:
- Light: Place the germination bed in a location where it receives ample natural light. Ideally, the seeds should receive 10-12 hours of indirect sunlight each day. If natural light is limited, you can use fluorescent grow lights placed overhead to provide the necessary light spectrum.
- Temperature: Grape seeds require consistent warmth for germination. The optimal temperature range for germination is between 70°F and 80°F (21°C to 27°C). You can use a thermometer to monitor the temperature and ensure it remains within this range.
- Avoid extreme temperatures: Avoid exposing the germination bed to extreme temperature fluctuations. Rapid changes in temperature can harm the seeds or disrupt the germination process.
Remember to adjust the lighting and temperature accordingly as the seasons change. Providing the right conditions will help the grape seeds germinate and thrive.
After ensuring the lighting and temperature conditions are appropriate, the next step is to properly water the grape seeds.
Step 6: Water the Grape Seeds
Watering is a critical aspect of germinating grape seeds as it provides the necessary moisture for the seeds to sprout. Follow these guidelines to properly water your grape seeds:
- Check the moisture level of the germination bed regularly. The soil should be consistently moist but not waterlogged. Overwatering can lead to rotting and fungal diseases.
- Use a watering can with a fine rose or a spray bottle to gently water the soil. Avoid pouring water directly onto the seeds, as the force can dislodge them or disturb their delicate roots.
- Water in small, incremental amounts to avoid water pooling on the surface or excessive runoff. Ensure that the soil is evenly moist throughout.
- Water whenever the top inch of soil feels slightly dry to the touch. Be mindful of the moisture needs of the specific grape variety you are growing, as some may require more or less water.
- Monitor the germination bed and adjust the watering frequency as needed. Aim to maintain a consistent level of moisture without allowing the soil to become waterlogged.
Remember that proper watering is crucial for the germination and early growth stages of grape seeds. With regular watering and the right conditions, you’ll soon see signs of germination.
Next, we’ll discuss how to monitor and maintain the germination bed throughout the process.
Step 7: Monitor and Maintain the Germination Bed
Monitoring and maintaining the germination bed is essential to ensure the health and development of the grape seeds. Follow these steps to keep a watchful eye on your germination bed:
- Check the germination bed daily to observe any signs of seed sprouting. It may take anywhere from a few days to several weeks for the seeds to germinate, depending on the variety and conditions.
- Remove the plastic wrap or dome once the majority of the seeds have sprouted. This will prevent excess humidity and reduce the risk of fungal growth.
- Thin out any weak or overcrowded seedlings to allow the stronger ones to grow. This ensures that each plant has enough space, nutrients, and light to thrive.
- Continue to monitor the moisture level in the germination bed. Adjust the watering frequency as necessary to maintain a consistent level of moisture. Avoid letting the soil dry out or become excessively wet.
- Inspect the germination bed for any signs of pests or diseases. If you notice any issues, take appropriate measures to address the problem, such as using organic pest control methods or adjusting environmental conditions.
- Provide adequate airflow in the area to prevent the buildup of excessive humidity, which can lead to plant diseases. A gentle fan or open window can help maintain proper air circulation.
By diligently monitoring and maintaining the germination bed, you’ll ensure that your grape seeds have the best chance of developing into healthy seedlings. Now, let’s move on to the next step: transplanting the germinated grape seeds.
Step 8: Transplant the Germinated Grape Seeds
Once your grape seeds have germinated and the seedlings have developed their first set of true leaves, it’s time to transplant them into individual containers or into your garden. Follow these steps to successfully transplant the germinated grape seeds:
- Prepare individual pots or containers filled with a well-draining potting mix. Make sure the containers have drainage holes.
- Gently remove the germinated seedlings from the germination bed, being careful not to damage their delicate roots.
- Dig a small hole in each container and place the seedling inside, making sure the root system is properly covered with soil.
- Press down gently around the base of each seedling to secure it in place.
- Water the transplanted seedlings thoroughly to help them settle into their new containers. Ensure that the soil is evenly moist.
- Place the newly transplanted seedlings in an area that receives sufficient sunlight and provides proper airflow.
- Continue to monitor the moisture levels and water the seedlings as needed, keeping the soil consistently moist but not waterlogged.
- Gradually acclimate the seedlings to outdoor conditions if you plan to transplant them into your garden. Start by placing them in a sheltered location for a few hours each day, gradually increasing their exposure to direct sunlight over the course of a few weeks.
Transplanting the germinated grape seeds allows them to establish stronger root systems and grow into healthy grape plants. With proper care and maintenance, your grape seedlings will thrive and develop into fruitful vines.
Now that you’ve successfully transplanted the seedlings, it’s time to sit back, nurture your plants, and enjoy the rewarding experience of growing your own grape vines!
Read more: How To Store Green Grapes
Conclusion
Congratulations on successfully germinating grape seeds and embarking on the journey of nurturing your own grape vines! Germination is just the beginning, and with proper care and attention, you can watch your grape seedlings grow into healthy and fruitful plants.
Remember, the process of germinating grape seeds requires patience, as it can take time for the seeds to sprout and develop. By following the steps outlined in this guide, you have set a solid foundation for the growth and success of your grape plants.
Throughout the process, make sure to provide adequate lighting, maintain the appropriate temperature, water your seeds with care, and monitor the germination bed for any signs of pests or diseases. Transplanting the germinated seeds into individual containers or into your garden will provide them with the space and resources they need to flourish.
As your grape plants continue to grow, remember to provide them with proper care and attention. This includes regular watering, fertilizing as needed, pruning for shape and structure, and protecting them from pests and diseases. With diligence and dedication, you can enjoy the beauty of lush grapevines and even harvest delicious grapes in due time.
Gardening is a journey filled with learning and rewards. Take the time to appreciate the progress of your grape plants, learn from any challenges that arise, and savor the satisfaction of growing your own food.
So go ahead, get your hands dirty, and enjoy the experience of growing grapevines from germinated seeds. Happy gardening!
Frequently Asked Questions about How To Germinate Grape
Was this page helpful?
At Storables.com, we guarantee accurate and reliable information. Our content, validated by Expert Board Contributors, is crafted following stringent Editorial Policies. We're committed to providing you with well-researched, expert-backed insights for all your informational needs.


0 thoughts on “How To Germinate Grape”