Home>Garden Essentials>How To Germinate Japanese Maple
Garden Essentials
How To Germinate Japanese Maple
Modified: March 16, 2024
Learn how to successfully germinate Japanese Maple trees in your garden with our step-by-step guide. Enhance your gardening skills and enjoy a beautiful addition to your landscape.
(Many of the links in this article redirect to a specific reviewed product. Your purchase of these products through affiliate links helps to generate commission for Storables.com, at no extra cost. Learn more)
Introduction
Welcome to this comprehensive guide on how to germinate Japanese Maple seeds. Japanese Maples are known for their stunning foliage and graceful beauty, making them popular additions to gardens all over the world. While it may seem intimidating to start growing these trees from seeds, with the right knowledge and proper care, you can successfully germinate Japanese Maple seeds and watch them flourish into magnificent trees.
Before we delve into the step-by-step process of germinating Japanese Maple seeds, let’s take a moment to understand the importance of this process. Germination is the first crucial step in the life cycle of a plant, where the seed transitions into a seedling and begins to establish its roots. By understanding and implementing the proper germination techniques, you can set your Japanese Maple seeds up for success and provide them with the ideal conditions they need to thrive.
In this guide, we will cover everything you need to know about germinating Japanese Maple seeds, from gathering the materials to providing optimal growing conditions and caring for the seedlings until they are ready to be transplanted. So let’s dive in and learn the art of germinating Japanese Maple seeds!
Key Takeaways:
- To germinate Japanese Maple seeds, gather materials like seed trays, seed starting mix, and grow lights. Prepare the seeds by cleaning, scarifying (optional), soaking (optional), and stratifying. Plant the seeds, provide optimal growing conditions, and care for the seedlings until they’re ready to be transplanted.
- Transplant Japanese Maple seedlings during the dormant season, prepare the new planting area, and carefully remove the seedling from its container. Backfill the hole, water the seedling, and maintain care to ensure a successful transition. Embrace the joy of nurturing and cultivating these living works of art!
Read more: How To Grow Japanese Maple From Seed
Step 1: Gathering the Materials
Before you begin the germination process, it’s important to gather all the necessary materials. This will ensure that you have everything you need at hand and can proceed seamlessly with the rest of the steps.
Here is a list of materials you will need:
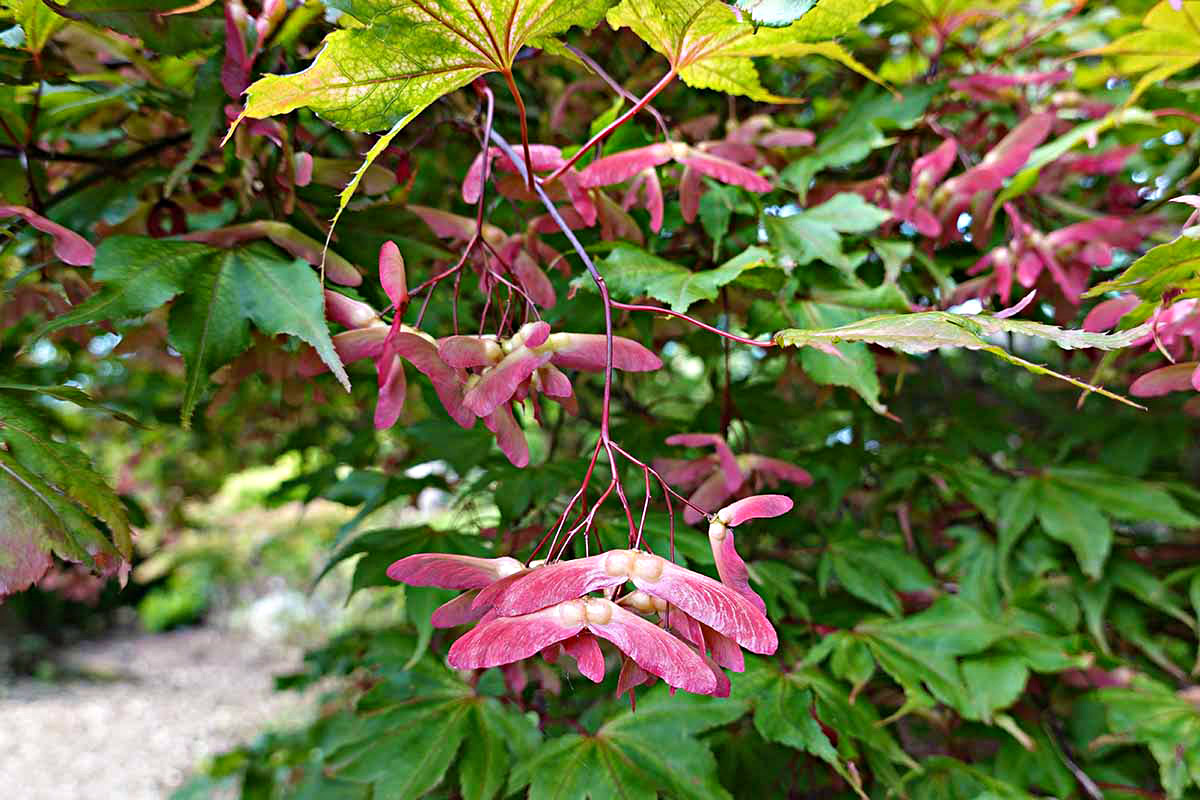
- Japanese Maple seeds – You can either collect seeds from an existing tree or purchase them from a reputable source. Make sure the seeds are fresh and viable.
- Seed tray or small pots – These containers will serve as the initial homes for your germinating seeds. Ensure that they have drainage holes to prevent waterlogging.
- Seed starting mix – It’s crucial to use a well-draining and nutrient-rich seed starting mix. Avoid using regular garden soil, as it can become compacted and hinder seedling growth.
- Plastic wrap or dome – Covering the seed tray or pots with plastic wrap or a dome helps create a moist and humid environment, which aids in seed germination.
- Watering can or spray bottle – You’ll need a watering can or spray bottle with a gentle misting setting to provide moisture to the seeds and seedlings without causing damage.
- Plant labels – It’s essential to label your seed tray or pots with the seed variety and the date of sowing. This will help you keep track of your seedlings and ensure proper care.
- Grow lights or a sunny windowsill – Japanese Maple seeds require adequate light to germinate. If you don’t have access to a sunny windowsill, invest in grow lights to provide the necessary light spectrum for healthy seedling growth.
Once you have gathered all the materials, you’ll be well-prepared to move on to the next steps of the germination process. Remember to choose high-quality seeds and ensure that your containers and growing medium are clean to provide the best conditions for successful germination.
Step 2: Preparing the Seeds
Now that you have gathered all the necessary materials, it’s time to prepare the Japanese Maple seeds for germination. This involves a few simple steps that will help improve their chances of sprouting successfully.
Here’s how to prepare the seeds:
- Clean the seeds: Before starting the germination process, it’s essential to clean the seeds. Rinse them gently with water to remove any dirt or debris that may be present. Pat them dry using a clean towel or paper towel.
- Scarify the seeds (optional): Scarification is a process that involves breaking or weakening the outer seed coat, allowing moisture to penetrate and promote germination. While some Japanese Maple seeds may benefit from scarification, it is not always necessary. If you choose to scarify the seeds, you can do so by gently rubbing them with sandpaper or nicking them with a knife. Be careful not to damage the embryo inside.
- Soak the seeds (optional): Another optional step is soaking the seeds before planting. Soaking can help soften the seed coat and speed up the germination process. Place the seeds in a container with warm water and let them soak for 24-48 hours. Discard any seeds that float, as they may not be viable.
- Stratify the seeds: Japanese Maple seeds require a period of cold stratification to break their dormancy and promote germination. Wrap the cleaned and optionally soaked seeds in a damp paper towel and place them inside an airtight plastic bag. Store the bag in the refrigerator for about 90-120 days. This mimics the natural winter conditions that the seeds would experience in their native environment.
By following these steps, you are preparing the Japanese Maple seeds to overcome dormancy and increase their chances of successful germination. The scarification and soaking steps are optional but can help facilitate the process for some seeds. Stratification is a crucial step to provide the necessary trigger for the seeds to begin their growth journey.
Once the stratification period is complete, you can proceed to the next step of planting the seeds and kickstarting their germination process.
Step 3: Stratification Process
The stratification process is a critical step in the germination of Japanese Maple seeds. It involves subjecting the seeds to a period of cold, moist conditions to break their dormancy and prepare them for germination. By mimicking the natural winter conditions, we can stimulate the seed’s internal clock and encourage the onset of growth.
Here’s how to stratify Japanese Maple seeds:
- Moisten a clean paper towel: Take a paper towel and dampen it with clean water. You want it to be slightly moist but not soaking wet.
- Place the seeds on the paper towel: Lay the seeds on one half of the moist paper towel. Make sure they are spread out and not touching each other. Then, fold the other half of the paper towel over the seeds, creating a seed sandwich.
- Transfer to a plastic bag: Gently place the paper towel with the enclosed seeds into a sealable plastic bag. Make sure to label the bag with the seed variety and the date of stratification for future reference.
- Store in the refrigerator: Put the sealed plastic bag containing the seeds in the refrigerator. The ideal temperature for stratification is between 32-41°F (0-5°C). Avoid placing the bag near fruits or vegetables, as they release ethylene gas, which can inhibit seed germination.
- Stratification duration: Allow the seeds to stratify for a period of 90-120 days. This duration ensures that the seeds receive a sufficient amount of cold exposure to break their dormancy. Regularly check the moisture level of the paper towel and remoisten it if necessary.
During the stratification process, the seeds undergo physiological changes that prepare them for germination. The chilling period helps to break down inhibitors in the seed coat, allowing water and oxygen to penetrate and initiate growth.
Once the stratification period is complete, move on to the next step of planting the seeds and providing them with the proper growing conditions to encourage successful germination.
Step 4: Planting the Seeds
After the stratification process is complete, it’s time to plant the Japanese Maple seeds. Planting them correctly will provide a suitable environment for germination and ensure the best chances of success in growing healthy seedlings.
Here’s how to plant the Japanese Maple seeds:
- Prepare the containers: Fill the seed tray or small pots with a well-draining seed starting mix. Make sure the containers have drainage holes at the bottom to prevent waterlogging.
- Plant the seeds: Create small indentations in the seed starting mix, approximately 1/4 inch (0.6 cm) deep. Place a single seed in each indentation and cover it lightly with the seed starting mix. Gently press down to ensure good seed-to-soil contact.
- Moisten the soil: Water the planted seeds to ensure the soil is evenly moist. Be careful not to oversaturate, as excessive moisture can lead to rotting. A spray bottle with a gentle misting setting is useful for providing moisture without causing damage.
- Cover the containers: Place a clear plastic wrap or a dome over the seed tray or pots to create a mini greenhouse effect. This helps retain moisture and promotes a humid environment that aids in seed germination.
- Provide proper lighting: Japanese Maple seeds need adequate light to germinate. Place the containers in a location with bright, indirect light or use grow lights if natural light is limited. Maintain a consistent temperature between 70-80°F (21-27°C) for optimal germination.
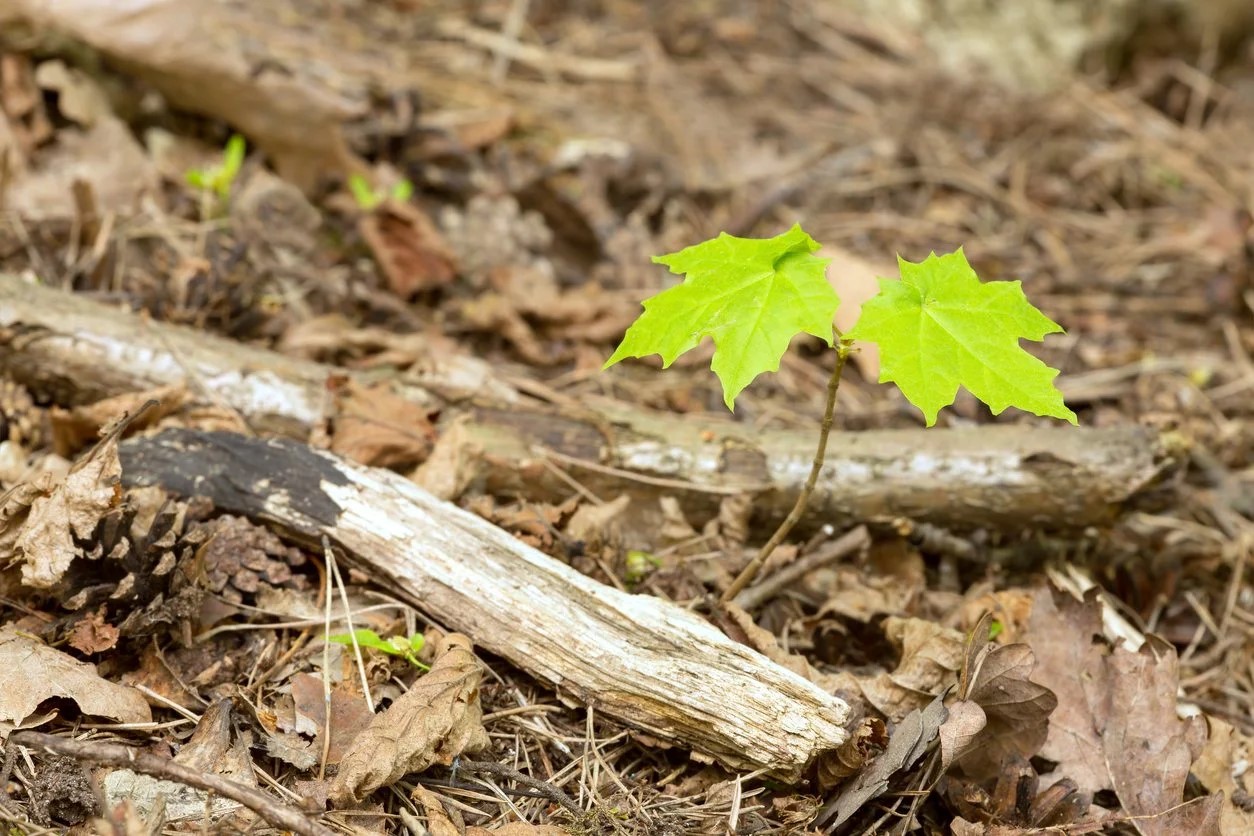
It’s important to note that Japanese Maple seeds may take several weeks to months to germinate, so be patient and maintain the appropriate growing conditions. Keep an eye on the moisture levels and ensure the soil doesn’t dry out completely. Mist the soil as needed to keep it slightly damp but not waterlogged.
Once the seeds start to germinate and the seedlings emerge, it’s time to provide them with the optimal growing conditions to foster healthy growth, which we will discuss in the next step.
To germinate Japanese maple seeds, stratify them in the refrigerator for 90-120 days, then plant in well-draining soil and keep moist. Keep in a warm, sunny spot and be patient, as germination can take several weeks.
Step 5: Providing Optimal Growing Conditions
As the Japanese Maple seedlings begin to emerge, it’s crucial to provide them with the right growing conditions to support healthy growth. Proper care during this stage will help the seedlings develop strong roots and leaves, setting them up for success as they mature.
Here are the key factors for providing optimal growing conditions:
- Light: Place the seedlings in a location that receives bright, indirect light. If natural light is limited, continue using grow lights to ensure they receive adequate illumination. Aim for 12-16 hours of light per day to promote healthy growth.
- Temperature: Maintain a consistently warm environment for the seedlings. Ideally, the temperature should range between 60-75°F (15-24°C). Avoid exposing the young seedlings to extreme temperature fluctuations or drafts, as they can stunt growth or cause damage.
- Watering: Water the seedlings carefully to keep the soil evenly moist. Avoid overwatering, as it can lead to root rot. Check the moisture levels regularly and adjust the watering frequency accordingly. It’s beneficial to use a misting spray bottle to provide gentle, fine misting to prevent disturbing the delicate seedlings.
- Fertilization: After the seedlings develop their first set of true leaves, you can start fertilizing them with a diluted, balanced liquid fertilizer. Follow the instructions provided on the fertilizer packaging for the appropriate dilution ratio and frequency of application. Be cautious not to over-fertilize, as it can burn the tender roots.
- Air circulation: Adequate air circulation is crucial for preventing diseases and ensuring healthy growth. Avoid overcrowding the seedlings and provide enough space for air to circulate between them. If using a plastic cover or dome, make sure to remove it for a short period every day to allow fresh air to reach the seedlings.
Consistency is key when providing these optimal growing conditions. Monitor the seedlings closely for any signs of stress, such as wilting or discoloration, and make adjustments as needed. As the seedlings grow, gradually acclimate them to outdoor conditions before transplanting them into the garden.
With proper care and attention, your Japanese Maple seedlings will continue to thrive and develop into beautiful trees that will enhance the aesthetic appeal of your garden.
Step 6: Caring for the Seedlings
As your Japanese Maple seedlings continue to grow, they require ongoing care and attention to ensure their health and development. Proper care during this stage will help the seedlings establish strong root systems and sturdy branches, setting them up for long-term success.
Here are some important aspects to consider when caring for your seedlings:
- Watering: Adequate watering is crucial for the seedlings’ growth. Keep the soil consistently moist, but not soggy. Water deeply and allow the soil to dry slightly between waterings to promote healthy root development. Monitor the soil moisture levels regularly and adjust the watering frequency accordingly.
- Pruning: As the seedlings develop, it may be necessary to prune them to shape their growth and promote a desirable form. Remove any dead or damaged branches, as well as any crossing branches that may impede proper growth. Additionally, selective pruning can encourage a more balanced and compact tree shape.
- Protection from pests: Keep a close eye on your seedlings for any signs of pest infestation, such as aphids, mealybugs, or scale insects. If you notice any pests, take appropriate measures to control them, such as using organic insecticides or introducing beneficial insects that prey on pests.
- Mulching: Apply a layer of mulch around the base of the seedlings to help conserve moisture, suppress weed growth, and regulate soil temperature. Use organic materials like wood chips or shredded leaves and ensure the mulch does not come into direct contact with the seedling stems to prevent rotting.
- Support: Depending on the height and structure of the seedlings, they may require support to prevent them from bending or collapsing under their own weight. Use stakes or small supports to provide stability until the seedlings grow stronger and can support themselves.
Regularly assess the condition of your seedlings and address any issues promptly. Pay attention to the overall health of the leaves, the development of new growth, and any signs of stress or disease. By providing proper care and taking proactive measures, you can ensure the well-being and vitality of your Japanese Maple seedlings.
Remember, each seedling is unique, and they may vary in their growth rate and development. Be patient and continue to provide the necessary care and attention, and you will soon have a collection of thriving Japanese Maple trees ready for transplanting.
Step 7: Transplanting the Maple Seedlings
Once your Japanese Maple seedlings have grown stronger and are well-established, it’s time to transplant them into their permanent locations in the garden or larger containers. Transplanting allows the seedlings to spread their roots and grow into mature trees.
Here’s how to transplant Japanese Maple seedlings:
- Choose the right timing: The best time to transplant Japanese Maple seedlings is during the dormant season, either in early spring before new growth emerges or in late fall after the leaves have dropped. This allows the seedlings to adjust to their new environment without the added stress of hot temperatures or active growth.
- Prepare the new planting area: Select a suitable location in your garden that provides the ideal growing conditions for Japanese Maples. They prefer well-draining soil with a slightly acidic pH. Amend the soil if needed and ensure the planting area receives adequate sunlight or partial shade.
- Dig the transplant hole: Dig a hole in the new planting area that is slightly wider and deeper than the root ball of the seedling. This will allow room for the roots to spread out. Gently loosen the soil in the bottom of the hole to encourage root penetration.
- Remove the seedling from its container: Carefully remove the seedling from its current container, being mindful of the delicate root system. If the roots are tightly packed, gently loosen them to encourage outward growth. Avoid pulling on the stem or damaging the fragile roots.
- Place the seedling in the hole: Position the seedling in the center of the hole and ensure it is at the same depth as it was in the previous container. The top of the root ball should be level with the soil surface. Adjust the position if necessary to ensure the seedling is straight and upright.
- Backfill and water: Fill the hole with soil, gently firming it around the roots to eliminate any air pockets. Water the newly transplanted seedling thoroughly to settle the soil and provide hydration. Apply a layer of mulch around the base, leaving a small gap around the stem to prevent moisture retention.
- Maintain care and monitor progress: After transplanting, continue to provide the same care as you did during the seedling stage. Monitor the moisture levels, water as needed, and protect the seedling from extreme weather conditions or pests. Over time, your Japanese Maple seedling will establish itself and grow into a magnificent tree in your garden.
It’s important to note that transplant shock may occur after moving the seedlings to a new location. This is normal, and the seedlings may experience some leaf drop or temporary wilting. However, with proper care and attention, they will recover and thrive in their new surroundings.
Transplanting Japanese Maple seedlings is an exciting step in their journey toward becoming mature trees. With careful handling and the right care, you can ensure a successful transition and enjoy the beauty of these magnificent trees in your garden for years to come.
Conclusion
Congratulations on completing the journey of germinating and growing Japanese Maple trees from seed! By following the step-by-step process outlined in this guide, you have gained the knowledge and skills necessary to successfully germinate Japanese Maple seeds and nurture the seedlings into healthy, vibrant trees.
From gathering the necessary materials to preparing the seeds, providing optimal growing conditions, and finally transplanting the seedlings, each step is essential in ensuring the growth and development of your Japanese Maple trees. Throughout this process, you have learned about the importance of proper care, including watering, pruning, and pest management, to support the seedlings’ growth and well-being.
Remember, growing Japanese Maples from seed requires patience and attention to detail, but the reward is well worth it. These stunning trees will add beauty, elegance, and color to your garden, creating a focal point and capturing the admiration of all who see them.
Continually assess the needs of your Japanese Maple trees as they mature, adjusting their care accordingly. With time and proper cultivation, your trees will become mature specimens, showcasing the unique characteristics and vibrant foliage that make Japanese Maples so beloved.
As you embark on your gardening journey with Japanese Maples, don’t forget to stay curious, experiment, and continue learning. Gardening is a continuous process of discovery and growth, and your passion for these remarkable trees will only deepen as you witness the remarkable transformation from tiny seeds to magnificent trees.
Embrace the joy of nurturing and cultivating these living works of art, and relish in the beauty and tranquility they bring to your outdoor space for years to come.
Happy gardening and may your Japanese Maple trees flourish and bring you endless delight!
Frequently Asked Questions about How To Germinate Japanese Maple
Was this page helpful?
At Storables.com, we guarantee accurate and reliable information. Our content, validated by Expert Board Contributors, is crafted following stringent Editorial Policies. We're committed to providing you with well-researched, expert-backed insights for all your informational needs.


0 thoughts on “How To Germinate Japanese Maple”