Home>Garden Essentials>How To Make A Toddler Play Area In The Kitchen
Garden Essentials
How To Make A Toddler Play Area In The Kitchen
Modified: October 28, 2024
Learn how to create a fun and safe garden-themed play area for your toddler in the kitchen. Transform meal prep time into playtime with these simple tips and ideas.
(Many of the links in this article redirect to a specific reviewed product. Your purchase of these products through affiliate links helps to generate commission for Storables.com, at no extra cost. Learn more)
Introduction
Welcome to the exciting world of gardening! Whether you are a novice or a seasoned green thumb, there is always something new to learn about plants and how to tend to them. In this comprehensive guide, we will explore various aspects of gardening, from choosing the right plants for your space to nurturing them to their fullest potential.
Gardening is not only a hobby but also a way to connect with nature and create a peaceful oasis in your own backyard. It allows you to take a break from the hustle and bustle of daily life and immerse yourself in the therapeutic benefits of tending to plants.
In this article, we will cover a wide range of topics, including soil preparation, plant selection, watering techniques, pest control, and much more. Whether you are interested in growing vegetables, flowers, or creating a stunning landscape, you’ll find valuable information and tips to help you succeed.
Furthermore, we will delve into the world of organic gardening, exploring the benefits of using natural fertilizers and pest control methods. Not only is organic gardening better for the environment, but it also ensures that your produce is free from harmful chemicals.
To make the most of your gardening experience, we will discuss essential gardening tools, their uses, and how to properly maintain them. From hand trowels and pruners to watering cans and wheelbarrows, having the right tools at your disposal can greatly enhance your gardening efforts.
Lastly, we will explore the various types of garden designs, ranging from traditional flower beds to contemporary container gardens. We will walk you through the steps of planning and creating your dream garden, considering factors such as sunlight, soil type, and the overall aesthetic you wish to achieve.
So, whether you have a small balcony, a spacious backyard, or even just a few pots on a windowsill, this guide will provide you with the knowledge and inspiration to unleash your inner gardener. Get ready to immerse yourself in the wonderful world of plants and watch as your garden blooms and flourishes.
Key Takeaways:
- Create a safe and fun play area in the kitchen for toddlers by childproofing, choosing durable flooring, and setting up engaging play zones. Follow kitchen safety rules to ensure a secure environment.
- Organize toys, incorporate comfortable seating, and establish clear safety guidelines to nurture your child’s creativity and learning in the kitchen play area. Regularly update and personalize the space for a magical experience.
Read more: How To Organize A Play Area For Toddlers
Step 1: Assessing the Space
Before diving into your gardening journey, it is crucial to assess the space you have available for your garden. This step will help you determine the type and size of plants you can accommodate, as well as the layout and design of your garden.
Start by carefully examining the available area. Take note of factors such as the amount of sunlight it receives throughout the day, the quality of the soil, and any existing structures or obstacles that may impact your gardening plans. These observations will guide you in choosing the right plants and developing a suitable garden layout.
First, consider the amount of sunlight your garden receives. Most plants require a minimum of 6 hours of direct sunlight each day, though some shade-tolerant varieties can thrive with less. Observe the path of the sun across your garden throughout the day and identify areas that receive ample sunlight and areas that are more shaded. This will help you determine where to place sun-loving plants and where to create shady spots for plants that prefer indirect light.
Next, evaluate the quality of the soil in your garden. Take a handful of soil and feel its texture. Good garden soil should be loose, crumbly, and well-draining. Sandy soils drain quickly, while clay soils retain moisture. You may need to amend your soil with organic matter, such as compost or peat moss, to improve its structure and fertility. Additionally, consider conducting a soil test to determine the pH level and nutrient content of your soil, allowing you to make any necessary adjustments to create optimal growing conditions for your plants.
Additionally, take note of any existing structures or obstacles in your garden, such as trees, fences, or utility lines. These features will affect the layout and design of your garden. Ensure that plants are not obstructed by structures or shaded by nearby trees. Similarly, avoid planting near utility lines to prevent any potential issues in the future.
After assessing the space, it’s time to start planning your garden. Consider the type of garden you want to create – whether it’s a vegetable garden, a flower garden, or a combination of both. Take into account the size and height of the plants you wish to grow, as well as any specific requirements they may have.
Creating a rough sketch or a layout plan of your garden can be extremely helpful in visualizing the space and determining where each plant will be placed. This will also assist you in ensuring that taller plants don’t overshadow smaller plants and that there is ample space for each plant to grow and spread.
By thoroughly assessing the space and planning accordingly, you can set a solid foundation for a successful garden. Understanding the unique characteristics of your garden will enable you to select the right plants and design a layout that maximizes the potential of your space.
Step 2: Childproofing the Kitchen
When creating a toddler play area in the kitchen, safety should be your top priority. The kitchen can be full of potential hazards for curious little ones, so it’s essential to take the necessary steps to childproof the space. By childproofing your kitchen, you can create a secure environment where your toddler can explore and play without any unnecessary risks.
Start by securing all sharp objects and hazardous materials out of reach. Store knives, scissors, and other sharp utensils in locked drawers or high cabinets. Keep cleaning supplies, chemicals, and medications in locked cabinets or at a height that is inaccessible to your child. Consider installing childproof locks on all cabinets and drawers to prevent your toddler from accessing dangerous items.
Next, ensure that all electrical outlets and cords are safely covered or tucked away. Use outlet covers to prevent your child from sticking their fingers or objects into the sockets. Secure any loose cords from kitchen appliances, such as blenders and toasters, to prevent your child from pulling on them and potentially causing an accident.
Install safety gates at the entrances of your kitchen to create a physical barrier between your child and the potentially dangerous area. This will help prevent your toddler from wandering into the kitchen unsupervised. Opt for gates that can be securely mounted to the wall and have a latch that is difficult for a child to open.
Take extra precautions in the kitchen when using the stove or oven. Install stove knob covers to prevent your child from accidentally turning on the burners. Use back burners whenever possible and turn pot handles inward to make them less accessible to your toddler. Consider using a stove guard or a safety gate to create a buffer between your child and the cooking area.
Ensure that all heavy appliances, such as microwaves and blenders, are placed on sturdy surfaces and are not easily tipped over. Secure them to the countertops or use appliance straps to prevent accidents. It’s also a good idea to keep small appliances unplugged and stored away when not in use to eliminate any potential hazards.
Lastly, pay attention to the flooring in your kitchen. Opt for nonslip surfaces to reduce the risk of slips and falls. Consider using nonslip rugs or mats in high traffic areas. Avoid using small rugs or mats that can become trip hazards for your toddler.
By thoroughly childproofing your kitchen, you can create a safe and secure area for your toddler to play and explore. By minimizing risks and potential hazards, you can have peace of mind knowing that your child can enjoy their playtime in the kitchen while you focus on your tasks at hand.
Step 3: Choosing the Right Flooring
When creating a toddler play area in the kitchen, one important aspect to consider is the choice of flooring. The right flooring can provide a safe and comfortable environment for your little one to explore and play. Here are some factors to consider when selecting the flooring for your toddler’s play area in the kitchen.
Durability is key when it comes to kitchen flooring. With the potential for spills, dropped utensils, and heavy foot traffic, you’ll want to choose a flooring material that can withstand the rigors of daily use. Opt for flooring options that are resistant to scratches, stains, and water damage.
Vinyl flooring is a popular choice for kitchens due to its durability and water resistance. It is easy to clean and maintain, making it ideal for households with young children. Vinyl flooring comes in a variety of styles and designs, allowing you to choose the one that best suits your kitchen decor.
Laminate flooring is another excellent option for a toddler play area in the kitchen. It is scratch-resistant and provides a similar look to hardwood flooring at a more affordable price. Laminate flooring is also easy to clean and maintain, making it a practical choice for a busy kitchen.
If you prefer a more natural look, hardwood flooring can add warmth and elegance to your kitchen. However, it is important to note that hardwood flooring may require more maintenance and can be susceptible to scratching and water damage. Be sure to choose a hardwood species that is known for its durability, such as oak or maple, and consider adding a protective layer, such as a sealant or wax, to minimize wear and tear.
Tiles are another popular choice for kitchen flooring. They are durable, easy to clean, and come in a wide variety of colors and patterns. Opt for tiles with a textured surface to provide a slip-resistant surface for your toddler. Look for tiles that are rated for high traffic areas to ensure they can withstand the demands of a busy kitchen.
In addition to durability, it is important to consider the comfort and safety of your toddler. Hard flooring materials, such as tile and hardwood, can be unforgiving on little feet and can increase the risk of injuries from falls. Consider adding an area rug or mats in the play area to provide cushioning and reduce the risk of slips and falls.
Lastly, keep in mind the overall aesthetic of your kitchen. Choose a flooring material and color that complements the existing decor and creates a cohesive look in the space. Remember that flooring is a long-term investment, so choose a style that you will be happy with for years to come.
By considering factors such as durability, comfort, and aesthetics, you can select the right flooring for your toddler’s play area in the kitchen. A well-chosen flooring material will provide a safe and enjoyable space for your little one to play while adding beauty and functionality to your kitchen.
Step 4: Installing Safety Gates
When creating a toddler play area in the kitchen, it is crucial to install safety gates to prevent your little one from accessing potentially dangerous areas. Safety gates act as physical barriers, restricting your child’s access to certain parts of the kitchen and ensuring their safety. Here’s a step-by-step guide on how to properly install safety gates in your kitchen.
1. Measure the space: Begin by measuring the width of the area where you want to install the safety gate. It’s important to choose a gate that fits securely and snugly in the desired location. Measure the height as well, ensuring that the gate is tall enough to prevent your toddler from climbing over it.
2. Choose the right gate: There are various types of safety gates available, such as pressure-mounted gates and hardware-mounted gates. Pressure-mounted gates are easy to install and can be used in doorways and openings between rooms. However, they are not suitable for areas such as the top of stairs. Hardware-mounted gates, on the other hand, are securely attached to the wall or doorway using screws, making them ideal for stairs and other high-risk areas.
3. Prepare the installation area: Before installing the gate, clean and prepare the area for proper placement. Remove any loose objects or obstacles that could interfere with the installation process.
4. Assembly: If your gate requires assembling, carefully follow the manufacturer’s instructions to put the gate together. Ensure that all components are properly secured and tightened.
5. Installation for pressure-mounted gates: For a pressure-mounted gate, position it in the desired location and adjust the width accordingly. Apply gentle pressure to the gate, compressing the gate’s sides against the walls or door frames until it is firmly in place. Double-check that the gate is stable and cannot be easily pushed or dislodged by your child.
6. Installation for hardware-mounted gates: For a hardware-mounted gate, use a pencil or marker to mark the spots where you will drill the screw holes. Make sure to position the gate at the appropriate height to prevent your toddler from climbing over it. Drill pilot holes into the marked spots, and then attach the gate using the provided screws and mounting hardware. Ensure that the gate is securely attached to the wall or doorway and cannot be easily dislodged.
7. Test the gate: Once the gate is installed, give it a thorough test to ensure its stability and effectiveness. Try to shake or push the gate to make sure it doesn’t move or loosen. Check that the gate’s latching mechanism works properly and is childproof.
8. Regular maintenance: Regularly inspect the safety gate to ensure that it remains secure and in good working condition. Tighten any loose screws or adjust the tension on pressure-mounted gates if needed. As your child grows, adjust the gate to fit their changing needs.
Installing safety gates in your kitchen is an important step in creating a safe play area for your toddler. By following these steps and choosing the right type of gate, you can provide a secure environment for your child to explore and play in the kitchen while keeping them away from potential hazards.
Read more: How To Set Up A Toddler Play Area
Step 5: Setting Up Child-friendly Storage Solutions
When creating a toddler play area in the kitchen, it’s essential to set up child-friendly storage solutions to keep the space organized and safe. By implementing the right storage solutions, you can ensure that your toddler can access their toys and belongings easily while minimizing the risk of accidents or messes. Here’s a step-by-step guide to setting up child-friendly storage solutions in your kitchen play area.
1. Assess your storage needs: Begin by evaluating the types of items you need to store in your kitchen play area. This may include toys, art supplies, books, or even cooking utensils for your child’s pretend play activities. Consider the size and quantity of these items to determine the appropriate storage solutions.
2. Choose child-friendly storage containers: Opt for storage containers that are safe and suitable for children. Look for containers made of non-toxic materials, such as BPA-free plastics or natural fibers. Avoid containers with sharp edges or small parts that can pose a choking hazard. Select containers that are durable and easy to clean, as spills and messes are bound to happen during playtime.
3. Label and categorize: Labeling storage containers can help your child understand what goes where and encourage them to clean up after playtime. Use simple, clear labels with pictures or words that your child can easily recognize. Categorize items based on their function or type, such as “toys,” “books,” or “art supplies,” to create a systematic and organized storage system.
4. Keep frequently used items within reach: Store items that your child frequently uses, such as their favorite toys or coloring books, within easy reach. This allows them to independently access these items without needing assistance. Utilize low shelves or cubbies to create an accessible storage area where your child can easily see and reach their belongings.
5. Utilize storage bins and baskets: Invest in storage bins and baskets to keep smaller items organized and contained. Use clear containers or labeled bins to make it easier for your child to find and put away their belongings. Make sure to choose bins with smooth edges and sturdy construction to prevent any injuries.
6. Consider open shelving: Open shelving can be a practical storage solution in a kitchen play area, as it allows for easy access and visibility. Arrange toys, books, or art supplies on the shelves to create an inviting display. Make sure that the shelves are securely attached to the wall and are at a height appropriate for your child’s reach.
7. Use storage furniture with safety features: Consider investing in child-friendly storage furniture with safety features such as rounded corners, anti-tip mechanisms, or doors with slow-close hinges. These features help minimize the risk of accidents and injuries. Anchor any tall or heavy furniture to the wall to prevent tipping.
8. Keep floor space clear: Ensure that the play area has enough open floor space for your child to move around freely and engage in active play. Avoid cluttering the floor with excess items or large storage units that can obstruct their movement.
By following these steps and setting up child-friendly storage solutions, you can create an organized and safe play area in your kitchen for your toddler. With easy access to their toys and belongings, your child can enjoy hours of imaginative play while you have peace of mind knowing that everything is in its proper place.
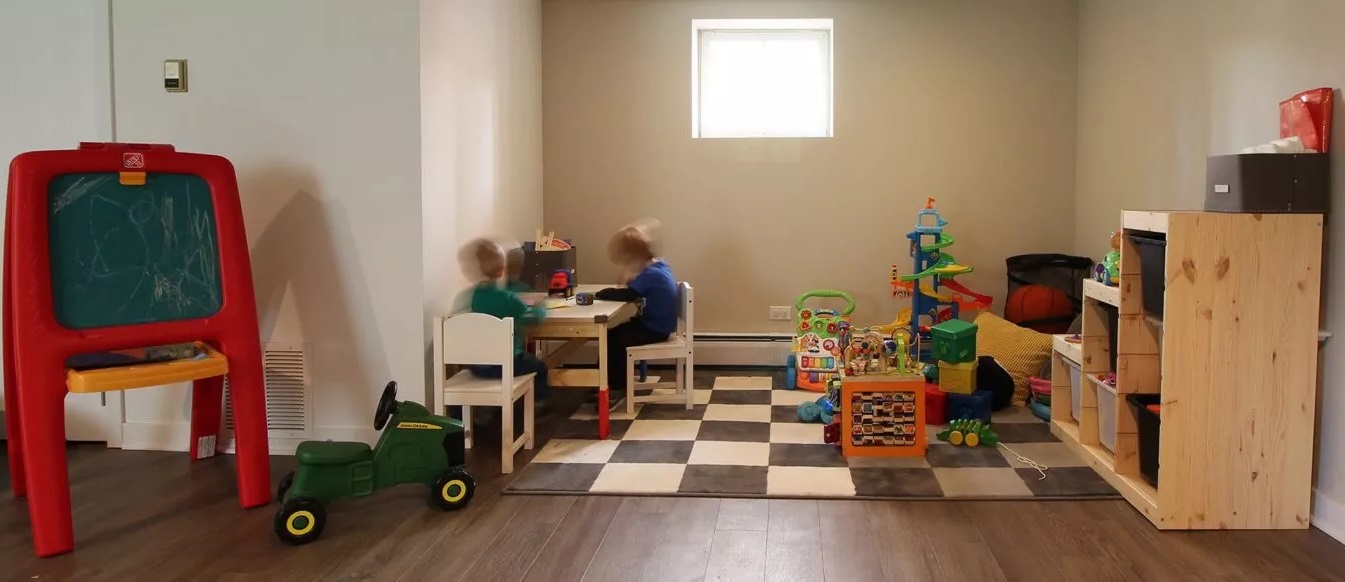
Use non-toxic, easy-to-clean materials like foam mats or rugs to create a designated play area in the kitchen. Add child-sized table and chairs, and store toys in bins for easy access. Keep the area away from hot appliances and sharp objects.
Step 6: Incorporating Play Areas
When creating a toddler play area in the kitchen, it’s important to incorporate designated play areas that are engaging and stimulating for your little one. These play areas will provide opportunities for imaginative play, learning, and exploration. Here’s a step-by-step guide on how to incorporate play areas into your kitchen space.
1. Identify the available space: Take a look at your kitchen layout and identify areas that can be transformed into play zones. Consider unused corners, underutilized countertops, or even a small section of the room that can be dedicated to play. Keep in mind that the play areas should be easily supervised and have sufficient space for your child to move around.
2. Create a cozy reading nook: Set up a cozy reading nook in one corner of the kitchen. Place a small bookshelf or stack books on a low shelf for easy access. Add soft cushions or a small child-sized chair where your toddler can comfortably sit and enjoy flipping through their favorite storybooks. Make sure to include proper lighting so your child can read comfortably.
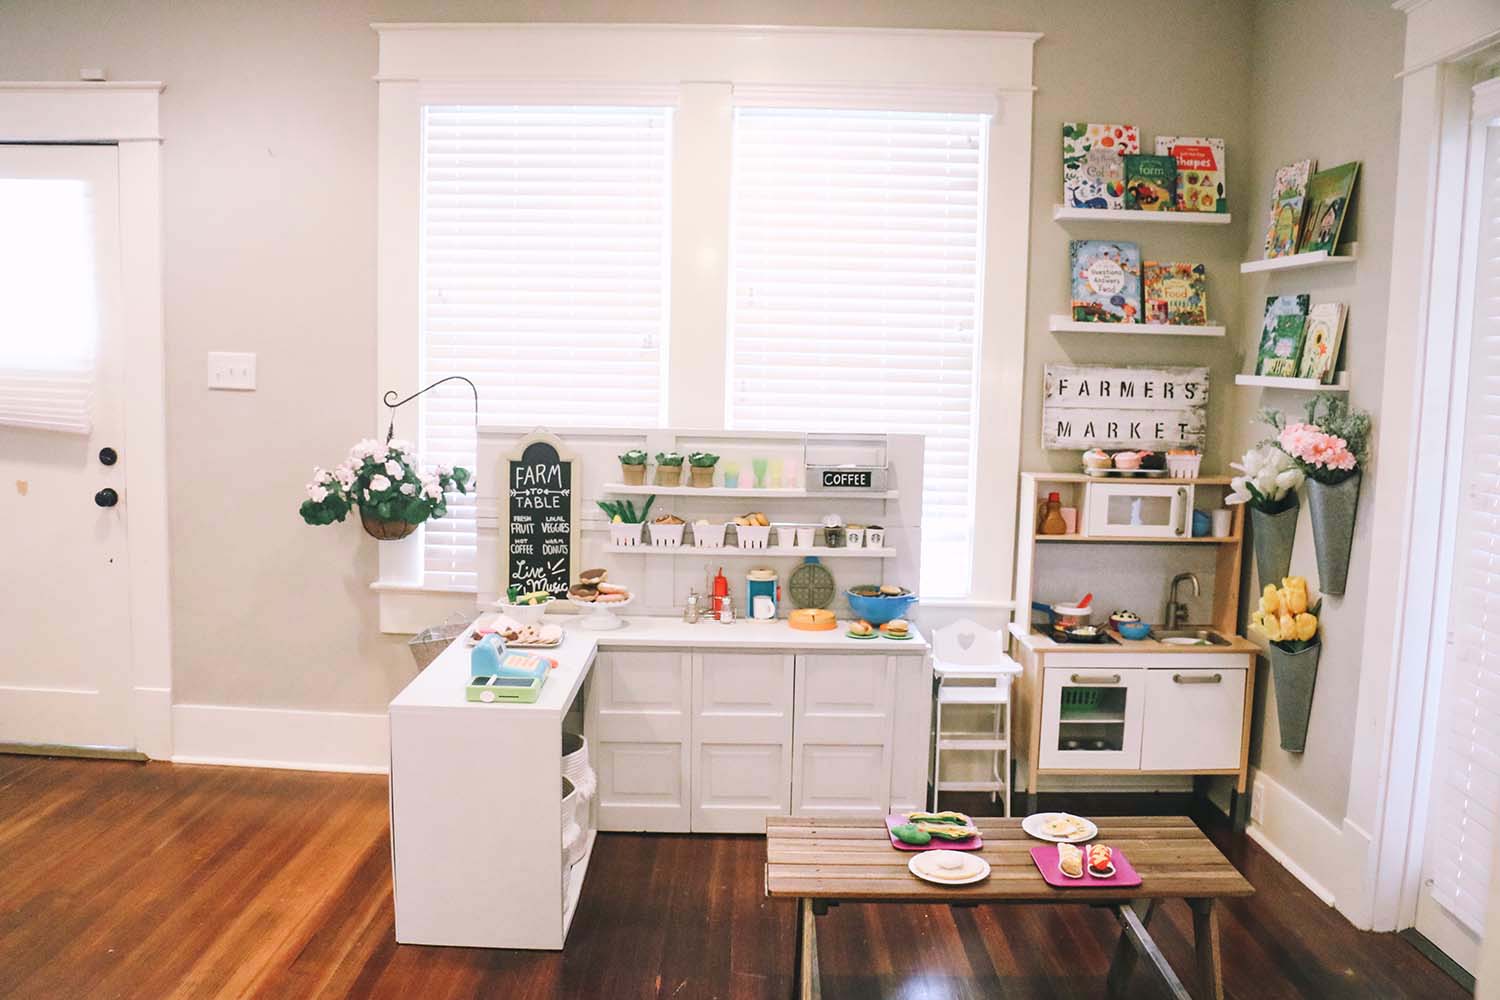
3. Build a pretend play kitchen: Incorporate a pretend play kitchen area where your child can imitate you and engage in imaginative cooking adventures. Set up a child-sized table or countertop with play kitchen utensils, pots, and pans. You can use toy food items or repurpose old kitchen items like plastic containers or cutlery (make sure they are safe for play). Encourage your child to explore their culinary creativity in their own little kitchen space.
4. Design an art corner: Encourage your child’s creativity by dedicating an art corner in the kitchen. Set up a small table or easel where your toddler can engage in art activities. Keep a stash of washable markers, crayons, colored pencils, and paper handy. Make sure to protect the surrounding area with a washable mat or tablecloth to save your kitchen surfaces from potential messes.
5. Construct a building and construction area: Set up a designated space for building blocks, puzzles, and other construction toys. Use a low shelf or storage bins to house the toys and create an inviting area for building and problem-solving activities. Consider adding a soft play mat or rug to provide a comfortable surface for playing.
6. Integrate sensory play elements: Incorporate sensory play elements into your kitchen play area to stimulate your toddler’s senses. You can create a sensory bin filled with dry rice, beans, or colored pasta for them to explore with their hands. Add small scoops, cups, and containers for scooping and pouring. Additionally, you can have a small water table for water play activities, but always supervise your child closely during water play to ensure their safety.
7. Personalize the play areas: Make the play areas feel special and personalized by adding your child’s artwork, photos, or their name displayed on the walls. This will create a sense of ownership and make the space feel uniquely theirs.
Remember to arrange the play areas in a way that allows for easy supervision and promotes a smooth flow of activities. Keep an eye on your child while they play to ensure their safety and provide guidance when needed. Regularly rotate toys and incorporate new ones to keep the play areas fresh and exciting.
By incorporating play areas into your kitchen space, you can create an engaging and interactive environment for your toddler. These designated areas will foster their imagination, creativity, and cognitive development while allowing them to be a part of the kitchen activities in their own unique way.
Step 7: Organizing Toys and Activities
When creating a toddler play area in the kitchen, organizing toys and activities is essential to create a neat and functional space. By establishing an organized system for storing toys and activities, you can easily find and access items while keeping the play area clutter-free. Here’s a step-by-step guide on how to effectively organize toys and activities in your kitchen play area.
1. Sort and declutter: Begin by sorting through your child’s toys and activities. Separate them into categories such as building blocks, pretend play items, art supplies, and puzzles. Toss out broken toys or items that are no longer safe for play. Consider donating toys that your child has outgrown or is no longer interested in.
2. Invest in storage containers: Choose suitable storage containers to keep toys and activities organized. Opt for transparent bins or baskets so your child can easily see and identify the contents. Use small containers or dividers within the bins to further organize small items like Legos or art supplies.
3. Designate specific storage spaces: Assign specific storage spaces for each category of toys and activities. For example, dedicate a shelf for building blocks, a basket for art supplies, and a bin for pretend play props. Label each storage container with words or pictures to help your child identify and return items to their proper place.
4. Implement a rotation system: To prevent the play area from becoming overwhelming, consider implementing a toy rotation system. Keep only a selection of toys and activities available for play at a time, while the rest are stored away. Every few weeks or months, swap out the toys to bring in fresh items and keep the play area engaging.
5. Create a display area: Set up a display area where your child can showcase their creations or favorite toys. Use a small shelf, bulletin board, or magnetic board to exhibit their artwork, photographs, or special items. This not only adds a personal touch to the play area but also encourages a sense of pride and accomplishment for your child.
6. Utilize wall space: Maximize vertical storage by utilizing wall space. Install hooks or pegboards to hang items such as dress-up clothes, aprons, or hats. Attach storage pockets or organizers to the wall for holding small toys or art supplies. This not only adds storage options but also keeps items easily accessible for your child.
7. Teach and practice tidiness: Teach your child the importance of tidiness and involve them in the organizing process. Encourage them to clean up after playtime by returning toys to their designated storage spaces. Make it a fun and engaging activity by singing songs or setting a timer for a quick clean-up race. Praise and reward your child for their efforts to reinforce positive habits.
8. Conduct regular evaluations and adjustments: Regularly evaluate the effectiveness of your toy organization system and make necessary adjustments. As your child grows and their interests change, you may need to modify the storage solutions or update the categories of toys and activities.
By implementing a structured organization system, you can maintain a tidy and functional play area in your kitchen. An organized space not only allows for easy access to toys and activities but also promotes independent play and fosters a sense of responsibility in your child.
Step 8: Creating a Comfortable Seating Area
When designing a toddler play area in the kitchen, it’s important to incorporate a comfortable seating area where both you and your child can relax and spend quality time together. A well-designed seating area not only provides a cozy space for bonding but also allows you to supervise your child’s play while engaging in kitchen activities. Here’s a step-by-step guide on creating a comfortable seating area in your kitchen play area.
1. Assess available space: Begin by considering the layout and available space in your kitchen. Look for a corner or area that can accommodate a seating arrangement without obstructing the flow of movement. Take measurements to ensure that the seating area will fit comfortably within the chosen space.
2. Select appropriate seating options: Choose seating options that are comfortable, child-friendly, and suitable for the kitchen environment. Consider a soft and cushioned sofa, armchair, or floor cushions that provide a cozy and inviting seating experience for both you and your child. Opt for easy-to-clean materials like washable fabric covers or wipeable surfaces to account for any spills or messes.
3. Incorporate child-sized furniture: For your child’s seating comfort and independence, include child-sized furniture in the seating area. Child-sized chairs or stools allow your toddler to have their own designated seat, promoting a sense of ownership and encouraging independence during mealtime or play activities.
4. Include storage solutions: Integrate storage solutions within or near the seating area to keep essential items within reach. This can include baskets or bins for storing blankets, pillows, or books. Having storage nearby ensures that everything is easily accessible and contributes to a clutter-free seating area.
5. Enhance comfort with cushions and pillows: Add plush cushions, pillows, and throws to enhance comfort and coziness in the seating area. Incorporate soft textures and designs that reflect your child’s interests, such as cartoon characters or vibrant patterns. These additions not only provide extra comfort but also contribute to the aesthetic appeal of the seating area.
6. Create a designated reading or activity corner: Within the seating area, create a designated space for reading or engaging in quiet activities. Set up a small bookshelf or storage rack to hold your child’s favorite books, puzzles, or coloring supplies. Place a low table or lap desk where your child can sit and participate in tabletop activities.
7. Ensure proper lighting: Proper lighting is crucial for creating a comfortable seating area. Utilize natural light from nearby windows whenever possible. Supplement with overhead or task lighting to ensure sufficient illumination for reading or other activities. Adjust the lighting based on the time of day and your preferences.
8. Personalize the space: Add personal touches to the seating area to make it feel special and inviting. Incorporate decorative elements that reflect your child’s interests or favorite colors. Hang artwork or photographs that showcase special memories. By personalizing the space, you create a warm and welcoming environment that your child will love spending time in.
By incorporating a comfortable seating area in your kitchen play area, you create a space where you and your child can relax, bond, and engage in various activities. It provides a cozy retreat within the kitchen while ensuring that you can supervise your child’s play and effortlessly transition between kitchen tasks and quality time together.
Read more: How To Make A Play Area For Baby
Step 9: Kitchen Safety Rules for Toddlers
When creating a toddler play area in the kitchen, it is essential to establish and enforce a set of kitchen safety rules to ensure the well-being of your child. These rules will help prevent accidents, teach your child about kitchen hazards, and instill good safety habits. Here are some important kitchen safety rules to implement for toddlers:
1. Always supervise: The most critical rule is to always supervise your child when they are in the kitchen. Never leave them unattended, especially when there are potentially dangerous objects or activities taking place.
2. Stay away from hot surfaces: Teach your child to stay away from hot surfaces such as stovetops, ovens, and toaster ovens. Make it clear that these areas can cause burns and are off-limits without adult supervision.
3. No touching or playing with appliances: Emphasize to your child that appliances such as blenders, food processors, or mixers are not toys and should never be touched or played with. These items have sharp blades and pose a risk of injury.
4. Use childproof locks on cabinets and drawers: Ensure that all cabinets and drawers in the kitchen are secured with childproof locks. This will prevent your child from accessing potentially hazardous items such as sharp knives, cleaning supplies, or plastic bags.
5. Be cautious around hot liquids: Teach your child the concept of hot liquids and how they can cause burns. Make sure they understand not to touch or play with cups of hot coffee, boiling water, or pots of hot food.
6. Keep electrical cords out of reach: Ensure that electrical cords from kitchen appliances such as kettles, toasters, or blenders are safely tucked away or out of your child’s reach. This will prevent them from accidentally pulling on cords and potentially causing an accident.
7. Wash hands before and after handling food: Teach your child the importance of proper hygiene. Instruct them to wash their hands thoroughly with soap and water before and after handling food, especially when engaging in pretend play cooking activities.
8. Use child-friendly utensils and appliances: Provide your child with child-sized utensils and kitchen tools that are safe for their use. Avoid giving them sharp knives or objects that can easily cause injury.
9. Teach safe food handling practices: Teach your child the basics of safe food handling, such as not eating raw or uncooked food without adult permission and not tasting unfamiliar ingredients without checking with an adult first.
10. Explain the dangers of choking hazards: Educate your child about the dangers of choking and which foods or objects can pose a choking risk. Encourage them to sit down while eating and to take small bites to minimize the risk of choking.
11. Clean up spills immediately: Instruct your child to notify you or an adult if they accidentally spill something in the kitchen. Teach them the importance of cleaning up spills promptly to prevent slips and falls.
12. Practice knife safety: When your child is old enough to handle a knife, teach them proper knife safety techniques, such as always cutting away from the body, using a cutting board, and keeping fingers away from the blade.
13. Avoid overcrowding in the kitchen: Limit the number of people in the kitchen during meal preparation or cooking to avoid accidents and maintain a safe working space.
Consistently reinforce these kitchen safety rules with your toddler through gentle reminders and explanations. By teaching them about potential hazards and guiding their behavior, you will instill important safety habits that will stay with them as they grow.
Conclusion
Creating a toddler play area in the kitchen is a wonderful way to engage your child in a safe and stimulating environment while allowing them to be a part of your daily kitchen activities. By following the steps outlined in this guide, you can establish a functional and enjoyable play area that promotes learning, creativity, and bonding.
Through assessing the space, childproofing the kitchen, choosing the right flooring, installing safety gates, and setting up child-friendly storage solutions, you can ensure that the play area is optimized for your child’s safety and exploration. Incorporating designated play areas, organizing toys and activities, and creating a comfortable seating area further enhance the overall experience for your child.
By implementing kitchen safety rules for toddlers and consistently reinforcing them, you can minimize the risk of accidents and foster a sense of responsibility in your child. Teaching them about potential hazards, properly handling kitchen tools, and practicing good hygiene will contribute to their overall well-being in the kitchen setting.
Remember to regularly evaluate and adjust the play area as your child grows and their needs change. Keep an open line of communication with your child, encouraging their input and involvement in the design and organization of their play area. This will foster a sense of ownership and pride in their space.
Creating a toddler play area in the kitchen not only provides a safe and enjoyable space for your little one but also allows you to nurture their curiosity, creativity, and love for learning. As you witness their growth and development in this stimulating environment, you’ll find that the kitchen becomes more than just a place to prepare meals—it becomes a space for laughter, exploration, and precious memories.
So embrace the opportunity to create a magical and educational play area in your kitchen. Watch as your child’s imagination flourishes and their love for food and cooking blossoms. With careful planning, organization, and adherence to safety guidelines, you can create a remarkable space that will benefit both you and your child for years to come.
Frequently Asked Questions about How To Make A Toddler Play Area In The Kitchen
Was this page helpful?
At Storables.com, we guarantee accurate and reliable information. Our content, validated by Expert Board Contributors, is crafted following stringent Editorial Policies. We're committed to providing you with well-researched, expert-backed insights for all your informational needs.


0 thoughts on “How To Make A Toddler Play Area In The Kitchen”