Home>Garden Essentials>Garden Storage>How To Return Prime Wardrobe
Garden Storage
How To Return Prime Wardrobe
Modified: December 7, 2023
Explore the steps to easily return items from Prime Wardrobe and learn about storage options for your clothing and accessories. Enhance your shopping experience with convenient storage solutions.
(Many of the links in this article redirect to a specific reviewed product. Your purchase of these products through affiliate links helps to generate commission for Storables.com, at no extra cost. Learn more)
Introduction
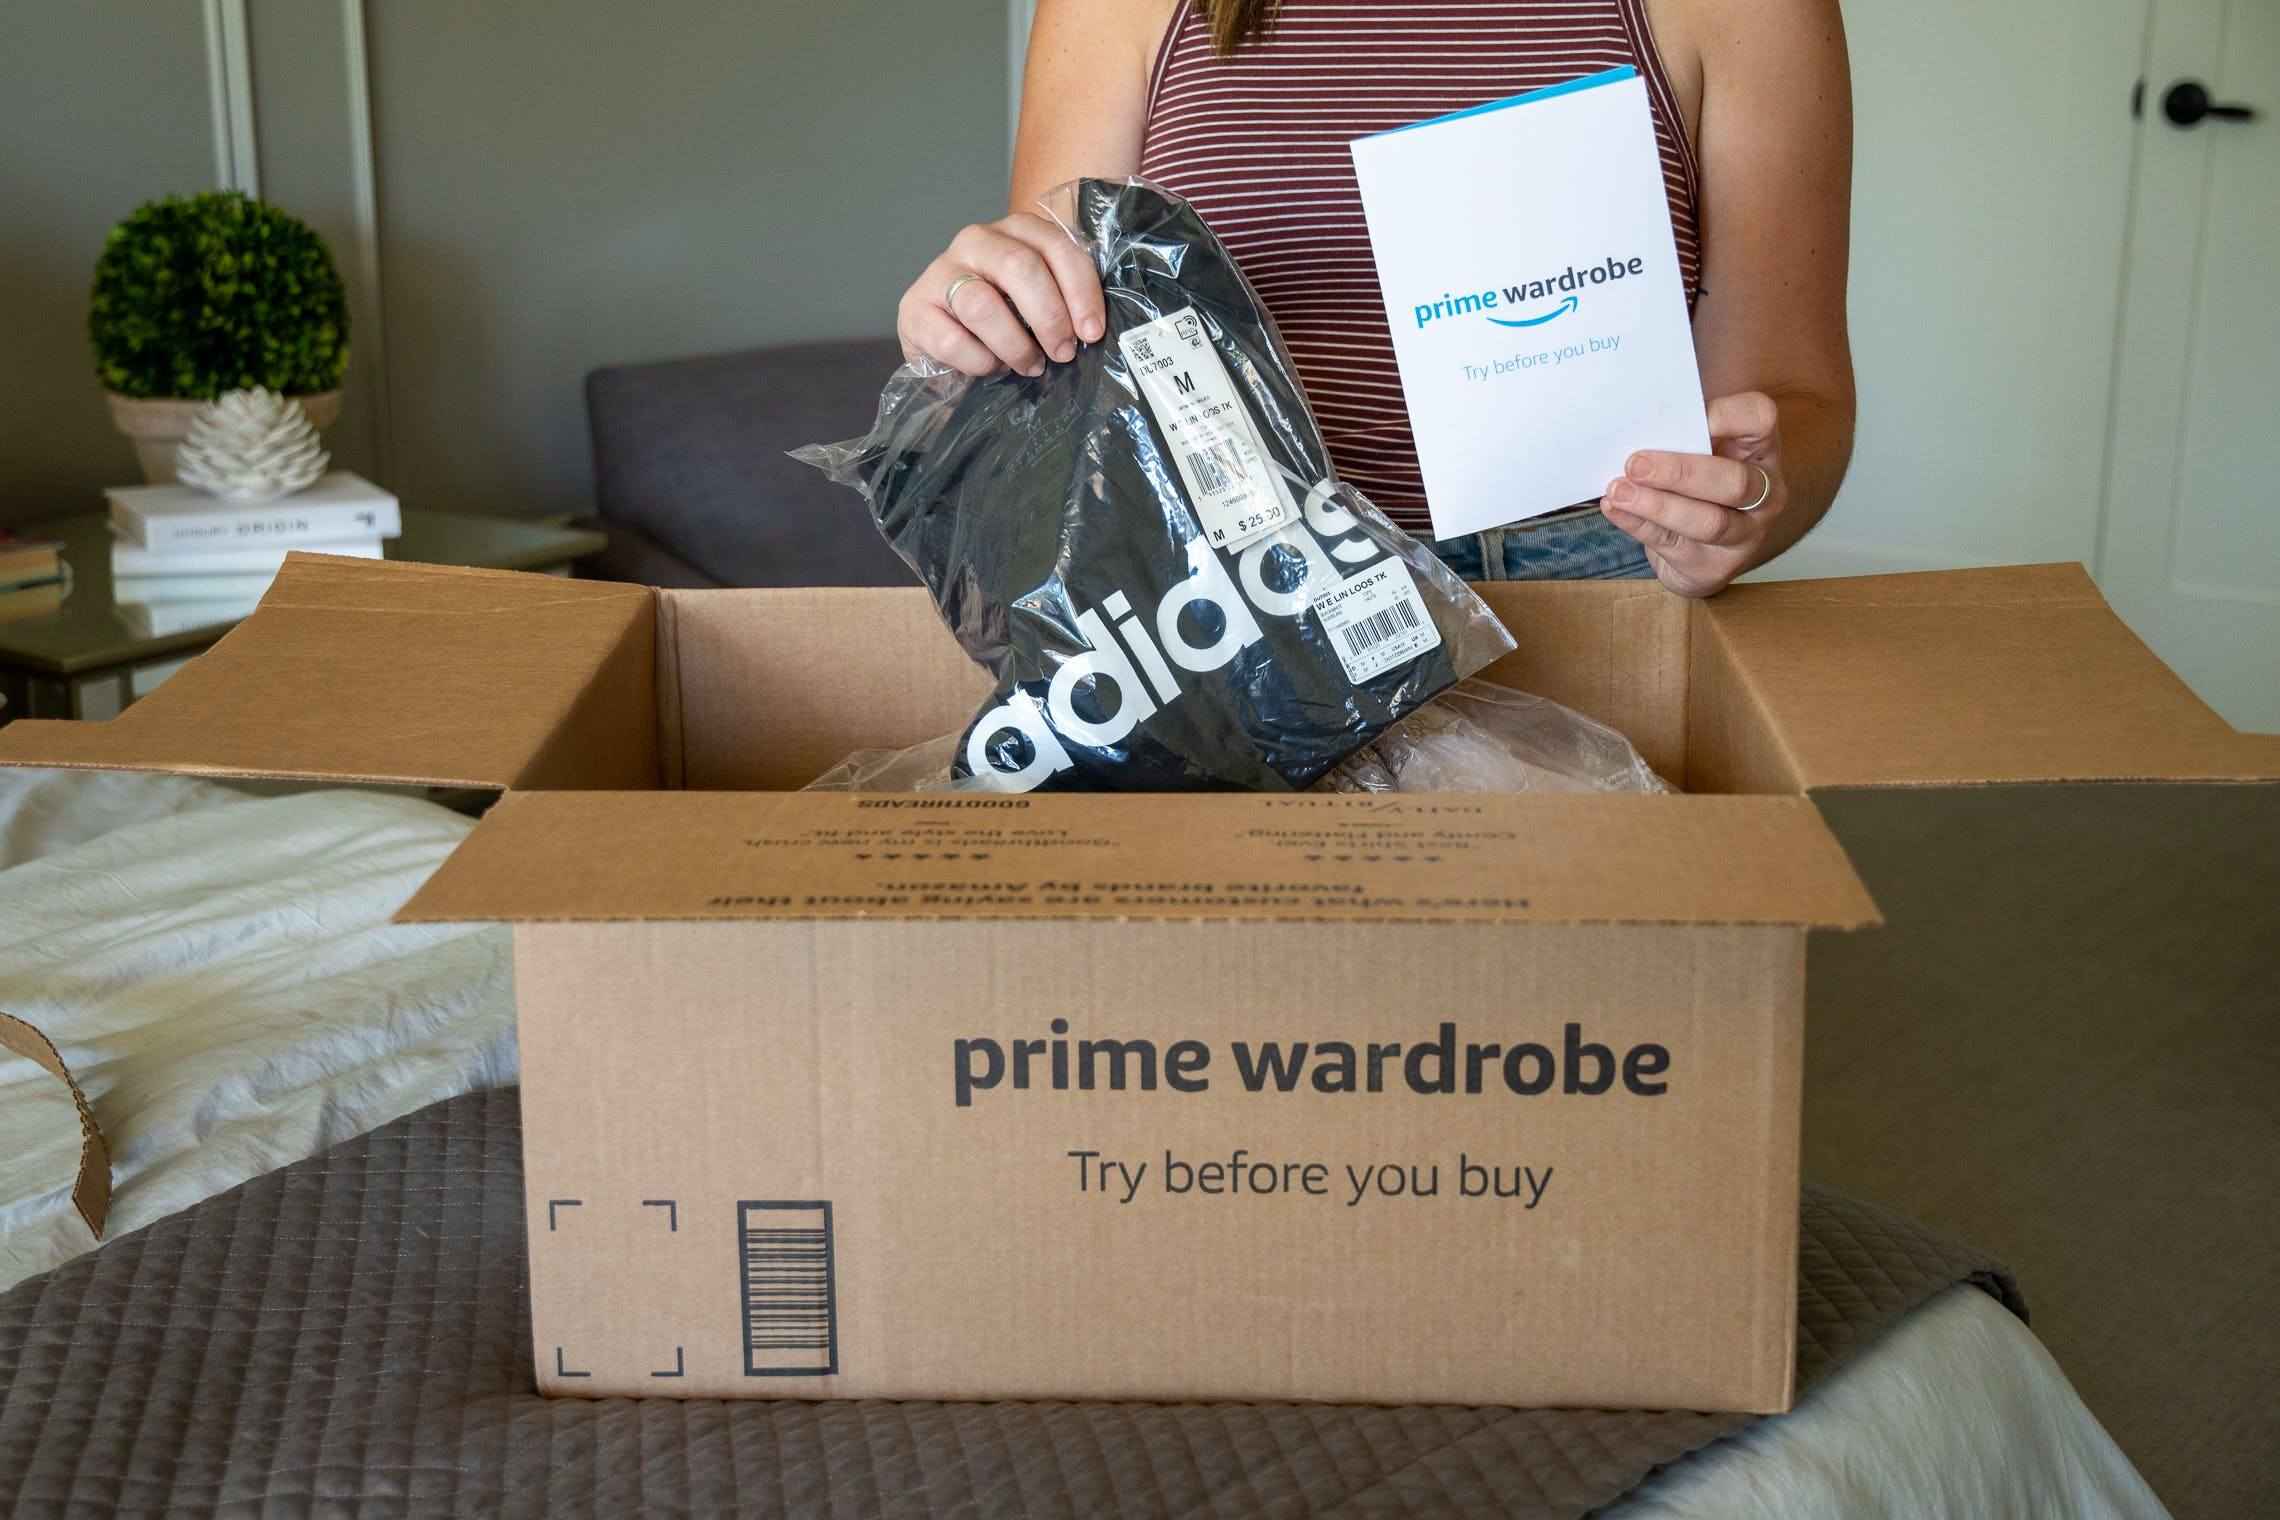
Welcome to the world of online shopping, where the convenience of browsing and purchasing your favorite items is just a few clicks away. With the rise of e-commerce giants like Amazon, shopping for clothing and accessories has become easier and more accessible than ever. However, sometimes the items we order may not meet our expectations or fit perfectly. That’s where Amazon Prime Wardrobe steps in, allowing customers to try on clothes and accessories before purchasing them.
In this article, we will guide you through the process of returning items that you have ordered through the Prime Wardrobe service. Whether the item didn’t quite match your style, the color wasn’t what you expected, or the fit wasn’t flattering, returning items through Prime Wardrobe is a simple and straightforward process.
Follow along as we take you through each step, from signing in to your Amazon account to receiving your refund. By the end of this article, you’ll have all the information you need to confidently initiate the return process for your Prime Wardrobe items.
Key Takeaways:
- Returning Prime Wardrobe items is a straightforward process that involves signing in, selecting items, preparing and packaging them, scheduling a pickup or drop-off, tracking the return, and receiving the refund.
- Customers can confidently navigate the Prime Wardrobe return process by following the step-by-step guide, ensuring items are in original condition, and staying informed about the return progress through tracking features.
Read more: How To Return A Mattress
Step 1: Sign in to your Amazon account
The first step in returning your Prime Wardrobe items is to ensure that you are signed in to your Amazon account. Head over to the Amazon website and click on the “Sign In” button in the top-right corner of the homepage. Enter your email address or mobile number associated with your account, followed by your password. If you don’t have an Amazon account, you’ll need to create one by clicking on the “Create your Amazon account” link.
Once you have successfully signed in, you’ll be redirected to your Amazon account dashboard. Take a moment to ensure that you are logged in with the correct account that was used for the Prime Wardrobe order.
Having trouble signing in? If you’ve forgotten your password, simply click on the “Forgot your password?” link on the sign-in page. Follow the instructions provided to reset your password. If you’re still experiencing issues, you can reach out to Amazon’s customer support for assistance.
Step 2: Go to the Prime Wardrobe section
Now that you’re signed in to your Amazon account, it’s time to navigate to the Prime Wardrobe section where you can initiate the return process for your items. From your account dashboard, look for the “Prime” tab in the top navigation menu. Hover over the “Prime” tab, and a drop-down menu will appear.
In the drop-down menu, you’ll find a variety of options related to your Prime membership. Look for and click on the “Prime Wardrobe” option. This will take you to the Prime Wardrobe page, where you can manage and view your Prime Wardrobe orders.
On the Prime Wardrobe page, you’ll see a list of your recent Prime Wardrobe orders. Locate the specific order containing the items you wish to return. Click on the order to expand it and view the individual items included in that order.
If you have multiple orders to return, repeat this step for each order until you have accessed the order containing the items you want to return.
Note: To be eligible for a return, items must be in their original condition, with all tags and packaging intact. Make sure the items you want to return meet these criteria before proceeding to the next step.
Step 3: Select the items you want to return
Now that you’re on the Prime Wardrobe order page, it’s time to select the specific items you wish to return. Scroll through the list of items included in the order and identify the ones you want to send back.
To select an item for return, you’ll typically find a checkbox or a button next to each item. Click on the checkbox or button corresponding to the items you want to return. This will highlight the selected items and indicate that they have been marked for return.
If you can’t find a checkbox or button, try hovering over the item or clicking on it to see if there are any additional options available. Some items may require you to initiate the return process through a separate button or link.
Double-check that you have selected all the items you want to return to avoid any confusion or missed returns. Review the selected items list to ensure that it accurately reflects your intended returns.
Don’t worry if you accidentally select an item you didn’t want to return. Most online retailers, including Amazon, have systems in place for cancelling or modifying returns before they are finalized.
Once you have confirmed the items you want to return, proceed to the next step to prepare them for the return process.
Step 4: Prepare the items for return
Now that you have selected the items you want to return, it’s time to prepare them for the return process. This step involves inspecting the items, ensuring they are in their original condition, and gathering any required materials for packaging.
Start by carefully examining each item to make sure it is free from any damages or signs of wear and tear. Check for any stains, tears, or missing components. If you received the item with any defects or issues, take note of them as you may need this information later during the return process.
It is important to ensure that the items you are returning are in their original condition. This means they should be unworn, with all tags and labels still attached. Additionally, make sure to include any original packaging, such as shoe boxes or bags, that came with the items.
If the items came with any accessories or additional items, make sure to include them in the return package as well. This includes items such as belts, extra buttons, or any promotional materials that were included with the original shipment.
Next, gather the necessary packaging materials to secure the items for their journey back to the retailer. This typically includes a suitable box or bag that can safely accommodate the items being returned. If possible, try to use the original packaging provided by the retailer, as it is designed to provide optimal protection during transit.
Additionally, you may need to gather packing materials such as bubble wrap or packing peanuts to cushion the items and prevent them from shifting or getting damaged during transportation. These materials can be found at most shipping supply stores or through online retailers.
Once you have inspected the items, ensured they are in their original condition, and gathered the necessary packaging materials, you are ready to proceed to the next step: packaging and labeling the items for return.
When returning items through Prime Wardrobe, make sure to use the provided return label and drop off the package at a UPS location. Keep the receipt as proof of return.
Read more: How To Return An Amazon Mattress
Step 5: Package and label the items
Now that you have prepared the items for return, it’s time to package and label them appropriately. Proper packaging ensures that the items are protected during transit and reduces the risk of any damage occurring.
Start by placing the items securely in the chosen packaging material. If there are multiple items, arrange them in a way that prevents them from shifting or colliding with each other. Use additional padding, such as bubble wrap or packing peanuts, to fill any empty spaces and provide extra protection.
Close and seal the packaging securely, ensuring that it is tightly sealed to prevent any items from falling out during transit. If necessary, use packaging tape to reinforce the closure and provide added security.
Next, it’s time to label the package. If you still have the original shipping label that came with the order, use it to ensure proper identification of the package. Remove any old shipping labels or markings to avoid confusion.
If you no longer have the original shipping label, create a new one with the necessary information. Include the return address, which is typically provided by the retailer or can be found on their website or within the return instructions. Make sure the return address is clearly visible and legible.
You may also need to include a return authorization or RMA (Return Merchandise Authorization) number if provided by the retailer. This helps streamline the return process and ensures that your return is processed correctly.
Double-check that all the required information is included on the label, including your own address as the sender and the retailer’s address as the recipient. This will ensure that the package is correctly routed once it reaches the retailer’s return facility.
Finally, affix the label securely to the package, making sure it is positioned prominently and is clearly visible. If using a shipping carrier’s label, follow their specific instructions for attachment.
With the items properly packaged and labeled, you are now ready to move on to the next step: scheduling a pickup or selecting a drop-off location for your return.
Step 6: Schedule a pickup or drop-off location
Once you have packaged and labeled your return, it’s time to decide how you want to send it back to the retailer. Amazon provides different options for returning Prime Wardrobe items, including scheduling a pickup or selecting a drop-off location.
If you prefer the convenience of having the return package picked up from your doorstep, you can schedule a pickup through Amazon’s carrier partners. Simply log in to your Amazon account and navigate to the Prime Wardrobe section. Locate the specific order and click on the “Return Items” button or link. Follow the prompts to select the pickup option and choose a preferred pickup date and time.
Alternatively, if you prefer to drop off the package at a designated location, such as a shipping store or Amazon Locker, you can select a drop-off location through the Amazon website. Again, navigate to the Prime Wardrobe section, click on the “Return Items” button or link, and follow the prompts to choose the drop-off option. Amazon will provide you with a list of available drop-off locations, and you can choose the one most convenient for you.
When scheduling a pickup or selecting a drop-off location, consider factors such as convenience, accessibility, and any associated fees. Some pickup options may require a small fee, while drop-off locations may have specific operating hours. Take note of any instructions or guidelines provided to ensure a smooth return process.
After scheduling the pickup or selecting the drop-off location, Amazon will provide you with any necessary information, such as the pickup confirmation or drop-off instructions. Be sure to keep this information handy for reference.
Now that you’ve scheduled the pickup or selected the drop-off location, it’s time to move on to the next step: tracking your return.
Step 7: Track your return
Once you have initiated the return process and arranged for pickup or drop-off, it’s important to track the progress of your return. Tracking allows you to stay updated on the status of your return and provides peace of mind knowing that your items are in transit.
Amazon provides a tracking feature that allows you to monitor the return journey of your package. To track your return, log in to your Amazon account and navigate to the Prime Wardrobe section. Locate the specific return order and click on the “Track Return” button or link.
On the tracking page, you’ll find information such as the current location of the package, expected delivery date, and any updates or notifications from the shipping carrier. This allows you to stay informed about the progress of your return and estimate when the refund will be processed.
Tracking your return also enables you to address any issues or delays that may arise during transit. If you notice any unexpected changes in the tracking information or have concerns about the return, you can reach out to Amazon’s customer support for assistance.
Remember to regularly check the tracking information as it gets updated to stay informed about the return’s progress. Once the package reaches the retailer’s return facility, you can expect the return to be processed and the refund to be initiated promptly.
With the ability to track your return, you can have peace of mind knowing that your items are on their way back to the retailer and that the return process is progressing smoothly.
Finally, let’s move on to the last step: receiving your refund.
Step 8: Receive your refund
After successfully returning your Prime Wardrobe items, the final step is to receive your refund. Once the retailer receives and processes your return, they will initiate the refund to the original payment method used for the purchase. It’s important to note that the refund process may vary depending on the retailer’s policies and the selected payment method.
Typically, it can take a few business days for the refund to be processed and credited back to your account. During this time, the retailer will review the returned items to confirm that they meet the return criteria and are in their original condition. Once the inspection is completed, the refund will be issued.
For credit card payments, the refund will be reflected on your card statement. It may take a billing cycle or two for the credit to appear, depending on your credit card provider’s processing time.
If you used a debit card, the refund will be credited back to your bank account. The timeline for the refund to show up in your account can vary depending on the bank’s processing procedures.
If you used other payment methods, such as Amazon Pay or gift cards, the refund will usually be returned to the original payment source or issued as store credit.
It’s recommended to keep an eye on your account statements or notifications for updates regarding the refund. If you do not receive the refund within the expected timeframe or have concerns about the refund process, reach out to the retailer’s customer support for assistance.
Once the refund is processed, you can expect to receive the funds back to your account, concluding the return process for your Prime Wardrobe items.
Congratulations! You have successfully completed all the steps to return your Prime Wardrobe items and receive your refund. We hope this guide has been helpful in navigating the return process and ensuring a smooth experience.
Remember, if you have any additional questions or need further assistance, don’t hesitate to reach out to the retailer’s customer support. They are there to help you and provide any necessary guidance throughout the return process.
Frequently Asked Questions about How To Return Prime Wardrobe
Was this page helpful?
At Storables.com, we guarantee accurate and reliable information. Our content, validated by Expert Board Contributors, is crafted following stringent Editorial Policies. We're committed to providing you with well-researched, expert-backed insights for all your informational needs.


0 thoughts on “How To Return Prime Wardrobe”