Home>Garden Essentials>When To Plant Moonflower Seeds
Garden Essentials
When To Plant Moonflower Seeds
Modified: March 15, 2024
Discover the best time to plant moonflower seeds in your garden. Learn how to create a stunning nighttime display with these beautiful flowers.
(Many of the links in this article redirect to a specific reviewed product. Your purchase of these products through affiliate links helps to generate commission for Storables.com, at no extra cost. Learn more)
Introduction
Welcome to the enchanting world of moonflowers! If you are a gardening enthusiast looking to add a touch of magic to your outdoor space, then moonflowers are the perfect choice. These beautiful flowering plants not only captivate the senses with their luminous blooms but also offer a delightful fragrance that fills the night air.
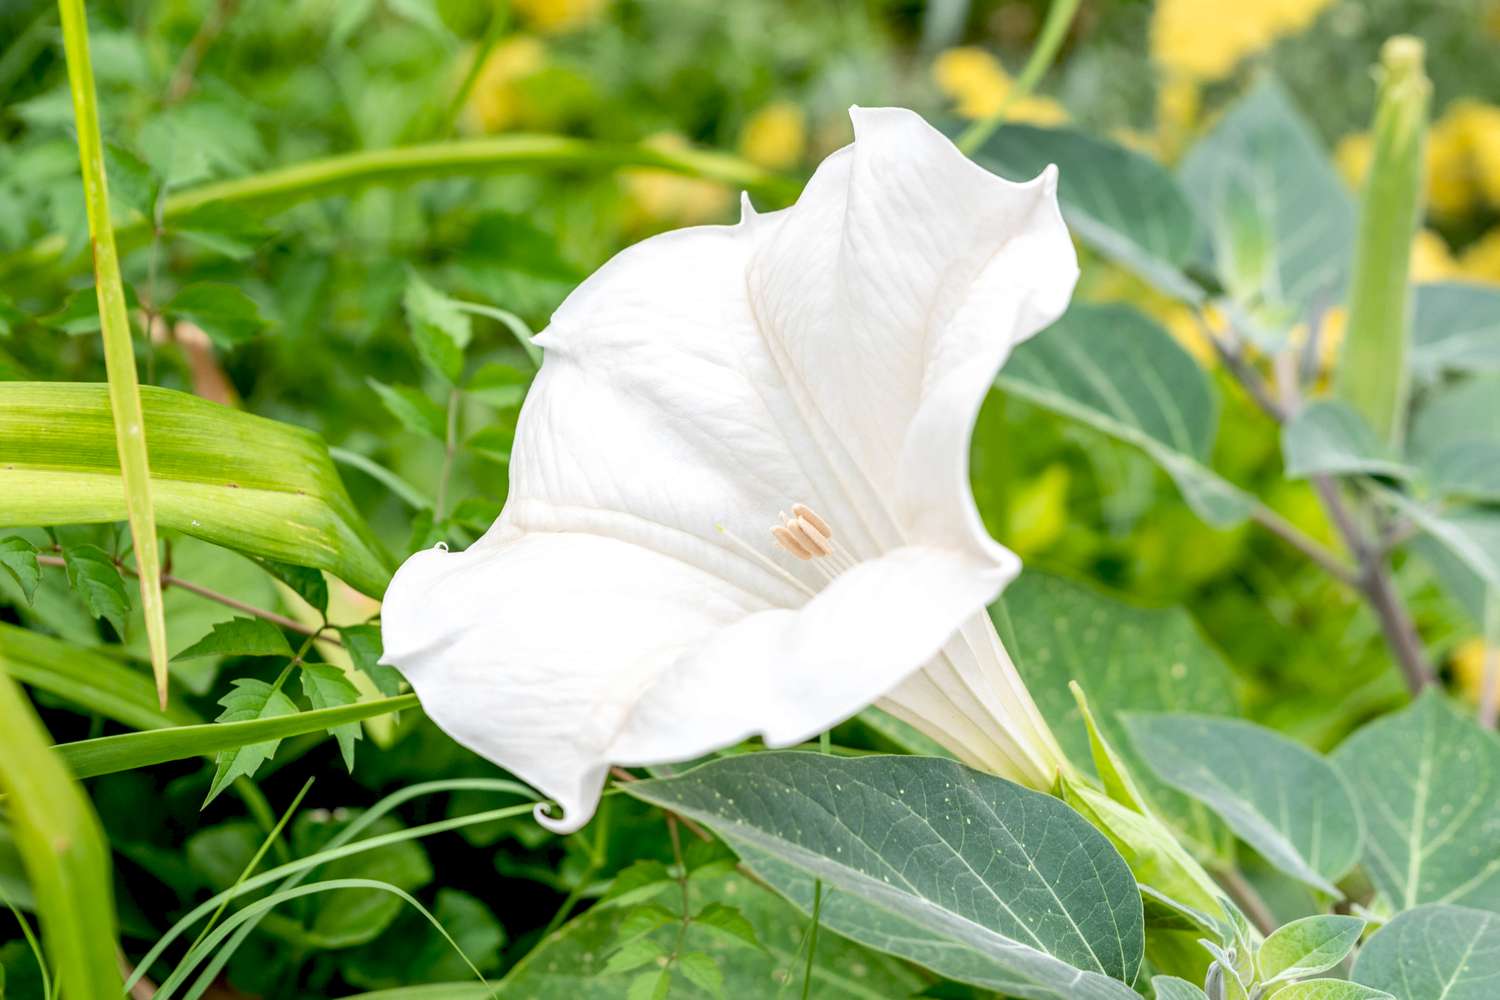
Moonflowers, scientifically known as Ipomoea alba, are native to tropical and subtropical regions. They are part of the morning glory family and are cherished for their large, trumpet-shaped flowers that open at dusk and close by sunrise. With their vibrant white petals and intoxicating scent, moonflowers create a romantic and mysterious ambiance in gardens and outdoor spaces.
Whether you have a sprawling garden or a small balcony, moonflowers make a captivating addition. But before you embark on your moonflower growing journey, it’s important to understand the factors that contribute to their successful cultivation.
In this article, we will explore when to plant moonflower seeds, both indoors and outdoors, and provide you with valuable tips on caring for your moonflower plants. So, let’s dive into the world of moonflowers and embrace the magic!
Key Takeaways:
- Moonflowers thrive in warm temperatures and need at least 6-8 hours of sunlight. Plant seeds directly outdoors after frost, or start indoors 4-6 weeks before the last frost date for a head start.
- Caring for moonflower plants involves regular watering, fertilization, and providing support for climbing. Harvest seeds once the flowers fade, and store them for future planting or sharing with other gardeners.
Read more: How Deep To Plant Moonflower Seeds
Understanding Moonflowers
Before you start planting moonflower seeds, it’s crucial to have a good understanding of these enchanting plants. Moonflowers are fast-growing vines that can reach heights of up to 15 feet or more. They have heart-shaped leaves that provide an attractive backdrop for their striking flowers. Moonflowers are known for their nocturnal blooming habit, with their flowers opening in the evening and remaining open throughout the night, attracting pollinators such as moths and nocturnal insects.
In addition to their captivating appearance, moonflowers also emit a sweet and intoxicating fragrance during the night, making them a favorite choice for evening gardens and moonlit walks. The flowers are usually pure white, although some varieties may have a hint of pale lavender or pink.
It’s important to note that moonflowers are considered annuals in most regions, meaning they complete their life cycle within one growing season. However, in warmer climates, they may exhibit perennial characteristics and reflower the following year.
One fascinating aspect of moonflowers is their rapid growth rate. Once they establish their roots, they quickly climb and cover trellises, arbors, fences, and any supportive structure within their reach. This makes them an excellent choice for creating vertical interest in your garden.
It’s also worth mentioning that moonflowers are not only visually appealing but also hold cultural significance in many parts of the world. In some cultures, moonflowers symbolize love, fertility, and beauty, while in others, they are associated with peace and tranquility. So, as you grow your moonflowers, you can also appreciate the heritage and symbolism behind these delightful plants.
Now that we have a deeper understanding of moonflowers, let’s explore the factors that you should consider before planting their seeds.
Factors to Consider
Before you start planting moonflower seeds, there are several important factors to consider to ensure their successful growth. By taking these factors into account, you can create the ideal conditions for your moonflowers to thrive.
1. Sunlight: Moonflowers are sun-loving plants that require at least 6 to 8 hours of direct sunlight per day. Make sure to select a location in your garden that receives ample sunlight to promote healthy growth and abundant blooming.
2. Soil Quality: Moonflowers prefer well-drained soil that is rich in organic matter. Before planting, prepare the soil by adding compost or well-rotted manure to improve its fertility and drainage. A slightly acidic to neutral pH level of 6.0 to 7.0 is ideal for moonflowers.
3. Watering Requirements: Moonflowers have moderate water needs. While they require regular watering, it’s important to avoid overwatering, as this can lead to root rot. Water the plants deeply once a week, allowing the soil to dry out slightly between watering sessions.
4. Temperature: Moonflowers thrive in warm temperatures between 70 to 80 degrees Fahrenheit (21 to 27 degrees Celsius). They are sensitive to frost, so ensure that the temperatures have warmed up before planting moonflower seeds outdoors.
5. Support Structures: Moonflowers are twining vines that require support to climb and grow vertically. Install trellises, arbors, or other sturdy structures for the plants to climb on. Be sure to provide enough space for the vines to spread and climb without obstruction.
6. Water Drainage: Adequate water drainage is essential for moonflowers. They do not tolerate soggy or waterlogged soil, so it’s crucial to ensure that the planting site has good drainage. If the soil tends to retain water, consider improving drainage by adding coarse sand or perlite.
7. Pests and Diseases: Moonflowers are relatively resistant to pests and diseases. However, occasional infestations by aphids, spider mites, or snails may occur. Keep a close eye on your plants and take necessary measures, such as using organic pest control methods or handpicking pests, to keep your moonflowers healthy.
By considering these factors and providing the optimal growing conditions, you can set the stage for successful moonflower cultivation. Now, let’s move on to the best time to plant moonflower seeds.
Best Time to Plant Moonflower Seeds
The timing of planting moonflower seeds is crucial for their successful growth and blooming. Moonflowers are considered warm-season annuals, meaning they thrive in warm weather and need a longer growing season to reach their full potential.
In regions with mild winters and a long growing season, moonflower seeds can be directly sown outdoors after the danger of frost has passed. This usually occurs in spring, when the soil has warmed up and temperatures consistently stay above 50 degrees Fahrenheit (10 degrees Celsius). Planting moonflower seeds directly in the ground allows them to establish their roots and grow vigorously during the warm months.
If you live in a region with short summers or cool temperatures, it’s recommended to start moonflower seeds indoors 4-6 weeks before the last frost date. This gives the plants a head start and allows them to develop strong roots and shoots before being transplanted outdoors.
To start moonflower seeds indoors, fill seed trays or small pots with a well-draining seed starting mix. Place one or two seeds per pot and cover them with a thin layer of soil. Keep the trays or pots in a warm location, around 70 to 75 degrees Fahrenheit (21 to 24 degrees Celsius), and provide them with bright, indirect light or supplemental fluorescent grow lights.
Keep the soil consistently moist but not overly saturated, as excessive moisture can lead to damping-off disease. Once the seedlings have developed two sets of true leaves, you can transplant them into larger pots or containers to allow for root development.
When all risk of frost has passed and the soil has warmed up, you can transplant the seedlings outdoors. Choose a location with full sun exposure and provide support structures for the vines to climb. Space the plants at least 6 inches apart to allow for proper airflow and growth.
If you prefer a hands-off approach, you can also purchase young moonflower plants from nurseries or garden centers and transplant them directly into your garden once the weather is suitable.
Remember to acclimate the seedlings or purchased plants to the outdoor conditions gradually. Start by placing them in a sheltered spot outdoors for a few hours each day, gradually increasing their exposure to sunlight and outdoor elements over the course of a week.
By choosing the appropriate timing for planting moonflower seeds, either directly outdoors or starting them indoors, you can ensure optimal growth and a season filled with magnificent moonlit blooms.
Now that you know the best time to plant moonflower seeds, let’s explore the steps for planting them indoors.
Planting Moonflower Seeds Indoors
Starting moonflower seeds indoors allows you to give your plants a head start and ensure a successful growing season. Here is a step-by-step guide to help you plant moonflower seeds indoors:
- Selecting the Right Containers: Choose small pots or seed trays with drainage holes for planting the moonflower seeds. Biodegradable pots made from materials like peat or coconut fiber can be a good option as they can be planted directly into the ground without disturbing the roots.
- Preparing the Seed Starting Mix: Fill the containers with a well-draining seed starting mix. This type of soil mix promotes healthy root development and prevents waterlogging. You can also create your own mix by combining equal parts of peat moss, perlite, and vermiculite.
- Sowing the Seeds: Place one or two moonflower seeds in each container, about 1 inch deep. Gently cover the seeds with soil and lightly tamp it down to ensure good seed-to-soil contact.
- Providing Optimal Conditions: Place the containers in a warm location, such as near a sunny window or under grow lights. Moonflower seeds require consistent temperatures of around 70 to 75 degrees Fahrenheit (21 to 24 degrees Celsius) for germination. Ensure that the seeds receive bright, indirect light for about 12 to 14 hours a day.
- Watering: Keep the soil evenly moist but not soggy. Watering from the bottom by placing the containers in a tray filled with water is a good technique to avoid disturbing the delicate seeds. Ensure proper drainage to prevent waterlogging and the risk of fungal diseases.
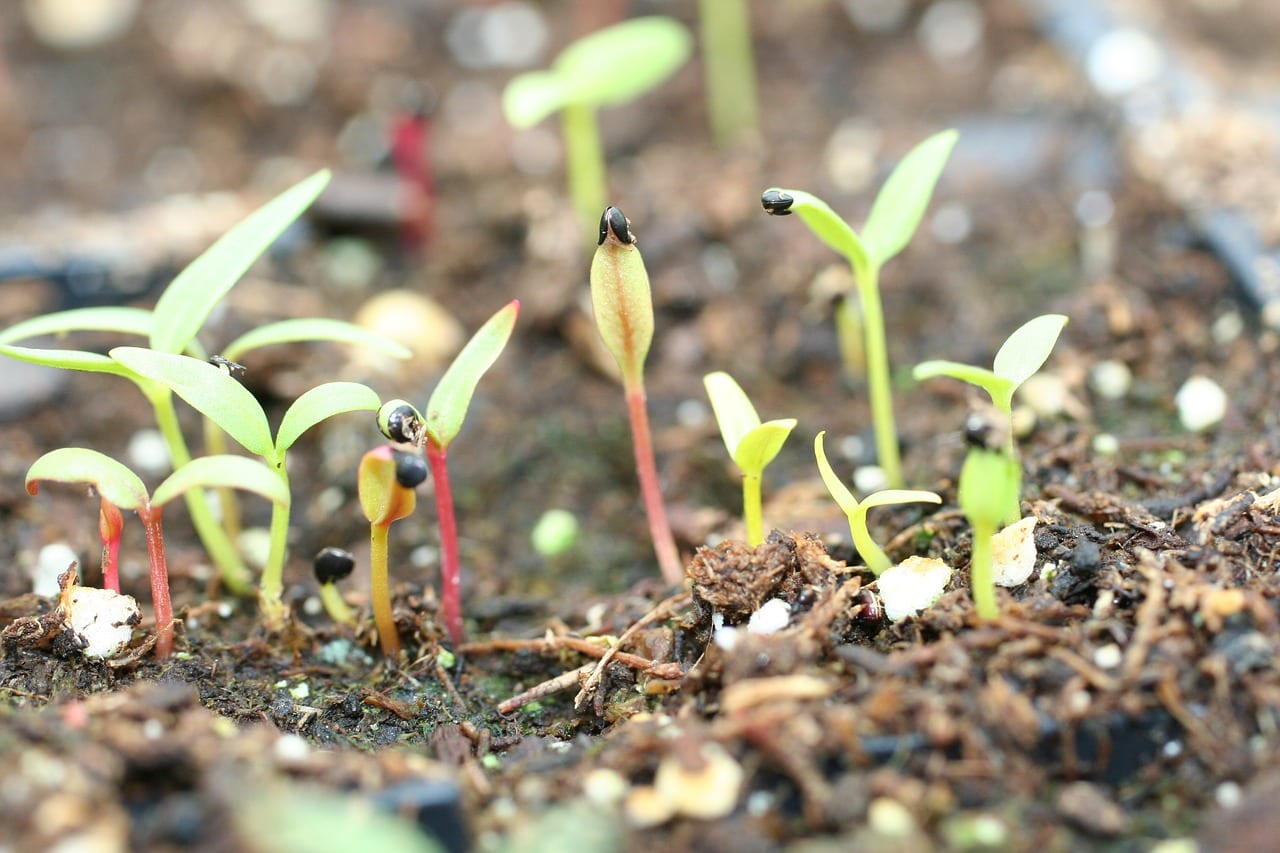
- Germination: Moonflower seeds typically take about 7 to 14 days to germinate. Once the seedlings emerge, thin them out if multiple seeds were planted in a single container. Keep the strongest and healthiest seedlings and remove the weaker ones to prevent overcrowding.
- Transplanting: Once the risk of frost has passed and the seedlings have developed at least two sets of true leaves, they are ready to be transplanted outdoors. Choose a location with full sun exposure and provide a sturdy support structure for the vines to climb. Space the seedlings at least 6 inches apart.
- Hardening Off: Before transplanting the seedlings outside, gradually acclimate them to the outdoor conditions. Start by placing them in a sheltered location outdoors for a few hours a day, gradually increasing their exposure to sunlight and outdoor elements over the course of a week.
By following these steps, you can successfully start moonflower seeds indoors and ensure healthy growth before transplanting them outdoors. Now let’s move on to planting moonflower seeds directly in your garden or outdoor space.
Plant moonflower seeds after the last frost in spring, when the soil has warmed up. Choose a sunny spot with well-drained soil and provide support for the vine to climb. Keep the soil moist but not waterlogged for best results.
Read more: When To Plant Borage Seeds
Planting Moonflower Seeds Outdoors
If you prefer to plant moonflower seeds directly in your garden or outdoor space, here is a step-by-step guide to help you achieve successful growth:
- Choosing the Right Location: Select a location in your garden that receives full sun exposure for at least 6-8 hours a day. Moonflowers thrive in bright sunlight, which promotes healthy growth and abundant flowering.
- Preparing the Soil: Moonflowers prefer well-draining soil that is rich in organic matter. Before planting, amend the soil by adding compost or well-rotted manure to improve its fertility and drainage. Break up any clumps and remove weeds or debris from the planting area.
- Sowing the Seeds: Plant moonflower seeds directly in the ground once the danger of frost has passed and the soil has warmed up. Make small holes in the soil, about 1 inch deep, and place one or two seeds in each hole. Space the seeds at least 6 to 12 inches apart to provide enough room for the vines to spread.
- Watering: After sowing the seeds, water the planting area gently but thoroughly. The soil should be evenly moist but not saturated to prevent rotting. Water consistently to keep the soil moist during the germination period.
- Maintaining Proper Moisture: Once the seedlings emerge, monitor the moisture levels in the soil. Water the plants deeply once a week, allowing the soil to dry out slightly between watering sessions. Avoid overwatering, as excessive moisture can lead to fungal diseases and root rot.
- Providing Support: Moonflowers are twining vines that require support to climb and grow vertically. Install trellises, arbors, or other sturdy structures for the plants to climb on. Place the supports before the vines start to grow, to avoid damaging the fragile stems.
- Thinning Seedlings: If multiple seeds germinate in one spot, thin them out once the seedlings have developed a few sets of true leaves. Leave the healthiest and strongest seedlings and remove the weaker ones to provide enough space for the remaining plants to thrive.
- Mulching: Apply a layer of organic mulch, such as straw or wood chips, around the base of the plants. Mulching helps conserve moisture, suppresses weed growth, and regulates soil temperature, creating optimal conditions for the moonflower plants.
By following these steps and providing the proper care, you can successfully plant moonflower seeds in your garden or outdoor space. Now, let’s explore the essential aspects of caring for moonflower plants to ensure their long-term health and success.
Caring for Moonflower Plants
Once you have planted your moonflower seeds and they begin to grow, it’s crucial to provide proper care to ensure the health and vitality of your plants. Here are some essential aspects of caring for moonflower plants:
1. Watering: Moonflowers require regular watering to keep the soil evenly moist. Water deeply once a week, allowing the soil to dry out slightly between waterings. Be mindful of overwatering, as excessive moisture can lead to root rot. Adjust the watering frequency based on the weather conditions and the moisture levels in the soil.
2. Fertilizing: Moonflowers benefit from regular fertilization to promote healthy growth and abundant blooming. Use a balanced, slow-release fertilizer or a water-soluble fertilizer formulated for flowering plants. Apply the fertilizer according to the manufacturer’s instructions, usually once every 4-6 weeks during the growing season.
3. Pruning and Training: Moonflowers can become vigorous climbers, so occasional pruning and training are necessary to keep them in check. Remove any dead or damaged foliage to promote better air circulation and prevent disease. Train the vines to grow along the support structures, redirecting any wayward growth to maintain a neat and well-managed appearance.
4. Managing Pests and Diseases: Moonflowers are relatively resistant to pests and diseases. However, occasional infestations by aphids, spider mites, or snails may occur. Inspect your plants regularly and take necessary measures such as using organic pest control methods or applying insecticidal soap to keep pests at bay. If any signs of disease, such as leaf spots or powdery mildew, appear, treat the plants promptly to prevent further spread.
5. Providing Support: As moonflowers grow, they rely on support structures to climb and reach their full potential. Regularly check the integrity of the support system and provide additional reinforcement if needed. Make sure the structures are sturdy enough to bear the weight of mature vines and blooms.
6. Monitoring for Weeds: Keep the planting area free from weeds, as they can compete for nutrients and water. Regularly remove any weeds that may appear near your moonflower plants. Applying a layer of organic mulch around the base of the plants can also help suppress weed growth and conserve moisture.
7. Harvesting Seeds: Once the moonflower flowers fade and dry out, they will produce seed pods containing mature seeds. Allow the seed pods to fully dry on the vine before harvesting them. Gently remove the pods and separate the seeds for future planting or sharing with fellow gardeners.
By following these care guidelines and providing regular attention, you can ensure the long-term health and vibrancy of your moonflower plants. Now, let’s address some common issues and troubleshooting tips for maintaining healthy moonflowers.
Common Issues and Troubleshooting
While moonflowers are generally low-maintenance plants, they can occasionally face some common issues. Here are a few problems you may encounter while growing moonflowers and some troubleshooting tips to address them:
1. Lack of Blooms: If your moonflower plants are not producing blooms, it could be due to insufficient sunlight. Ensure that they are receiving at least 6-8 hours of direct sunlight per day. Additionally, over-fertilization with nitrogen-rich fertilizers can promote leaf growth at the expense of blooming. Adjust the fertilizer application to provide the right balance of nutrients.
2. Pests and Diseases: Moonflowers are relatively resistant to pests and diseases. However, aphids, spider mites, and snails can sometimes infest the plants. Use organic pest control methods or apply insecticidal soap to eliminate these pests. When it comes to diseases like powdery mildew or leaf spots, ensure good airflow, avoid excessive moisture on the leaves, and apply appropriate treatments as necessary.
3. Slow Growth: If your moonflower plants are exhibiting slow growth, it may be due to poor soil quality or insufficient nutrients. Ensure that the soil is well-draining and rich in organic matter. Consider using a balanced fertilizer to provide the necessary nutrients for healthy growth. Lack of water or overwatering can also impede growth, so maintain proper watering practices.
4. Failure to Climb: In some cases, moonflowers may fail to climb the support structures properly. This could be due to weak or insufficient vines. Ensure that the support structures are sturdy and properly installed. You can also gently train the vines to guide them towards the support system. Lightly tying the vines to the structure can also assist them in climbing.
5. Vine Damage from High Winds: Moonflower vines are delicate and can be susceptible to damage from strong winds. To prevent this, provide a sheltered location or use wind barriers to protect the plants. If a vine gets damaged, prune it back to healthy growth to allow new vines to take its place.
6. Lack of Seed Production: If your moonflower plants are not producing seed pods, it may be due to insufficient pollination. Attraction of nocturnal pollinators, such as moths, can be enhanced by planting other night-blooming flowers nearby. This increases the chances of cross-pollination and seed production.
By addressing these common issues and troubleshooting any problems that arise, you can ensure that your moonflower plants remain healthy, vibrant, and display their breathtaking blooms throughout the growing season.
Now that you are equipped with the knowledge to grow and care for moonflowers, let’s explore the exciting process of harvesting moonflower seeds.
Harvesting Moonflower Seeds
One of the rewarding aspects of growing moonflowers is the opportunity to harvest their seeds for future planting or sharing with fellow gardeners. Harvesting moonflower seeds allows you to preserve the beauty and magic of these enchanting flowers. Here’s a step-by-step guide on how to harvest moonflower seeds:
- Observing Seed Maturity: Monitor the moonflower flowers as they begin to fade after blooming. The petals will wilt, and the flower heads will start to dry out.
- Patience: Allow the seed pods to fully mature and dry on the vine. This may take several weeks, depending on environmental conditions. The seed pods will turn brown and become hard and brittle when fully ripe.
- Harvesting Seed Pods: Once the seed pods are dry and ready for harvest, gently pluck them from the vine. Be careful not to damage the pods or break them open prematurely.
- Removing Seeds: To extract the seeds, carefully open the dry seed pods. Inside, you will find small brown or black seeds. Use your fingers or tweezers to collect the seeds, separating them from any chaff or debris.
- Thoroughly Drying: After collecting the seeds, spread them out in a single layer on a clean, dry surface. Allow them to air dry for about a week to ensure complete dryness and prevent mold or rot.
- Storage: Once the seeds are thoroughly dried, store them in airtight containers, such as small glass jars or seed envelopes. Label the containers with the date and variety of the moonflower seeds for future reference.
- Proper Seed Storage: Store the seeds in a cool, dry place away from direct sunlight. A dark pantry or a refrigerator can be suitable options for long-term storage. Avoid areas with excess moisture, as it can reduce the seed viability.
By following these steps, you can successfully harvest moonflower seeds and ensure their viability for future planting. Sharing these seeds with other gardeners can spread the beauty of moonflowers and create a sense of community.
Now that you know how to harvest moonflower seeds, it’s time to wrap up our journey through the world of moonflowers.
Read more: When To Plant Vinca Seeds
Conclusion
Congratulations on completing our journey through the world of moonflowers! We have explored everything from understanding moonflowers to planting their seeds both indoors and outdoors, caring for the plants, addressing common issues, and finally, harvesting their seeds. With this knowledge in hand, you are well-equipped to embark on your own moonflower growing adventure.
Moonflowers hold a unique charm with their exquisite, trumpet-shaped blossoms that open at dusk and emit a mesmerizing fragrance. These fast-growing vines can quickly transform your garden into a magical oasis, attracting nocturnal pollinators and filling the night air with an enchanting ambiance.
Remember, when planting moonflower seeds, consider factors such as sunlight, soil quality, watering, temperature, and support structures. Whether you choose to start the seeds indoors to give them a head start or sow them directly in your garden, providing optimum growing conditions is key.
Caring for moonflower plants involves regular watering, fertilization, pruning, and monitoring for pests and diseases. By attending to these needs, you can ensure healthy growth and abundant blooms. And when the flowers fade, don’t forget to harvest the seeds, allowing you to continue the cycle of beauty and growth in future seasons.
As you embark on this moonflower growing journey, remember to indulge in the wonder and magic that these flowers bring. Take a moment to savor their fragrance on a moonlit evening and appreciate the delicate intricacy of their blooms.
Now it’s time to let your garden come alive with the enchantment of moonflowers. Whether you have a sprawling garden or a small balcony, these delightful plants will add a touch of elegance and mystery to your outdoor space.
So, gather your seeds, prepare your soil, and let the moonflowers dance under the night sky. May their beauty and fragrance fill your garden with joy and wonder.
Happy gardening!
Frequently Asked Questions about When To Plant Moonflower Seeds
Was this page helpful?
At Storables.com, we guarantee accurate and reliable information. Our content, validated by Expert Board Contributors, is crafted following stringent Editorial Policies. We're committed to providing you with well-researched, expert-backed insights for all your informational needs.


0 thoughts on “When To Plant Moonflower Seeds”