Home>Gardening & Outdoor>Landscaping Ideas>How To Make Realistic Grass For Dioramas
Landscaping Ideas
How To Make Realistic Grass For Dioramas
Modified: February 18, 2024
Learn how to create realistic grass for your dioramas with these landscaping ideas. Get step-by-step instructions and tips for lifelike results. Ideal for hobbyists and model enthusiasts.
(Many of the links in this article redirect to a specific reviewed product. Your purchase of these products through affiliate links helps to generate commission for Storables.com, at no extra cost. Learn more)
Introduction
Creating a captivating and lifelike diorama often hinges on the intricate details, and one of the most crucial elements is the realistic depiction of grass. Whether you are crafting a miniature landscape for a model train set, a historical reenactment, or a scenic display, the art of making realistic grass for dioramas can elevate your creation to a whole new level. By incorporating natural textures and vibrant hues, you can bring your diorama to life with an immersive and visually stunning grassy terrain.
In this comprehensive guide, we will delve into the step-by-step process of crafting realistic grass for your diorama. From gathering the essential materials to applying the finishing touches, you will learn how to evoke the essence of a lush, verdant landscape within your miniature world. With a blend of creativity, precision, and attention to detail, you can transform a plain base into a vibrant and captivating scene that draws the viewer into a world of miniature wonder.
Let's embark on this exciting journey to discover the art of creating realistic grass for dioramas, where every blade tells a story and every tuft invites exploration. Whether you are a seasoned diorama enthusiast or a newcomer to the craft, this guide will equip you with the knowledge and techniques to breathe life into your miniature masterpieces. Get ready to unleash your creativity and infuse your dioramas with the enchanting allure of lifelike grassy landscapes.
Key Takeaways:
- Crafting realistic grass for dioramas involves meticulous steps, from preparing the base to adding subtle details, to create captivating miniature landscapes that evoke the timeless beauty of nature.
- By blending precision and creativity, you can transform basic materials into lifelike grass, infusing your dioramas with the enchanting allure of vibrant and visually stunning natural landscapes.
Materials Needed
Before diving into the process of creating realistic grass for your diorama, it’s essential to gather the necessary materials. By assembling these items, you will be well-prepared to embark on this creative endeavor and bring your miniature landscape to fruition. Here’s a comprehensive list of the materials you’ll need:
- Static Grass: This specialized material forms the basis of your realistic grass. It is available in various lengths and colors to suit different types of landscapes.
- Base Material: You’ll need a sturdy base for your diorama, such as a wooden board or a foam base, to create a stable foundation for the grass.
- Adhesive: A reliable adhesive, such as white glue or scenic cement, is essential for securing the grass to the base effectively.
- Applicator: A static grass applicator, which generates an electrostatic charge to apply the grass vertically, is crucial for achieving a realistic look.
- Masking Tape: This will help create defined edges and boundaries on your diorama, ensuring a neat and precise application of the grass.
- Paints and Pigments: Various shades of green and earth tones are useful for adding depth and realism to the grassy terrain.
- Tweezers: Precision tweezers aid in the placement of individual grass tufts and can help achieve a natural distribution pattern.
- Sealer: A matte sealer or fixative is necessary to protect the finished grass and prevent it from shedding excessively.
- Optional Additions: Depending on your diorama’s theme, you may want to incorporate additional elements such as small rocks, fallen leaves, or flowers to enhance the overall realism.
By ensuring you have these materials at your disposal, you’ll be ready to embark on the process of creating lifelike grass for your diorama. With the right tools and a touch of creativity, you can transform these basic components into a captivating and realistic miniature landscape that evokes the essence of the natural world.
Step 1: Prepare the Base
Before delving into the intricate process of creating lifelike grass for your diorama, it’s crucial to establish a solid foundation. The base serves as the canvas upon which you will construct your miniature landscape, providing stability and structure for the grassy terrain to come alive. Follow these essential steps to prepare the base for your diorama:
- Select a Suitable Base: Choose a sturdy and appropriately sized base for your diorama, such as a wooden board or a foam platform. Ensure that the base aligns with the dimensions and theme of your envisioned landscape.
- Prime the Surface: If using a wooden base, apply a coat of primer to create a smooth and uniform surface. This step is crucial for ensuring proper adhesion of the grass and other scenic elements.
- Define the Terrain: Use masking tape to outline the contours of the landscape, including hills, valleys, and any distinct features. This delineation will guide the placement of grass and help create a natural flow within the diorama.
- Create Texture: Depending on the desired terrain, consider adding texture to the base using materials such as sculpting mold, sand, or modeling paste. This step adds depth and realism to the landscape, mimicking the natural irregularities of the earth.
- Paint and Detail: Apply a base coat of paint to the prepared surface, using earthy tones to mimic the soil or underlying ground cover. Additionally, consider adding subtle details such as patches of dirt, small rocks, or other natural elements to enhance the authenticity of the terrain.
By meticulously preparing the base of your diorama, you set the stage for the subsequent application of realistic grass. A well-crafted foundation not only ensures the effective adhesion of the grass but also contributes to the overall visual impact and coherence of the miniature landscape. With the base primed and ready, you are poised to embark on the next phase of this creative journey, where the verdant allure of lifelike grass awaits.
Step 2: Creating the Grass
Now that the foundation of your diorama is primed and awaiting the verdant touch of lifelike grass, it’s time to delve into the intricate process of crafting the very essence of your miniature landscape. Creating realistic grass involves a blend of precision, artistry, and attention to detail. Follow these essential steps to bring your grassy terrain to life:
- Choose the Right Static Grass: Select static grass in varying lengths and shades of green to mimic the natural diversity of real grass. Consider the scale of your diorama and the specific type of landscape you aim to recreate when choosing the appropriate grass.
- Prepare the Applicator: If using a static grass applicator, ensure that it is clean and free of any residual grass from previous use. The applicator’s electrostatic charge is essential for achieving a realistic vertical orientation of the grass fibers.
- Apply Adhesive: Using a fine-tipped applicator or brush, carefully apply a thin layer of adhesive to the areas where you intend to create the grassy terrain. Work in small sections to prevent the adhesive from drying before the grass application.
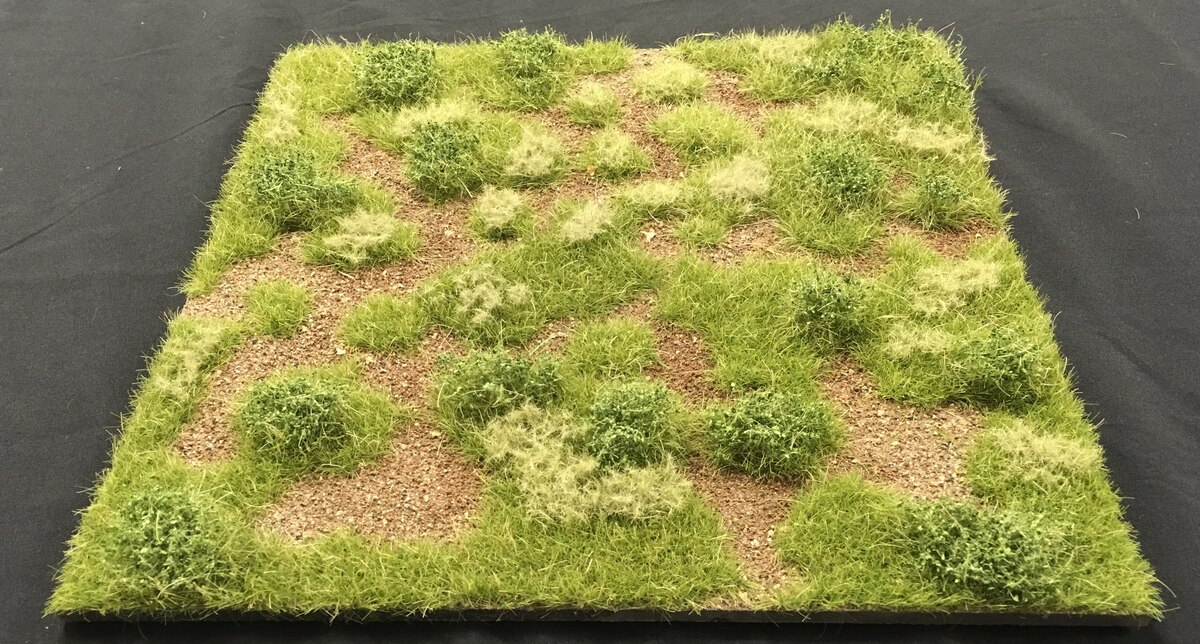
- Electrostatic Application: With the adhesive in place, use the static grass applicator to disperse the grass fibers over the designated areas. The electrostatic charge will cause the fibers to stand upright, creating a natural and lifelike appearance reminiscent of real grass.
- Layering and Blending: Experiment with layering different lengths and shades of grass to add depth and variation to the terrain. By blending various grass types, you can achieve a more organic and visually compelling representation of natural landscapes.
As you meticulously apply the static grass to your diorama, envision the undulating meadows, verdant fields, or rugged wilderness that you seek to emulate. Each delicate fiber contributes to the immersive allure of your miniature world, inviting the viewer to step into a realm where the grass sways with an ethereal vitality. With the grassy terrain taking shape, you are one step closer to realizing a captivating and lifelike diorama that beckons with the enchantment of nature.
To make realistic grass for dioramas, use static grass applicator to apply different lengths and shades of static grass to create a natural look. Varying the direction and density of the grass will also add to the realism.
Step 3: Applying the Grass to the Diorama
With the lifelike grass meticulously crafted, it’s time to seamlessly integrate it into your diorama, infusing the landscape with the vibrant allure of natural greenery. The application process requires precision and a keen eye for detail to achieve a cohesive and realistic representation of grassy terrain. Follow these essential steps to artfully apply the grass to your diorama:
- Define Areas for Grass: Identify the specific regions of your diorama where the grass will be most prominent, such as open fields, meadows, or sloping hills. This delineation will guide the targeted application of the grass fibers.
- Gradual Application: Begin by applying the grass in layers, starting with shorter fibers and gradually incorporating longer strands to create a natural gradient. This approach mimics the organic growth patterns of real grass, enhancing the authenticity of the landscape.
- Focus on Detail: Pay attention to small details such as patches of exposed earth, subtle variations in grass height, and the natural flow of the terrain. These nuanced elements contribute to the overall realism of the grassy landscape.
- Blend and Integrate: Ensure a seamless transition between different sections of grass by blending the fibers and integrating them with the surrounding terrain. This cohesive integration prevents abrupt transitions and enhances the visual continuity of the landscape.
- Refine Edges and Boundaries: Use tweezers or a fine brush to refine the edges of the grassy areas, ensuring a clean and defined border where the grass meets other elements of the diorama, such as pathways or water features.
As you meticulously apply the grass to your diorama, envision the dynamic interplay of light and shadow dancing across the verdant expanse. Each carefully placed fiber contributes to the immersive allure of your miniature world, inviting the viewer to embrace the tranquil beauty of a meticulously crafted landscape. With the grass seamlessly integrated into the diorama, you are poised to embark on the final phase of this creative journey, infusing your miniature masterpiece with the enchanting realism of nature’s splendor.
Step 4: Adding Realism
As the lush grassy terrain takes shape within your diorama, the final touches and subtle details play a pivotal role in elevating the realism and visual impact of the miniature landscape. By infusing your creation with nuanced elements and meticulous refinements, you can evoke the essence of a natural environment with captivating authenticity. Follow these essential steps to add realism and depth to your grassy diorama:
- Weathering Effects: Introduce subtle weathering effects to the grassy terrain, such as patches of lighter or dried-out grass, to mimic the natural impact of sun exposure and environmental factors. This variation adds depth and visual interest to the landscape.
- Scenic Accents: Incorporate small scenic accents such as fallen leaves, delicate flowers, or tiny rocks nestled within the grassy expanse. These details evoke the charm of a natural setting and infuse the diorama with an enchanting sense of realism.
- Dynamic Elements: Consider introducing dynamic elements such as small animals, figures, or miniature accessories that interact with the grassy terrain, further enhancing the narrative and visual intrigue of the diorama.
- Subtle Disturbances: Delicately disturb sections of the grass to create natural irregularities, mimicking the effect of wind, animal trails, or human footprints. This subtle manipulation adds a sense of movement and organic vitality to the landscape.
- Lighting and Shadows: Experiment with lighting to cast naturalistic shadows across the grassy terrain, accentuating the undulating textures and creating a captivating interplay of light and dark within the diorama.
As you meticulously refine and enhance the grassy landscape, envision the immersive allure of a natural world captured in miniature form. Each carefully considered detail contributes to the captivating realism of your creation, inviting the viewer to immerse themselves in a realm where every blade of grass tells a story and every subtle nuance evokes the timeless beauty of nature. With the final touches in place, your diorama stands as a testament to the artistry and craftsmanship that brings the enchanting allure of lifelike grass to vibrant fruition.
Conclusion
Crafting realistic grass for dioramas is a captivating journey that melds artistry, precision, and a deep appreciation for the natural world. From the meticulous creation of lifelike grass to the seamless integration into the diorama, every step of this process contributes to the enchanting allure of a miniature landscape that beckons with the timeless beauty of nature.
As you embark on your own creative endeavors in the realm of diorama crafting, remember that each blade of grass holds the potential to evoke a sense of wonder and transport the viewer to a world where the verdant splendor of the outdoors is captured in miniature form. Whether you are recreating a serene countryside scene, a bustling urban park, or a rugged wilderness, the art of crafting realistic grass infuses your diorama with an immersive and visually stunning element that captivates the imagination.
Through the careful selection of materials, the meticulous application of grass fibers, and the infusion of nuanced details, you have the power to breathe life into your miniature world. As you refine the edges, blend the textures, and add subtle touches of realism, envision the captivating allure of a landscape that invites exploration and storytelling.
Ultimately, the art of creating realistic grass for dioramas is a testament to the boundless creativity and the enduring allure of nature’s splendor. With each diorama you craft, you have the opportunity to transport the viewer to a realm where the grass sways with an ethereal vitality and the landscape teems with the timeless charm of the outdoors. Embrace this journey, infuse your creations with the enchanting allure of lifelike grass, and let your dioramas stand as testaments to the artistry and craftsmanship that bring the natural world to vibrant fruition in the palm of your hand.
Frequently Asked Questions about How To Make Realistic Grass For Dioramas
Was this page helpful?
At Storables.com, we guarantee accurate and reliable information. Our content, validated by Expert Board Contributors, is crafted following stringent Editorial Policies. We're committed to providing you with well-researched, expert-backed insights for all your informational needs.


0 thoughts on “How To Make Realistic Grass For Dioramas”