Home>Home Appliances>Lighting Appliances>Why Aren’t My LED Strips Working

Lighting Appliances
Why Aren’t My LED Strips Working
Modified: January 5, 2024
Discover why your LED strips aren't working and how to fix them. Get expert advice on lighting appliances to ensure your lights shine brightly.
(Many of the links in this article redirect to a specific reviewed product. Your purchase of these products through affiliate links helps to generate commission for Storables.com, at no extra cost. Learn more)
Introduction
LED strips are a popular lighting option that can provide both functionality and visual appeal to various spaces. However, there may be instances where the LED strips are not working as expected, leaving you perplexed and frustrated. Before you start troubleshooting, it’s important to understand the possible reasons why your LED strips might not be functioning properly.
In this article, we will explore some common issues that can cause LED strips to malfunction and discuss the troubleshooting steps you can take to resolve the problems.
Key Takeaways:
- Troubleshooting LED strip issues involves checking connections, verifying power supply compatibility, reviewing wiring configuration, and testing strip functionality. Prioritize safety and seek professional help if needed.
- Understanding potential LED strip malfunctions and following appropriate troubleshooting steps can help identify and resolve issues, ensuring optimal lighting performance and longevity.
Read more: Why Are My LED Strips Flashing
Possible Reasons for LED Strips Not Working
When your LED strips are not working, there are several potential reasons that could be contributing to the issue. Understanding these possible causes will help you narrow down the problem and effectively troubleshoot it. Let’s take a look at some common reasons why your LED strips might not be functioning:
- Poor Connection: One of the most common causes of LED strip malfunction is a poor connection. If the strips are not securely connected or if there are loose wires, it can prevent the electricity from flowing properly and result in the strips not lighting up.
- Incompatible Power Supply: LED strips require a specific voltage to operate efficiently. If the power supply you are using is incompatible or does not provide the correct voltage, it can lead to issues with the LED strips. Insufficient power supply can cause flickering, dimming, or even complete failure of the strips.
- Incorrect Wiring: Another possible reason for LED strip failure is incorrect wiring. If the wires are not connected properly or if there is a mix-up of the positive and negative terminals, it can disrupt the electrical flow and cause the LED strips to not work. It is essential to double-check the wiring configuration to ensure it is accurate.
- Faulty LED Strip: In some cases, the LED strip itself may be faulty. It could be due to a defect in the manufacturing process or damage that occurred during installation. If the LED strip is damaged, burnt out, or has a defect, it will not function properly.
These are just a few possible reasons why your LED strips may not be working. It’s important to note that troubleshooting the issue may require a combination of these factors or even other unforeseen factors. Identifying the specific reason for the malfunction will help you take the necessary steps to fix the problem.
Poor Connection
A poor connection is one of the most common reasons why LED strips fail to work properly. When the connection between the LED strip and the power source is weak or loose, it can interrupt the flow of electricity and prevent the strips from illuminating.
There are several factors that can contribute to a poor connection:
- Loose Wires: If the wires connecting the LED strip to the power source are not securely fastened, they can become loose over time, resulting in a weak connection. This can happen due to improper installation or accidental pulling of the wires. Ensure that the wires are tightly connected to avoid any disruptions in the electrical flow.
- Corroded Contacts: Over time, the metal contacts on the LED strip and the power source can accumulate dirt, dust, or corrosion, which can impede the flow of electricity. Clean the contacts regularly using a soft cloth and electrical contact cleaner to remove any debris and ensure a solid connection.
- Poor Soldering: If the LED strip was not properly soldered during installation, it can lead to weak connections between the individual LED segments. This can result in certain sections of the strip not lighting up or flickering intermittently. Inspect the soldering joints and re-solder any loose or damaged connections to ensure a reliable electrical connection.
To resolve poor connection issues, follow these troubleshooting steps:
- Inspect the Wiring: Carefully examine the wires connecting the LED strip to the power source. Ensure that they are securely attached and free from any damage or fraying. If you notice any loose connections or damaged wires, repair or replace them as necessary.
- Tighten the Connectors: Check the connections between the LED strip and the power source. If they are loose, gently tighten them using pliers or a screwdriver. Make sure not to overtighten as this can damage the connectors.
- Clean the Contacts: If you suspect that the contacts on the LED strip or the power source are dirty or corroded, clean them using a soft cloth and electrical contact cleaner. Be gentle while cleaning to avoid causing any damage to the components.
By ensuring a secure and reliable connection, you can significantly improve the performance of your LED strips and prevent any issues with them not working properly. Addressing poor connections is often the first step in troubleshooting LED strip problems, so it’s important to pay attention to this aspect during installation and maintenance.
Incompatible Power Supply
An incompatible power supply is another common reason why LED strips may not work correctly. LED strips require a specific voltage and current to operate efficiently, and if the power supply you are using does not meet the requirements, it can result in various issues.
Here are a few scenarios that could indicate an incompatible power supply:
- Insufficient Voltage: LED strips typically require a specific voltage, such as 12V or 24V, to function properly. If the power supply you are using does not provide the required voltage, the LED strips may not light up at all or may appear dim and flicker. It is crucial to ensure that your power supply matches the voltage requirements of your LED strips.
- Inadequate Current: LED strips also have specific current requirements, usually measured in amps (A). If the power supply cannot deliver enough current to meet the demands of the LED strips, it can lead to performance issues. Symptoms of inadequate current may include dim lighting or sections of the LED strips not lighting up at all.
- Polarity Mismatch: Some LED strips have polarity markings to indicate the correct direction of the electrical current flow. If the power supply is connected incorrectly, with the positive and negative terminals reversed, it can prevent the LED strips from working correctly. Double-check the polarity markings on both the LED strips and the power supply and ensure they are aligned correctly.
To troubleshoot power supply compatibility issues, follow these steps:
- Check Voltage and Current Output: Examine the specifications of your LED strips and compare them with the voltage and current output of your power supply. Ensure that they match or are within the acceptable range.
- Verify Polarity: If your LED strips have polarity markings, confirm that the positive and negative terminals on both the LED strips and the power supply are aligned correctly. Make any necessary adjustments if they are reversed.
- Upgrade the Power Supply: If your current power supply is incompatible, consider replacing it with one that meets the voltage and current requirements of your LED strips. Consult the manufacturer’s recommendations or seek professional advice to ensure you choose a suitable power supply.
Using an incompatible power supply can put unnecessary strain on your LED strips, potentially leading to reduced lifespan or permanent damage. It is crucial to use a power supply that is specifically designed for LED lighting to ensure optimal performance and longevity.
Incorrect Wiring
Incorrect wiring is another potential reason why LED strips may not work properly. The wiring configuration plays a crucial role in delivering the correct electrical current to the LED strips, and any errors can disrupt the flow of electricity and prevent them from illuminating.
Here are a few common wiring mistakes that can affect the functionality of LED strips:
- Reverse Polarity: LED strips typically have positive (+) and negative (-) terminals that need to be connected correctly to the power supply. If the positive and negative terminals are reversed during installation, it can result in the LED strips not lighting up. Double-check the wiring connections and ensure that the positive and negative terminals are properly aligned.
- Loose or Damaged Wires: If the wires used to connect the LED strips are loose, damaged, or poorly insulated, it can interrupt the electrical current flow and cause the LED strips to malfunction. To troubleshoot this issue, inspect the wiring connections and replace any damaged or faulty wires.
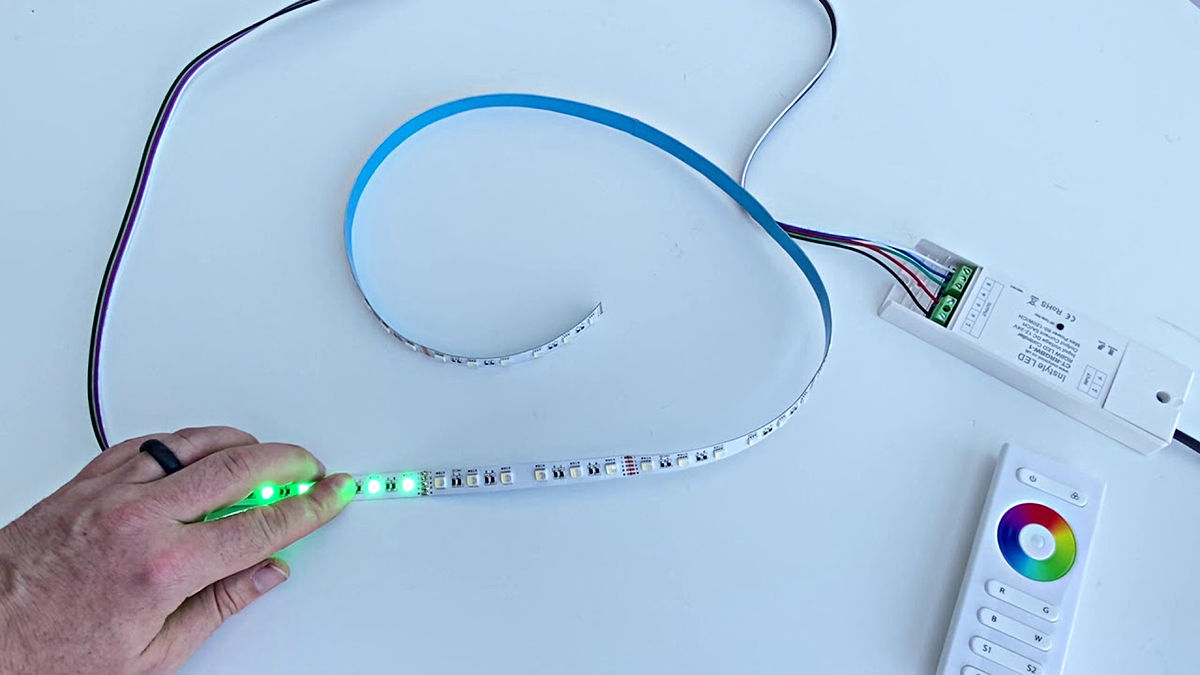
- Misalignment of Color Codes: RGB LED strips have multiple color-coded wires that need to be connected correctly to achieve the desired lighting effects. Ensure that the color codes on both the LED strips and the connectors are aligned properly. Mixing up the color-coded wires can lead to inaccurate color representation or the LED strips not functioning as intended.
To address wiring issues, follow these troubleshooting steps:
- Review the Wiring Diagram: Refer to the wiring diagram provided by the manufacturer of your LED strips. Ensure that you have followed the correct wiring configuration and that all connections are secure.
- Check for Reverse Polarity: Verify that the positive and negative terminals on both the LED strips and the power supply are connected correctly. If they are reversed, make the necessary adjustments to align them properly.
- Inspect the Wires: Examine the wires connecting the LED strips to the power supply. Check for any loose connections, damaged wires, or poor insulation. Replace any faulty wires and ensure that all connections are secure.
- Align Color Codes: If you are working with RGB LED strips, ensure that the color-coded wires are connected correctly according to the manufacturer’s instructions. Pay attention to the alignment of the color codes on both the LED strips and the connectors.
By troubleshooting and correcting any wiring mistakes, you can restore the proper functionality of your LED strips. Careful attention to the wiring configuration will ensure a consistent and reliable electrical connection, enabling the LED strips to emit light as intended.
Read more: Why Are My LED Strips Two Different Colors
Faulty LED Strip
In some cases, the LED strip itself may be faulty, leading to issues with its performance. A faulty LED strip may exhibit various problems, such as sections not lighting up, flickering, or complete failure to illuminate.
Here are a few common reasons why an LED strip may be considered faulty:
- Manufacturing Defect: Occasionally, an LED strip may have a manufacturing defect that causes it to malfunction. This can include issues with the LED diodes, soldering joints, or other components. If the LED strip was defective from the beginning, it may not work properly or have a significantly shorter lifespan.
- Damage During Installation: Improper handling or installation of the LED strip can cause damage, resulting in its failure to function correctly. For instance, if excessive force was applied when bending the strip or if it was accidentally cut or pierced, it may lead to electrical disruptions and affect the overall performance.
- Burned Out LEDs: Over time, individual LED diodes on the strip may burn out due to prolonged use or exposure to excessive heat. If certain sections of the LED strip are not lighting up or appearing significantly dimmer than others, it may indicate burned-out LEDs.
Here are some troubleshooting steps to determine if the LED strip is faulty:
- Inspect the LED Strip: Carefully examine the LED strip for any visible signs of damage, such as broken segments, burnt-out LEDs, or loose connections between the segments. Note any areas that appear abnormal or defective.
- Test the LED Strip: To test whether the LED strip is functioning, temporarily connect it to a different power supply that you know is working correctly. If the LED strip still does not light up or exhibits the same issues, it is likely that the strip itself is faulty.
- Consult the Manufacturer: If you determine that the LED strip is faulty, reach out to the manufacturer for further assistance. They may provide guidance on how to proceed, such as offering a replacement or repair options.
If you discover that the LED strip is indeed faulty, it is advisable to replace it with a new one from a reliable manufacturer. Ensuring the quality of the LED strip will reduce the chances of experiencing similar issues in the future.
Remember to handle the LED strips with care during installation and avoid applying excessive force or causing any damage that may compromise their functionality.
Check the power supply and connections to ensure they are properly connected and providing the correct voltage. Also, make sure the LED strips are compatible with the power supply being used.
Troubleshooting Steps
If you’ve encountered issues with your LED strips not working, it’s important to follow a systematic approach to troubleshoot and resolve the problem. Here are some general troubleshooting steps you can take to identify and address the issue:
- 1. Checking Connection: Start by examining the connections between the LED strips and the power source. Ensure that all connections are secure and tightly fastened. If you notice any loose wires or connectors, reattach them properly.
- 2. Verifying Power Supply Compatibility: Confirm that the power supply you are using is compatible with the LED strips. Verify that the voltage and current output of the power supply match the requirements of the LED strips. If not, consider obtaining a suitable power supply.
- 3. Reviewing Wiring Configuration: Double-check the wiring configuration to ensure that the positive and negative terminals are correctly connected. Make sure the wires are not frayed or damaged. If necessary, redo the wiring to ensure a proper connection.
- 4. Testing LED Strip Functionality: Test the LED strip with a different power supply or by connecting it to another compatible source. This will help determine if the issue lies with the LED strip or the power supply. If the strip works with the alternative power source, you know the original power supply is the problem.
- 5. Seeking Professional Assistance: If you’ve gone through the troubleshooting steps without success, it may be beneficial to seek professional help. A licensed electrician or an experienced lighting technician can provide expert advice and assistance in diagnosing and resolving the issue.
Keep in mind that these troubleshooting steps are general guidelines. The specific steps you take may vary depending on the unique circumstances and configuration of your LED strips.
It’s crucial to approach troubleshooting with patience and attention to detail. Take your time to carefully examine the connections, review the specifications of your LED strips and power supply, and test different variables to isolate and resolve the issue.
Remember, if you’re not confident in your troubleshooting abilities, it’s always best to seek professional help. Working with electrical components can be dangerous, and it’s important to prioritize safety.
By following these troubleshooting steps, you’ll be on your way to resolving the problem and enjoying the benefits of properly functioning LED strips.
Checking Connection
When your LED strips are not working, the first troubleshooting step is to check the connection between the LED strips and the power source. Poor or loose connections can disrupt the flow of electricity, causing the LED strips to malfunction.
Here are the essential steps to check the connection:
- Inspect the wiring: Start by visually examining the wiring connecting the LED strips to the power source. Look for any loose connections, frayed wires, or damaged insulation. These issues can interrupt the electrical current and prevent the LED strips from working properly.
- Tighten the connectors: If you notice any loose connections, gently tighten them to ensure a secure fit. Use pliers or a screwdriver to tighten the connectors, being careful not to overtighten and damage the wiring.
- Verify the polarity: Check that the positive (+) and negative (-) terminals on both the LED strips and the power source are correctly aligned. If they are reversed, disconnect the wires and reconnect them with the correct polarity.
- Reattach any loose wires: If you find any loose wires, reattach them securely to their respective terminals. Be sure to match the positive (+) and negative (-) connections properly.
- Check for corrosion: Over time, the metal contacts on the LED strips and the power source can accumulate dirt, dust, or corrosion, leading to poor conductivity. Use a soft cloth and electrical contact cleaner to clean the contacts and remove any debris or corrosion.
- Ensure proper insulation: Make sure that the wire insulation is intact and not damaged. Damaged insulation can cause wires to touch, resulting in short circuits or electrical issues. Replace any wires with compromised insulation to prevent potential hazards.
By carefully checking and addressing any connection issues, you can improve the electrical flow to the LED strips and restore their functionality. It’s crucial to pay attention to the wiring and connectors to ensure a secure and reliable connection.
If you’ve performed all the necessary checks and the LED strips are still not working, it may be time to move on to the next step of troubleshooting and explore other possible causes for the issue.
Verifying Power Supply Compatibility
Another important step in troubleshooting LED strip issues is to verify the compatibility of the power supply you are using. LED strips require a specific voltage and current to function correctly, and using an incompatible power supply can lead to various problems.
Here are the key steps to verify power supply compatibility:
- Check the voltage requirement: Review the specifications of your LED strips to determine the required voltage. It is typically indicated as 12V or 24V. Examine the voltage output of the power supply to ensure that it matches the LED strip’s voltage requirement. Using a power supply with a different voltage can result in the LED strips not lighting up or not functioning at their optimal level.
- Confirm the current output: LED strips have specific current requirements, typically measured in amps (A). Ensure that the current output of the power supply matches the LED strip’s current requirement. Using a power supply with inadequate current can cause the LED strips to appear dim or not light up entirely.
- Check for polarity: Some LED strips have polarity markings, indicating the correct direction of the electrical current flow. Ensure that the positive (+) and negative (-) terminals on both the LED strips and the power supply are connected correctly. If they are reversed, the LED strips might not function as expected.
- Upgrade the power supply if necessary: If you determine that the power supply you are currently using is not compatible with the LED strips, consider obtaining a suitable power supply. Consult the manufacturer’s recommendations or seek professional assistance to ensure you choose a power supply that meets the voltage and current requirements of your LED strips.
By verifying and ensuring power supply compatibility, you can provide the necessary voltage and current to the LED strips, allowing them to function optimally. Using an incompatible power supply can lead to poor performance, flickering, or even damage to the LED strips.
Remember to always follow the manufacturer’s specifications and guidelines when selecting a power supply for your LED strips. Matching the voltage and current requirements is critical to ensure reliable and safe operation.
If you’ve confirmed that the power supply is compatible, but the LED strips are still not working correctly, it’s time to move on to the next troubleshooting step in order to identify and resolve the issue.
Read more: Why Is My Surge Protector Not Working
Reviewing Wiring Configuration
When troubleshooting LED strip issues, it’s important to review the wiring configuration to ensure that the connections are correct. Incorrect wiring can disrupt the flow of electricity and prevent the LED strips from functioning properly.
Here are the key steps to review the wiring configuration:
- Check the wiring diagram: Refer to the wiring diagram provided by the manufacturer of your LED strips. Ensure that you have followed the correct wiring configuration for your specific LED strip model. Compare your actual wiring connections to the diagram to identify any discrepancies.
- Verify the polarity: Confirm that the positive (+) and negative (-) terminals on both the LED strips and the power source are connected correctly. If the polarity is reversed, disconnect the wires and reconnect them with the correct polarity. Proper polarity is crucial for the LED strips to function as designed.
- Inspect the wiring connections: Examine the connections between the LED strips, connectors, and power source. Look for loose connections, improperly crimped wires, or signs of damage. Ensure that all connections are secure and tightly fastened.
- Review RGB color-coded wires: If you are working with RGB LED strips, verify that the color-coded wires are connected correctly. Each wire corresponds to a specific color channel (red, green, and blue). Consult the manufacturer’s documentation to ensure that the color-coded wires are aligned with the correct terminals.
- Check for damaged insulation: Inspect the wiring for any signs of damaged insulation. If the insulation is compromised, it can lead to short circuits or other electrical problems. Replace any wires with damaged insulation to prevent potential hazards.
By reviewing the wiring configuration, you can identify any errors or discrepancies that may be causing the LED strips to malfunction. Correcting any issues with the wiring will ensure a proper electrical flow to the LED strips, allowing them to function as intended.
If you’ve carefully reviewed the wiring configuration and made any necessary corrections, but the LED strips are still not working correctly, it’s time to move on to the next troubleshooting step in order to isolate and resolve the issue.
Testing LED Strip Functionality
When troubleshooting LED strip issues, testing the functionality of the LED strips themselves is a crucial step. This will help determine if the problem lies with the LED strip or with other components such as the power supply or wiring.
Here are the key steps to test the LED strip functionality:
- Verify the power supply: Ensure that the power supply you are using is working correctly and is compatible with the LED strip specifications. Connect the LED strip to a known working power supply that matches the voltage and current requirements.
- Check for proper connectivity: Ensure that all connections between the LED strip, power supply, and any intermediary components (such as dimmers or controllers) are securely fastened. Loose or faulty connections can cause the LED strip to malfunction.
- Inspect the LED strip: Examine the LED strip for any visible signs of damage, such as broken sections, burnt-out LEDs, or loose connections between segments. Damaged or faulty LEDs can prevent the entire strip or specific sections from lighting up.
- Test different sections: If your LED strip is divided into sections, test each section separately. This will help identify if the issue is specific to one section or if it is present across the entire strip. Test different sections by connecting them individually to the power supply.
- Observe the lighting pattern: When the LED strip is powered on, carefully observe the lighting pattern. Look for any sections that are not lighting up, flickering, or exhibiting inconsistent brightness. Such discrepancies can indicate faulty LEDs or wiring issues.
- Document the observations: Make note of any specific patterns or observations regarding the LED strip’s behavior. This documentation will be helpful when communicating with the manufacturer or seeking further assistance.
By testing the LED strip’s functionality, you can determine if the issue lies with the strip itself or with other external factors. If the LED strip works when connected to a different power supply or if specific sections behave differently, it suggests that the problem might not be with the LED strip itself, but with the power supply or wiring.
If you’ve followed the testing steps and identified that the LED strip is indeed faulty or exhibiting irregular behavior, it is recommended to contact the manufacturer for support or consider replacing the strip to ensure optimal lighting performance.
Remember, when handling the LED strip, exercise caution and take necessary safety precautions to avoid electrical shocks. If you remain uncertain or have concerns about performing the testing, seeking assistance from a professional electrician or an experienced lighting technician is always a good option.
Conclusion
LED strips can add a stunning and versatile lighting solution to any space. However, when they encounter issues and fail to work properly, it can be frustrating. By understanding the potential reasons behind LED strip malfunctions and following the appropriate troubleshooting steps, you can identify and resolve the issues that may be affecting their performance.
In this article, we discussed several possible reasons why LED strips may not be working correctly, including poor connection, incompatible power supply, incorrect wiring, and faulty LED strips. We also outlined troubleshooting steps to address each of these issues, such as checking connections, verifying power supply compatibility, reviewing the wiring configuration, and testing the LED strip functionality.
Remember, as you troubleshoot LED strip problems, it is essential to prioritize safety. Take necessary precautions when handling electrical components and seek professional help if you are unsure or uncomfortable performing the tasks yourself.
By being diligent and systematic in troubleshooting LED strip issues, you can identify the root cause of the problem and take appropriate steps to resolve it. Whether it’s securing loose connections, replacing an incompatible power supply, correcting the wiring configuration, or addressing faulty LED strips, taking the time to troubleshoot and fix the issues will help restore the functionality of your LED strips.
If you have exhausted your efforts in troubleshooting and cannot resolve the issues, it is best to consult the manufacturer or seek professional assistance. They can provide further guidance and ensure that your LED strips are working optimally.
By maintaining your LED strips properly and promptly addressing any issues that arise, you can continue to enjoy their beautiful illumination and enhance the ambiance of your space for years to come.
Frequently Asked Questions about Why Aren't My LED Strips Working
Was this page helpful?
At Storables.com, we guarantee accurate and reliable information. Our content, validated by Expert Board Contributors, is crafted following stringent Editorial Policies. We're committed to providing you with well-researched, expert-backed insights for all your informational needs.








0 thoughts on “Why Aren’t My LED Strips Working”