
Articles
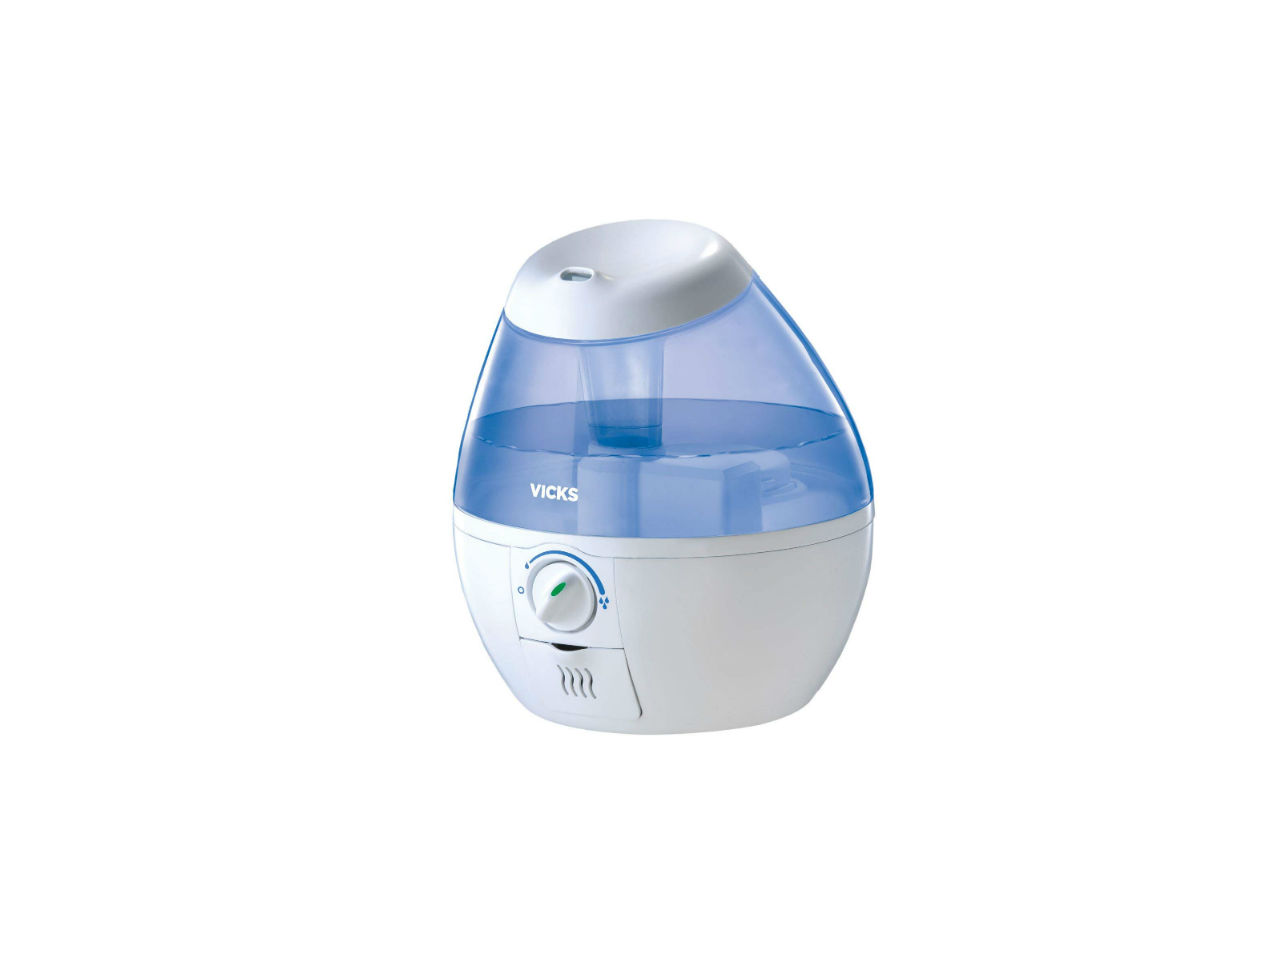
Why Is My Humidifier Not Working
Modified: September 1, 2024
Discover articles on why your humidifier is not working and how to troubleshoot common issues. Find solutions to improve the functionality and performance of your humidifier.
(Many of the links in this article redirect to a specific reviewed product. Your purchase of these products through affiliate links helps to generate commission for Storables.com, at no extra cost. Learn more)
Introduction
Humidifiers are essential appliances that help maintain proper humidity levels in our indoor spaces. They provide a myriad of benefits, including alleviating dry skin, reducing static electricity, and relieving respiratory issues. However, there can be instances when your humidifier is not working as expected, leaving you puzzled and in need of a solution. In this article, we will explore some common issues that can cause a humidifier to malfunction and provide troubleshooting steps to help you get it back up and running.
When your humidifier fails to work properly, it can be a frustrating experience. The good news is that many common issues can be easily resolved with a few simple troubleshooting steps.
Before diving into the troubleshooting process, it’s important to understand some of the typical problems that can occur with a humidifier. The most common issues include power supply problems, water supply problems, clogged filters, incorrect humidity settings, and faulty sensors.
By recognizing these potential issues, you can narrow down the possible causes and start troubleshooting more effectively. Let’s take a closer look at each of these common problems and how to address them.
Key Takeaways:
- Troubleshooting Your Humidifier
Identify and address common issues like power supply problems, water supply issues, clogged filters, incorrect humidity settings, and faulty sensors to troubleshoot and restore your humidifier’s functionality. - Regular Maintenance is Key
Regularly clean or replace filters, adjust humidity settings, and test sensors to ensure your humidifier operates optimally. Following manufacturer’s guidelines and seeking professional assistance when needed can help maintain a healthy indoor environment.
Read more: Why Is My Humidifier Leaking
Common Issues
When your humidifier is not working as expected, there are several common issues that could be causing the problem. Understanding these issues can help you identify the problem and take the necessary steps to resolve it. Here are the most common issues you may encounter:
- Power Supply Problems: One of the most common reasons for a humidifier not working is a power supply issue. It could be as simple as a loose power connection or a blown fuse. Make sure to check the power cord, outlet, and circuit breaker to ensure a secure connection and proper power supply.
- Water Supply Problems: Another common issue involves the water supply to the humidifier. If the water reservoir is not filled or the water line is blocked, the humidifier will not be able to generate moisture. Check that the water level is sufficient and the water inlet valve is open and clear of any obstructions.
- Clogged Filters: Over time, the filters in a humidifier can become clogged with mineral deposits and impurities from the water. This can hinder the airflow and reduce the effectiveness of the humidifier. Regularly inspect and clean or replace the filters to ensure optimal performance.
- Incorrect Humidity Settings: Sometimes, the humidifier may not be working because the humidity settings are not properly configured. Ensure that the desired humidity level is set appropriately on the humidistat or control panel. If the humidity level is set too low or too high, it can affect the operation of the humidifier.
- Faulty Sensors: Some humidifiers are equipped with humidity sensors that detect the moisture level in the air. If these sensors are faulty or dirty, they may provide inaccurate readings and prevent the humidifier from functioning correctly. Clean or replace the sensors if necessary.
These common issues can often be resolved by taking a few simple steps. In the following sections, we will provide troubleshooting steps for each of these issues, helping you get your humidifier back in working order.
Power Supply Problems
Power supply problems are one of the most common reasons for a humidifier not working. Here are a few steps to troubleshoot and address power supply issues:
- Check the power connection: Make sure the power cord is securely plugged into both the humidifier and a functioning power outlet. Look for any visible damage or loose connections in the cord. If the cord is damaged, it may need to be replaced.
- Inspect the power outlet: Verify that the power outlet is working by plugging in a different device or using a voltage tester. If the outlet is not providing power, check the circuit breaker or fuse box to ensure it hasn’t tripped or blown a fuse. Resetting the breaker or replacing the fuse can often resolve the issue.
- Try a different power source: If you suspect a problem with the power outlet, try connecting the humidifier to a different outlet in a different location. This will help determine if the issue lies with the outlet or the humidifier itself.
- Test the power cord: If you have access to a multimeter, you can test the power cord for continuity to ensure there are no breaks or faulty connections. If the cord is defective, it should be replaced with a new one.
By following these steps, you can identify and resolve power supply problems that may be preventing your humidifier from working. If the power supply is not the issue, move on to the next common problem: water supply problems.
Water Supply Problems
Another common issue that can cause a humidifier to not work properly is water supply problems. Here are some troubleshooting steps to address water supply issues:
- Check the water level: Ensure that the water reservoir of the humidifier is filled to the recommended level. If the water level is too low, the humidifier may not be able to generate sufficient moisture. Refill the reservoir if necessary, following the manufacturer’s guidelines.
- Inspect the water inlet valve: Check if the water inlet valve, where the water enters the humidifier, is open and clear of any debris or obstructions. If it is clogged, carefully remove any blockages or clean the valve to allow for proper water flow.
- Inspect the water line: If your humidifier is connected to a water line, ensure that the line is not damaged or kinked. A damaged or twisted water line can prevent the flow of water to the humidifier. Straighten any kinks or replace the water line if required.
- Check for mineral buildup: Over time, minerals from the water can accumulate and clog the water inlet valve or other internal components of the humidifier. Regular cleaning or descaling of the humidifier can help prevent mineral buildup and ensure proper water flow.
By troubleshooting these water supply problems, you can ensure that your humidifier has an adequate water supply to generate moisture. If water supply issues are not the cause of the problem, move on to the next potential issue: clogged filters.
Clogged Filters
Clogged filters are a common issue that can hinder the performance of a humidifier. Here are some steps to address clogged filter problems:
- Inspect the filters: Locate the filters in your humidifier. Depending on the type of humidifier, there may be one or more filters present. Remove the filters and inspect them for buildup of mineral deposits, dirt, or other debris.
- Clean the filters: If the filters are dirty or clogged, gently rinse them with water or clean them as per the manufacturer’s instructions. Avoid using harsh chemicals or scrubbing vigorously, as this can damage the filters.
- Replace the filters: If the filters are excessively dirty or damaged, it is recommended to replace them with new ones. Consult the user manual or contact the manufacturer to obtain the correct replacement filters for your humidifier.
- Keep up with regular maintenance: To prevent future clogging issues, it is important to perform regular maintenance on your humidifier. This includes cleaning or replacing the filters as recommended by the manufacturer and ensuring that the humidifier is cleaned regularly to remove any mineral deposits or impurities.
By addressing clogged filter problems, you can improve the airflow and efficiency of your humidifier. If clogged filters do not seem to be the cause of the issue, continue troubleshooting by checking the humidity settings of your humidifier.
Read more: How Humidifier Works
Incorrect Humidity Settings
Incorrect humidity settings can be another reason why your humidifier is not working as expected. Here are some steps to troubleshoot and adjust the humidity settings:
- Check the humidistat or control panel: Locate the humidistat or control panel on your humidifier. Ensure that the humidity level is set to the desired level. Sometimes, the settings may have been accidentally changed or set too low or too high, affecting the operation of the humidifier.
- Adjust the humidity level: If the current humidity level is not comfortable or appropriate for your needs, adjust the setting accordingly. Most humidifiers have a control dial or arrow buttons that allow you to increase or decrease the humidity level. Refer to the user manual for specific instructions on adjusting the settings.
- Observe the humidity reading: Some humidifiers have built-in humidity sensors that provide a reading of the current humidity level in the room. If your humidifier has this feature, observe the humidity reading to ensure it matches your desired level. If the reading is inaccurate, you may need to recalibrate or replace the sensor.
- Allow time for adjustment: After adjusting the humidity settings, give your humidifier some time to reach the desired level. It may take a few hours for the humidifier to humidify the space and stabilize the humidity level. Monitor the humidity over time to ensure it remains at the desired level.
By troubleshooting and adjusting the humidity settings, you can optimize the performance of your humidifier to maintain the desired humidity level in your indoor space. If incorrect humidity settings are not the cause of the issue, proceed to the next potential problem: faulty sensors.
Faulty Sensors
Faulty sensors can be a factor that prevents your humidifier from working properly. Here are some steps to troubleshoot and address sensor-related problems:
- Clean the sensors: If your humidifier is equipped with humidity sensors, they may become dirty or covered with dust, which can result in inaccurate readings or malfunction. Gently clean the sensors using a soft cloth or cotton swab dampened with water. Be cautious not to damage the sensors in the process.
- Recalibrate the sensors: Some humidifiers allow you to recalibrate the sensors to ensure accurate humidity readings. Refer to the user manual for instructions on how to recalibrate the sensors, as the process may vary depending on the model of your humidifier.
- Test the sensors: If cleaning or recalibration does not resolve the issue, you can perform a simple test to check the functionality of the sensors. Place the humidifier in a room with known humidity levels or use a separate hygrometer to measure the humidity. Compare the readings on the humidifier’s sensors with the separate hygrometer. If there is a significant difference, the sensors may be faulty and need to be replaced.
- Contact the manufacturer: If you suspect that the sensors are faulty and require replacement, it is recommended to contact the manufacturer or consult a professional technician. They can provide guidance on acquiring and installing new sensors or offer further troubleshooting assistance.
Addressing faulty sensor issues can help ensure that your humidifier provides accurate humidity readings and functions properly. If none of the above troubleshooting steps resolve the problem, it may be advisable to seek professional help or contact customer support for further assistance.
Now that we have explored common issues that can cause a humidifier to malfunction and provided troubleshooting steps, you can proceed with the appropriate solutions based on the specific problem you are facing. By addressing these common issues, you can restore your humidifier’s functionality and enjoy the benefits of balanced humidity levels in your indoor environment.
Check if the water tank is properly seated and the power cord is plugged in. Clean the humidifier regularly to prevent clogs and ensure proper functioning.
Troubleshooting Steps
Now that we have identified the common issues that can cause a humidifier to not work properly, let’s discuss the troubleshooting steps you can take to address these problems:
- Check Power Connection: Ensure that the power cord is securely plugged into the humidifier and a functional power outlet. Look for any visible damage or loose connections. If necessary, test the outlet with another device or a voltage tester to ensure it is providing power.
- Ensure Proper Water Supply: Verify that the water reservoir is filled to the recommended level. Check the water inlet valve for any obstructions, and make sure the water line is not damaged or kinked. Clean the inlet valve and descale the humidifier if mineral buildup is present.
- Clean or Replace Filters: Remove the filters and inspect them for dirt or mineral deposits. Clean the filters according to the manufacturer’s instructions or replace them if they are excessively dirty or damaged. Maintain regular filter maintenance to prevent future clogging issues.
- Adjust Humidity Settings: Check the humidity settings on the humidistat or control panel and ensure that they are set to the desired level. Make adjustments as needed, and monitor the humidity level over time to ensure it remains stable.
- Test Sensors: Clean the humidity sensors if present and recalibrate them if necessary. Perform a comparison test between the humidifier’s sensors and a separate hygrometer to check for accuracy. If the sensors are found to be faulty, consider contacting the manufacturer for replacement.
By following these troubleshooting steps, you can effectively address the common issues that may be causing your humidifier to malfunction. Remember to consult the user manual for specific instructions and guidelines provided by the manufacturer. If the problem persists or appears to be more complex, it is advisable to seek professional assistance or contact customer support for further guidance.
Now that you are equipped with the necessary information and troubleshooting steps, you can confidently tackle any issues with your humidifier and get it back to working efficiently in no time.
Check Power Connection
When your humidifier is not working, one of the first troubleshooting steps you should take is to check the power connection. Here are some steps to ensure a proper power connection:
- Inspect the power cord: Start by examining the power cord of your humidifier. Look for any signs of damage, such as frayed wires or broken plugs. If you notice any damage, it is important to replace the power cord to avoid any electrical hazards.
- Verify the plug connection: Ensure that the power cord is securely plugged into both the humidifier and a functioning power outlet. Sometimes, the plug can become loose or disconnected due to accidental bumps or movements. Push the plug firmly into the outlet to ensure a snug fit.
- Check the outlet: If you suspect a power issue, test the outlet with another device to confirm if it is working properly. Plug in a different appliance or use a voltage tester to check for power supply. If there is no power in the outlet, try plugging the humidifier into a different outlet to identify if the issue lies with the outlet or the humidifier.
- Reset the circuit breaker: If the power outlet is functioning properly but the humidifier still does not turn on, check the circuit breaker or fuse box. Sometimes, a tripped breaker or blown fuse can cause a power interruption. Locate the breaker or fuse corresponding to the power outlet and reset or replace it if necessary.
By following these steps, you can ensure that your humidifier has a proper power connection. If the issue persists, it may indicate a more complex problem, and you may need to consult the manufacturer’s troubleshooting guide or contact customer support for further assistance.
Remember to always prioritize safety when dealing with electrical appliances. If you are unsure or uncomfortable performing any of these steps, it is best to seek professional help to avoid any accidents or damage to the humidifier.
Now that you have checked the power connection and ruled out any issues, you can move on to the next troubleshooting step to address the problem with your humidifier.
Read more: Why Is My Dishwasher Not Working
Ensure Proper Water Supply
Another common issue that can cause your humidifier to not work properly is a problem with the water supply. To ensure a proper water supply, follow these troubleshooting steps:
- Check the water reservoir: Begin by inspecting the water reservoir of your humidifier. Ensure that it is filled to the recommended water level. If the water level is too low, the humidifier may not be able to generate adequate moisture. Follow the manufacturer’s instructions to fill the reservoir properly.
- Inspect the water inlet valve: Locate the water inlet valve, which is where the water enters the humidifier. Check if the valve is open and clear of any debris or blockages. Sometimes, mineral deposits or impurities from the water can obstruct the inlet valve. Clean the valve carefully if necessary to ensure proper water flow.
- Examine the water line: If your humidifier is connected to a water line, inspect the line for any damage or kinks. A damaged or twisted water line can impede the flow of water to the humidifier. Straighten any kinks or replace the water line if needed to ensure a proper water supply.
- Address mineral buildup: Over time, mineral deposits from hard water can accumulate inside the humidifier and obstruct the water flow. This can result in a reduced or irregular supply of water. Regular cleaning and descaling of the humidifier can help prevent mineral buildup and ensure a proper water supply. Follow the manufacturer’s instructions for cleaning and descaling to avoid any damage to the unit.
By going through these troubleshooting steps, you can ensure that your humidifier has a proper water supply to generate moisture effectively. If the issue persists or you suspect a more complex problem, it is recommended to consult the manufacturer’s guide or contact customer support for further assistance.
Always refer to the user manual or instructions provided by the manufacturer for specific guidance on maintaining and troubleshooting your particular model of humidifier. Additionally, prioritize safety while handling and cleaning the humidifier to prevent any accidents or damage.
Now that you have addressed the water supply issue, continue to the next troubleshooting step to identify and resolve any further problems with your humidifier.
Clean or Replace Filters
Clogged filters can often lead to a poorly functioning humidifier. To address this issue, follow these steps to clean or replace the filters:
- Locate the filters: Depending on the model of your humidifier, the filters may be located at the top or bottom of the unit. Consult the user manual or manufacturer’s instructions to locate the filters.
- Remove the filters: Carefully remove the filters from the humidifier. Take note of their positioning and any instructions on how to handle them.
- Inspect the filters: Examine the filters for any signs of dirt, debris, or mineral buildup. Clogged filters can restrict the airflow and reduce the efficiency of the humidifier. If the filters are excessively dirty or damaged, they may need to be replaced.
- Clean the filters: If the filters are dirty but still in good condition, you can clean them instead of replacing them. Follow the manufacturer’s instructions for cleaning the filters. Some filters can be rinsed with water, while others may require a gentle wipe with a soft cloth to remove any trapped particles.
- Replace the filters: If the filters are worn out, damaged, or cannot be effectively cleaned, it is recommended to replace them. Purchase the appropriate replacement filters from the manufacturer or an authorized retailer. Install the new filters in the correct position as indicated in the user manual.
- Maintain regular filter maintenance: To prevent future clogging issues and ensure the optimal performance of your humidifier, it is important to establish a routine for cleaning or replacing the filters. Follow the manufacturer’s guidelines for the recommended frequency of filter maintenance.
By cleaning or replacing the filters, you can improve the airflow and efficiency of your humidifier. Make sure to handle the filters gently and as instructed to avoid any damage. Regular maintenance of the filters will help maintain the quality of your humidifier’s performance over time.
Remember to consult the user manual or guidelines provided by the manufacturer for specific instructions on cleaning and replacing filters for your particular make and model of humidifier.
Now that you have addressed the filter issue, proceed to the next troubleshooting step to continue identifying and resolving any potential problems with your humidifier.
Adjust Humidity Settings
Incorrect humidity settings can affect the performance of your humidifier. To ensure optimal operation, follow these steps to adjust the humidity settings:
- Locate the control panel: Identify the control panel or humidistat on your humidifier. It is usually located on the front or top of the unit. Refer to the user manual or manufacturer’s instructions for the specific location of the control panel.
- Check the current humidity level: Take note of the current humidity level displayed on the control panel or humidistat. This reading indicates the humidity level in the room as detected by the humidifier’s sensors, if applicable.
- Adjust the desired humidity level: Determine the desired humidity level you would like to maintain in your indoor space. Adjust the setting on the control panel using the dial, buttons, or digital display to match your preferred humidity level.
- Observe the humidifier’s operation: Once you have adjusted the humidity setting, monitor the operation of the humidifier. You should hear the fan or motor running, and the humidifier should start generating moisture to maintain the desired humidity level.
- Monitor the humidity level: Use a separate hygrometer or the humidifier’s built-in humidity sensor, if available, to monitor the actual humidity level in the room. Compare it to the desired humidity level you set on the control panel. Adjust the setting if necessary to ensure the humidifier maintains the desired level.
By adjusting the humidity settings, you can customize the operation of your humidifier to match the desired comfort level in your indoor space. Regularly monitor the humidity level to ensure it remains within the desired range.
It is important to keep in mind that excessively high humidity levels can promote the growth of mold and mildew, while low humidity levels can result in dryness and discomfort. Finding the appropriate balance is key to creating a comfortable and healthy environment.
Refer to the user manual or guidelines provided by the manufacturer for specific instructions on adjusting the humidity settings for your particular humidifier model.
Now that you have adjusted the humidity settings, proceed to the next troubleshooting step to identify and address any potential problems with your humidifier.
Test Sensors
If your humidifier is equipped with humidity sensors, testing them can help identify and address any issues related to their functionality. Follow these steps to test the sensors:
- Identify the sensor: Determine the location of the humidity sensor in your humidifier. The sensor is usually located near the control panel or inside the unit, depending on the model. Refer to the user manual or manufacturer’s instructions for the specific location.
- Clean the sensor: Before testing the sensor, make sure it is clean and free of any dust, dirt, or debris. Gently wipe the sensor with a soft cloth or cotton swab to remove any particles that may affect its accuracy.
- Recalibrate the sensor: Some humidifiers allow you to recalibrate the sensors to ensure accurate humidity readings. Consult the user manual or manufacturer’s instructions for the specific steps to recalibrate the sensor. Follow the provided guidelines carefully to avoid any misconfigurations.
- Comparison test: Perform a comparison test between the humidifier’s sensor and a separate hygrometer or humidity monitor. Place the hygrometer in close proximity to the humidifier and compare the humidity readings of both devices. If there is a significant divergence in the readings, it may indicate a problem with the sensor.
- Contact the manufacturer: If the sensor appears to be faulty or the readings are consistently inaccurate, it is recommended to contact the manufacturer or customer support for further assistance. They can provide guidance on troubleshooting the sensor or offer information on how to obtain a replacement sensor if necessary.
Testing the sensors of your humidifier helps ensure accurate humidity readings and enables the unit to function optimally. Clean the sensor regularly to maintain its performance and recalibrate it as needed to guarantee precise readings.
Remember to consult the user manual or guidelines provided by the manufacturer for specific instructions on testing and maintaining the sensors of your particular humidifier model.
Now that you have tested the sensors, you have completed the troubleshooting steps to identify and resolve potential problems with your humidifier. If the issue persists or additional concerns arise, it may be necessary to seek professional help or contact customer support for further assistance.
Read more: Why Is My Salt Lamp Not Working
Conclusion
A properly functioning humidifier is essential for maintaining optimal humidity levels in your indoor space. When faced with a humidifier that is not working as expected, it’s important to thoroughly troubleshoot common issues to identify and address the problem.
In this article, we discussed several common issues that can cause a humidifier to malfunction. These included power supply problems, water supply issues, clogged filters, incorrect humidity settings, and faulty sensors. By understanding these potential issues, you can systematically troubleshoot and resolve them.
We provided step-by-step troubleshooting steps for each of these common issues. This included checking the power connection, ensuring proper water supply, cleaning or replacing filters, adjusting humidity settings, and testing sensors. Following these steps can often resolve the problem and get your humidifier back up and running smoothly.
It’s crucial to consult the user manual or manufacturer’s instructions specific to your humidifier model throughout the troubleshooting process. This ensures that you follow the appropriate guidelines and precautions for your particular device.
If, after going through the troubleshooting steps, the issue persists or you feel uncomfortable with the process, it is advisable to contact the manufacturer’s customer support or seek professional assistance. They can provide further guidance and help resolve any more complex problems.
Remember, regular maintenance and care, such as cleaning filters and descaling the humidifier, are essential for its long-term performance. Following the manufacturer’s recommendations will help keep your humidifier in good working condition.
By effectively troubleshooting and addressing common issues, you can restore the functionality of your humidifier and enjoy the benefits of optimized humidity levels in your indoor environment. A properly working humidifier can provide relief from dryness, improve respiratory health, and enhance overall comfort.
Now that you are equipped with the knowledge and troubleshooting steps, you can confidently tackle any issues that may arise with your humidifier and create a more comfortable and healthier living space.
Frequently Asked Questions about Why Is My Humidifier Not Working
Was this page helpful?
At Storables.com, we guarantee accurate and reliable information. Our content, validated by Expert Board Contributors, is crafted following stringent Editorial Policies. We're committed to providing you with well-researched, expert-backed insights for all your informational needs.


0 thoughts on “Why Is My Humidifier Not Working”