Home>Home Maintenance>Where Does The Dryer Vent Go
Home Maintenance
Where Does The Dryer Vent Go
Modified: October 20, 2024
Wondering where the dryer vent goes? Learn about proper home maintenance and find out where your dryer vent should be directed for optimal efficiency.
(Many of the links in this article redirect to a specific reviewed product. Your purchase of these products through affiliate links helps to generate commission for Storables.com, at no extra cost. Learn more)
Introduction
Welcome to the world of home maintenance! In today’s article, we will delve into the important topic of dryer vents and their role in ensuring the safety and efficiency of your home.
Have you ever wondered where the hot air from your dryer goes? Well, that’s where the dryer vent comes into play. A dryer vent is a crucial component of a dryer system, responsible for expelling excess moisture and heat from the dryer to the outside of your home. Without a properly functioning vent, your dryer could become inefficient, causing longer drying times and potential safety hazards.
Understanding the purpose, types, and installation location of dryer vents is essential for every homeowner or someone looking to buy a new dryer. Moreover, knowing how to maintain and clean your dryer vent can save you from costly repairs and ensure the longevity of your appliance.
In this comprehensive guide, we will take a closer look at dryer vents, including their purpose, different types, proper installation techniques, and the importance of regular maintenance. So, let’s dive in and unveil the secrets behind this often overlooked but crucial aspect of home maintenance.
Key Takeaways:
- Regularly cleaning your dryer vent prevents fire hazards, improves efficiency, and extends your dryer’s lifespan. It’s an essential task for a safe and effective laundry routine.
- Hiring a professional for dryer vent installation or repair ensures safety compliance, quality workmanship, and peace of mind. It’s a smart investment in your home maintenance.
Read more: Where Is Dryer Vent Located
Purpose of a Dryer Vent
The primary purpose of a dryer vent is to safely remove moist air, lint, and other debris generated during the drying process from the interior of your home. When you run your clothes dryer, it produces hot, moist air that needs to be vented outside. Without a dryer vent, this moist air would accumulate in your home, leading to high humidity levels, potential mold growth, and even damage to the structure of your house.
By expelling this moist air outdoors, a dryer vent helps to improve the overall air quality within your home and ensures that excess moisture doesn’t create a breeding ground for mold and mildew. In addition, a properly functioning dryer vent prevents the buildup of lint, which is highly flammable, reducing the risk of dryer fires.
Not only does a dryer vent enhance your indoor air quality and reduce the risk of fire hazards, but it also plays a crucial role in improving the energy efficiency of your dryer. A clogged or improperly installed dryer vent can cause your dryer to work harder and longer, leading to increased energy consumption and higher utility bills. By maintaining a clear and properly functioning dryer vent, you can optimize the performance of your dryer and save energy.
In summary, the purpose of a dryer vent can be broken down into three main benefits: ensuring the safety of your home by removing moisture and lint, improving indoor air quality by preventing the accumulation of excess moisture, and enhancing the energy efficiency of your dryer.
Types of Dryer Vents
When it comes to dryer vents, there are a few different types to choose from. The type of vent you select for your dryer will depend on factors such as the location of your dryer, the layout of your home, and local building codes. Let’s explore the most common types of dryer vents:
- Flexible Plastic or Vinyl Vent Hose: This is the most basic type of dryer vent. It is often included with new dryers and is easy to install. However, it is important to note that this type of vent hose is not as durable or long-lasting as other options. It can also sag or develop kinks over time, restricting airflow and increasing the risk of lint buildup.
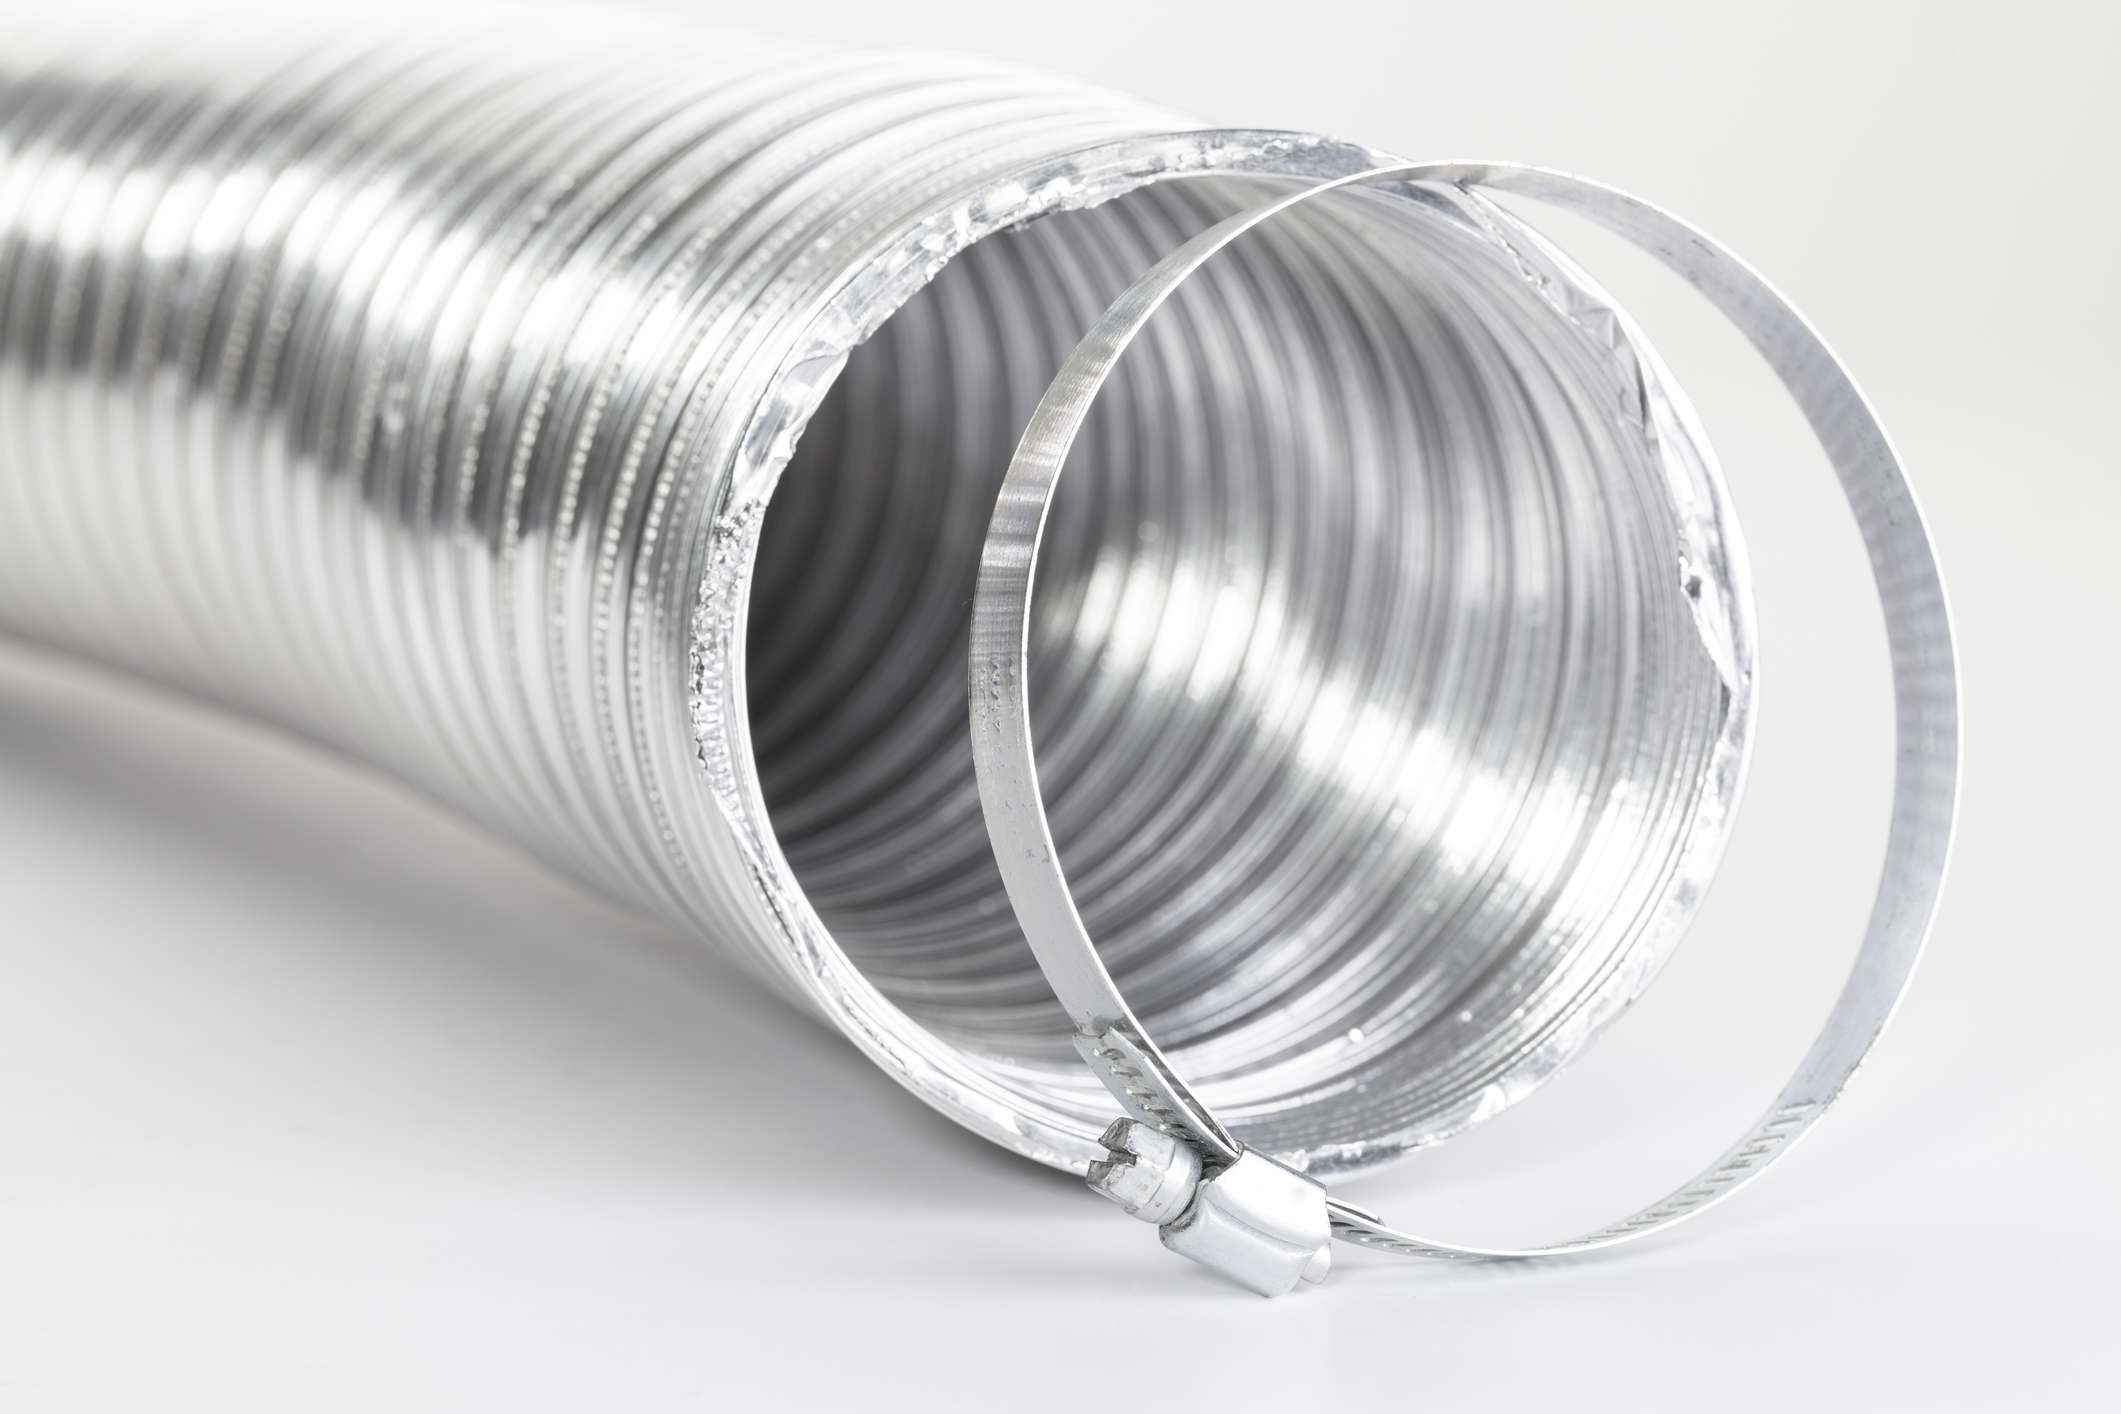
- Flexible Aluminum Vent Hose: This type of vent hose is made of a more durable material, allowing it to withstand higher temperatures. It is lightweight and flexible, making it easier to install and work with. However, like the plastic or vinyl hose, it can also accumulate lint if not cleaned regularly.
- Rigid Metal Vent Pipe: Made of aluminum or galvanized steel, this type of vent pipe is the most durable and long-lasting option. It provides a smooth and unrestricted path for airflow, minimizing lint buildup. Rigid metal vent pipes are the preferred choice for longer vent runs or when the dryer is located far from an exterior wall.
- Semi-Rigid Metal Vent Pipe: This type of vent pipe is a hybrid between the flexible and rigid varieties. It offers the durability and airflow efficiency of rigid metal vent pipes while also providing some flexibility for easier installation. Semi-rigid metal vent pipes are a popular choice for shorter vent runs or when there are space constraints.
It’s important to note that regardless of the type of vent you choose, it should be properly sized to match your dryer’s exhaust outlet. The diameter of the vent should typically match the diameter of the exhaust outlet to ensure optimal airflow and prevent lint buildup.
Always refer to the manufacturer’s recommendations and local building codes when selecting and installing a dryer vent to ensure proper ventilation and safety.
Location of the Dryer Vent
The location of your dryer vent plays a crucial role in its effectiveness and efficiency. It is important to consider several factors when determining the ideal location for your dryer vent. Let’s explore these considerations:
- Exterior Wall: The most common and convenient location for a dryer vent is on an exterior wall of your home. This allows for a direct path for the hot air and lint to exit the house. When choosing the exterior wall, consider the distance from the dryer to ensure a smooth and efficient airflow.
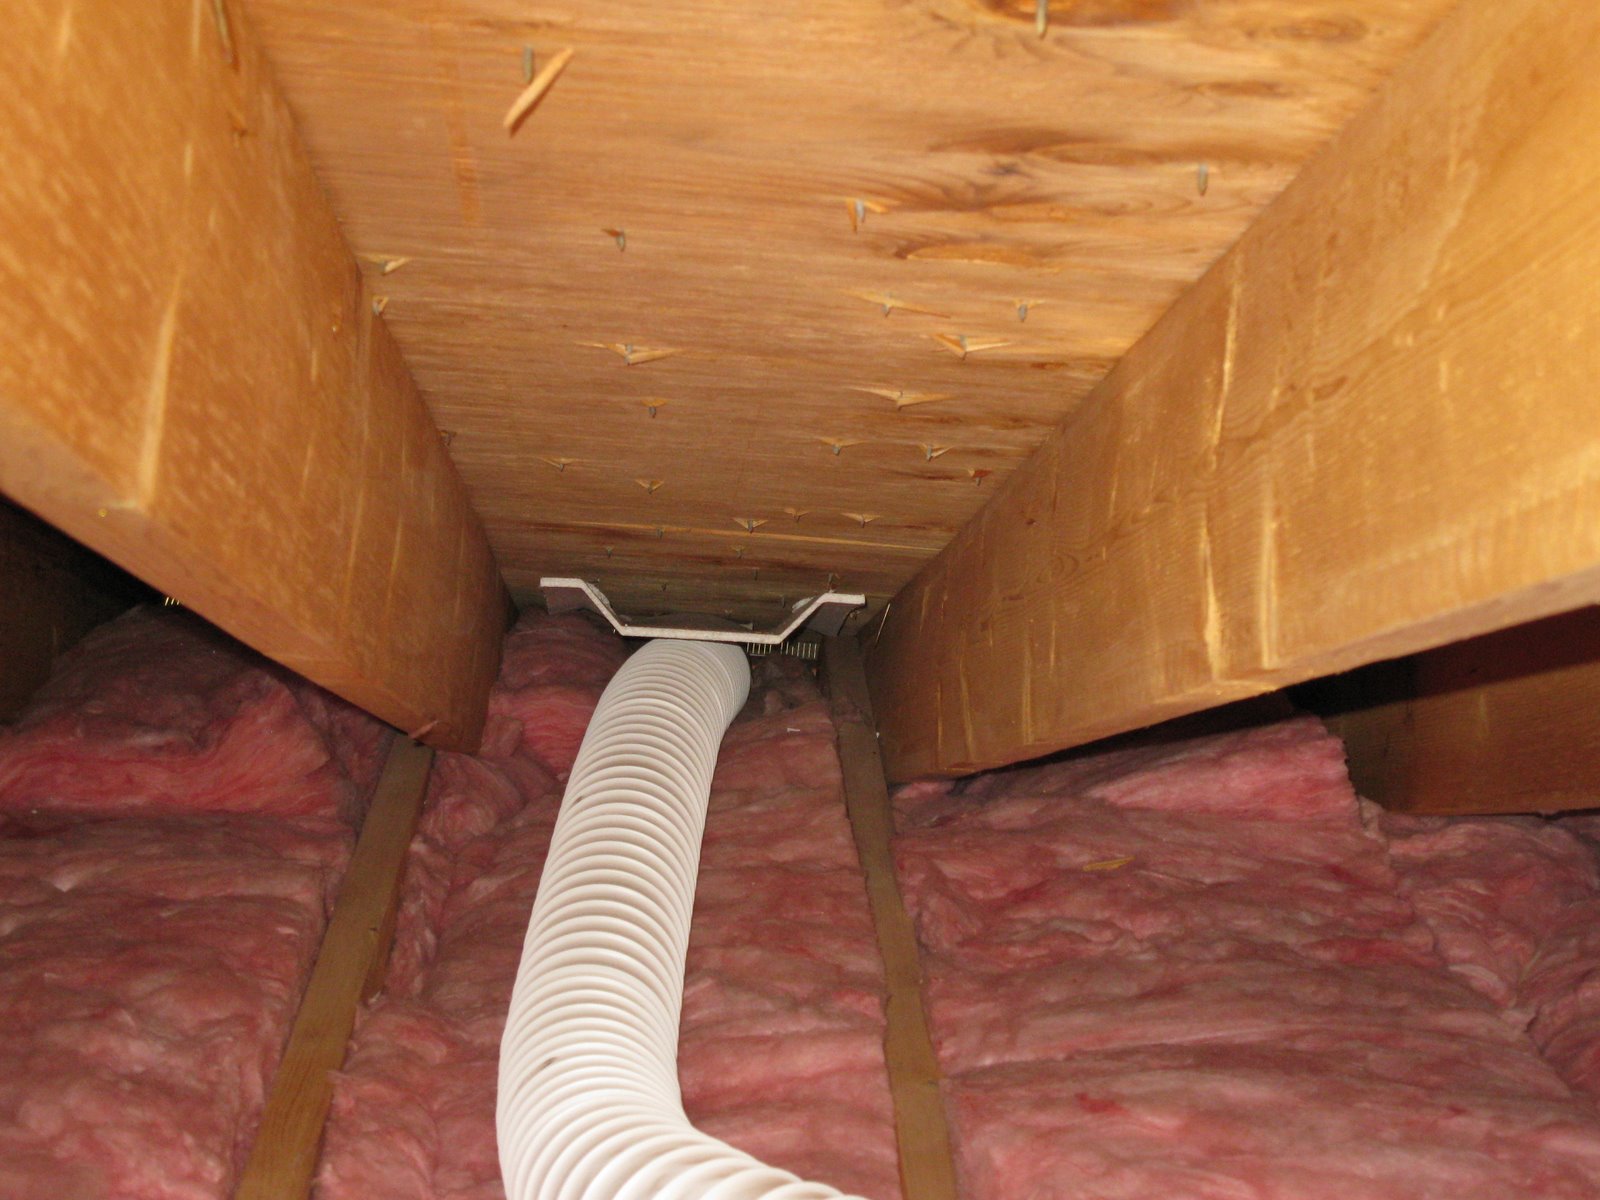
- Roof: In some cases, due to the home’s layout or other restrictions, venting through the roof may be necessary. Venting through the roof requires careful planning and professional installation to ensure proper insulation, weatherproofing, and prevention of leaks.
- Window: In situations where an exterior wall or roof venting is not possible, some homeowners opt for venting through a window. This may require the use of a window vent kit or special attachment. It is important to ensure that the window remains securely sealed when using this method.
- Attic: Venting the dryer into the attic is not recommended, as it can lead to moisture accumulation and potential damage to the attic space. Moisture can also promote the growth of mold and mildew, compromising the air quality in your home.
When determining the best location for your dryer vent, it is crucial to follow local building codes and regulations. These codes may dictate specific requirements for the distance between the vent exit and adjacent windows, doors, or other ventilation sources.
Additionally, it is important to avoid routing the dryer vent through crawlspaces, chimneys, or other enclosed spaces. This can increase the risk of lint buildup, restrict airflow, and create potential fire hazards.
Remember, proper installation and location of the dryer vent promote optimal airflow, reduce the risk of lint accumulation, and ensure the efficient operation of your dryer.
Common Locations for Dryer Vents
When it comes to the specific placement of your dryer vent, there are a few common locations that homeowners often choose. These locations provide convenient access for venting the hot air and lint outside while minimizing potential obstructions. Let’s explore some of the most common locations for dryer vents:
- Near an Exterior Wall: A common and preferred location for a dryer vent is near an exterior wall of your home. This allows for a direct path to vent the hot air and lint outside. The vent should be positioned at a suitable height above the ground, typically a few inches above the foundation or at a height recommended by local building codes.
- In a Laundry Room: Many homes have a dedicated laundry room, making it a convenient and practical location for a dryer vent. Ideally, the vent should be placed along an exterior wall within the laundry room, providing a direct exit for the hot air and lint. Ensure that the vent does not obstruct access to the dryer or create any safety hazards.
- In a Basement: If your laundry area is located in the basement, you can install the dryer vent to vent out through the basement wall or through a window. If venting through the basement wall, ensure that the vent is positioned properly to maintain a safe distance from windows, utilities, or other potential obstructions.
- In a Garage: Some homeowners choose to place their dryer in the garage, particularly if the laundry area is combined with the garage space. In this case, the vent can be installed through the garage wall, allowing for easy venting of the hot air and lint outside. Ensure that the vent is properly sealed and insulated to prevent air leaks or possible damage caused by extreme temperatures.
Regardless of the chosen location, it is crucial to consider the distance between the dryer and the vent exit. Longer vent runs may require the use of rigid metal vent pipes to maintain optimal airflow and minimize lint accumulation.
Before finalizing the location for your dryer vent, consult local building codes and regulations to ensure compliance with guidelines regarding vent exit heights, distances from windows and doors, and any other specific requirements.
By selecting the right location for your dryer vent, you can ensure efficient ventilation and reduce the risk of lint buildup, keeping your home safe and your dryer running smoothly.
Read more: Where Does The Dessert Plate Go?
Proper Installation of a Dryer Vent
Proper installation of a dryer vent is crucial for ensuring optimal performance, safety, and efficiency. Follow these essential steps when installing a dryer vent:
- Select the Right Vent Type: Choose the appropriate vent type based on your specific needs and local building codes. Options include flexible plastic or vinyl vent hoses, flexible aluminum vent hoses, semi-rigid metal vent pipes, and rigid metal vent pipes. Ensure that the vent size matches the dryer’s exhaust outlet.
- Determine the Vent Location: Select the ideal placement for your dryer vent, considering factors such as proximity to the dryer, accessibility, and compliance with local building codes. Common locations for dryer vents include near an exterior wall, in a laundry room, in a basement, or in a garage.
- Measure and Cut the Vent Hole: Mark the location for the vent hole on the exterior wall or other chosen location. Use a drill to create a pilot hole, and then cut a properly-sized hole using a hole saw or reciprocating saw. Ensure that the hole is slightly larger than the diameter of the vent to allow for easy installation and airflow.
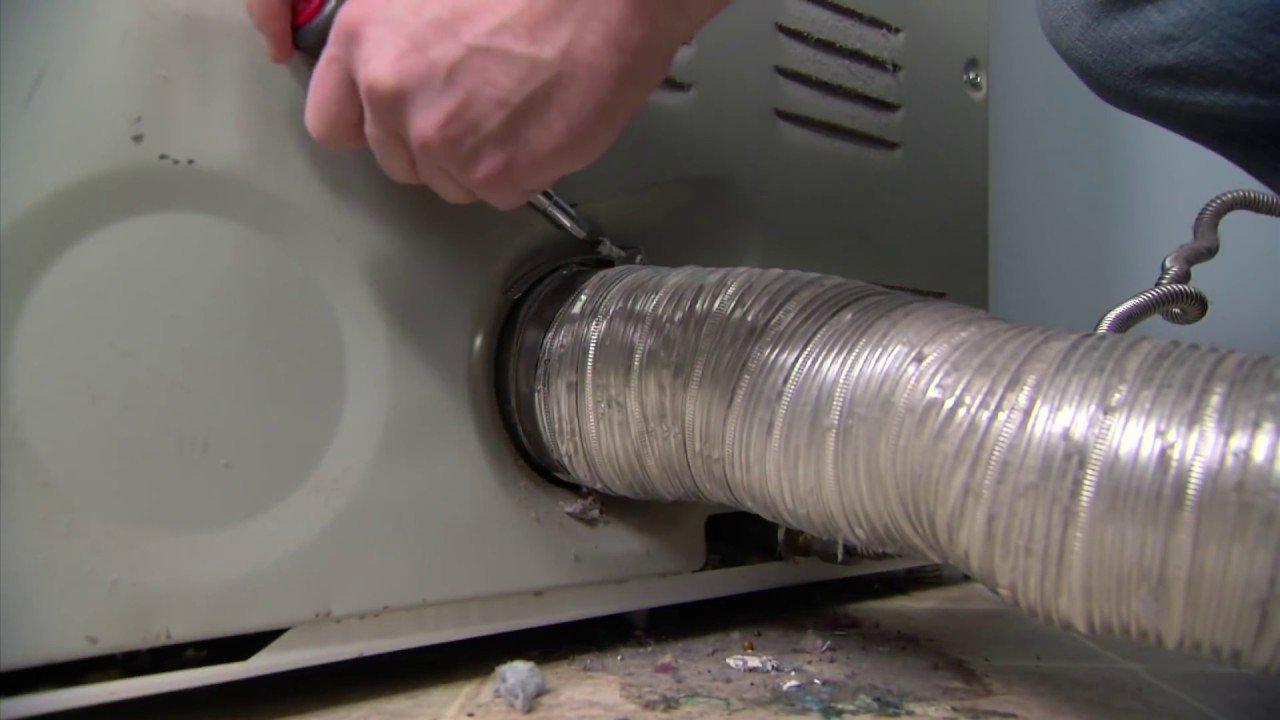
- Attach the Vent to the Dryer Outlet: Connect the vent to the dryer’s exhaust outlet using clamps or adjustable metal bands. Make sure the connection is secure and tight to prevent leaks or disconnections. Avoid using duct tape, as it may not provide a durable, long-lasting seal.
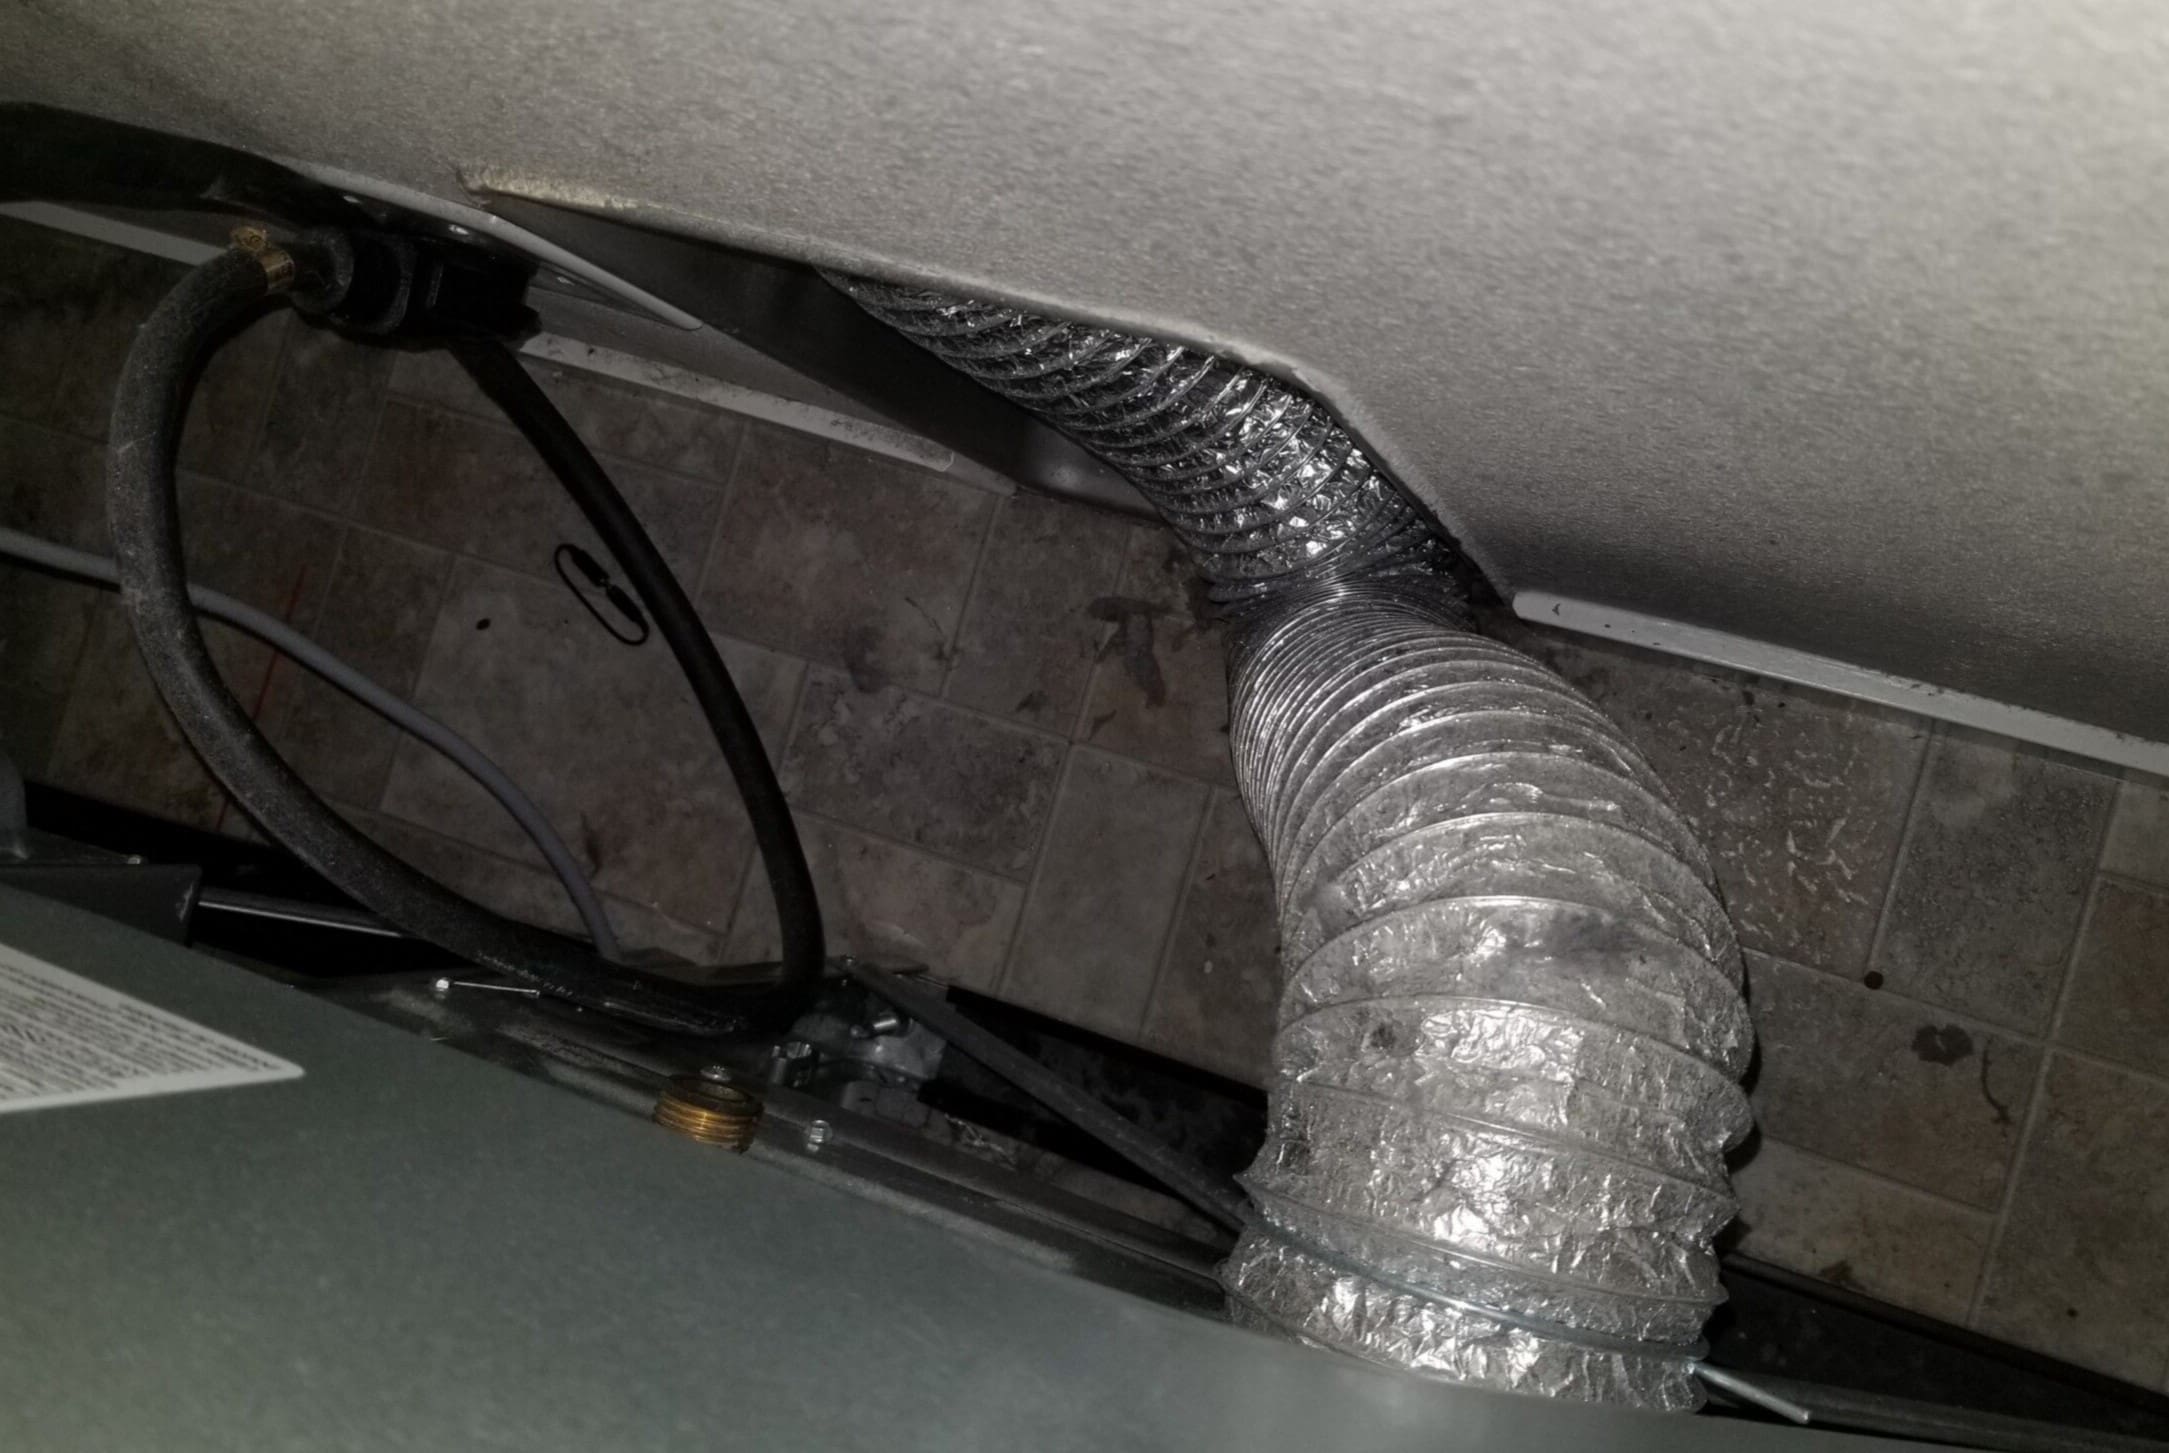
- Route the Vent Pipe: Carefully route the vent pipe from the dryer to the vent hole, ensuring a straight and unobstructed path. Avoid sharp bends or excessive lengths of vent pipe, as these can restrict airflow and increase the risk of lint buildup.
- Secure the Vent Pipe: Use suitable brackets, clamps, or straps to secure the vent pipe in place. This prevents sagging or shifting over time, ensuring a stable and efficient venting system. Make sure the vent pipe is supported at regular intervals to maintain proper alignment and prevent damage.
- Seal the Vent Hole and Connections: Apply weather-resistant caulk or silicone sealant around the vent hole and any connections to ensure a tight seal. This helps to prevent air leaks, moisture infiltration, and potential damage to the surrounding area.
- Test the Venting System: Once the dryer vent is properly installed, run the dryer to test its performance. Check for any signs of leaks, loose connections, or restricted airflow. Ensure that hot air and lint are being properly expelled from the dryer to the outside of your home.
Remember, proper installation of a dryer vent is crucial for the efficient operation of your dryer, as well as the safety and well-being of your home. If you are unsure about any aspect of the installation process, it is recommended to consult a professional to ensure a proper and safe installation.
The dryer vent should go outside the home to expel hot, moist air. It should not be vented into an attic or crawl space to prevent mold and fire hazards. Regularly clean the vent to prevent lint buildup and improve dryer efficiency.
Importance of Maintaining a Dryer Vent
Maintaining a dryer vent is essential for several reasons. Neglecting proper maintenance can lead to a range of issues that can compromise the safety, efficiency, and longevity of your dryer. Here are some key reasons why regular maintenance of your dryer vent is important:
- Preventing Fire Hazards: A clogged or obstructed dryer vent is a significant fire hazard. The accumulation of lint, debris, and other flammable materials can easily ignite when exposed to the high temperatures generated during the drying process. Regular maintenance, including cleaning the vent, helps prevent lint buildup and reduce the risk of dryer fires.
- Improving Efficiency: A poorly maintained dryer vent can lead to reduced airflow, causing the dryer to work harder and longer to dry your clothes. This inefficiency not only wastes energy but also increases your utility bills. By keeping the vent clear and free of obstructions, you can optimize the performance and efficiency of your dryer.
- Extending the Lifespan of Your Dryer: When a dryer vent is clogged, the dryer has to work harder to push the air out. This strain on the dryer’s components can lead to premature wear and tear, potentially resulting in costly repairs or the need for a replacement. Regular maintenance helps prolong the lifespan of your dryer, saving you money in the long run.
- Preventing Mold and Mildew: A blocked or poorly vented dryer can create excess moisture in your home, leading to the growth of mold and mildew. Mold can be detrimental to your health and cause damage to your property. By ensuring proper ventilation, you can prevent moisture buildup and keep your home safe and healthy.
- Enhancing Indoor Air Quality: Over time, lint, dust, and other debris can accumulate in the dryer vent. When the vent is clogged, these particles can be released back into your home, potentially causing respiratory issues and allergies. Regular maintenance and cleaning of the dryer vent contribute to better indoor air quality for you and your family.
It is recommended to schedule regular maintenance tasks for your dryer vent, including cleaning the vent pipe, checking for obstructions, and inspecting the vent cap or cover. Additionally, be attentive to any warning signs of a clogged or damaged vent, such as longer drying times, excessive heat, strange odors, or unusual noises.
By taking the time to properly maintain your dryer vent, you can ensure the safety and efficiency of your dryer while preserving the quality of the air in your home.
Signs of a Clogged or Damaged Dryer Vent
Recognizing the signs of a clogged or damaged dryer vent is crucial for maintaining the safety, efficiency, and longevity of your dryer. Here are some common signs to watch out for:
- Longer Drying Times: If it takes longer than usual for your clothes to dry, it could be a sign of a clogged or restricted dryer vent. When the vent is blocked, hot air and moisture cannot escape efficiently, leading to prolonged drying times.
- Excessive Heat: If your dryer feels excessively hot to the touch during or after a drying cycle, it may indicate a clogged vent. The trapped hot air cannot escape properly, causing the dryer to heat up more than usual.
- Foul Odors: A strong, musty odor emanating from your dryer during operation could be a sign of a clogged vent. When lint and debris accumulate in the vent, they can emit a foul smell when exposed to heat.
- Inefficient Drying: Clothes that come out of the dryer still damp or not fully dry may indicate a ventilation problem. Poor airflow due to a clogged vent prevents the moisture from being effectively expelled.
- Lint Accumulation: Pay attention to the amount of lint collecting around your dryer and within the lint trap. If you notice an excessive buildup of lint, it could be a sign that the vent is unable to effectively expel lint, leading to its accumulation within the dryer and its surroundings.
- Strange Noises: Unusual rattling or banging noises coming from your dryer during operation may indicate a clogged or damaged vent. When the airflow is restricted, it can lead to the shaking of the dryer components.
- Exterior Vent Blockage: The exterior vent cap or cover should have a steady flow of warm air when the dryer is in operation. If you notice little to no airflow or if you see lint or debris around the vent opening, it suggests a blockage or damaged vent.
If you observe any of these signs, it is important to address the issue promptly to prevent potential hazards and dryer malfunctions. Cleaning or repairing the vent may require professional assistance, especially if the clog is severe or if there is extensive damage to the vent pipe or the exterior vent.
Regular maintenance and cleaning of your dryer vent can help prevent these issues from occurring and ensure the safe and efficient operation of your dryer.
How to Clean a Dryer Vent
Cleaning your dryer vent is an important maintenance task that helps prevent clogs, reduce fire risks, and maintain the efficiency of your dryer. Follow these steps to effectively clean your dryer vent:
- Disconnect the Dryer: Before starting the cleaning process, make sure to unplug the dryer from the power source and disconnect it from the vent hose or duct. This will ensure your safety while working on the vent.
- Remove the Lint Trap: Locate the lint trap, usually located on the top or inside the dryer door. Remove any lint or debris from the trap and give it a thorough cleaning. This step helps prevent further buildup in the vent system.
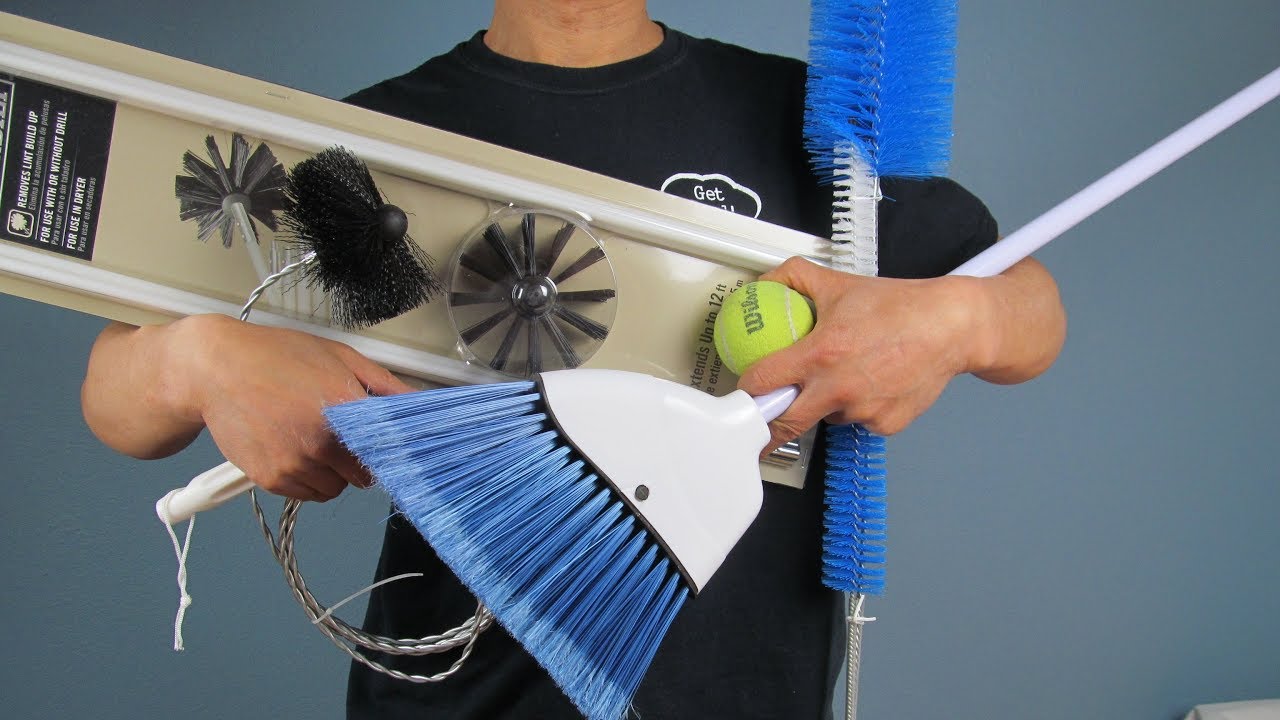
- Clean the Vent Hose or Duct: Depending on the accessibility, detach the vent hose or duct from the dryer and the wall vent. Use a vent cleaning brush or a vacuum cleaner with a long, flexible attachment to remove lint, dust, and debris from the hose or duct. Pay special attention to removing any stubborn lint that may be stuck within the vent system.
- Clear the Vent Opening: Go outside and locate the vent opening on the exterior of your home. Remove any obstacles or debris that may be blocking the opening, such as leaves, dirt, or lint. Use a vent brush or a vacuum cleaner to clean the vent opening and remove any remaining lint.
- Reconnect the Vent Hose or Duct: Once the vent hose or duct and the vent opening are clean, reattach the hose or duct to the dryer and the wall vent. Ensure that the connections are secure and tight to prevent leaks or disconnections.
- Run a Test Cycle: Plug the dryer back in and run a test cycle to ensure that everything is functioning properly. Pay attention to the airflow and temperature to ensure adequate ventilation.
- Schedule Regular Cleaning: It is recommended to clean your dryer vent at least once a year. However, if you notice any signs of a clogged vent, such as longer drying times or excessive heat, it is advisable to clean it immediately. Regular cleaning will help maintain the efficiency and safety of your dryer.
If you are unsure about how to clean your dryer vent or if you encounter any difficulties during the process, it is recommended to consult a professional dryer vent cleaning service. They have the expertise and specialized tools necessary to thoroughly clean and maintain your dryer vent.
By regularly cleaning your dryer vent, you can reduce the risk of fire, improve the efficiency of your dryer, and enhance the overall safety of your home.
Read more: Where Does Toilet Water Go
Hiring a Professional to Install or Repair a Dryer Vent
When it comes to installing or repairing a dryer vent, it is often beneficial to enlist the help of a professional. Hiring a professional ensures that the job is done correctly and efficiently, reducing the risk of issues or safety hazards. Here are some reasons why you should consider hiring a professional for your dryer vent installation or repair:
- Expertise and Experience: Professional technicians have the knowledge, expertise, and experience to properly install or repair a dryer vent. They are familiar with local building codes and regulations, ensuring that your vent is installed according to the required standards.
- Quality Workmanship: Professionals are equipped with the necessary tools and materials to complete the job to a high standard. They have access to quality vent pipes, connectors, and other components, ensuring that your dryer vent is durable and efficient.
- Efficient Installation: Installing a dryer vent requires precision and careful consideration of factors such as vent length, routing, and proper sealing. Professionals have the know-how to efficiently install the vent, ensuring optimal airflow and minimizing the risk of lint buildup or leaks.
- Proper Ventilation Path: Professionals can assess your home’s layout and determine the most suitable route for the vent pipe. They can navigate obstacles and ensure that the venting system is properly installed without compromising the integrity of your home’s structure.
- Safety Compliance: Venting systems that do not meet safety standards can pose fire hazards and lead to other issues. By hiring a professional, you can have peace of mind knowing that the vent is installed properly and meets safety requirements.
- Time and Convenience: Installing or repairing a dryer vent can be a time-consuming task, especially if you are unfamiliar with the process. Hiring a professional allows you to save time and ensures that the job is completed efficiently, allowing you to focus on other aspects of your home maintenance.
- Preventive Maintenance: Professionals can also provide valuable advice on preventive maintenance, such as how often to clean the vent and what signs to look out for to ensure the optimal performance and safety of your dryer vent.
When choosing a professional for your dryer vent installation or repair, ensure that they have the necessary qualifications, licenses, and insurance coverage. It is also helpful to read reviews or get recommendations from trusted sources to ensure their reliability and quality of work.
Overall, hiring a professional for your dryer vent installation or repair can save you time, ensure safety compliance, and provide you with peace of mind knowing that the job is done correctly and efficiently.
Conclusion
Proper maintenance of your dryer vent is essential for ensuring the safety, efficiency, and longevity of your dryer, as well as maintaining a healthy living environment. By understanding the purpose of a dryer vent, the different types available, and the importance of a well-maintained vent, you can take the necessary steps to keep your dryer running smoothly.
Regularly inspecting and cleaning your dryer vent is crucial to prevent lint buildup, improve airflow, and reduce the risk of fire hazards. Signs such as longer drying times, excessive heat, or strange odors indicate the need for vent cleaning or repairs. It’s important to address these issues promptly to maintain the efficiency and safety of your dryer.
When it comes to installation or major repairs, it is advisable to hire a professional who has the expertise and experience to ensure proper ventilation, compliance with building codes, and longevity of your dryer vent system. A professional can offer valuable advice on preventive maintenance and provide guidance on how to keep your dryer vent in optimal condition.
Remember to schedule regular maintenance tasks, such as cleaning the vent pipe and checking for obstructions, to keep your dryer vent operating at its best. By maintaining a clear and well-functioning dryer vent, you can enjoy efficient drying cycles, reduce energy consumption, and minimize the risk of fire hazards in your home.
In conclusion, prioritize the maintenance of your dryer vent to protect your home, extend the lifespan of your dryer, and ensure the safety and efficiency of your laundry routine. By taking the necessary steps to maintain your dryer vent, you can enjoy hassle-free drying and peace of mind for years to come.
Frequently Asked Questions about Where Does The Dryer Vent Go
Was this page helpful?
At Storables.com, we guarantee accurate and reliable information. Our content, validated by Expert Board Contributors, is crafted following stringent Editorial Policies. We're committed to providing you with well-researched, expert-backed insights for all your informational needs.