Home>Ideas and Tips>DIY Guide To Installing A French Door

Ideas and Tips
DIY Guide To Installing A French Door
Published: August 31, 2024
Learn how to install a French door with our step-by-step DIY guide. Enhance your home's look and functionality with these easy-to-follow instructions.
(Many of the links in this article redirect to a specific reviewed product. Your purchase of these products through affiliate links helps to generate commission for Storables.com, at no extra cost. Learn more)
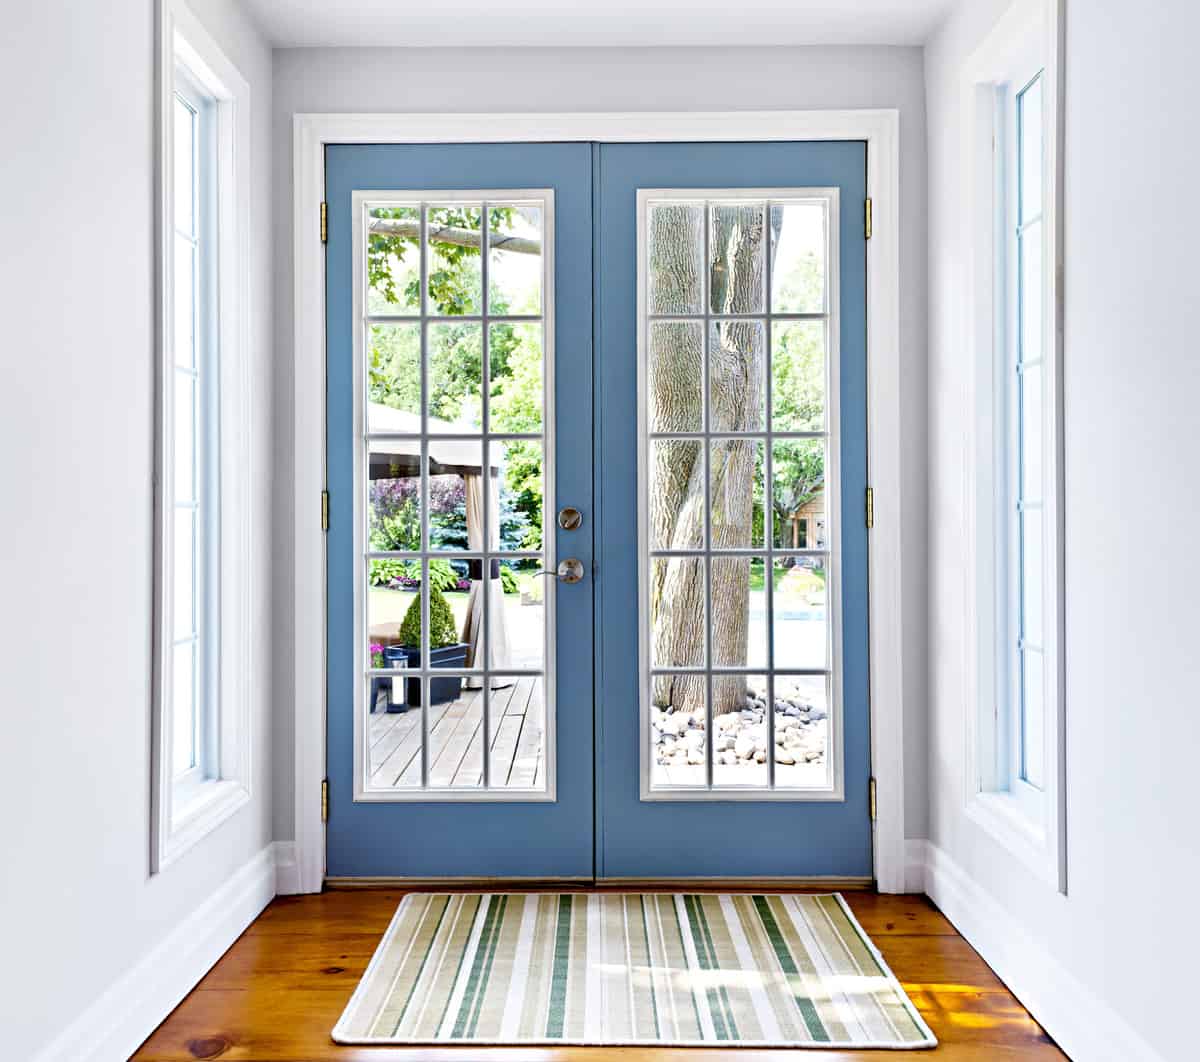
Installing a French door can be a rewarding DIY project that enhances the aesthetic and functionality of your home. French doors are known for their elegant, open look and can significantly improve the natural light and ventilation in your space. However, the process requires careful planning and execution to ensure a smooth and successful installation. In this guide, we will walk you through the step-by-step process of installing a French door, covering everything from preparing the rough opening to finalizing the installation.
Preparing the Rough Opening
Before you begin installing your French door, it is crucial to prepare the rough opening. This involves ensuring that the opening is square, level, and plumb. Here’s how you can do it:
-
Measure the Rough Opening:
- Measure the width and height of the existing door opening, taking into account any existing trim. The manufacturer will provide specific dimensions for the rough opening size required for your French door. If your opening is non-standard, you may need to reframe it to fit the door properly.
-
Check for Plumb, Level, and Square:
- Use a level to ensure that the opening is perfectly level and plumb. A square will help you verify that the corners are square.
-
Remove Existing Trim:
- Remove any existing trim or molding around the door opening. This will give you a clear view of the area you need to work with.
-
Install Sill Pan for Exterior Doors:
- A sill pan is a crucial component that prevents water from entering your home. It should be installed according to the manufacturer’s instructions. Typically, you will need to cut the flashing in a butterfly style to fit it into the bottom corner of the opening.
-
Integrate Housewrap and Sill Pan:
- Pull back the housewrap and integrate it with the sill pan flashing. Fold the housewrap to the interior of the stud and tack it into position. This helps prevent water or air from getting under the door. Cut the housewrap back about 2 to 3 inches from the edge of the stud to prevent creating a bypass for air or water.
-
Seal Air Channels:
- Use flashing under the sill pan to seal air channels in the subfloor. This is especially important if you have a solid hardwood floor, as it will prevent water from entering your home during storms.
Read more: DIY Guide To Installing A Glass Shower Door
Installing the Door Frame
Once your rough opening is prepared, you can start installing the door frame. Here’s how you can do it:
-
Assemble the Door Frame:
- Begin by rebating the door tread for the French doors to close against. Use an Australian kiln-dried hardwood like blackbutt for a durable finish.
-
Rebate Hinges into Door Styles:
- Determine the size of your French door frame opening, taking into account rebated doors and required spaces between doors and frames. Rebate hinges into door styles for a solid door. Use three 100 mm stainless steel hinges for each door, marking their positions on the styles using a story rod.
-
Install Door Frame:
- Assemble the door frame by gluing and nailing it together, then securing with three screws into each corner. Fold and add seal flashing into the concrete ready bait for the seal to sit on.
-
Install Door Frame in Opening:
- Lift the door frame into place and screw the styles into packers, ensuring they are plumb on both sides. This step is crucial for maintaining the integrity of your door installation.
Installing the First French Door
Now that your door frame is installed, you can proceed with installing the first French door. Here’s how you can do it:
-
Rebate and Attach Hinges to Door:
- Rebit and attach hinges to the door using the same story rod as before. Leave a 3 mm space between the top of the door and the frame to allow for proper alignment.
-
Install Striker Plate First:
- Install the striker plate first, which allows you to easily measure the door opening for the second door. This ensures that both doors will align properly when installed.
-
Drill Holes for Locks:
- Drill holes for locks according to the manufacturer’s instructions. This step is essential for securing your doors and ensuring they function properly.
-
Install First French Door:
- Tilt the first French door into place, ensuring that the inside of the door sill is fully seated into the sealant on the sill pan. Secure it by pre-drilling holes and then driving number eight three-inch deck screws behind the weather strip.
-
Shim Head and Side Jambs:
- Shim the head and side jambs until the unit is plumb level and square in the opening. Verify there is an even and consistent margin between the frame and door panels.
-
Seal Exterior and Interior:
- Seal the exterior between the frame and rough opening with backer rod and sealant. Seal the interior with low expansion foam to prevent air leaks.
Installing the Second French Door
Installing the second French door is similar to installing the first one, but you need to ensure that both doors align properly and function smoothly. Here’s how you can do it:
-
Measure Alignment Notch:
- Measure the alignment notch from step 2 on one side of the rough opening. This will help you align both doors correctly.
-
Place Second Door:
- Place the second French door into the opening, ensuring it is centered and aligned with the first door. Use a pencil and level to draw a plumb line down the drywall, roughly a 1/2 inch from the rough door opening.
-
Screw Top Bracket First:
- Start by screwing the top bracket to the wall first, ensuring it aligns with the drawn line from step 2. Then screw in the next two hinge side brackets while making sure that the drawn line goes through the exact same notch.
-
Attach Backside Brackets:
- Move to the backside of the double French door and bend all six protruding tabs down flush to the wall. Then attach them with screws.
-
Install Door Trim:
- Finish installing a door by covering the tabs with trim. Nail the door casing/trim directly over the brackets to conceal them, resulting in a nicely installed door.
Finalizing the Installation
After installing both French doors, you need to finalize the installation by ensuring everything is secure and functional. Here’s how you can do it:
-
Test Door Operation:
- Test your doors for proper operation. Ensure they open and close smoothly without any obstructions or air leaks.
-
Seal Remaining Gaps:
- Seal any remaining gaps between the frame and door panels using backer rod and sealant. This will prevent air leaks and ensure a watertight seal.
-
Install Lock Set:
- Install the lock set according to the manufacturer’s instructions. This will secure your doors and prevent unauthorized entry.
-
Add Finishing Touches:
- Add any finishing touches such as installing chute bolt strike plates if necessary. This will complete your French door installation and ensure it looks professional and functional.
Read more: DIY Guide To Installing Wainscoting
Conclusion
Installing a French door is a rewarding DIY project that can significantly enhance your home's aesthetic and functionality. By following these steps carefully, you can ensure a smooth and successful installation. Remember to always consult the manufacturer’s instructions for specific details and to take necessary safety precautions when working with tools and materials. With patience and attention to detail, you can achieve professional-looking results and enjoy the benefits of your new French doors for years to come.
Was this page helpful?
At Storables.com, we guarantee accurate and reliable information. Our content, validated by Expert Board Contributors, is crafted following stringent Editorial Policies. We're committed to providing you with well-researched, expert-backed insights for all your informational needs.


0 thoughts on “DIY Guide To Installing A French Door”