Home>Ideas and Tips>Upgrading Your Home’s Deck With DIY Privacy Screens
Ideas and Tips
Upgrading Your Home’s Deck With DIY Privacy Screens
Modified: November 2, 2024
Enhance your deck with DIY privacy screens. Discover benefits, types, and step-by-step installation to create a private, stylish outdoor space.
(Many of the links in this article redirect to a specific reviewed product. Your purchase of these products through affiliate links helps to generate commission for Storables.com, at no extra cost. Learn more)
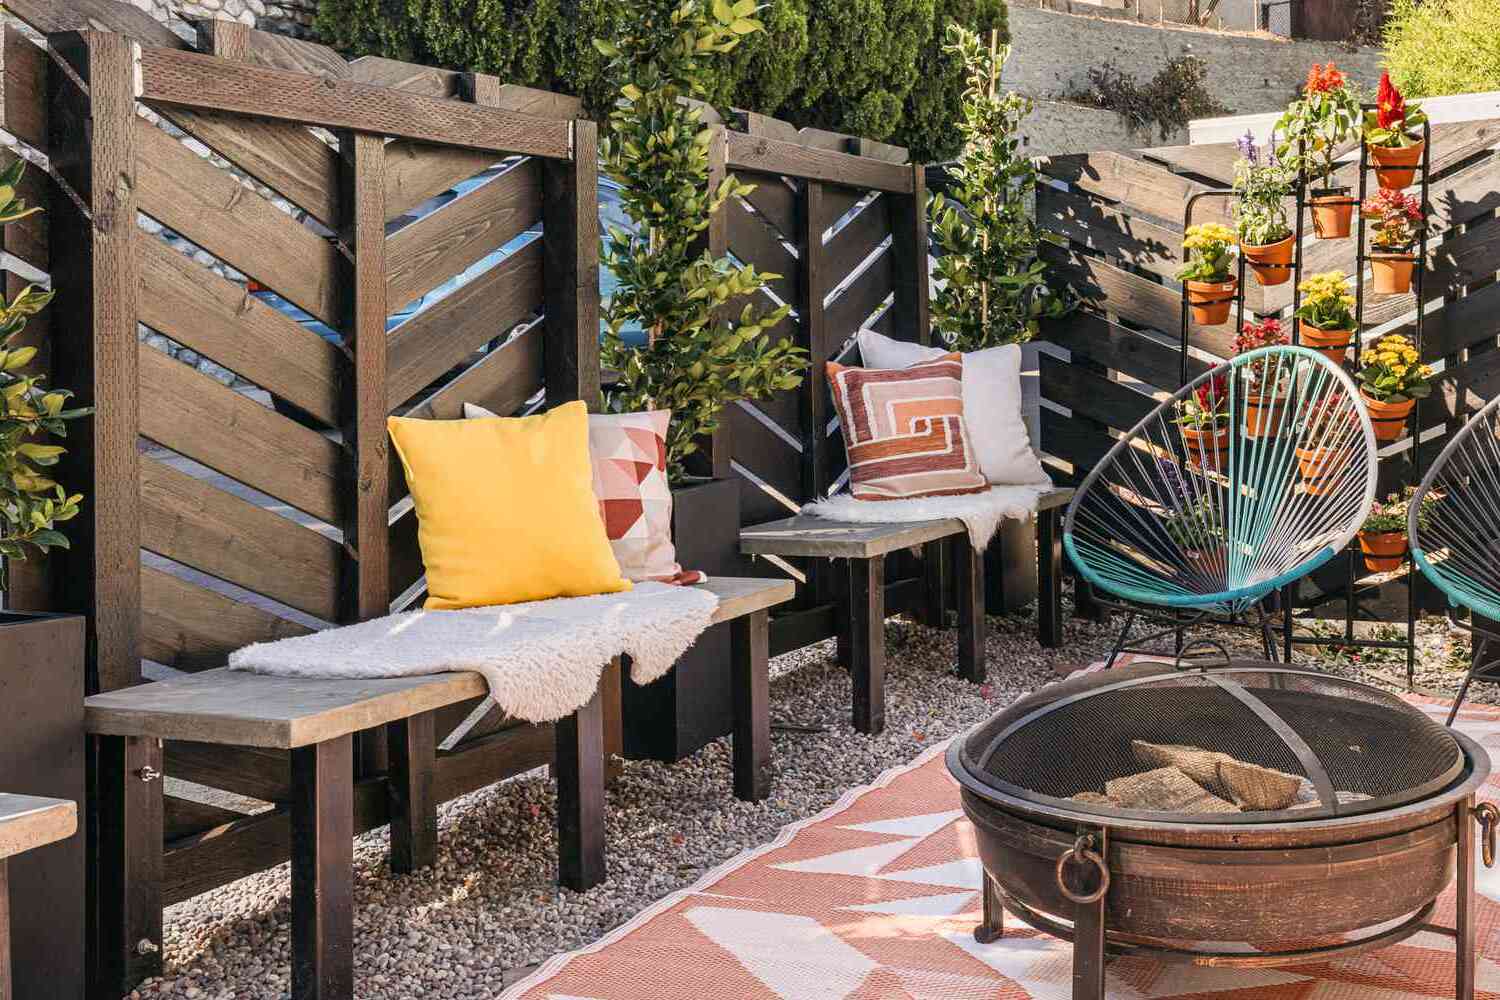
Adding a deck to your home is one of the most rewarding home improvement projects you can undertake. Not only does it extend your living space, providing a beautiful and functional area for relaxation and entertainment, but it also significantly boosts the value of your property. However, one of the common challenges many homeowners face with their decks is the lack of privacy. Whether you're concerned about unwanted visitors, nosy neighbors, or simply want to create a more intimate atmosphere for family gatherings, installing a DIY privacy screen can be an excellent solution.
Why Install a DIY Privacy Screen?
Installing a DIY privacy screen on your deck can greatly enhance its functionality. By creating a more private space, you can enjoy your deck without feeling like you're on display for everyone to see. This is particularly important if you have a pool or hot tub, as it ensures that you can use these amenities without worrying about prying eyes. Moreover, privacy screens not only serve a practical purpose but also add an aesthetic appeal to your deck. They come in various styles and materials, ranging from traditional lattice to modern metal designs. By choosing a design that complements your home's architecture and landscape, you can create a visually appealing and cohesive outdoor space. Lastly, investing in a DIY privacy screen is not just about personal enjoyment; it also has the potential to increase your home's resale value. A well-designed and functional deck with privacy features is highly desirable to potential buyers. This can make your home stand out in a competitive market and potentially attract higher offers.
Benefits of DIY Privacy Screens
Improved Functionality
One of the primary reasons to install a DIY privacy screen on your deck is to enhance its functionality. By creating a more private space, you can enjoy your deck without feeling like you're on display for everyone to see. This is particularly important if you have a pool or hot tub, as it ensures that you can use these amenities without worrying about prying eyes.
Enhanced Aesthetics
Privacy screens not only serve a practical purpose but also add an aesthetic appeal to your deck. They come in various styles and materials, ranging from traditional lattice to modern metal designs. By choosing a design that complements your home's architecture and landscape, you can create a visually appealing and cohesive outdoor space.
Increased Home Resale Value
Investing in a DIY privacy screen is not just about personal enjoyment; it also has the potential to increase your home's resale value. A well-designed and functional deck with privacy features is highly desirable to potential buyers. This can make your home stand out in a competitive market and potentially attract higher offers.
Types of DIY Privacy Screens
Lattice Privacy Screens
Lattice privacy screens are one of the most popular and versatile options available. They come in various styles, including slatted panels and trellises, which can be installed on your deck or along your patio. These screens offer a delicate yet effective way to block unwanted views while allowing the breeze to pass through.
Installing Lattice Privacy Screens
-
Materials Needed:
- Lattice panels
- 2×2 lumber (for frame)
- Screws or nails
- Drill
- Measuring tape
-
Step-by-Step Instructions:
- Measure Your Deck: Determine the length and width of your deck where you want to install the lattice.
- Cut the Frame: Cut the 2×2 lumber to the required length for the frame.
- Assemble the Frame: Use screws or nails to assemble the frame.
- Attach Lattice: Attach the lattice panels to the frame using screws or nails.
- Secure to Deck: Use screws or nails to secure the lattice frame to your deck railing or posts.
Trellis Privacy Screens
Trellis privacy screens offer a more structural approach to creating a private space. They consist of vertical beams with lattice or other materials on top, providing shade and adding an architectural element to your deck.
Installing Trellis Privacy Screens
-
Materials Needed:
- Trellis frame
- Lattice or other materials for top
- 2×4 lumber (for posts)
- Screws or nails
- Drill
- Measuring tape
-
Step-by-Step Instructions:
- Measure Your Deck: Determine the length and width of your deck where you want to install the trellis.
- Cut Posts: Cut the 2×4 lumber to the required height for the posts.
- Assemble Posts: Use screws or nails to assemble the posts.
- Attach Trellis Frame: Attach the trellis frame to the posts using screws or nails.
- Add Lattice: Attach lattice or other materials on top of the trellis frame for added privacy and shade.
Green Privacy Screens
For those who prefer a more natural look, green privacy screens are an excellent option. These involve planting tall, lush greenery next to your deck or patio to block unwanted views while adding color and texture to your space.
Installing Green Privacy Screens
-
Materials Needed:
- Plants (tall, lush greenery)
- Planters or containers
- Soil
- Fertilizer
-
Step-by-Step Instructions:
- Choose Plants: Select plants that are tall enough to provide adequate privacy and suitable for your climate.
- Prepare Planters: Fill planters or containers with soil and plant your chosen greenery.
- Place Planters: Position planters next to your deck or patio, ensuring they are securely anchored to prevent them from toppling over in the wind.
DIY Privacy Wall
For a more permanent solution, you can build a DIY privacy wall using materials like pressure-treated lumber and PVC trim.
Materials Needed:
- 6 pieces of 2×4 lumber (pressure-treated)
- 20 pieces of 3/4 inch x 3-1/2 inch x 12 ft PVC trim (white)
- 6 pieces of 4 inch x 4 inch x 100 inch PVC wrap (post jacket) white
- 2 boxes exterior screws steel
- 6 pieces of 2 inch x 1-1/2 inch x 2-3/4 inch galvanized angle L brackets steel
- 1 can exterior paint white
- 1 tube caulk white
Step-by-Step Instructions:
- Cut Lumber: Cut the 2×4 lumber to the desired height using a miter saw.
- Paint Lumber: Paint the back side of the lumber white.
- Cut PVC Trim: Cut the PVC trim to desired length using a miter saw.
- Attach Slats: Use outdoor steel screws to attach slats on the back side of the wall, ensuring each screw is covered with caulk.
- Attach PVC Wrap: Cut PVC wrap in half and attach it to the front side of each section using outdoor steel screws.
- Attach Wall to Deck: Use galvanized steel L brackets to attach each section of the wall to your deck posts.
- Decorate: Add additional decorative elements such as caulk around screws and paint if necessary.
Tips for Installing DIY Privacy Screens
Wind Resistance
One of the biggest design considerations when installing a privacy screen is wind resistance. Even lattice will create significant wind resistance and needs to be anchored firmly to prevent it from being blown away or damaged by strong winds.
Solutions:
- Use Sturdy Posts: Use 4×4 posts where possible for added stability.
- Drill Large Diameter Bolts: Drill large diameter bolts through railing caps into posts for secure attachment.
- Use Metal Angle Brackets: Use metal angle brackets along with screws for added support.
Aesthetics
When choosing a privacy screen design, it's crucial to consider aesthetics as well as functionality.
Solutions:
- Match with Home Style: Ensure that your privacy screen matches your home's architectural style for a cohesive look.
- Add Decorative Elements: Incorporate decorative elements such as vines growing up through lattice or adding colorful pillows and flowers around the deck.
Conclusion
Upgrading your home's deck with DIY privacy screens is a rewarding project that offers numerous benefits ranging from improved functionality and aesthetics to increased home resale value. By choosing the right type of screen—whether it's lattice, trellis, greenery, or a DIY privacy wall—you can create a private oasis that enhances both your outdoor living experience and property value.
Remember always to follow local building codes and ensure that your installation is secure against wind resistance for long-lasting results. With these steps and tips in mind, you'll be well on your way to transforming your deck into a beautiful and private space where you can enjoy quality time with family and friends without any distractions.
Additional Resources
For more detailed instructions or inspiration, consider visiting websites like TimberTech for curated deck ideas or DoItYourself.com for community forums discussing various DIY projects including installing privacy screens on decks.
By combining practical tips with creative solutions, you'll find that upgrading your home's deck with DIY privacy screens is not only feasible but also highly rewarding. So why wait? Start planning today and enjoy the peace and tranquility of your newly upgraded outdoor space
Was this page helpful?
At Storables.com, we guarantee accurate and reliable information. Our content, validated by Expert Board Contributors, is crafted following stringent Editorial Policies. We're committed to providing you with well-researched, expert-backed insights for all your informational needs.


0 thoughts on “Upgrading Your Home’s Deck With DIY Privacy Screens”